ECO mode YAMAHA XT1200Z 2017 Owners Manual
[x] Cancel search | Manufacturer: YAMAHA, Model Year: 2017, Model line: XT1200Z, Model: YAMAHA XT1200Z 2017Pages: 120, PDF Size: 3.32 MB
Page 2 of 120
EAU69362
Read this manual carefully before operatin g this vehicle. This manual
shoul d stay with this vehicle if it is sol d.
Date of issue:
Signature of Responsible Person: April 28, 2016
Product: IMMOBILIZER
Model: 2BS-00
Supplied by
YAMAHA MOTOR ELECTRONICS
CO.,LTD.
1450-6 Mori, Mori-machi Shuchi-gun
Shizuoka 437-0292 Japan
EN 60950-1: 2006 + Amd.11:2009 + Amd.1:2010 +
Amd.12: 2011 + Amd.2:2013
EN 62479: 2010
Hiroshi Kamiiizaka
GENERAL MANAGER
QUALITY ASSURANCE DIV. 97/24/EC from 17.06.1997
EN 300 330-1 V1.8.1
EN 300 330-2 V1.6.1
Technical Construction File held by
YAMAHA MOTOR ELECTRONICS
CO.,LTD.
1450-6 Mori, Mori-machi Shuchi-gun
Shizuoka 437-0292 Japan
R&TTE Directive
(Article 3.1(a) Safety)
R&TTE Directive
(Article 3.1(b) EMC)
R&TTE Directive
(Article 3.2 Spectrum)
DECLARATION of CONFORMITY For
YAMAHA MOTOR ELECTRONICS CO., LTD.1450-6, Mori, Mori-machi, Shuchi-gun, Shizuoka-ken, 437-0292 Japan
Standard used for comply
Means of Conformity
We declare under our sole responsibility that the Product (s) is conformity with the essential requirements and other relevant requirements of the
Radio and Telecommunication Terminal Equipment (R&TTE) Directive (1999/5/EC).
UBP8E0E0.book Page 1 Thursday, December 8, 2016 7:25 PM
Page 11 of 120

Safety information
1-5
1
operator and may limit control
ability, therefore, such accesso-
ries are not recommended.
Use caution when adding electri-
cal accessories. If electrical ac-
cessories exceed the capacity of
the motorcycle’s electrical sys-
tem, an electric failure could re-
sult, which could cause a
dangerous loss of lights or engine
power.
Aftermarket Tires an d Rims
The tires and rims that came with your
motorcycle were designed to match
the performance capabilities and to
provide the best combination of han-
dling, braking, and comfort. Other
tires, rims, sizes, and combinations
may not be appropriate. Refer to page
6-19 for tire specifications and more in-
formation on replacing your tires.
Transportin g the Motorcycle
Be sure to observe following instruc-
tions before transporting the motorcy-
cle in another vehicle. Remove all loose items from the
motorcycle.
Check that the fuel cock (if
equipped) is in the “OFF” position
and that there are no fuel leaks.
Point the front wheel straight
ahead on the trailer or in the truck
bed, and choke it in a rail to pre-
vent movement.
Shift the transmission in gear (for
models with a manual transmis-
sion).
Secure the motorcycle with tie-
downs or suitable straps that are
attached to solid parts of the mo- torcycle, such as the frame or up-
per front fork triple clamp (and not,
for example, to rubber-mounted
handlebars or turn signals, or
parts that could break). Choose
the location for the straps carefully
so the straps will not rub against
painted surfaces during transport.
The suspension should be com-
pressed somewhat by the tie-
downs, if possible, so that the mo-
torcycle will not bounce exces-
sively during transport.
UBP8E0E0.book Page 5 Thursday, December 8, 2016 7:25 PM
Page 18 of 120

Instrument and control functions
3-4
3
EAU4939C
In dicator li ghts and warning
li g hts
EAU11032Turn si gnal in dicator li ghts “ ”
an d“”
Each indicator light will flash when its
corresponding turn signal lights are
flashing.
EAU11061Neutral in dicator li ght “ ”
This indicator light comes on when the
transmission is in the neutral position.
EAU11081Hi gh beam in dicator li ght “ ”
This indicator light comes on when the
high beam of the headlight is switched
on.
EAU11256Oil level warnin g li ght “ ”
This warning light comes on if the en-
gine oil level is low.
The electrical circuit of the warning
light can be checked by turning the key
to “ON”. The warning light should
come on for a few seconds and then
go off.
If the warning light does not come on
initially when the key is turned to “ON”,
or if the warning light remains on after
confirming that the oil level is correct
(see page 6-10), have a Yamaha dealer
check the vehicle.
TIP
Even if the oil level is sufficient, the
warning light may flicker when rid-
ing on a slope or during sudden
acceleration or deceleration, but
this is not a malfunction.
This model is equipped with a self-
diagnosis device for the oil level
detection circuit. If a problem is
detected in the oil level detection
circuit, the oil level warning light
will flash repeatedly. If this occurs,
have a Yamaha dealer check the
vehicle.
EAU58401Cruise control in dicator
li g hts “ ”/“SET”
These indicator lights come on when
the cruise control system is activated.
See page 3-6 for a detailed explanation
of the function of these indicator lights.
The electrical circuit of these indicator
lights can be checked by turning the
key to “ON”. These indicator lights
should come on for a few seconds, and
then go off.
1. Left turn signal indicator light “ ”
2. Right turn signal indicator light “ ”
3. Oil level warning light “ ”
4. Engine trouble warning light “ ”
5. Anti-lock Brake System (ABS) warning light “ ”
6. Traction control system indicator light “ ”
7. Cruise control indicator lights “ ”/“SET”
8. High beam indicator light “ ”
9. Neutral indicator light “ ”
10.Immobilizer system indicator light “ ”
GEARN25A.TEMP ˚C
LoC.TEMP˚C
0:00TIME TRIP
345687910
12
ABS
UBP8E0E0.book Page 4 Thursday, December 8, 2016 7:25 PM
Page 20 of 120

Instrument and control functions
3-6
3 The electrical circuit of the indicator
light can be checked by turning the key
to “ON”. The indicator light should
come on for a few seconds, and then
go off.
If the indicator light does not come on
initially when the key is turned to “ON”,
if the indicator light remains on, or if the
indicator light flashes in a pattern (if a
problem is detected in the immobilizer
system, the immobilizer system indica-
tor light will flash in a pattern), have a
Yamaha dealer check the vehicle.
TIP
If the immobilizer system indicator light
flashes in the pattern, slowly 5 times
then quickly 2 times, this could be
caused by transponder interference. If
this occurs, try the following.
1. Make sure there are no other im- mobilizer keys close to the main
switch. Other immobilizer system
keys may cause signal interfer-
ence and prevent the engine from
starting.
2. Use the code re-registering key to start the engine.
3. If the engine starts, turn it off, and try starting the engine with the
standard keys.
4. If one or both of the standard keys do not start the engine, take the
vehicle and all 3 keys to a Yamaha
dealer to have the standard keys
re-registered.
EAU59131
Cruise control system
This model is equipped with a cruise
control system designed to maintain a
set cruising speed.
The cruise control system operates
only when riding in 3rd gear at speeds
between about 50 km/h (31 mi/h) and
100 km/h (62 mi/h), 4th gear at speeds
between about 50 km/h (31 mi/h) and
150 km/h (93 mi/h), or 5th or 6th gear at
speeds between about 50 km/h (31
mi/h) and 180 km/h (112 mi/h).
WARNING
EWA16341
Improper use of the cruise con-
trol system may result in loss of
control, which coul d lea d to an
acci dent. Do not activate the
cruise control system in heavy
traffic, poor weather con ditions,
or amon g win din g, slippery,
hilly, rou gh or g ravel roa ds.
When travelin g uphill or d own-
hill, the cruise control system
may not b e able to maintain the
set cruisin g speed .
To prevent acci dentally activat-
in g the cruise control system,
turn it off when not in use. Make
sure that the cruise control sys-
tem ind icator light “ ” is off.
UBP8E0E0.book Page 6 Thursday, December 8, 2016 7:25 PM
Page 23 of 120

Instrument and control functions
3-9
3
TIP
In some cases, the cruise control sys-
tem may not be able to maintain the set
cruising speed when the vehicle is
traveling uphill or downhill.
When the vehicle is traveling up-
hill, the actual traveling speed may
become lower than the set cruis-
ing speed. If this occurs, acceler-
ate to the desired traveling speed
using the throttle.
When the vehicle is traveling
downhill, the actual traveling
speed may become higher than
the set cruising speed. If this oc-
curs, the setting switch cannot be
used to adjust the set cruising
speed. To reduce the traveling
speed, apply the brakes. When
the brakes are applied, the cruise
control system will become deac-
tivated.
EAU58937
Multi-function meter unit
WARNING
EWA12423
Be sure to stop the vehicle before
makin g any settin g chan ges to the
multi-function meter unit. Chang ing
settin gs while ri din g can d istract the
operator an d increase the risk of an
acci dent.
The multi-function meter unit is
equipped with:
speedometer
tachometer
clock
fuel meter
eco indicator
transmission gear indicator
drive mode indicator
traction control system indicator
information display
1. “RESET” button
2. “TCS” button
3. Clock
4. Tachometer
5. Speedometer
6. Transmission gear indicator
7. Information display selection function
8. Information display
9. Fuel meter
10.Eco indicator “ECO”
11.Drive mode indicator
12.Traction control system indicator
GEARN25A.TEMP ˚C
LoC.TEMP˚C
0:00TIME TRIP
89101112
12 3 4 56
7
UBP8E0E0.book Page 9 Thursday, December 8, 2016 7:25 PM
Page 25 of 120
Instrument and control functions
3-11
3
TIP
If a problem is detected in the fuel me-
ter circuit, all display segments of the
fuel meter will start flashing. If this oc-
curs, have a Yamaha dealer check the
vehicle.
Eco in dicator
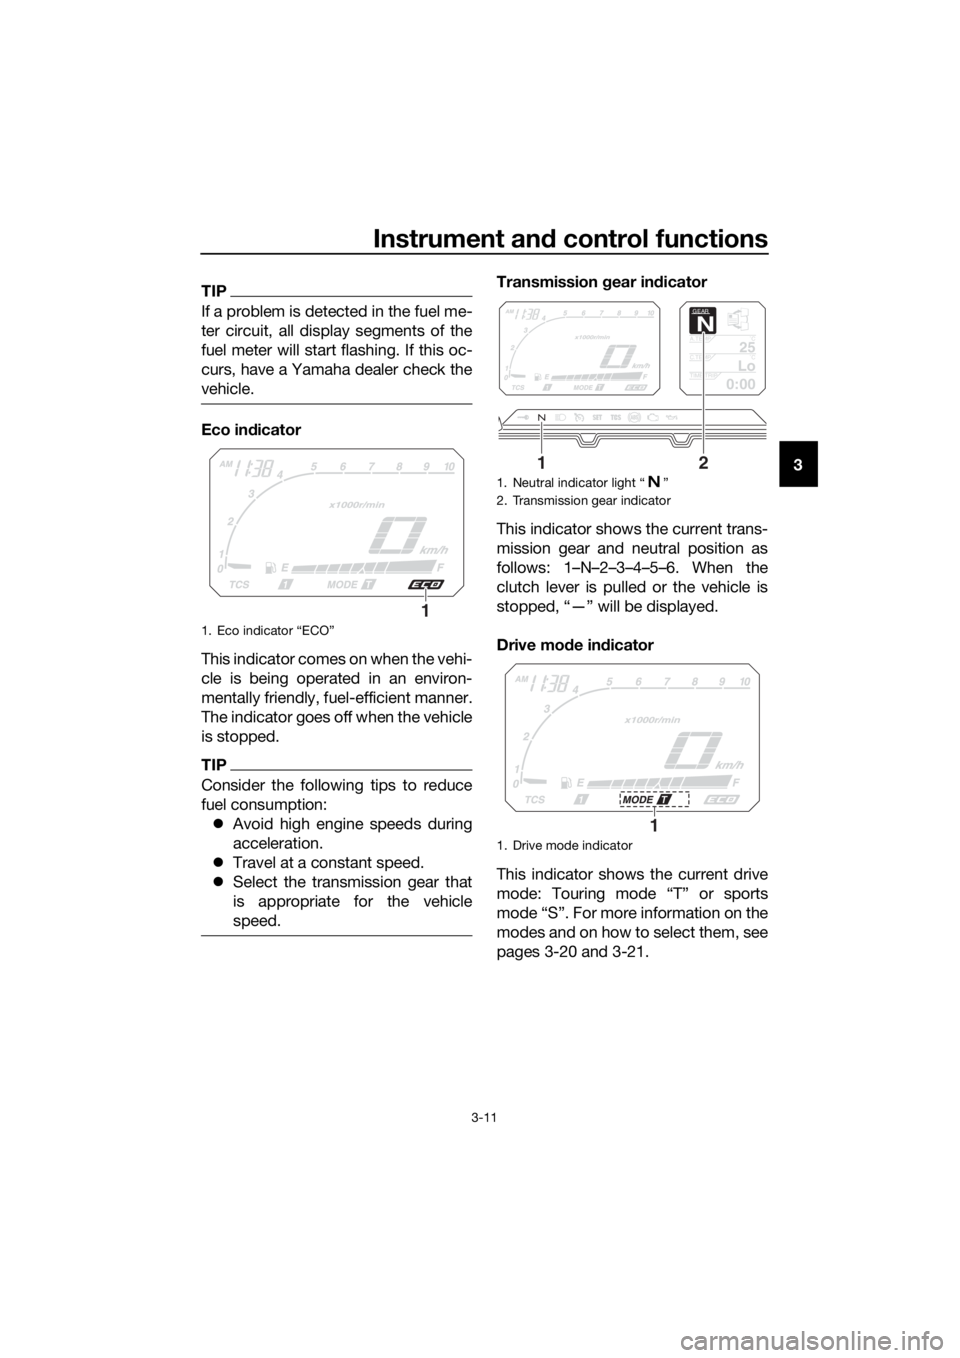
This indicator comes on when the vehi-
cle is being operated in an environ-
mentally friendly, fuel-efficient manner.
The indicator goes off when the vehicle
is stopped.
TIP
Consider the following tips to reduce
fuel consumption: Avoid high engine speeds during
acceleration.
Travel at a constant speed.
Select the transmission gear that
is appropriate for the vehicle
speed.
Transmission gear in dicator
This indicator shows the current trans-
mission gear and neutral position as
follows: 1–N–2–3–4–5–6. When the
clutch lever is pulled or the vehicle is
stopped, “—” will be displayed.
Drive mo de in dicator
This indicator shows the current drive
mode: Touring mode “T” or sports
mode “S”. For more information on the
modes and on how to select them, see
pages 3-20 and 3-21.
1. Eco indicator “ECO”
1
1. Neutral indicator light “ ”
2. Transmission gear indicator
1. Drive mode indicator
GEAR
N
25A.TEMP ˚C
LoC.TEMP˚C
0:00TIME TRIP
12
1
UBP8E0E0.book Page 11 Thursday, December 8, 2016 7:25 PM
Page 27 of 120

Instrument and control functions
3-13
3
change to the fuel reserve tripmeter
“TRIP-F” and start counting the dis-
tance traveled from that point.
In this case, push the select switch to
rotate among the information display
pages in the following order;
TRIP-F
→ Display–1 → Display–2 →
Display–3 → TRIP-F
To reset a tripmeter, push the “RESET”
button briefly so that the tripmeter
flashes, and then push and hold the
“RESET” button for 2 seconds.
TIP
The fuel reserve tripmeter can be reset
manually, or after refueling and travel-
ing 5 km (3 mi), it will reset automatical-
ly and disappear from the display.
Estimated traveling range:
This shows the approximate distance
that can be traveled with the remaining
fuel under current riding conditions. Elapsed time:
This timer shows the elapsed time
since the key was turned to “ON”. The
maximum time that can be shown is
99:59.
This timer automatically resets when
the key is turned to “OFF”.
TIP
There are also “TIME–2” and “TIME–3”
timer functions, but they cannot be set
to the information display pages. See
“Setting mode” on page 3-15 for more
information.
Air intake temperature:
This shows the temperature of the air
drawn into the air filter case. The dis-
play range is –9 °C to 93 °C in 1 °C in-
crements.
TIP
The displayed temperature may
vary from the actual ambient tem-
perature.
The temperature reading may be
affected by engine heat when rid-
ing slowly (under 20 km/h [12
mi/h]) or when stopped at traffic
signals, etc.
GEAR
4
3.4
TRIP-F km
11
RANGEkm
0:06
TIME TRIP
25
A.TEMP ˚C
UBP8E0E0.book Page 13 Thursday, December 8, 2016 7:25 PM
Page 29 of 120
Instrument and control functions
3-15
3
“MPG” shows the number of miles
traveled per Imp.gallon of fuel.
TIP
See “Selecting the units” on page
3-16 to change the kilometer-
based fuel consumption units or
to switch to miles.
When traveling under 10 km/h (6
mi/h), “_ _._” will be displayed.
NOTICE
ECA15474
If there is a malfunction, “– –.–” will
be continuously displaye d. Have a
Yamaha dealer check the vehicle.
Settin g mo de
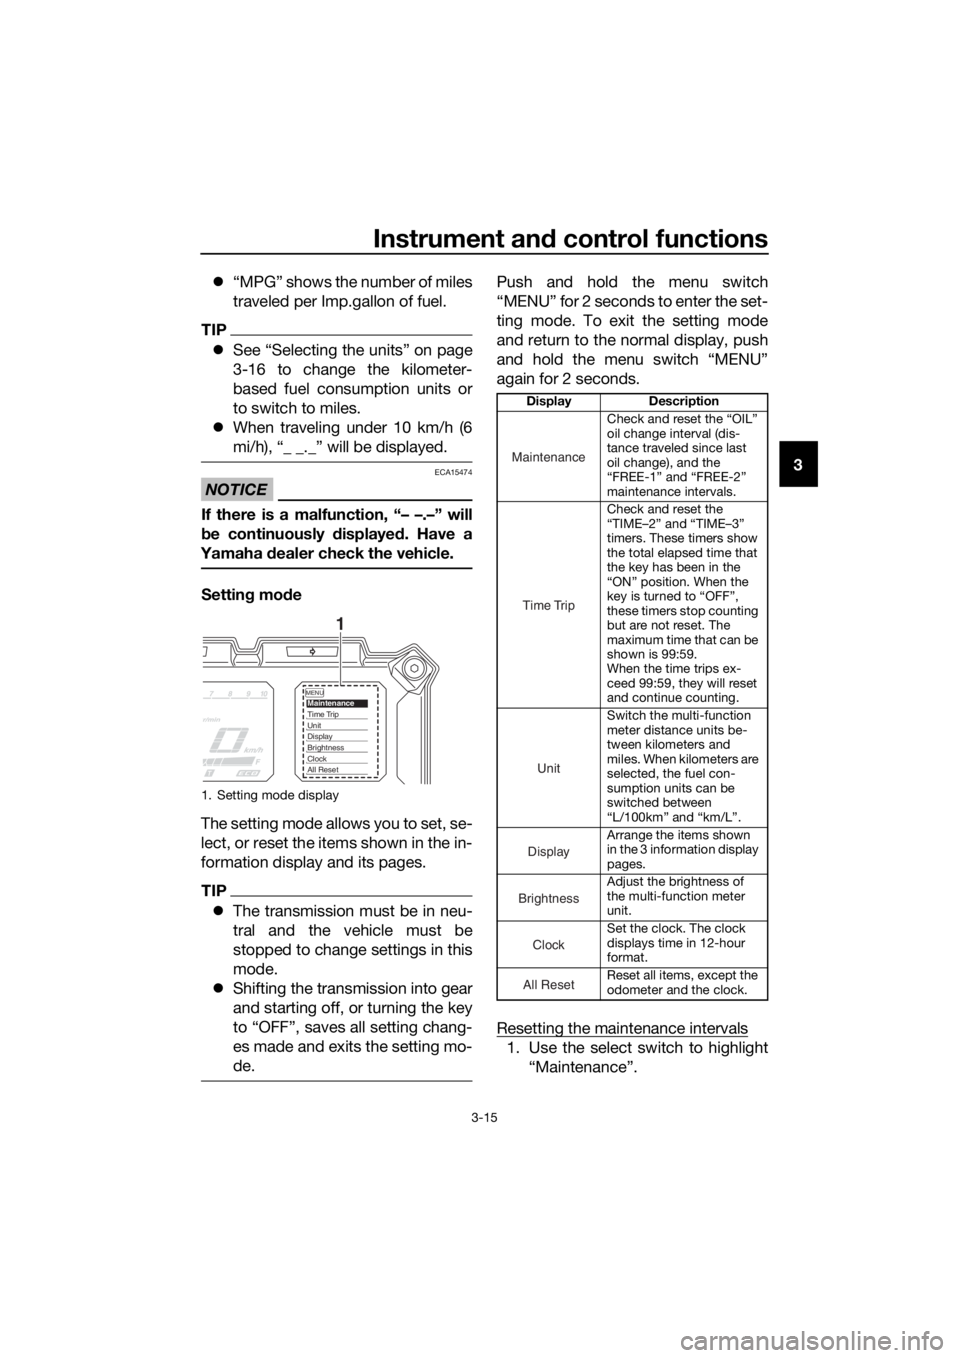
The setting mode allows you to set, se-
lect, or reset the items shown in the in-
formation display and its pages.
TIP
The transmission must be in neu-
tral and the vehicle must be
stopped to change settings in this
mode.
Shifting the transmission into gear
and starting off, or turning the key
to “OFF”, saves all setting chang-
es made and exits the setting mo-
de.
Push and hold the menu switch
“MENU” for 2 seconds to enter the set-
ting mode. To exit the setting mode
and return to the normal display, push
and hold the menu switch “MENU”
again for 2 seconds.
Resetting the maintenance intervals
1. Use the select switch to highlight
“Maintenance”.
1. Setting mode display
MENUMaintenanceTime TripUnitDisplayBrightnessClockAll Reset
1
Display Description
Check and reset the “OIL”
oil change interval (dis-
tance traveled since last
oil change), and the
“FREE-1” and “FREE-2”
maintenance intervals.
Check and reset the
“TIME–2” and “TIME–3”
timers. These timers show
the total elapsed time that
the key has been in the
“ON” position. When the
key is turned to “OFF”,
these timers stop counting
but are not reset. The
maximum time that can be
shown is 99:59.
When the time trips ex-
ceed 99:59, they will reset
and continue counting.
Switch the multi-function
meter distance units be-
tween kilometers and
miles. When kilometers are
selected, the fuel con-
sumption units can be
switched between
“L/100km” and “km/L”.
Arrange the items shown
in the 3 information display
pages.
Adjust the brightness of
the multi-function meter
unit.
Set the clock. The clock
displays time in 12-hour
format.
Reset all items, except the
odometer and the clock.
Maintenance
Time Trip
Unit
Display
Brightness
Clock
All Reset
UBP8E0E0.book Page 15 Thursday, December 8, 2016 7:25 PM
Page 30 of 120
Instrument and control functions
3-16
3
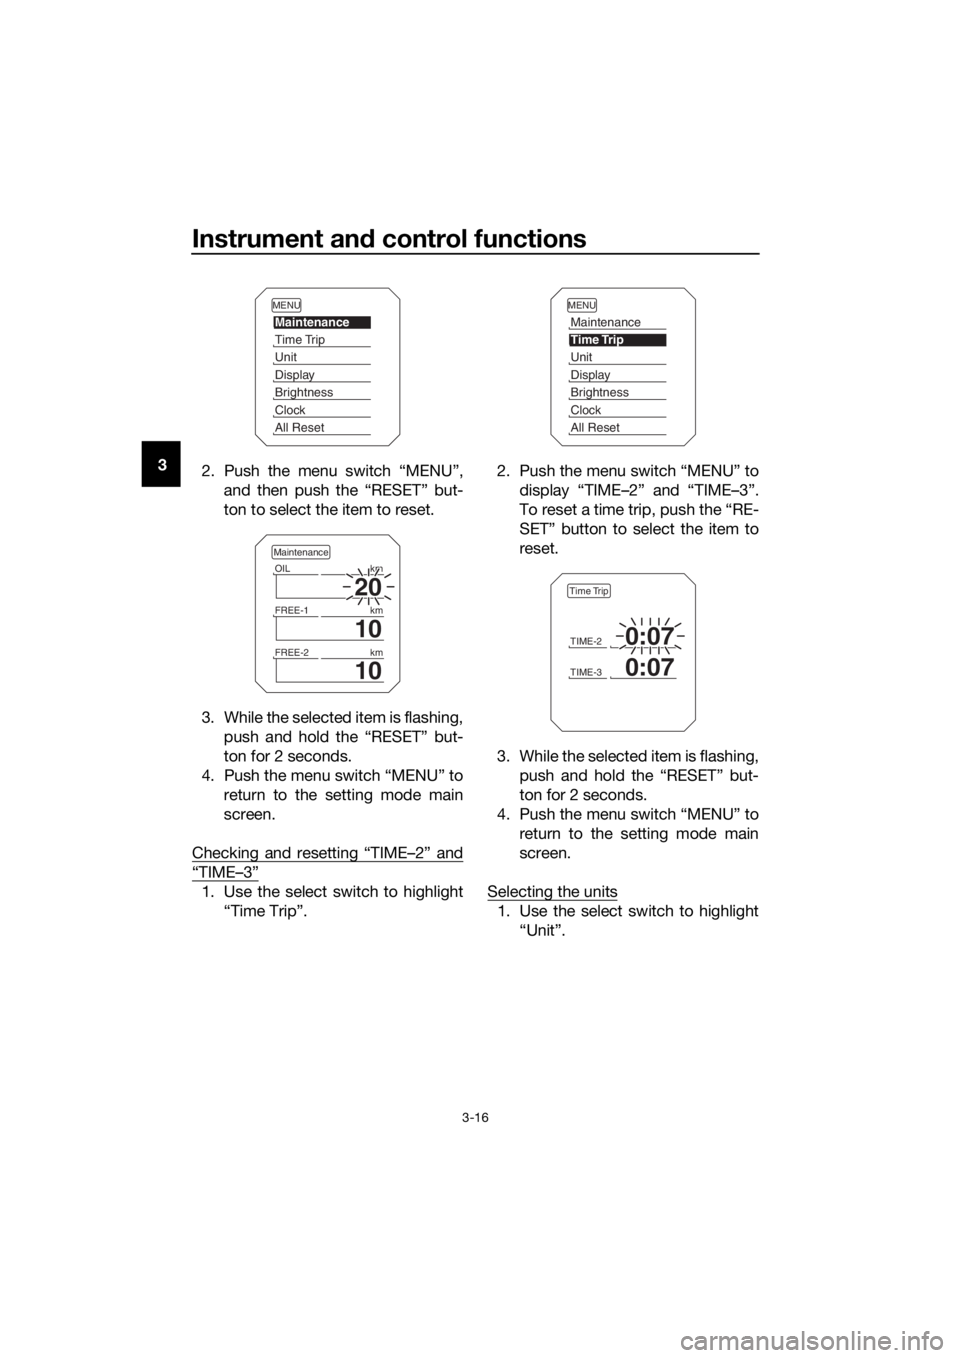
2. Push the menu switch “MENU”,
and then push the “RESET” but-
ton to select the item to reset.
3. While the selected item is flashing, push and hold the “RESET” but-
ton for 2 seconds.
4. Push the menu switch “MENU” to return to the setting mode main
screen.
Checking and resetting “TIME–2” and
“TIME–3”
1. Use the select switch to highlight “Time Trip”. 2. Push the menu switch “MENU” to
display “TIME–2” and “TIME–3”.
To reset a time trip, push the “RE-
SET” button to select the item to
reset.
3. While the selected item is flashing, push and hold the “RESET” but-
ton for 2 seconds.
4. Push the menu switch “MENU” to return to the setting mode main
screen.
Selecting the units
1. Use the select switch to highlight “Unit”.
MENU
Maintenance
Time Trip
Unit
Display
Brightness
Clock
All Reset
20
OIL km
10
FREE-1km
10
FREE-2km
Maintenance
MENU
Maintenance
Time Trip
Unit
Display
Brightness
Clock
All Reset
TIME-20:07
TIME-30:07
Time Trip
UBP8E0E0.book Page 16 Thursday, December 8, 2016 7:25 PM
Page 40 of 120
Instrument and control functions
3-26
3 The traction control system indicator
light flashes when traction control has
engaged. You may notice slight chang-
es in engine and exhaust sounds when
the system has engaged.
When the vehicle is turned on, the trac-
tion control system is turned on and
set to “TCS 1”. The traction control
system modes are as follows.
“TCS 1”
: Default mode
“TCS 2” : Sporty mode
This mode decreases traction control
system assist, allowing the rear wheel
to spin more freely than “TCS 1”.
“TCS OFF” : The traction control sys-
tem is turned off. The system may also
be automatically disabled in some rid-
ing conditions.
TIP
Use the mode “TCS OFF” to help free
the rear wheel if the motorcycle gets
stuck in mud, sand, or other soft sur-
faces.
NOTICE
ECA16801
Use only the specifie d tires. (See
pa ge 6-19.) Usin g different sized
tires will prevent the traction control
system from controllin g tire rotation
accurately.
Settin g the traction control system
WARNING
EWA15441
Be sure to stop the vehicle before
makin g any settin g chan ges to the
traction control system. Chan gin g
settin gs while ri din g can d istract the
operator an d increase the risk of an
acci dent.
The traction control system mode can
be changed only when the vehicle is
stopped.
Push the “TCS” button to change
between modes “1” and “2”.
Push the button for two seconds
to select “TCS OFF” and turn the
traction control system off. Push
the button again to return to the
previously selected mode.
Resetting
The traction control system will disable
in the following conditions: excessive rear wheel spinning
the front or rear wheel comes off
the ground while riding
either wheel is rotated with the key
turned to “ON” (such as when per-
forming maintenance)
If the traction control system has been
disabled, both the traction control sys-
tem indicator light and the engine trou-
ble warning light come on.
Should this occur, try restting the sys-
tem as follows. 1. Stop the vehicle and turn the key to “OFF”.
2. Wait a few seconds and then turn the key back to “ON”.
3. The traction control system indi- cator light should turn off and the
system be enabled.
TIP
If the traction control system indicator
light remains on after resetting, the mo-
torcycle may still be ridden. However,
have a Yamaha dealer check the vehi-
cle as soon as possible.
UBP8E0E0.book Page 26 Thursday, December 8, 2016 7:25 PM