ECO mode YAMAHA XT1200Z 2019 Owners Manual
[x] Cancel search | Manufacturer: YAMAHA, Model Year: 2019, Model line: XT1200Z, Model: YAMAHA XT1200Z 2019Pages: 118, PDF Size: 3.8 MB
Page 11 of 118

Safety information
1-5
1
operator and may limit control
ability, therefore, such accesso-
ries are not recommended.
Use caution when adding electri-
cal accessories. If electrical ac-
cessories exceed the capacity of
the motorcycle’s electrical sys-
tem, an electric failure could re-
sult, which could cause a
dangerous loss of lights or engine
power.
Aftermarket Tires an d Rims
The tires and rims that came with your
motorcycle were designed to match
the performance capabilities and to
provide the best combination of han-
dling, braking, and comfort. Other
tires, rims, sizes, and combinations
may not be appropriate. Refer to page
6-19 for tire specifications and more in-
formation on replacing your tires.
Transportin g the Motorcycle
Be sure to observe following instruc-
tions before transporting the motorcy-
cle in another vehicle. Remove all loose items from the
motorcycle.
Check that the fuel cock (if
equipped) is in the “OFF” position
and that there are no fuel leaks.
Point the front wheel straight
ahead on the trailer or in the truck
bed, and choke it in a rail to pre-
vent movement.
Shift the transmission in gear (for
models with a manual transmis-
sion).
Secure the motorcycle with tie-
downs or suitable straps that are
attached to solid parts of the mo- torcycle, such as the frame or up-
per front fork triple clamp (and not,
for example, to rubber-mounted
handlebars or turn signals, or
parts that could break). Choose
the location for the straps carefully
so the straps will not rub against
painted surfaces during transport.
The suspension should be com-
pressed somewhat by the tie-
downs, if possible, so that the mo-
torcycle will not bounce exces-
sively during transport.
UBP8E1E0.book Page 5 Friday, September 14, 2018 11:35 AM
Page 23 of 118
Instrument and control functions
3-9
3
EAU58937
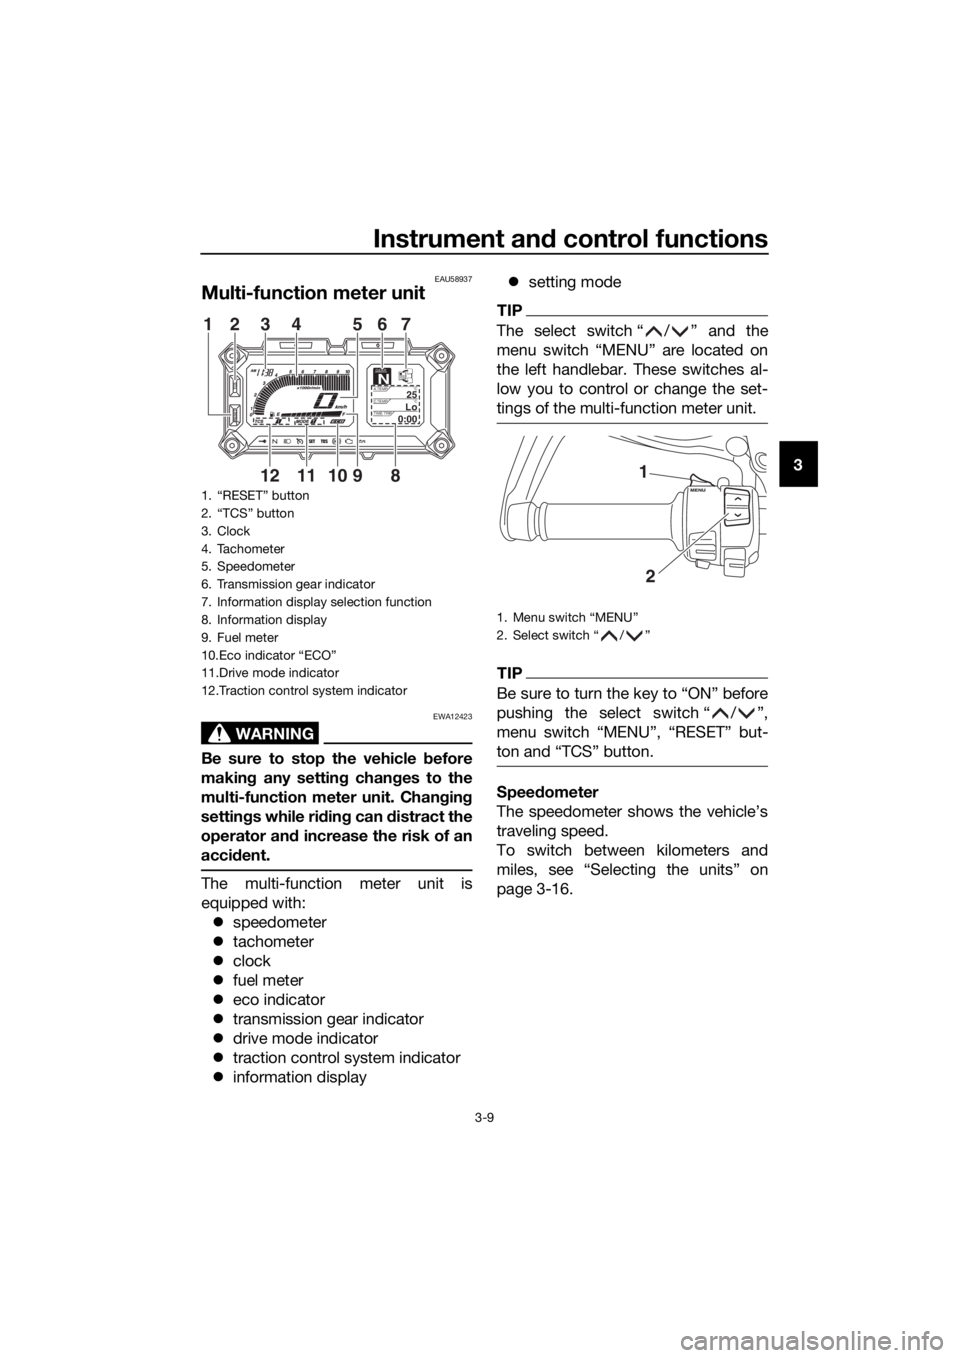
Multi-function meter unit
WARNING
EWA12423
Be sure to stop the vehicle before
makin g any settin g chan ges to the
multi-function meter unit. Chang ing
settin gs while ri din g can d istract the
operator an d increase the risk of an
acci dent.
The multi-function meter unit is
equipped with:
speedometer
tachometer
clock
fuel meter
eco indicator
transmission gear indicator
drive mode indicator
traction control system indicator
information display
setting mode
TIP
The select switch “ / ” and the
menu switch “MENU” are located on
the left handlebar. These switches al-
low you to control or change the set-
tings of the multi-function meter unit.
TIP
Be sure to turn the key to “ON” before
pushing the select switch “ / ”,
menu switch “MENU”, “RESET” but-
ton and “TCS” button.
Speed ometer
The speedometer shows the vehicle’s
traveling speed.
To switch between kilometers and
miles, see “Selecting the units” on
page 3-16.
1. “RESET” button
2. “TCS” button
3. Clock
4. Tachometer
5. Speedometer
6. Transmission gear indicator
7. Information display selection function
8. Information display
9. Fuel meter
10.Eco indicator “ECO”
11.Drive mode indicator
12.Traction control system indicator
GEARN25A.TEMP ˚C
LoC.TEMP˚C
0:00TIME TRIP
89101112
12 3 4 56
7
1. Menu switch “MENU”
2. Select switch “ / ”
1
2
UBP8E1E0.book Page 9 Friday, September 14, 2018 11:35 AM
Page 28 of 118
Instrument and control functions
3-14
3
“km/L” shows the number of kilo-
meters traveled on one liter of fuel.
“L/100km” shows how many liters
of fuel is needed to travel 100 km.
“MPG” shows the number of miles
traveled per Imp.gallon of fuel.
TIP
See “Selecting the units” on page 3-16
to change the kilometer-based fuel
consumption units or to switch to
miles.
To reset the average fuel consumption,
push the “RESET” button briefly so
that the average fuel consumption dis-
play flashes, and then push and hold
the “RESET” button for 2 seconds.
TIP
After resetting the average fuel con-
sumption, “_ _._” will be shown until
the vehicle has traveled 1 km (0.6 mi).
NOTICE
ECA15474
If there is a malfunction, “– –.–” will
be continuously displaye d. Have a
Yamaha dealer check the vehicle.
Instantaneous fuel consumption:
This function calculates the instanta-
neous fuel consumption under current
riding conditions. The instantaneous
fuel consumption can be displayed as
“km/L”, “L/100km” or “MPG”.
“km/L” shows the number of kilo-
meters traveled on one liter of fuel.
“L/100km” shows how many liters
of fuel is needed to travel 100 km.
“MPG” shows the number of miles
traveled per Imp.gallon of fuel.
TIP
See “Selecting the units” on page
3-16 to change the kilometer-
based fuel consumption units or
to switch to miles.
When traveling under 10 km/h (6
mi/h), “_ _._” will be displayed.
NOTICE
ECA15474
If there is a malfunction, “– –.–” will
be continuously displaye d. Have a
Yamaha dealer check the vehicle.
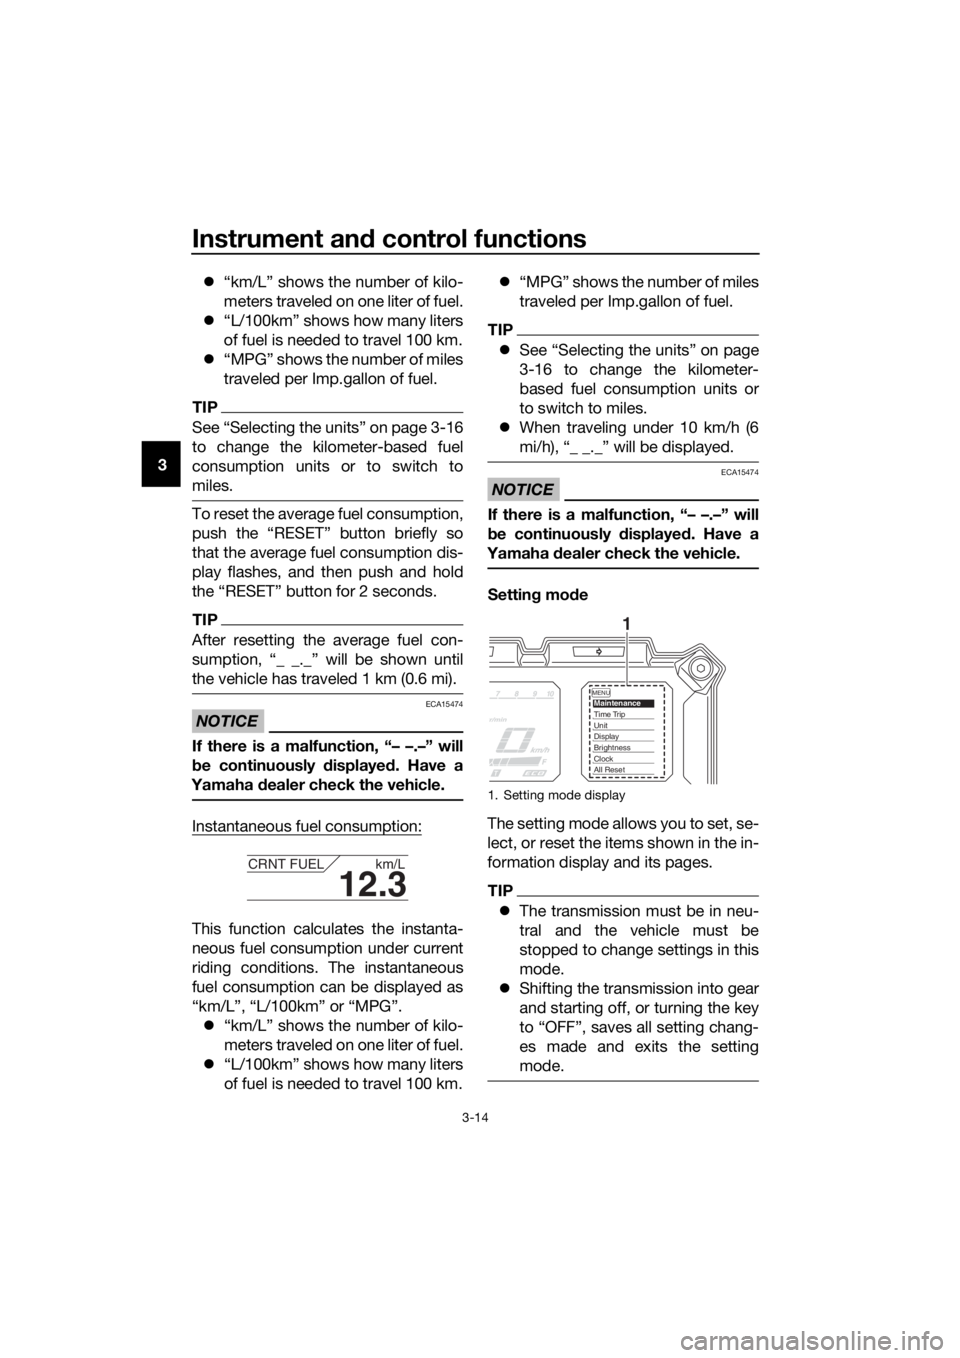
Settin g mo de
The setting mode allows you to set, se-
lect, or reset the items shown in the in-
formation display and its pages.
TIP
The transmission must be in neu-
tral and the vehicle must be
stopped to change settings in this
mode.
Shifting the transmission into gear
and starting off, or turning the key
to “OFF”, saves all setting chang-
es made and exits the setting
mode.
12.3
CRNT FUEL km/L
1. Setting mode display
MENUMaintenanceTime TripUnitDisplayBrightnessClockAll Reset
1
UBP8E1E0.book Page 14 Friday, September 14, 2018 11:35 AM
Page 29 of 118
Instrument and control functions
3-15
3
Push and hold the menu switch
“MENU” for 2 seconds to enter the set-
ting mode. To exit the setting mode
and return to the normal display, push
and hold the menu switch “MENU”
again for 2 seconds.
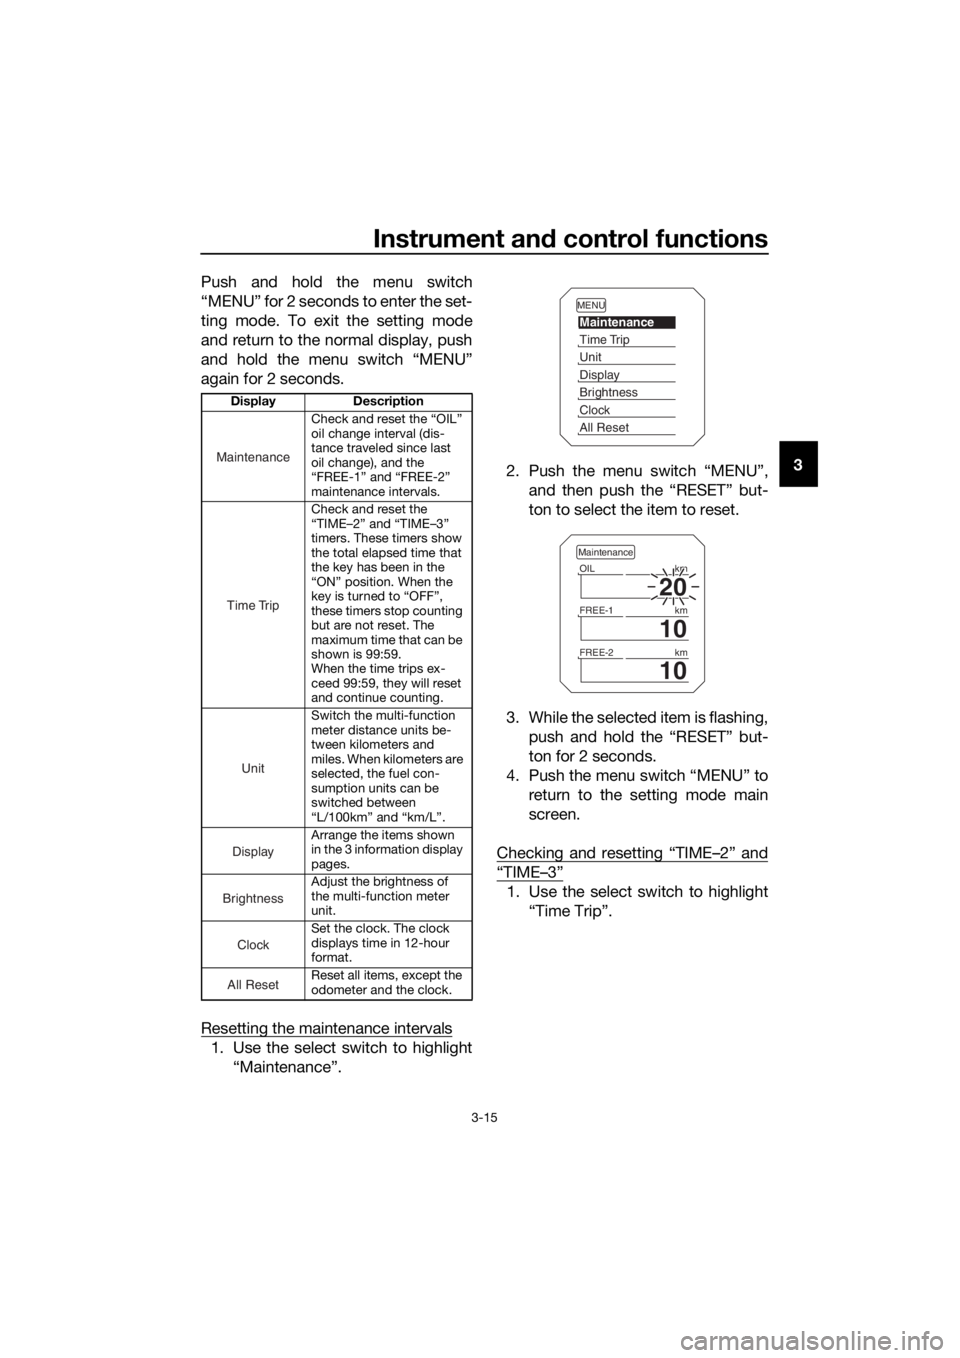
Resetting the maintenance intervals
1. Use the select switch to highlight
“Maintenance”. 2. Push the menu switch “MENU”,
and then push the “RESET” but-
ton to select the item to reset.
3. While the selected item is flashing, push and hold the “RESET” but-
ton for 2 seconds.
4. Push the menu switch “MENU” to return to the setting mode main
screen.
Checking and resetting “TIME–2” and
“TIME–3”
1. Use the select switch to highlight “Time Trip”.
Display Description
Check and reset the “OIL”
oil change interval (dis-
tance traveled since last
oil change), and the
“FREE-1” and “FREE-2”
maintenance intervals.
Check and reset the
“TIME–2” and “TIME–3”
timers. These timers show
the total elapsed time that
the key has been in the
“ON” position. When the
key is turned to “OFF”,
these timers stop counting
but are not reset. The
maximum time that can be
shown is 99:59.
When the time trips ex-
ceed 99:59, they will reset
and continue counting.
Switch the multi-function
meter distance units be-
tween kilometers and
miles. When kilometers are
selected, the fuel con-
sumption units can be
switched between
“L/100km” and “km/L”.
Arrange the items shown
in the 3 information display
pages.
Adjust the brightness of
the multi-function meter
unit.
Set the clock. The clock
displays time in 12-hour
format.
Reset all items, except the
odometer and the clock.
Maintenance
Time Trip
Unit
Display
Brightness
Clock
All Reset
MENU
Maintenance
Time Trip
Unit
Display
Brightness
Clock
All Reset
20
OIL km
10
FREE-1km
10
FREE-2km
Maintenance
UBP8E1E0.book Page 15 Friday, September 14, 2018 11:35 AM
Page 30 of 118
Instrument and control functions
3-16
3
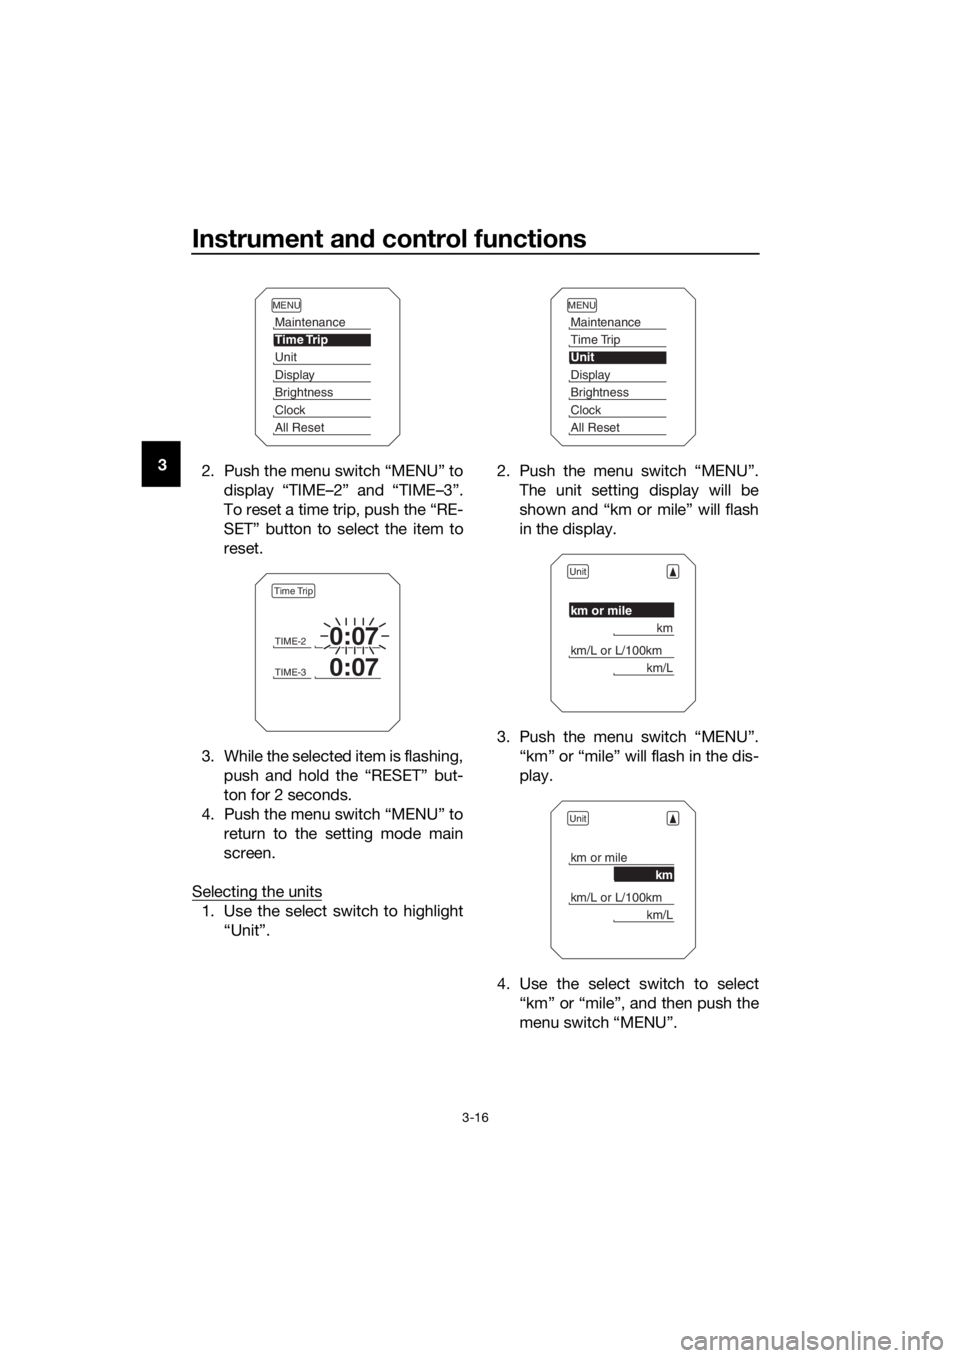
2. Push the menu switch “MENU” to
display “TIME–2” and “TIME–3”.
To reset a time trip, push the “RE-
SET” button to select the item to
reset.
3. While the selected item is flashing, push and hold the “RESET” but-
ton for 2 seconds.
4. Push the menu switch “MENU” to return to the setting mode main
screen.
Selecting the units
1. Use the select switch to highlight “Unit”. 2. Push the menu switch “MENU”.
The unit setting display will be
shown and “km or mile” will flash
in the display.
3. Push the menu switch “MENU”. “km” or “mile” will flash in the dis-
play.
4. Use the select switch to select “km” or “mile”, and then push the
menu switch “MENU”.
MENU
Maintenance
Time Trip
Unit
Display
Brightness
Clock
All Reset
TIME-20:07
TIME-30:07
Time Trip
MENU
Maintenance
Time Trip
Unit
Display
Brightness
Clock
All Reset
Unit
km or mile
km
km/L or L/100km
km/L
Unit
km or mile
km
km/L or L/100km
km/L
UBP8E1E0.book Page 16 Friday, September 14, 2018 11:35 AM
Page 40 of 118
Instrument and control functions
3-26
3 The traction control system indicator
light flashes when traction control has
engaged. You may notice slight chang-
es in engine and exhaust sounds when
the system has engaged.
When the vehicle is turned on, the trac-
tion control system is turned on and
set to “TCS 1”. The traction control
system modes are as follows.
“TCS 1”
: Default mode
“TCS 2” : Sporty mode
This mode decreases traction control
system assist, allowing the rear wheel
to spin more freely than “TCS 1”.
“TCS OFF” : The traction control sys-
tem is turned off. The system may also
be automatically disabled in some rid-
ing conditions.
TIP
Use the mode “TCS OFF” to help free
the rear wheel if the motorcycle gets
stuck in mud, sand, or other soft sur-
faces.
NOTICE
ECA16801
Use only the specifie d tires. (See
pa ge 6-19.) Usin g different sized
tires will prevent the traction control
system from controllin g tire rotation
accurately.
Settin g the traction control system
WARNING
EWA15441
Be sure to stop the vehicle before
makin g any settin g chan ges to the
traction control system. Chan gin g
settin gs while ri din g can d istract the
operator an d increase the risk of an
acci dent.
The traction control system mode can
be changed only when the vehicle is
stopped.
Push the “TCS” button to change
between modes “1” and “2”.
Push the button for two seconds
to select “TCS OFF” and turn the
traction control system off. Push
the button again to return to the
previously selected mode.
Resetting
The traction control system will disable
in the following conditions: excessive rear wheel spinning
the front or rear wheel comes off
the ground while riding
either wheel is rotated with the key
turned to “ON” (such as when per-
forming maintenance)
If the traction control system has been
disabled, both the traction control sys-
tem indicator light and the engine trou-
ble warning light come on.
Should this occur, try resetting the sys-
tem as follows. 1. Stop the vehicle and turn the key to “OFF”.
2. Wait a few seconds and then turn the key back to “ON”.
3. The traction control system indi- cator light should turn off and the
system be enabled.
TIP
If the traction control system indicator
light remains on after resetting, the mo-
torcycle may still be ridden. However,
have a Yamaha dealer check the vehi-
cle as soon as possible.
UBP8E1E0.book Page 26 Friday, September 14, 2018 11:35 AM
Page 58 of 118

Operation and important rid ing points
5-1
5
EAU15952
Read the Owner’s Manual carefully to
become familiar with all controls. If
there is a control or function you do not
understand, ask your Yamaha dealer.
WARNING
EWA10272
Failure to familiarize yourself with
the controls can lea d to loss of con-
trol, which coul d cause an acci dent
or injury.
EAU73451
TIP
This model is equipped with: a lean angle sensor to stop the en-
gine in case of turnover. Turn the
main switch off once before at-
tempting to restart the engine.
Failing to do so will prevent the en-
gine from starting, even though
the engine will crank when the
start switch is pushed.
an engine auto-stop system. The
engine stops automatically if left
idling for 20 minutes. In this case,
simply push the start switch to re-
start the engine.
UBP8E1E0.book Page 1 Friday, September 14, 2018 11:35 AM
Page 73 of 118
Periodic maintenance an d a djustment
6-10
6
EAU79401
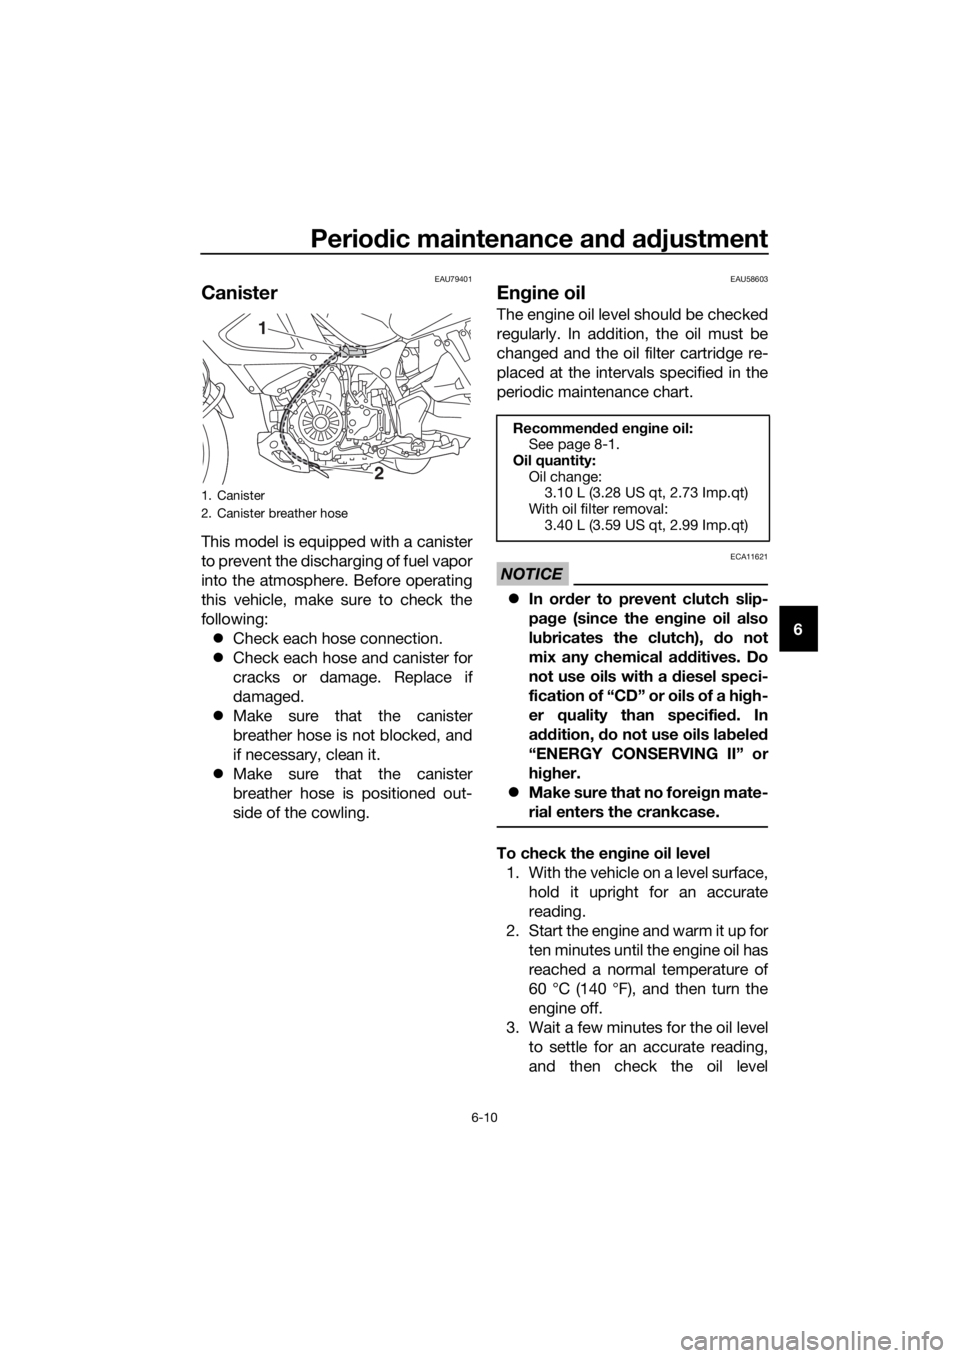
Canister
This model is equipped with a canister
to prevent the discharging of fuel vapor
into the atmosphere. Before operating
this vehicle, make sure to check the
following:
Check each hose connection.
Check each hose and canister for
cracks or damage. Replace if
damaged.
Make sure that the canister
breather hose is not blocked, and
if necessary, clean it.
Make sure that the canister
breather hose is positioned out-
side of the cowling.
EAU58603
Engine oil
The engine oil level should be checked
regularly. In addition, the oil must be
changed and the oil filter cartridge re-
placed at the intervals specified in the
periodic maintenance chart.
NOTICE
ECA11621
In or der to prevent clutch slip-
pa ge (since the en gine oil also
lu bricates the clutch), do not
mix any chemical additives. Do
not use oils with a diesel speci-
fication of “CD” or oils of a hi gh-
er quality than specified . In
a dd ition, do not use oils la bele d
“ENERGY CONSERVING II” or
hi gher.
Make sure that no forei gn mate-
rial enters the crankcase.
To check the en gine oil level
1. With the vehicle on a level surface, hold it upright for an accurate
reading.
2. Start the engine and warm it up for ten minutes until the engine oil has
reached a normal temperature of
60 °C (140 °F), and then turn the
engine off.
3. Wait a few minutes for the oil level to settle for an accurate reading,
and then check the oil level
1. Canister
2. Canister breather hose
2
1
Recommen ded en gine oil:
See page 8-1.
Oil quantity: Oil change: 3.10 L (3.28 US qt, 2.73 Imp.qt)
With oil filter removal: 3.40 L (3.59 US qt, 2.99 Imp.qt)
UBP8E1E0.book Page 10 Friday, September 14, 2018 11:35 AM
Page 85 of 118

Periodic maintenance an d a djustment
6-22
6
EAU49713
Spoke wheels
To maximize the performance, durabil-
ity, and safe operation of your vehicle,
note the following points.
Check each wheel for cracks, de-
formation and other damage. If
any damage is found, have the
wheel inspected by your Yamaha
dealer. Do not attempt to repair or
straighten a bent or damaged
wheel.
Check the spokes for looseness. If
any loose spokes are found, have
the wheel adjusted by your
Yamaha dealer. Improperly tight-
ened spokes can cause wheel
misalignment.
Have the wheel balanced whenev-
er the tire or tube has been re-
placed. An unbalanced wheel can
result in adverse handling charac-
teristics and shortened tire life.
EAU42851
Clutch lever
Since this model is equipped with a hy-
draulic clutch, adjusting the clutch le-
ver free play is not needed. However, it
is necessary to check the hydraulic
system for leakage before each ride. If
the clutch lever free play does become
excessive, and shifting becomes rough
or clutch slippage occurs, causing
poor acceleration, there may be air in
the clutch system. If there is air in the
hydraulic system, have a Yamaha deal-
er bleed the system before operating
the motorcycle.
UBP8E1E0.book Page 22 Friday, September 14, 2018 11:35 AM
Page 110 of 118

Specifications
8-1
8
Dimensions:
Overall length:2250 mm (88.6 in)
Overall width:
980 mm (38.6 in)
Overall height: 1410/1470 mm (55.5/57.9 in)
Seat height: 845/870 mm (33.3/34.3 in)
Wheelbase:
1540 mm (60.6 in)
Ground clearance: 190 mm (7.48 in)
Minimum turning radius: 2.7 m (8.86 ft)
Wei ght:
Curb weight:
258 kg (569 lb)
Engine:
Combustion cycle:
4-stroke
Cooling system:
Liquid cooled
Valve train: DOHC
Cylinder arrangement: Inline
Number of cylinders:
2-cylinder
Displacement: 1199 cm³
Bore × stroke:
98.0 × 79.5 mm (3.86 × 3.13 in)
Starting system:
Electric starter
Engine oil:
Recommended brand:
SAE viscosity grades:
10W-40
Recommended engine oil grade: API service SG type or higher, JASO
standard MA
Engine oil quantity: Oil change:3.10 L (3.28 US qt, 2.73 Imp.qt) With oil filter removal:
3.40 L (3.59 US qt, 2.99 Imp.qt)
Final gear oil:
Type:
Yamaha genuine shaft drive gear oil SAE
80W-90 API GL-5 or SAE 80 API GL-4
Hypoid gear oil
Quantity: 0.20 L (0.21 US qt, 0.18 Imp.qt)
Coolant quantity:
Coolant reservoir (up to the maximum level
mark):
0.26 L (0.27 US qt, 0.23 Imp.qt)
Radiator (including all routes):
1.83 L (1.93 US qt, 1.61 Imp.qt)
Fuel:
Recommended fuel:Premium unleaded gasoline (Gasohol [E10]
acceptable)
Fuel tank capacity: 23 L (6.1 US gal, 5.1 Imp.gal)
Fuel reserve amount:
3.9 L (1.03 US gal, 0.86 Imp.gal)
Fuel injection:
Throttle body:ID mark: BP81 00
Drivetrain:
Gear ratio:
1st:2.769 (36/13)
2nd:
2.063 (33/16)
3rd: 1.571 (33/21)
4th: 1.250 (30/24)
5th:
1.042 (25/24)
6th: 0.929 (26/28)
Front tire:
Type:
Tubeless
Size: 110/80R19M/C 59V
Manufacturer/model: BRIDGESTONE/BW501
UBP8E1E0.book Page 1 Friday, September 14, 2018 11:35 AM