ECU YAMAHA XT1200Z 2019 Owners Manual
[x] Cancel search | Manufacturer: YAMAHA, Model Year: 2019, Model line: XT1200Z, Model: YAMAHA XT1200Z 2019Pages: 118, PDF Size: 3.8 MB
Page 11 of 118

Safety information
1-5
1
operator and may limit control
ability, therefore, such accesso-
ries are not recommended.
Use caution when adding electri-
cal accessories. If electrical ac-
cessories exceed the capacity of
the motorcycle’s electrical sys-
tem, an electric failure could re-
sult, which could cause a
dangerous loss of lights or engine
power.
Aftermarket Tires an d Rims
The tires and rims that came with your
motorcycle were designed to match
the performance capabilities and to
provide the best combination of han-
dling, braking, and comfort. Other
tires, rims, sizes, and combinations
may not be appropriate. Refer to page
6-19 for tire specifications and more in-
formation on replacing your tires.
Transportin g the Motorcycle
Be sure to observe following instruc-
tions before transporting the motorcy-
cle in another vehicle. Remove all loose items from the
motorcycle.
Check that the fuel cock (if
equipped) is in the “OFF” position
and that there are no fuel leaks.
Point the front wheel straight
ahead on the trailer or in the truck
bed, and choke it in a rail to pre-
vent movement.
Shift the transmission in gear (for
models with a manual transmis-
sion).
Secure the motorcycle with tie-
downs or suitable straps that are
attached to solid parts of the mo- torcycle, such as the frame or up-
per front fork triple clamp (and not,
for example, to rubber-mounted
handlebars or turn signals, or
parts that could break). Choose
the location for the straps carefully
so the straps will not rub against
painted surfaces during transport.
The suspension should be com-
pressed somewhat by the tie-
downs, if possible, so that the mo-
torcycle will not bounce exces-
sively during transport.
UBP8E1E0.book Page 5 Friday, September 14, 2018 11:35 AM
Page 15 of 118
Instrument and control functions
3-1
3
EAU10979
Immo bilizer system
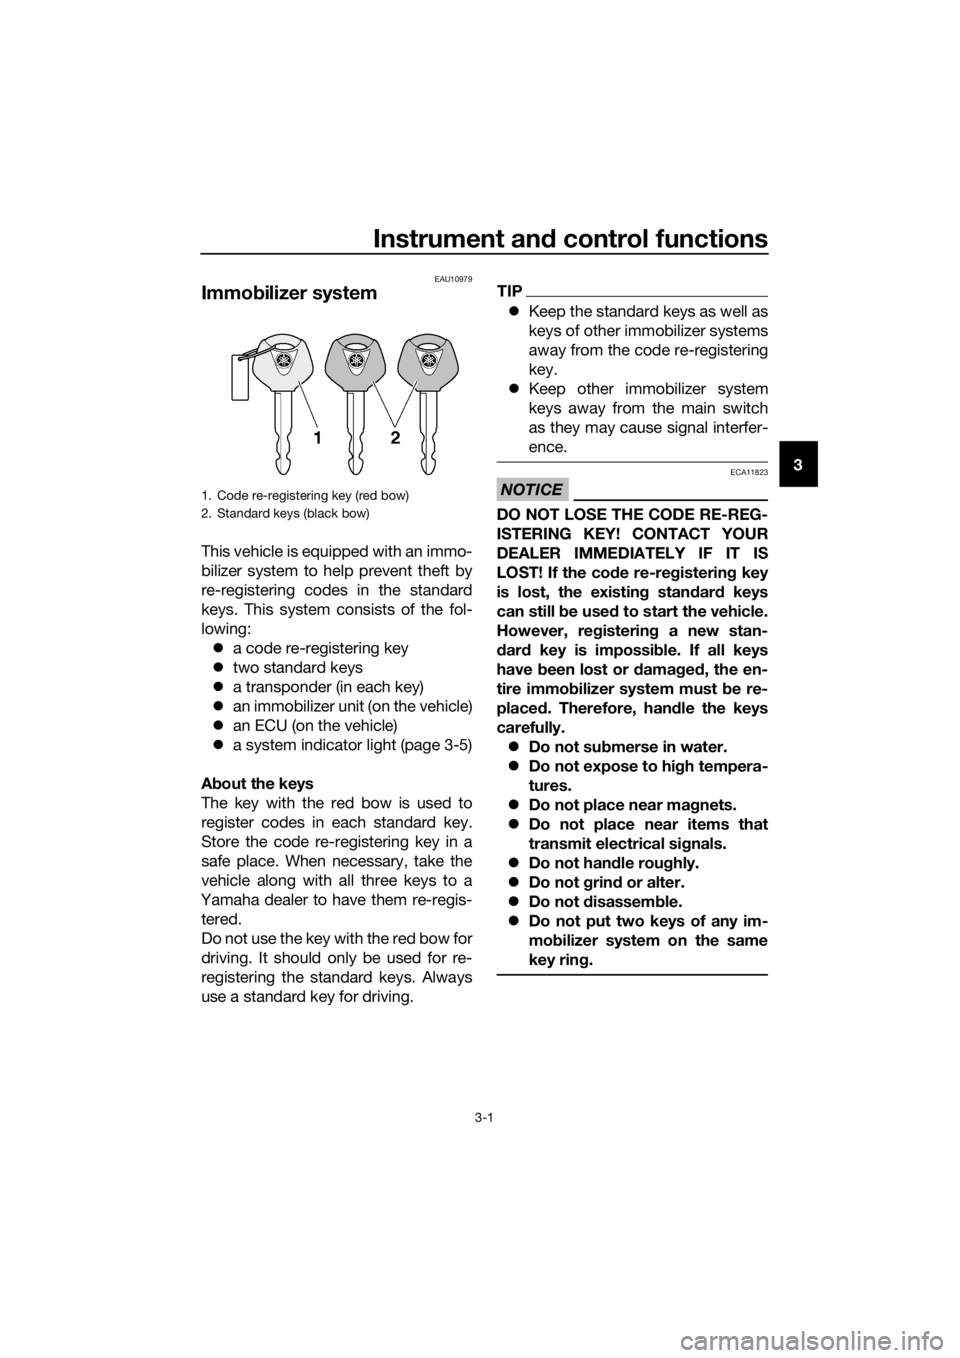
This vehicle is equipped with an immo-
bilizer system to help prevent theft by
re-registering codes in the standard
keys. This system consists of the fol-
lowing:
a code re-registering key
two standard keys
a transponder (in each key)
an immobilizer unit (on the vehicle)
an ECU (on the vehicle)
a system indicator light (page 3-5)
A bout the keys
The key with the red bow is used to
register codes in each standard key.
Store the code re-registering key in a
safe place. When necessary, take the
vehicle along with all three keys to a
Yamaha dealer to have them re-regis- tered.
Do not use the key with the red bow for
driving. It should only be used for re-
registering the standard keys. Always
use a standard key for driving.
TIP
Keep the standard keys as well as
keys of other immobilizer systems
away from the code re-registering
key.
Keep other immobilizer system
keys away from the main switch
as they may cause signal interfer-
ence.
NOTICE
ECA11823
DO NOT LOSE THE CODE RE-REG-
ISTERING KEY! CONTACT YOUR
DEALER IMMEDIATELY IF IT IS
LOST! If the co de re-re gisterin g key
is lost, the existin g stan dar d keys
can still be used to start the vehicle.
However, re gisterin g a new stan-
d ar d key is impossi ble. If all keys
have been lost or damag ed , the en-
tire immo bilizer system must be re-
placed . Therefore, han dle the keys
carefully. Do not su bmerse in water.
Do not expose to hi gh tempera-
tures.
Do not place near mag nets.
Do not place near items that
transmit electrical si gnals.
Do not han dle rou ghly.
Do not grin d or alter.
Do not disassem ble.
Do not put two keys of any im-
mo bilizer system on the same
key rin g.
1. Code re-registering key (red bow)
2. Standard keys (black bow)
UBP8E1E0.book Page 1 Friday, September 14, 2018 11:35 AM
Page 37 of 118
Instrument and control functions
3-23
3
EAU4951B
Brake lever
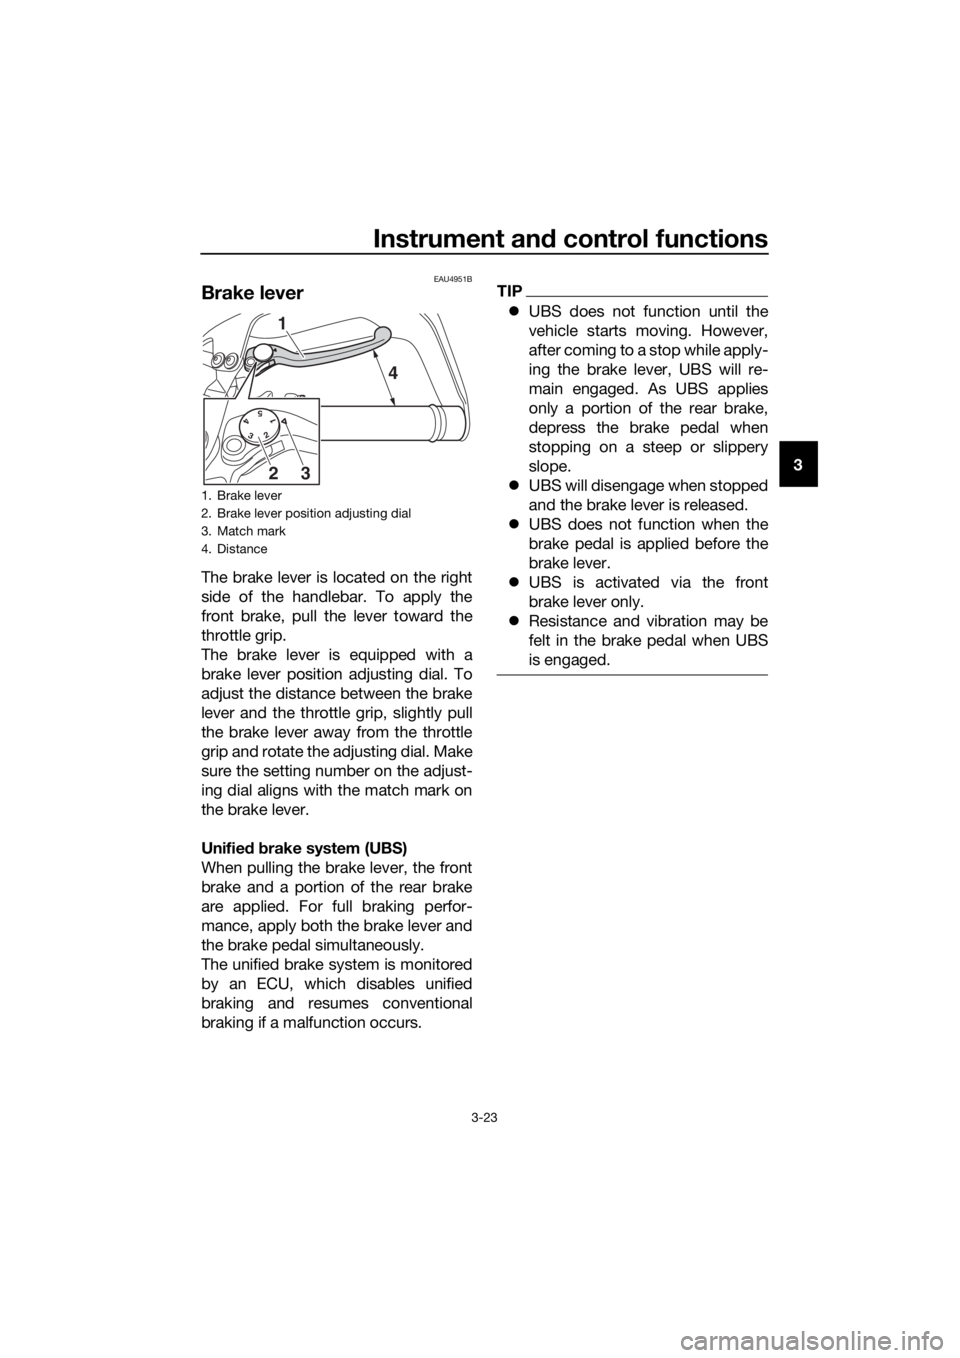
The brake lever is located on the right
side of the handlebar. To apply the
front brake, pull the lever toward the
throttle grip.
The brake lever is equipped with a
brake lever position adjusting dial. To
adjust the distance between the brake
lever and the throttle grip, slightly pull
the brake lever away from the throttle
grip and rotate the adjusting dial. Make
sure the setting number on the adjust-
ing dial aligns with the match mark on
the brake lever.
Unifie d b rake system (UBS)
When pulling the brake lever, the front
brake and a portion of the rear brake
are applied. For full braking perfor-
mance, apply both the brake lever and
the brake pedal simultaneously.
The unified brake system is monitored
by an ECU, which disables unified
braking and resumes conventional
braking if a malfunction occurs.
TIP
UBS does not function until the
vehicle starts moving. However,
after coming to a stop while apply-
ing the brake lever, UBS will re-
main engaged. As UBS applies
only a portion of the rear brake,
depress the brake pedal when
stopping on a steep or slippery
slope.
UBS will disengage when stopped
and the brake lever is released.
UBS does not function when the
brake pedal is applied before the
brake lever.
UBS is activated via the front
brake lever only.
Resistance and vibration may be
felt in the brake pedal when UBS
is engaged.
1. Brake lever
2. Brake lever position adjusting dial
3. Match mark
4. Distance
5 4 3 2 1
1
4
32
UBP8E1E0.book Page 23 Friday, September 14, 2018 11:35 AM
Page 38 of 118
Instrument and control functions
3-24
3
EAU49484
Brake ped al
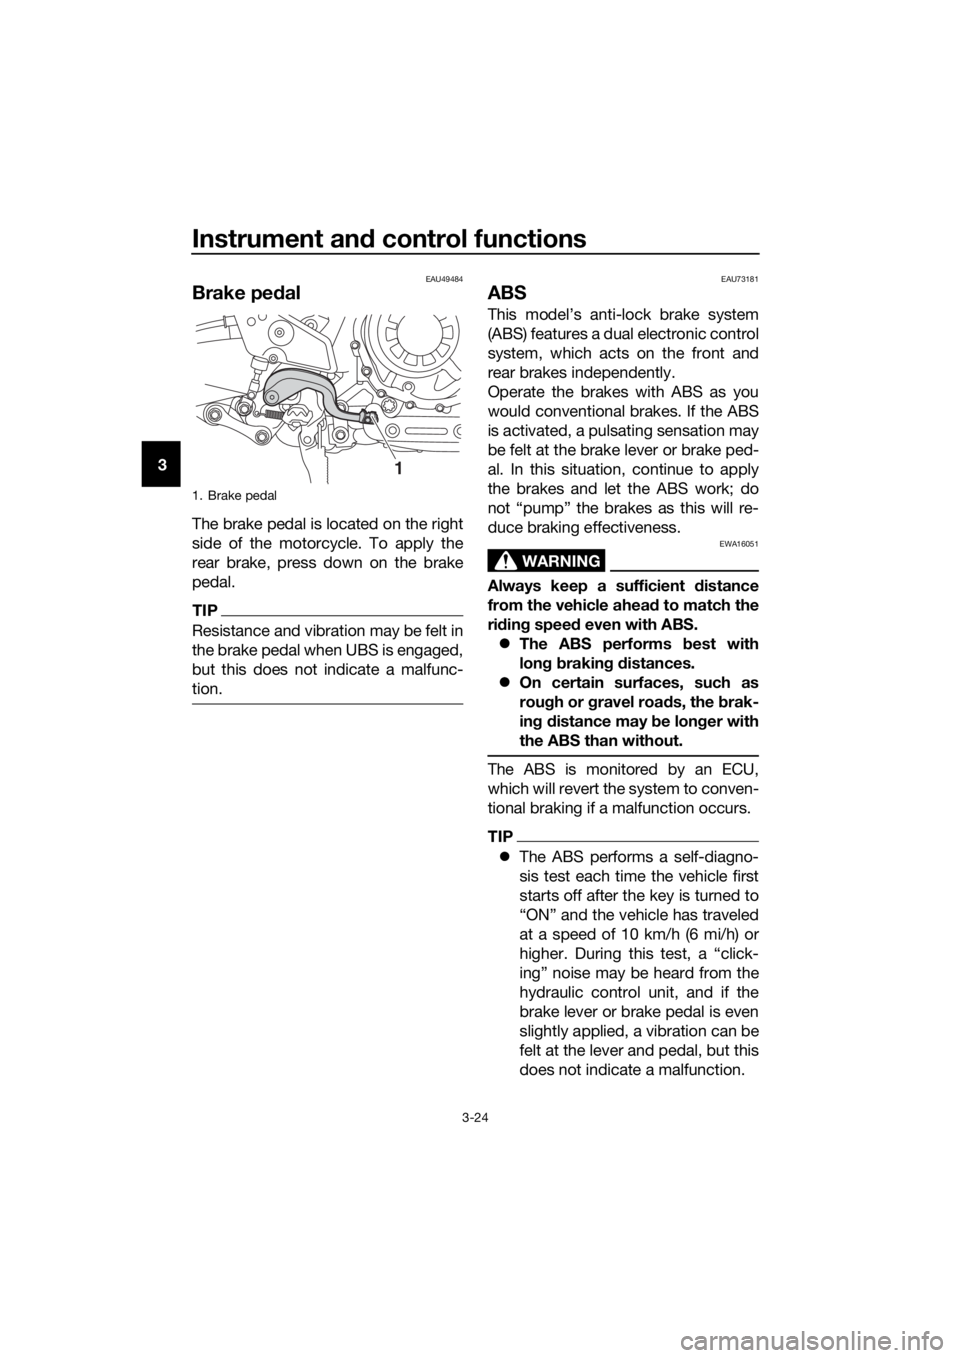
The brake pedal is located on the right
side of the motorcycle. To apply the
rear brake, press down on the brake
pedal.
TIP
Resistance and vibration may be felt in
the brake pedal when UBS is engaged,
but this does not indicate a malfunc-
tion.
EAU73181
ABS
This model’s anti-lock brake system
(ABS) features a dual electronic control
system, which acts on the front and
rear brakes independently.
Operate the brakes with ABS as you
would conventional brakes. If the ABS
is activated, a pulsating sensation may
be felt at the brake lever or brake ped-
al. In this situation, continue to apply
the brakes and let the ABS work; do
not “pump” the brakes as this will re-
duce braking effectiveness.
WARNING
EWA16051
Always keep a sufficient d istance
from the vehicle ahead to match the
ri din g speed even with ABS.
The ABS performs b est with
lon g b rakin g d istances.
On certain surfaces, such as
rou gh or g ravel roa ds, the b rak-
in g d istance may be lon ger with
the ABS than without.
The ABS is monitored by an ECU,
which will revert the system to conven-
tional braking if a malfunction occurs.
TIP
The ABS performs a self-diagno-
sis test each time the vehicle first
starts off after the key is turned to
“ON” and the vehicle has traveled
at a speed of 10 km/h (6 mi/h) or
higher. During this test, a “click-
ing” noise may be heard from the
hydraulic control unit, and if the
brake lever or brake pedal is even
slightly applied, a vibration can be
felt at the lever and pedal, but this
does not indicate a malfunction.
1. Brake pedal
1
UBP8E1E0.book Page 24 Friday, September 14, 2018 11:35 AM
Page 42 of 118
Instrument and control functions
3-28
3
EAU13222
Fuel
Make sure there is sufficient gasoline in
the tank.
WARNING
EWA10882
Gasoline an d g asoline vapors are
extremely flamma ble. To avoi d fires
an d explosions an d to re duce the
risk of injury when refuelin g, follow
these instructions.
1. Before refueling, turn off the en- gine and be sure that no one is sit-
ting on the vehicle. Never refuel
while smoking, or while in the vi-
cinity of sparks, open flames, or
other sources of ignition such as
the pilot lights of water heaters
and clothes dryers.
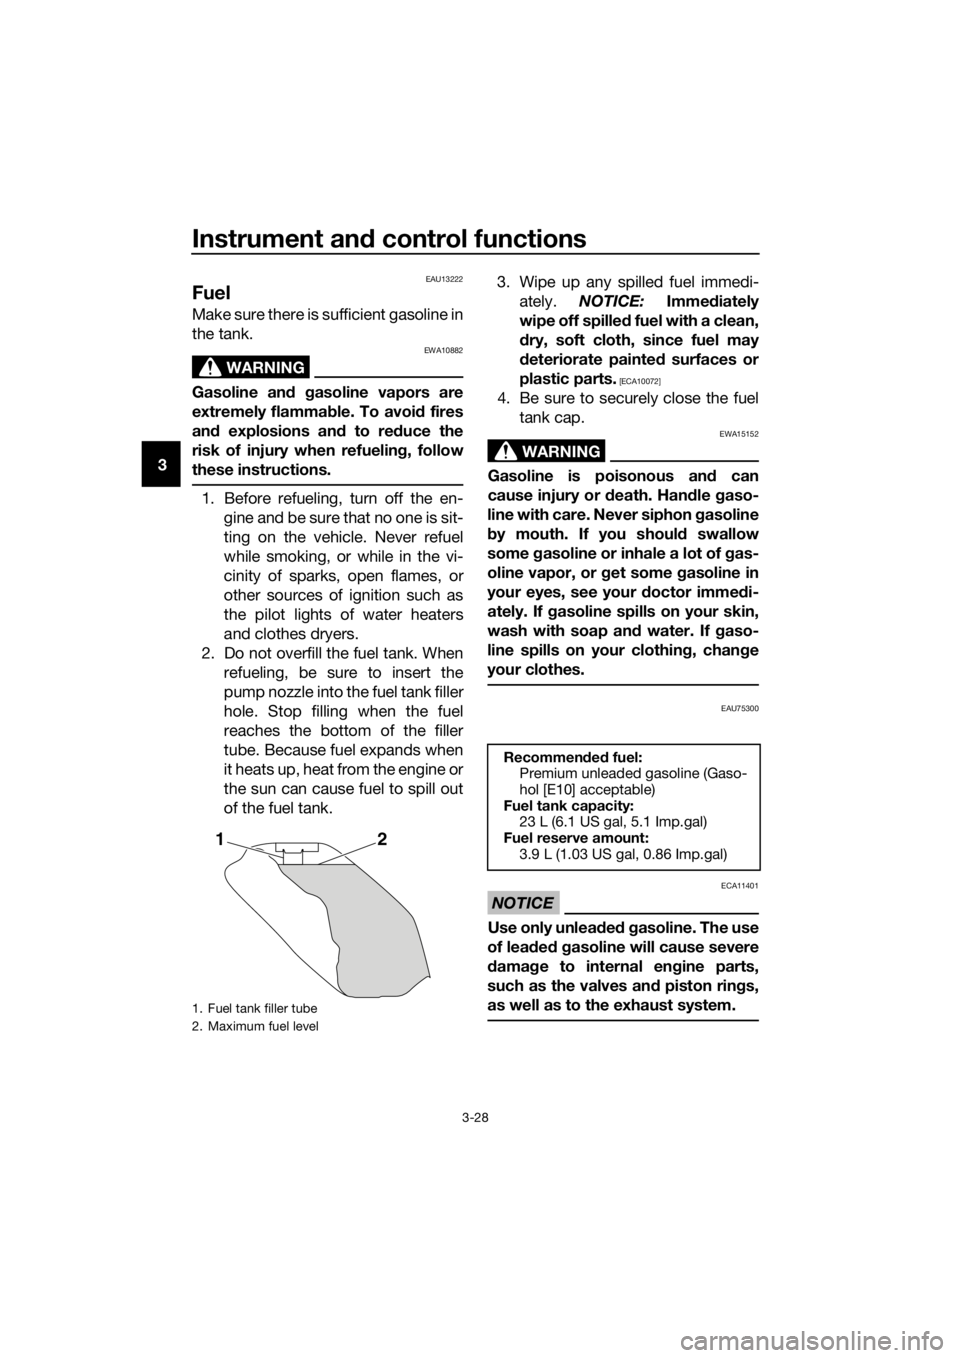
2. Do not overfill the fuel tank. When refueling, be sure to insert the
pump nozzle into the fuel tank filler
hole. Stop filling when the fuel
reaches the bottom of the filler
tube. Because fuel expands when
it heats up, heat from the engine or
the sun can cause fuel to spill out
of the fuel tank. 3. Wipe up any spilled fuel immedi-
ately. NOTICE: Immediately
wipe off spille d fuel with a clean,
d ry, soft cloth, since fuel may
d eteriorate painte d surfaces or
plastic parts.
[ECA10072]
4. Be sure to securely close the fuel tank cap.
WARNING
EWA15152
Gasoline is poisonous an d can
cause injury or death. Han dle gaso-
line with care. Never siphon gasoline
b y mouth. If you shoul d swallow
some gasoline or inhale a lot of gas-
oline vapor, or get some gasoline in
your eyes, see your doctor imme di-
ately. If gasoline spills on your skin,
wash with soap an d water. If gaso-
line spills on your clothin g, chan ge
your clothes.
EAU75300
NOTICE
ECA11401
Use only unlea ded g asoline. The use
of lead ed g asoline will cause severe
d amag e to internal en gine parts,
such as the valves an d piston rin gs,
as well as to the exhaust system.
1. Fuel tank filler tube
2. Maximum fuel level
21
Recommen ded fuel:
Premium unleaded gasoline (Gaso-
hol [E10] acceptable)
Fuel tank capacity: 23 L (6.1 US gal, 5.1 Imp.gal)
Fuel reserve amount:
3.9 L (1.03 US gal, 0.86 Imp.gal)
UBP8E1E0.book Page 28 Friday, September 14, 2018 11:35 AM
Page 44 of 118
Instrument and control functions
3-30
3
EAU13434
Catalytic converter
This model is equipped with a catalytic
converter in the exhaust system.
WARNING
EWA10863
The exhaust system is hot after op-
eration. To prevent a fire hazar d or
b urns:
Do not park the vehicle near
possi ble fire hazard s such as
g rass or other materials that
easily burn.
Park the vehicle in a place
where pe destrians or chil dren
are not likely to touch the hot
exhaust system.
Make sure that the exhaust sys-
tem has coole d down before
d oin g any maintenance work.
Do not allow the en gine to i dle
more than a few minutes. Lon g
i d lin g can cause a b uild-up of
heat.
NOTICE
ECA10702
Use only unlea ded g asoline. The use
of lead ed g asoline will cause unre-
pairab le dama ge to the catalytic
converter.
EAU49445
Ri der seat
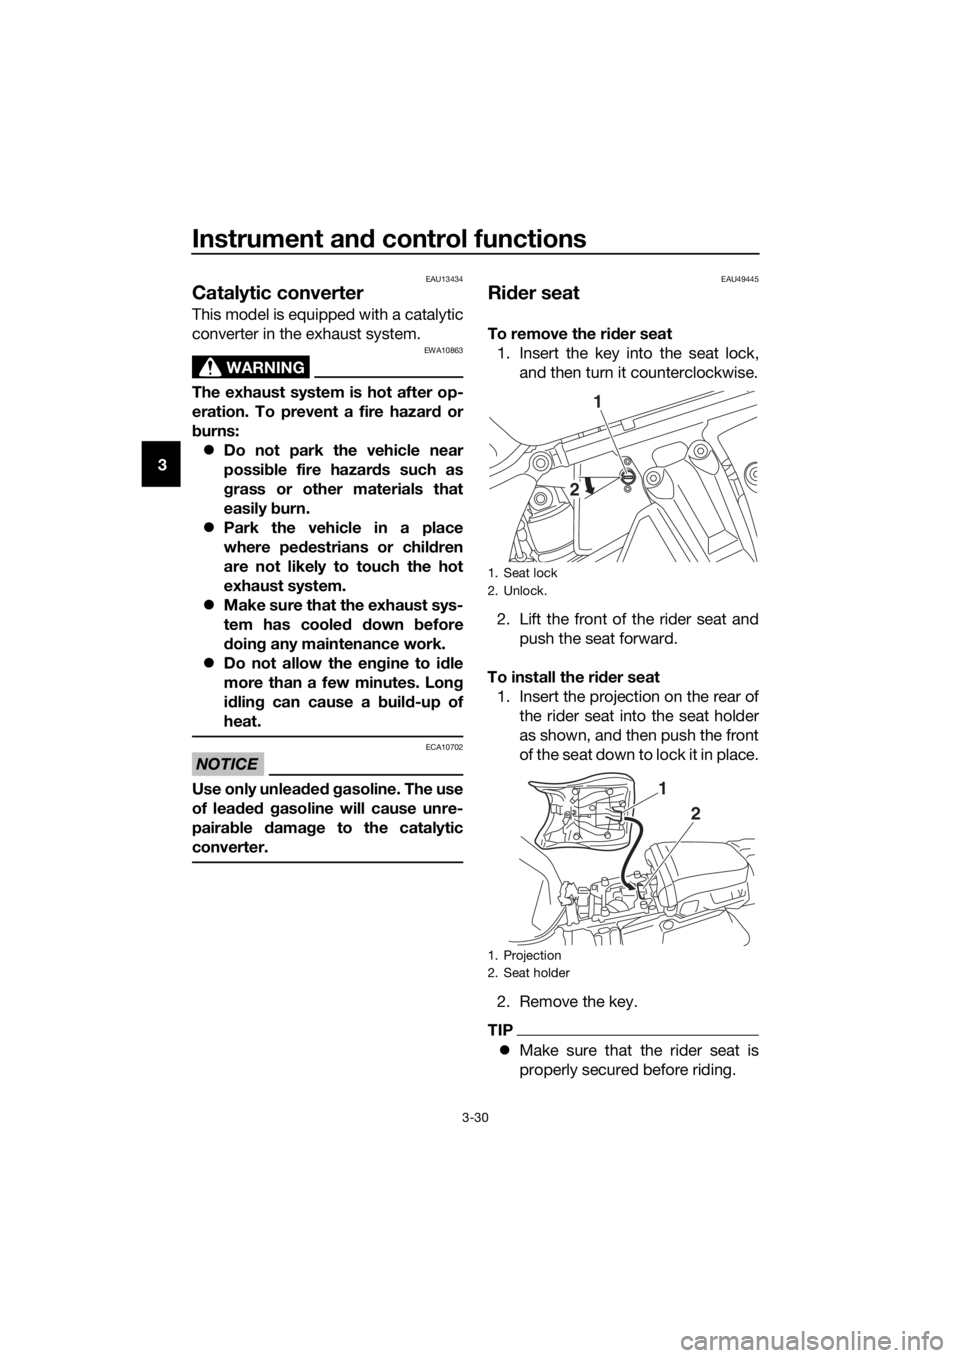
To remove the ri der seat
1. Insert the key into the seat lock, and then turn it counterclockwise.
2. Lift the front of the rider seat and push the seat forward.
To install the ri der seat
1. Insert the projection on the rear of the rider seat into the seat holder
as shown, and then push the front
of the seat down to lock it in place.
2. Remove the key.
TIP
Make sure that the rider seat is
properly secured before riding.
1. Seat lock
2. Unlock.
1. Projection
2. Seat holder
1
2
1
2
UBP8E1E0.book Page 30 Friday, September 14, 2018 11:35 AM
Page 46 of 118
Instrument and control functions
3-32
3
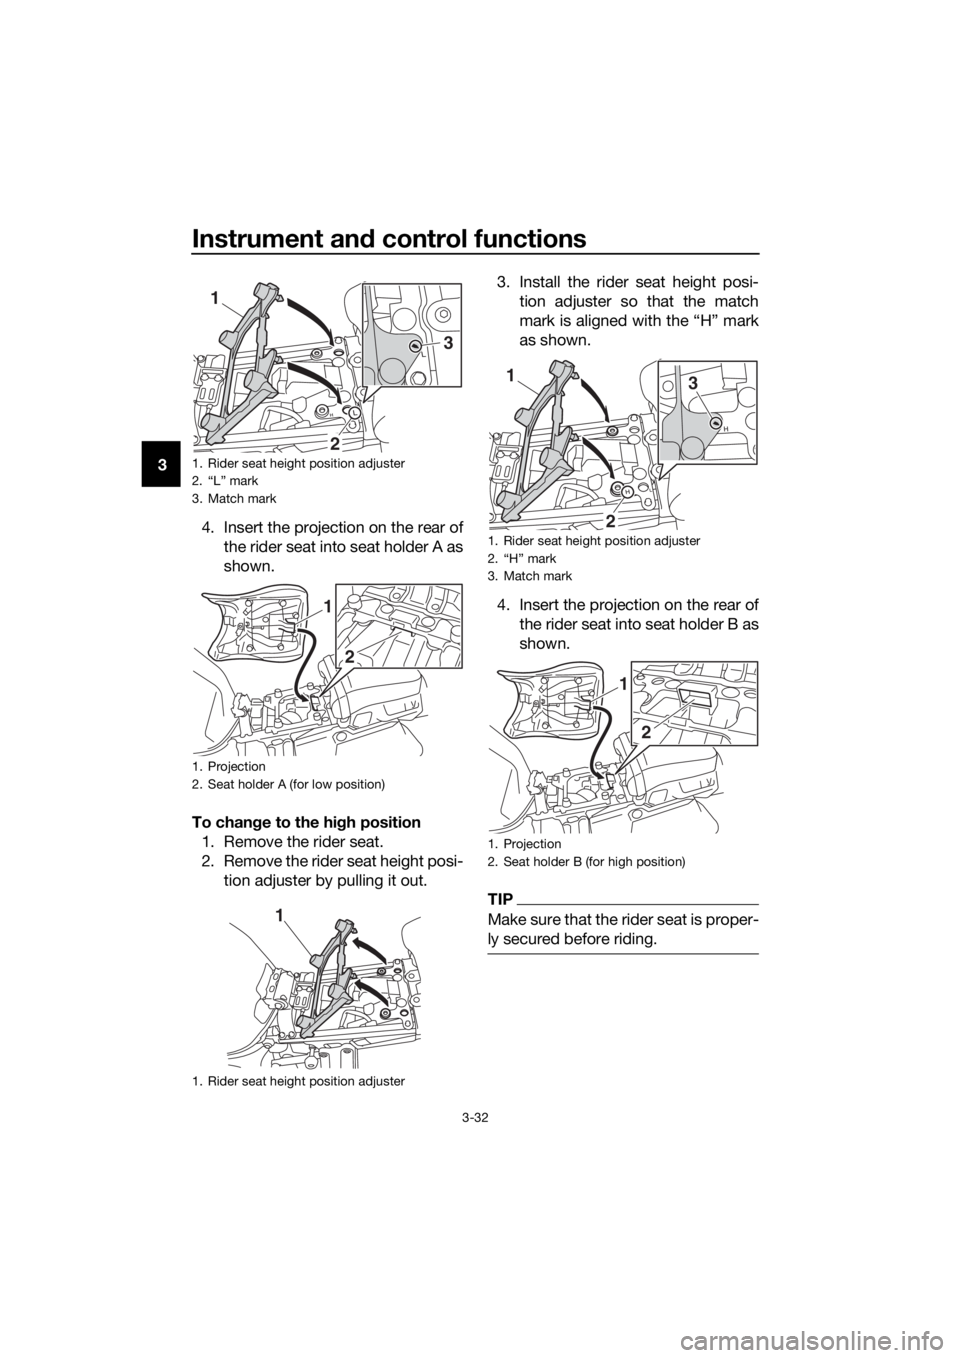
4. Insert the projection on the rear ofthe rider seat into seat holder A as
shown.
To chan ge to the hi gh position
1. Remove the rider seat.
2. Remove the rider seat height posi- tion adjuster by pulling it out. 3. Install the rider seat height posi-
tion adjuster so that the match
mark is aligned with the “H” mark
as shown.
4. Insert the projection on the rear of the rider seat into seat holder B as
shown.
TIP
Make sure that the rider seat is proper-
ly secured before riding.
1. Rider seat height position adjuster
2. “L” mark
3. Match mark
1. Projection
2. Seat holder A (for low position)
1. Rider seat height position adjuster
3
2
1
1
2
1
1. Rider seat height position adjuster
2. “H” mark
3. Match mark
1. Projection
2. Seat holder B (for high position)
2 3
1
1
2
UBP8E1E0.book Page 32 Friday, September 14, 2018 11:35 AM
Page 84 of 118
Periodic maintenance an d a djustment
6-21
6 This model is equipped with tubeless
tires and tire air valves.
Tires age, even if they have not been
used or have only been used occasion-
ally. Cracking of the tread and sidewall
rubber, sometimes accompanied by
carcass deformation, is an evidence of
ageing. Old and aged tires shall be
checked by tire specialists to ascertain
their suitability for further use.
WARNING
EWA10902
The front an d rear tires shoul d
b e of the same make an d d e-
si gn, otherwise the han dlin g
characteristics of the motorcy-
cle may be different, which
coul d lea d to an acci dent.
Always make sure that the valve
caps are securely installe d to
prevent air pressure leaka ge.
Use only the tire valves an d
valve cores liste d below to
avoi d tire d eflation durin g a ri de.
After extensive tests, only the tires list-
ed below have been approved for this
model by Yamaha.
WARNING
EWA10601
This motorcycle is fitte d with super-
hi gh-spee d tires. Note the followin g
points in or der to make the most ef-
ficient use of these tires. Use only the specified replace-
ment tires. Other tires may run
the dan ger of bursting at super
hi gh spee ds.
Bran d-new tires can have a rel-
atively poor g rip on certain roa d
surfaces until they have been
“ b roken in”. Therefore, it is a d-
visa ble before doin g any hi gh-
speed ridin g to ri de conserva-
tively for approximately 100 km
(60 mi) after installin g a new tire.
The tires must be warmed up
b efore a hi gh-spee d run.
Always a djust the tire air pres-
sure accor din g to the operatin g
con ditions.
Front tire:
Size:
110/80R19M/C 59V
Manufacturer/model: BRIDGESTONE/BW501
Rear tire: Size:150/70R17M/C 69V
Manufacturer/model: BRIDGESTONE/BW502
FRONT an d REAR:
Tire air valve: TR412
Valve core:
#9100 (original)
UBP8E1E0.book Page 21 Friday, September 14, 2018 11:35 AM
Page 89 of 118

Periodic maintenance an d a djustment
6-26
6
EAU22754
Chan gin g the brake an d
clutch flui ds
Have a Yamaha dealer change the
brake and clutch fluids at the intervals
specified in the periodic maintenance
and lubrication chart. In addition, have
the oil seals of the brake and clutch
master cylinders and calipers as well
as the brake and clutch hoses replaced
at the intervals listed below or whenev-
er they are damaged or leaking.
Oil seals: Replace every two
years.
Brake and clutch hoses: Replace
every four years.
EAU23115
Checkin g an d lu bricatin g the
throttle grip an d ca ble
The operation of the throttle grip
should be checked before each ride. In
addition, the cable should be lubricat-
ed by a Yamaha dealer at the intervals
specified in the periodic maintenance
chart.
The throttle cable is equipped with a
rubber cover. Make sure that the cover
is securely installed. Even though the
cover is installed correctly, it does not
completely protect the cable from wa-
ter entry. Therefore, use care not to
pour water directly onto the cover or
cable when washing the vehicle. If the
cable or cover becomes dirty, wipe
clean with a moist cloth.
UBP8E1E0.book Page 26 Friday, September 14, 2018 11:35 AM
Page 92 of 118
Periodic maintenance an d a djustment
6-29
6
EAU23273
Checkin g the front fork
The condition and operation of the
front fork must be checked as follows
at the intervals specified in the periodic
maintenance and lubrication chart.
To check the con dition
Check the inner tubes for scratches,
damage and excessive oil leakage.
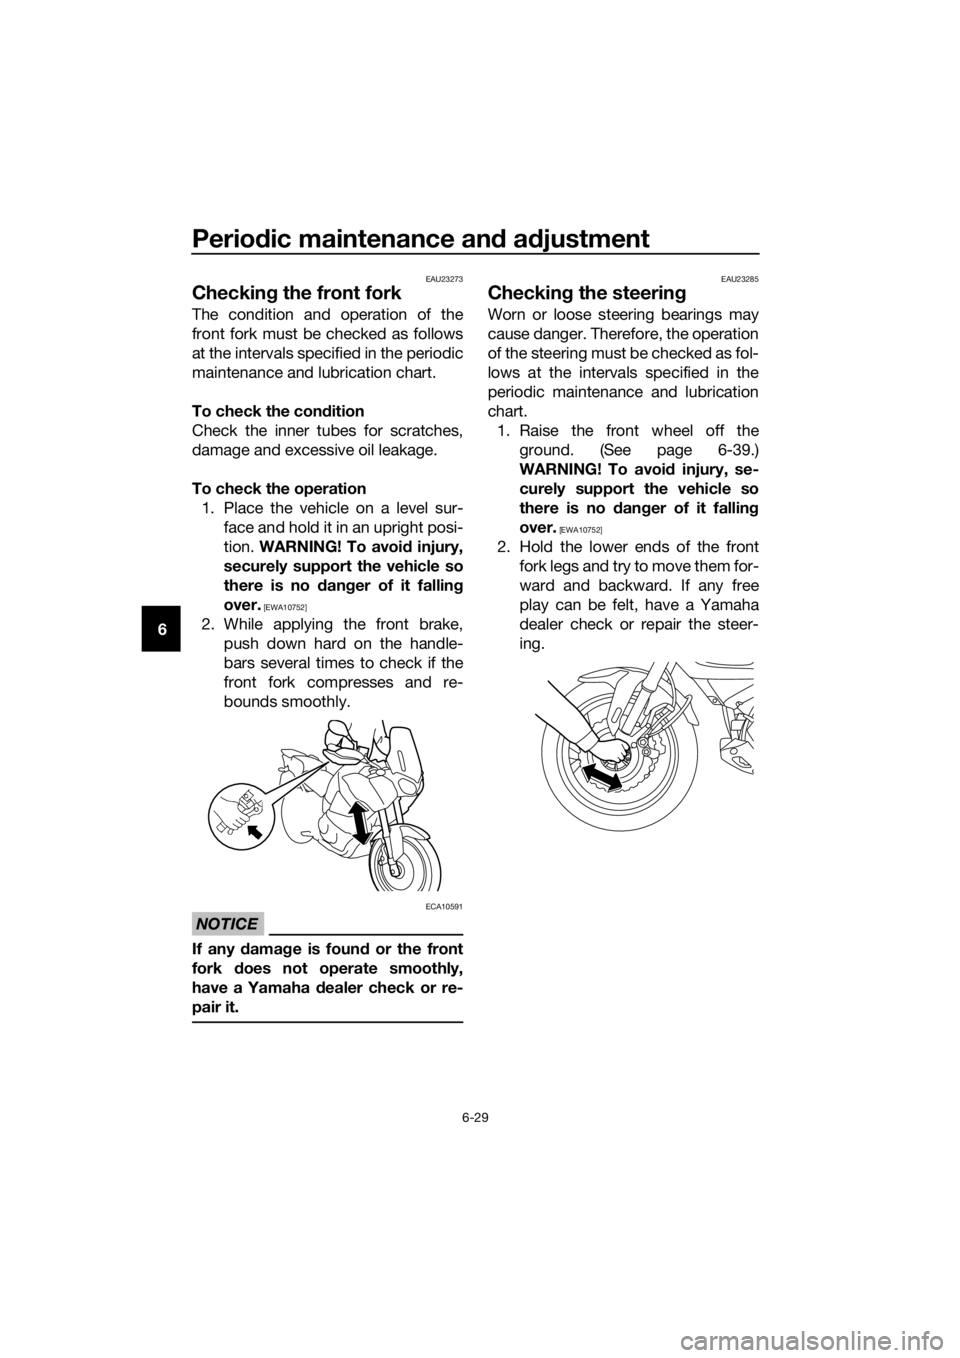
To check the operation 1. Place the vehicle on a level sur- face and hold it in an upright posi-
tion. WARNING! To avoi d injury,
securely support the vehicle so
there is no dan ger of it fallin g
over.
[EWA10752]
2. While applying the front brake, push down hard on the handle-
bars several times to check if the
front fork compresses and re-
bounds smoothly.
NOTICE
ECA10591
If any d amage is foun d or the front
fork does not operate smoothly,
have a Yamaha dealer check or re-
pair it.
EAU23285
Checkin g the steerin g
Worn or loose steering bearings may
cause danger. Therefore, the operation
of the steering must be checked as fol-
lows at the intervals specified in the
periodic maintenance and lubrication
chart.
1. Raise the front wheel off the ground. (See page 6-39.)
WARNING! To avoi d injury, se-
curely support the vehicle so
there is no dan ger of it fallin g
over.
[EWA10752]
2. Hold the lower ends of the front fork legs and try to move them for-
ward and backward. If any free
play can be felt, have a Yamaha
dealer check or repair the steer-
ing.
UBP8E1E0.book Page 29 Friday, September 14, 2018 11:35 AM