brake light YAMAHA XT1200ZE 2015 Owners Manual
[x] Cancel search | Manufacturer: YAMAHA, Model Year: 2015, Model line: XT1200ZE, Model: YAMAHA XT1200ZE 2015Pages: 118, PDF Size: 3.13 MB
Page 6 of 118

TABLE OF CONTENTSSAFETY INFORMATION.................. 1-1
DESCRIPTION .................................. 2-1
Left view ......................................... 2-1
Right view ....................................... 2-2
Controls and instruments ............... 2-3
INSTRUMENT AND CONTROL
FUNCTIONS ...................................... 3-1
Immobilizer system......................... 3-1
Main switch/steering lock............... 3-2
Indicator lights and warning lights............................................ 3-4
Cruise control system..................... 3-7
Multi-function meter unit .............. 3-10
D-mode (drive mode).................... 3-24
Handlebar switches ...................... 3-24
Clutch lever .................................. 3-26
Shift pedal .................................... 3-27
Brake lever.................................... 3-27
Brake pedal .................................. 3-28
ABS .............................................. 3-28
Traction control system ................ 3-29
Fuel tank cap ................................ 3-31
Fuel ............................................... 3-32
Fuel tank breather hose and
overflow hose ............................ 3-33
Catalytic converter ....................... 3-33
Rider seat ..................................... 3-34
Adjusting the rider seat height...... 3-35
Windshield .................................... 3-36 Adjusting the front and rear
suspension ................................ 3-37
Carriers.......................................... 3-42
Luggage strap holders .................. 3-42
Sidestand ...................................... 3-43
Ignition circuit cut-off system ....... 3-43
Auxiliary DC jack ........................... 3-45
FOR YOUR SAFETY –
PRE-OPERATION CHECKS ............. 4-1
OPERATION AND IMPORTANT
RIDING POINTS ................................ 5-1
Starting the engine .......................... 5-1
Shifting ............................................ 5-2
Tips for reducing fuel consumption ................................ 5-3
Engine break-in ............................... 5-3
Parking ............................................ 5-4
PERIODIC MAINTENANCE AND
ADJUSTMENT ................................... 6-1
Owner’s tool kit ............................... 6-2
Periodic maintenance chart for the
emission control system .............. 6-3
General maintenance and
lubrication chart ........................... 6-4
Removing and installing cowlings... 6-8
Checking the spark plugs ............. 6-10
Engine oil and oil filter cartridge.... 6-11
Final gear oil .................................. 6-14 Coolant ......................................... 6-15
Air filter element ............................ 6-17
Checking the engine idling
speed ........................................ 6-17
Checking the throttle grip free
play ............................................ 6-17
Valve clearance............................. 6-18
Tires .............................................. 6-18
Spoke wheels ............................... 6-20
Clutch lever................................... 6-21
Checking the brake lever free play ............................................ 6-21
Brake light switches ..................... 6-22
Checking the front and rear brake pads .......................................... 6-22
Checking the brake fluid level ...... 6-23
Changing the brake and clutch fluids .......................................... 6-24
Checking and lubricating the throttle grip and cable ............... 6-24
Checking and lubricating the brake and shift pedals............... 6-25
Checking and lubricating the
brake and clutch levers ............. 6-25
Checking and lubricating the centerstand and sidestand........ 6-26
Lubricating the swingarm pivots......................................... 6-27
Checking the front fork ................. 6-27
Checking the steering................... 6-28
Checking the wheel bearings ....... 6-28U2KBE1E0.book Page 1 Monday, August 18, 2014 9:42 AM
Page 7 of 118

TABLE OF CONTENTS
Battery ...........................................6-28
Replacing the fuses .......................6-30
Replacing a headlight bulb............6-31
Replacing an auxiliary light bulb....6-33
Turn signal light and tail/brake light ............................................6-35
Replacing a license plate light bulb ............................................6-35
Troubleshooting ............................6-36
Troubleshooting charts .................6-37
MOTORCYCLE CARE AND
STORAGE ..........................................7-1
Matte color caution .........................7-1
Care .................................................7-1
Storage ............................................7-4
SPECIFICATIONS ..............................8-1
CONSUMER INFORMATION ............9-1
Identification numbers .....................9-1
INDEX ...............................................10-1
U2KBE1E0.book Page 2 Monday, August 18, 2014 9:42 AM
Page 19 of 118
INSTRUMENT AND CONTROL FUNCTIONS
3-4
3
EAU49397
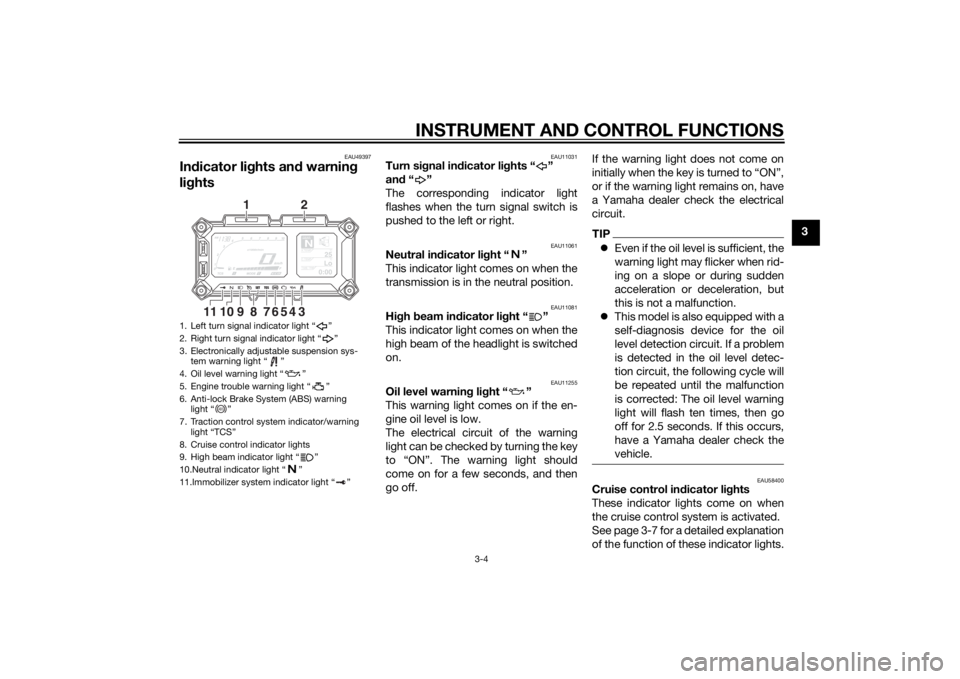
Indicator lig hts and warning
lig hts
EAU11031
Turn si gnal in dicator li ghts “ ”
an d“”
The corresponding indicator light
flashes when the turn signal switch is
pushed to the left or right.
EAU11061
Neutral in dicator li ght “ ”
This indicator light comes on when the
transmission is in the neutral position.
EAU11081
Hi gh beam in dicator li ght “ ”
This indicator light comes on when the
high beam of the headlight is switched
on.
EAU11255
Oil level warnin g lig ht “ ”
This warning light comes on if the en-
gine oil level is low.
The electrical circuit of the warning
light can be checked by turning the key
to “ON”. The warning light should
come on for a few seconds, and then
go off. If the warning light does not come on
initially when the key is turned to “ON”,
or if the warning light remains on, have
a Yamaha dealer check the electrical
circuit.
TIP
Even if the oil level is sufficient, the
warning light may flicker when rid-
ing on a slope or during sudden
acceleration or deceleration, but
this is not a malfunction.
This model is also equipped with a
self-diagnosis device for the oil
level detection circuit. If a problem
is detected in the oil level detec-
tion circuit, the following cycle will
be repeated until the malfunction
is corrected: The oil level warning
light will flash ten times, then go
off for 2.5 seconds. If this occurs,
have a Yamaha dealer check the
vehicle.
EAU58400
Cruise control in dicator li ghts
These indicator lights come on when
the cruise control system is activated.
See page 3-7 for a detailed explanation
of the function of these indicator lights.
1. Left turn signal indicator light “ ”
2. Right turn signal indicator light “ ”
3. Electronically adjustable suspension sys- tem warning light “ ”
4. Oil level warning light “ ”
5. Engine trouble warning light “ ”
6. Anti-lock Brake System (ABS) warning light “ ”
7. Traction control system indicator/warning light “TCS”
8. Cruise control indicator lights
9. High beam indicator light “ ”
10.Neutral indicator light “ ”
11.Immobilizer system indicator light “ ”
GEARN
25
A.TEMP ˚C
Lo
C.TEMP˚C
0:00
TIME TRIP34567
9
8
1011
1
2
ABS
U2KBE1E0.book Page 4 Monday, August 18, 2014 9:42 AM
Page 20 of 118
INSTRUMENT AND CONTROL FUNCTIONS
3-5
3The electrical circuit of these indicator
lights can be checked by turning the
key to “ON”. These indicator lights
should come on for a few seconds,
and then go off.
If an indicator light does not come on
initially when the key is turned to “ON”,
or if an indicator light remains on, have
a Yamaha dealer check the electrical
circuit.
EAU59110
En
gine trou ble warnin g lig ht “ ”
This warning light comes on or flashes
if a problem is detected in the electrical
circuit monitoring the engine. If this oc-
curs, have a Yamaha dealer check the
self-diagnosis system. (See page 3-23
for an explanation of the self-diagnosis
device.)
The electrical circuit of the warning
light can be checked by turning the key
to “ON”. The warning light should
come on for a few seconds, and then
go off. If the warning light does not come on
initially when the key is turned to “ON”,
or if the warning light remains on, have
a Yamaha dealer check the electrical
circuit.
TIPThe engine trouble warning light will
come on while the start switch is
pushed, but this does not indicate a
malfunction.
EAU59120
ABS warnin
g li ght “ ”
In normal operation, the ABS warning
light comes on when the key is turned
to “ON”, and goes off after traveling at
a speed of 10 km/h (6 mi/h) or higher.
If the ABS warning light: does not come on when the key is
turned to “ON”
comes on or flashes while riding
does not go off after traveling at a
speed of 10 km/h (6 mi/h) or high-
er
The ABS may not work correctly. If any
of the above occurs, have a Yamaha
dealer check the system as soon as
possible. (See page 3-28 for an expla-
nation of the ABS.)
WARNING
EWA16041
If the ABS warnin g li ght does not g o
off after travelin g at a speed of 10
km/h (6 mi/h) or hi gher, or if the
warnin g li ght comes on or flashes
while ri din g, the brake system re-
verts to conventional brakin g. If ei-
ther of the a bove occurs, or if the
warnin g li ght does not come on at
all, use extra caution to avoi d possi-
b le wheel lock durin g emer gency
b rakin g. Have a Yamaha d ealer
check the brake system an d electri-
cal circuits as soon as possi ble.TIPThe ABS warning light will also come
on while the start switch is pushed, but
this does not indicate a malfunction.
EAU58902
Traction control system in dica-
tor/warnin g lig ht “TCS”
This indicator/warning light flashes
when the traction control system en-
gages.
ABS
U2KBE1E0.book Page 5 Monday, August 18, 2014 9:42 AM
Page 23 of 118
INSTRUMENT AND CONTROL FUNCTIONS
3-8
3
cruise control setting switch down will
increase or decrease the speed contin-
uously until the switch is released.
You can also manually increase your
traveling speed using the throttle. After
you have accelerated, you can set a
new cruising speed by pushing the
“SET–” side of the setting switch. If you
do not set a new cruising speed, when
you return the throttle grip, the vehicle
will decelerate to the previously set
cruising speed.
Deactivatin
g the cruise control sys-
tem
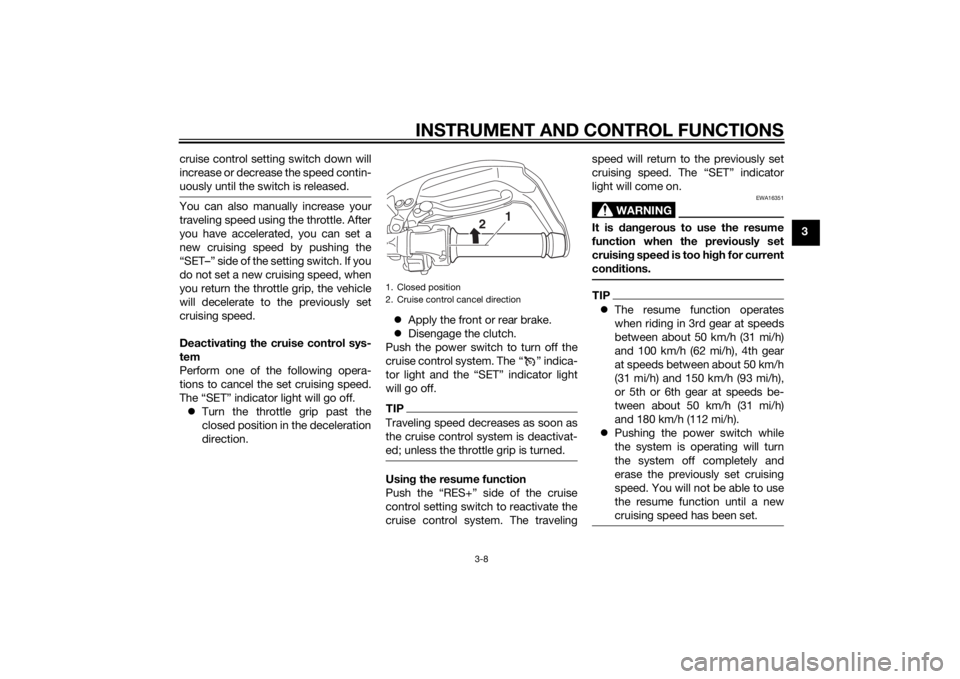
Perform one of the following opera-
tions to cancel the set cruising speed.
The “SET” indicator light will go off. Turn the throttle grip past the
closed position in the deceleration
direction.
Apply the front or rear brake.
Disengage the clutch.
Push the power switch to turn off the
cruise control system. The “ ” indica-
tor light and the “SET” indicator light
will go off.
TIPTraveling speed decreases as soon as
the cruise control system is deactivat-
ed; unless the throttle grip is turned.Usin g the resume function
Push the “RES+” side of the cruise
control setting switch to reactivate the
cruise control system. The traveling speed will return to the previously set
cruising speed. The “SET” indicator
light will come on.
WARNING
EWA16351
It is d
angerous to use the resume
function when the previously set
cruisin g speed is too hi gh for current
con ditions.TIP The resume function operates
when riding in 3rd gear at speeds
between about 50 km/h (31 mi/h)
and 100 km/h (62 mi/h), 4th gear
at speeds between about 50 km/h
(31 mi/h) and 150 km/h (93 mi/h),
or 5th or 6th gear at speeds be-
tween about 50 km/h (31 mi/h)
and 180 km/h (112 mi/h).
Pushing the power switch while
the system is operating will turn
the system off completely and
erase the previously set cruising
speed. You will not be able to use
the resume function until a new
cruising speed has been set.
1. Closed position
2. Cruise control cancel direction
2
1
U2KBE1E0.book Page 8 Monday, August 18, 2014 9:42 AM
Page 24 of 118
INSTRUMENT AND CONTROL FUNCTIONS
3-9
3Automatic deactivation of the cruise
control systemThe cruise control system for this mod-
el is electronically controlled and is
linked with the other control systems.
The cruise control system will auto-
matically become deactivated under
the following conditions:
The cruise control system is not
able to maintain the set cruising
speed.
Wheel slip or wheel spin is detect-
ed. (If the traction control system
has not been turned off, the trac-
tion control system will work.)
The start/engine stop switch is set
to the “ ” position.
The engine stalls.
The sidestand is lowered.
When traveling with a set cruising
speed, if the cruise control system is
deactivated under the above condi-
tions, the “ ” indicator light will go off
and the “SET” indicator light will flash
for 4 seconds, and then go off.
When not traveling with a set cruising
speed, if the start/engine stop switch is
set to the “ ” position, the engine stalls, or the sidestand is lowered, then
the “ ” indicator light will go off (the
“SET” indicator light will not flash).
If the cruise control system is automat-
ically deactivated, please stop and
confirm that your vehicle is in good op-
erating condition.
Before using the cruise control system
again, activate it using the power
switch.
TIPIn some cases, the cruise control sys-
tem may not be able to maintain the set
cruising speed when the vehicle is
traveling uphill or downhill.
When the vehicle is traveling up-
hill, the actual traveling speed may
become lower than the set cruis-
ing speed. If this occurs, acceler-
ate to the desired traveling speed
using the throttle.
When the vehicle is traveling
downhill, the actual traveling
speed may become higher than
the set cruising speed. If this oc-
curs, the setting switch cannot be
used to adjust the set cruising
speed. To reduce the traveling speed, apply the brakes. When
the brakes are applied, the cruise
control system will become deac-
tivated.
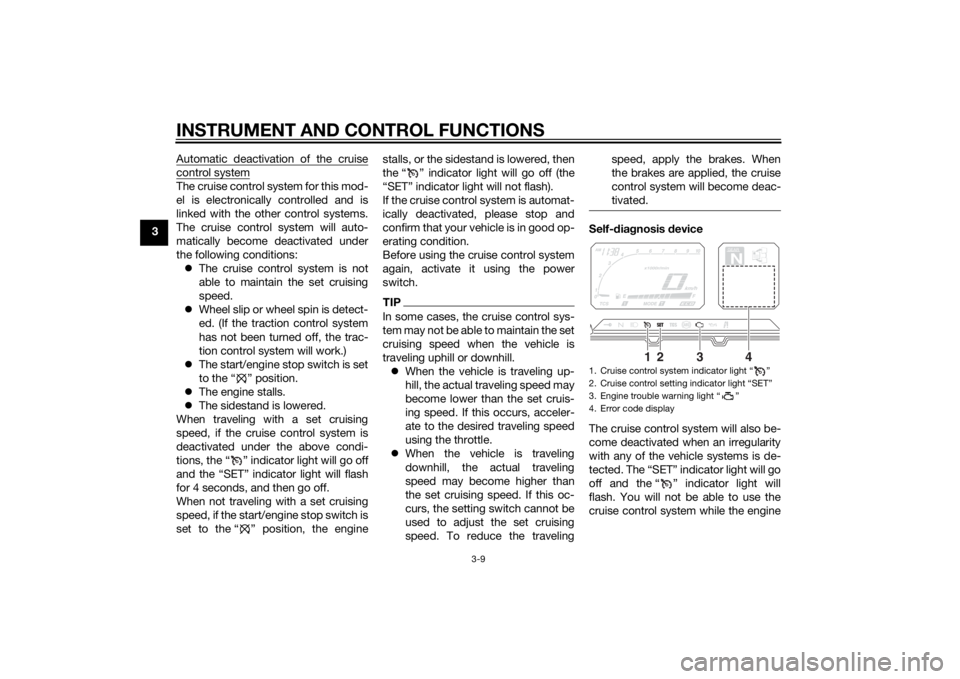
Self-d
iagnosis device
The cruise control system will also be-
come deactivated when an irregularity
with any of the vehicle systems is de-
tected. The “SET” indicator light will go
off and the “ ” indicator light will
flash. You will not be able to use the
cruise control system while the engine1. Cruise control system indicator light “ ”
2. Cruise control setting indicator light “SET”
3. Engine trouble warning light “ ”
4. Error code display
GEARN
25
A.TEMP ˚C
Lo
C.TEMP ˚C
0:00
TIME TRIP
1
2
3
4
U2KBE1E0.book Page 9 Monday, August 18, 2014 9:42 AM
Page 44 of 118
INSTRUMENT AND CONTROL FUNCTIONS
3-29
3
TIPThe ABS performs a self-diagno-
sis test each time the vehicle first
starts off after the key is turned to
“ON” and the vehicle has traveled
at a speed of 10 km/h (6 mi/h) or
higher. During this test, a “click-
ing” noise can be heard from un-
der the seat, and if the brake lever
or brake pedal is even slightly ap-
plied, a vibration can be felt at the
lever and pedal, but these do not
indicate a malfunction.
This ABS has a test mode which
allows the owner to experience
the pulsation at the brake lever or
brake pedal when the ABS is op-
erating. However, special tools are
required, so please consult your
Yamaha dealer.NOTICE
ECA16831
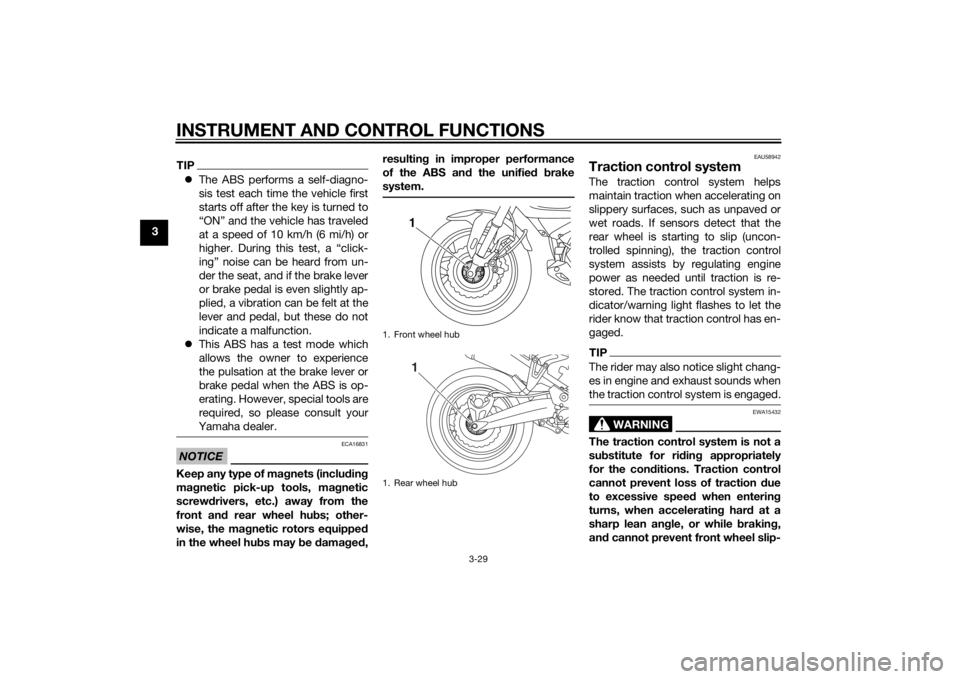
Keep any type of mag nets (includin g
ma gnetic pick-up tools, ma gnetic
screwd rivers, etc.) away from the
front an d rear wheel hu bs; other-
wise, the ma gnetic rotors equippe d
in the wheel hu bs may be damag ed , resultin
g in improper performance
of the ABS an d the unifie d b rake
system.
EAU58942
Traction control systemThe traction control system helps
maintain traction when accelerating on
slippery surfaces, such as unpaved or
wet roads. If sensors detect that the
rear wheel is starting to slip (uncon-
trolled spinning), the traction control
system assists by regulating engine
power as needed until traction is re-
stored. The traction control system in-
dicator/warning light flashes to let the
rider know that traction control has en-
gaged.TIPThe rider may also notice slight chang-
es in engine and exhaust sounds when
the traction control system is engaged.
WARNING
EWA15432
The traction control system is not a
su bstitute for rid ing appropriately
for the con ditions. Traction control
cannot prevent loss of traction due
to excessive speed when entering
turns, when acceleratin g har d at a
sharp lean an gle, or while brakin g,
an d cannot prevent front wheel slip-
1. Front wheel hub
1. Rear wheel hub
11
U2KBE1E0.book Page 29 Monday, August 18, 2014 9:42 AM
Page 88 of 118
PERIODIC MAINTENANCE AND ADJUSTMENT
6-22
6
EAU22283
Brake light switchesThe brake light, which is activated by
the brake pedal and brake lever,
should come on just before braking
takes effect. Since the brake light
switches are components of the cruise
control system, they must be adjusted
by a Yamaha dealer, who has the nec-
essary professional knowledge and ex-
perience.
EAU22393
Checkin g the front an d rear
b rake pa dsThe front and rear brake pads must be
checked for wear at the intervals spec-
ified in the periodic maintenance and
lubrication chart.
EAU36891
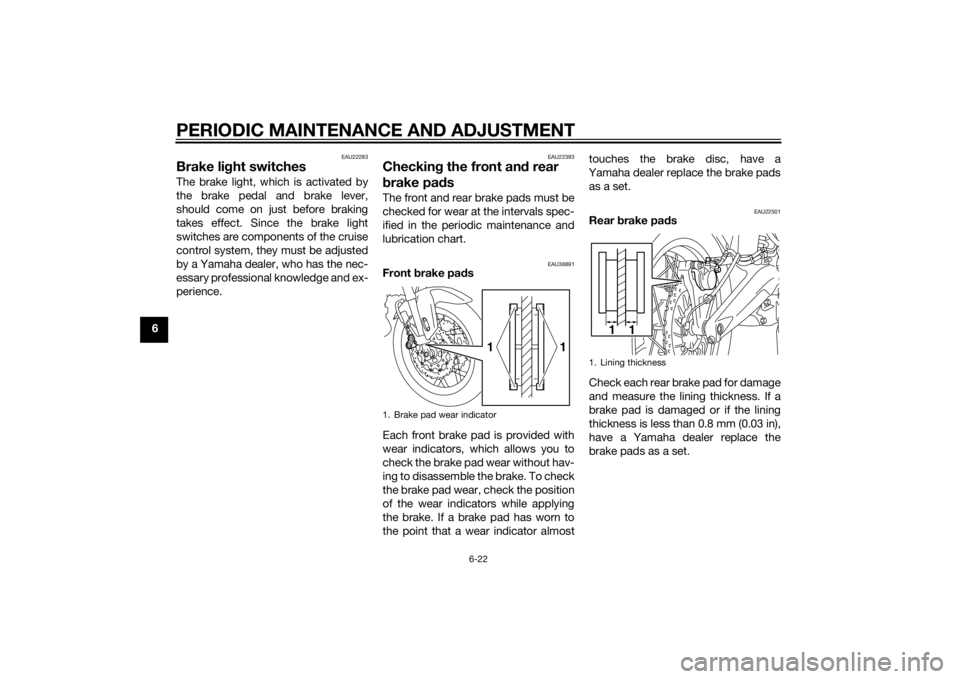
Front brake pa ds
Each front brake pad is provided with
wear indicators, which allows you to
check the brake pad wear without hav-
ing to disassemble the brake. To check
the brake pad wear, check the position
of the wear indicators while applying
the brake. If a brake pad has worn to
the point that a wear indicator almost touches the brake disc, have a
Yamaha dealer replace the brake pads as a set.
EAU22501
Rear brake pad s
Check each rear brake pad for damage
and measure the lining thickness. If a
brake pad is damaged or if the lining
thickness is less than 0.8 mm (0.03 in),
have a Yamaha dealer replace the
brake pads as a set.
1. Brake pad wear indicator
1
1
1. Lining thickness
11
U2KBE1E0.book Page 22 Monday, August 18, 2014 9:42 AM
Page 96 of 118
PERIODIC MAINTENANCE AND ADJUSTMENT
6-30
6
EAU58961
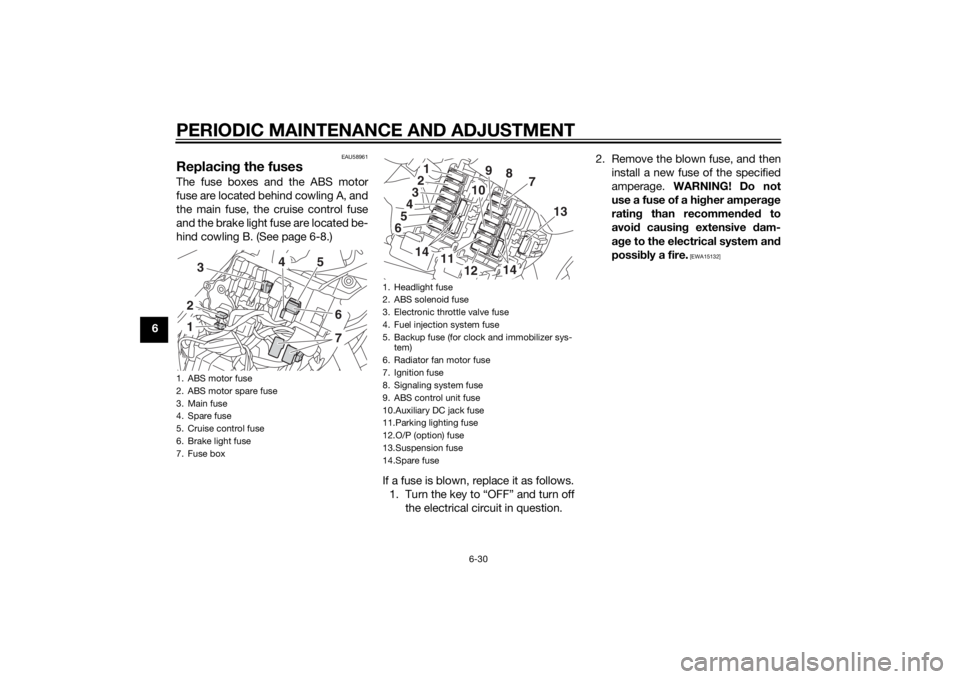
Replacing the fusesThe fuse boxes and the ABS motor
fuse are located behind cowling A, and
the main fuse, the cruise control fuse
and the brake light fuse are located be-
hind cowling B. (See page 6-8.)
If a fuse is blown, replace it as follows.1. Turn the key to “OFF” and turn off the electrical circuit in question. 2. Remove the blown fuse, and then
install a new fuse of the specified
amperage. WARNING! Do not
use a fuse of a hi gher ampera ge
ratin g than recommen ded to
avoi d causin g extensive d am-
a g e to the electrical system an d
possi bly a fire.
[EWA15132]
1. ABS motor fuse
2. ABS motor spare fuse
3. Main fuse
4. Spare fuse
5. Cruise control fuse
6. Brake light fuse
7. Fuse box123
5
67
4
1. Headlight fuse
2. ABS solenoid fuse
3. Electronic throttle valve fuse
4. Fuel injection system fuse
5. Backup fuse (for clock and immobilizer sys-
tem)
6. Radiator fan motor fuse
7. Ignition fuse
8. Signaling system fuse
9. ABS control unit fuse
10.Auxiliary DC jack fuse
11.Parking lighting fuse
12.O/P (option) fuse
13.Suspension fuse
14.Spare fuse
13456
2
7
8
9
10
14
13
11
12
14
U2KBE1E0.book Page 30 Monday, August 18, 2014 9:42 AM
Page 97 of 118
PERIODIC MAINTENANCE AND ADJUSTMENT
6-31
6
3. Turn the key to “ON” and turn on
the electrical circuit in question to
check if the device operates.
4. If the fuse immediately blows again, have a Yamaha dealer
check the electrical system.
EAU39014
Replacin g a hea dlig ht bul bThis model is equipped with halogen
bulb headlights. If a headlight bulb
burns out, replace it as follows.NOTICE
ECA10651
Take care not to d amage the follow-
in g parts:
Hea dlig ht bul b
Do not touch the glass part of
the hea dlig ht bul b to keep it free
from oil, otherwise the transpar-
ency of the glass, the luminosity
of the bul b, an d the bul b life will
b e a dversely affected . Thor-
ou ghly clean off any dirt an d fin-
g erprints on the head lig ht bul b
usin g a cloth moistene d with al-
cohol or thinner.
Hea dlig ht lens
Do not affix any type of tinted
film or stickers to the hea dlig ht
lens.
Do not use a hea dlig ht bul b of a
watta ge hi gher than specified .
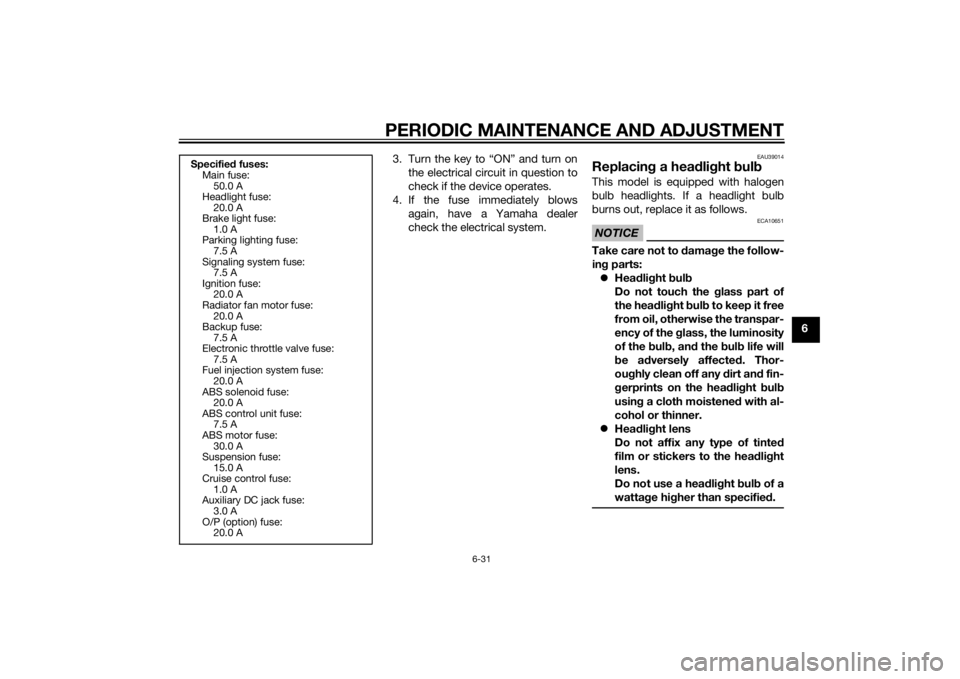
Specified fuses:
Main fuse:
50.0 A
Headlight fuse: 20.0 A
Brake light fuse: 1.0 A
Parking lighting fuse:
7.5 A
Signaling system fuse: 7.5 A
Ignition fuse: 20.0 A
Radiator fan motor fuse:
20.0 A
Backup fuse: 7.5 A
Electronic throttle valve fuse: 7.5 A
Fuel injection system fuse:
20.0 A
ABS solenoid fuse: 20.0 A
ABS control unit fuse: 7.5 A
ABS motor fuse:
30.0 A
Suspension fuse: 15.0 A
Cruise control fuse: 1.0 A
Auxiliary DC jack fuse:
3.0 A
O/P (option) fuse: 20.0 A
U2KBE1E0.book Page 31 Monday, August 18, 2014 9:42 AM