warning YAMAHA XV1600A 2001 User Guide
[x] Cancel search | Manufacturer: YAMAHA, Model Year: 2001, Model line: XV1600A, Model: YAMAHA XV1600A 2001Pages: 104, PDF Size: 20.37 MB
Page 35 of 104
PRE-OPERATION CHECKS
4-2
4
NOTE:@ Pre-operation checks should be made each time the motorcycle is used. Such an inspection can be accomplished in a very
short time; and the added safety it assures is more than worth the time involved. @
EWA00033
WARNING
@ If any item in the Pre-operation check list is not working properly, have it inspected and repaired before operating
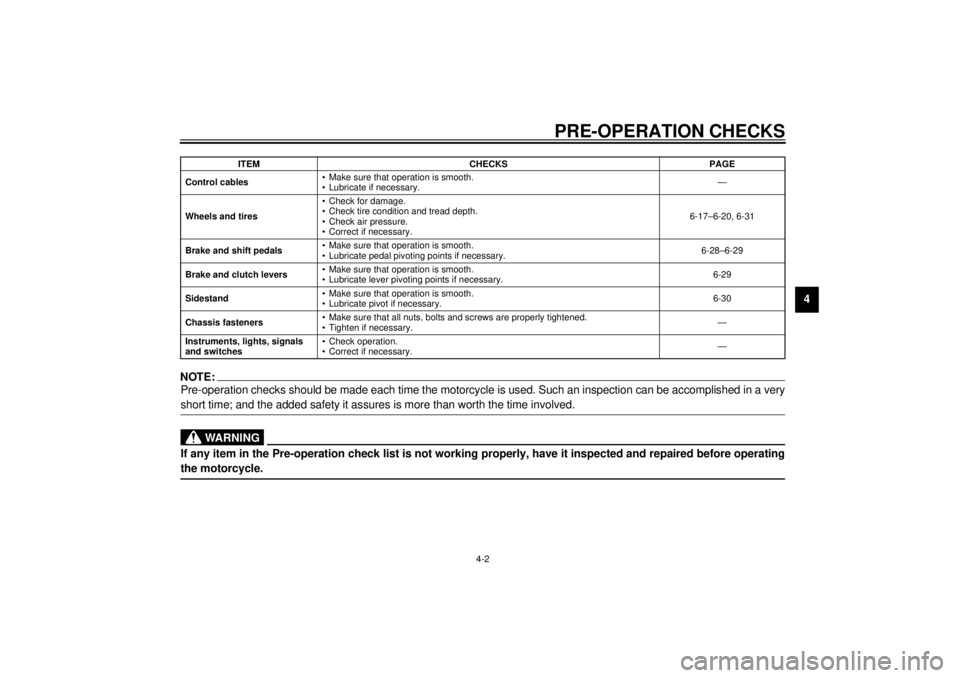
the motorcycle. @Control cables• Make sure that operation is smooth.
• Lubricate if necessary.—
Wheels and tires• Check for damage.
• Check tire condition and tread depth.
• Check air pressure.
• Correct if necessary.6-17–6-20, 6-31
Brake and shift pedals• Make sure that operation is smooth.
• Lubricate pedal pivoting points if necessary.6-28–6-29
Brake and clutch levers• Make sure that operation is smooth.
• Lubricate lever pivoting points if necessary.6-29
Sidestand• Make sure that operation is smooth.
• Lubricate pivot if necessary.6-30
Chassis fasteners• Make sure that all nuts, bolts and screws are properly tightened.
• Tighten if necessary.—
Instruments, lights, signals
and switches• Check operation.
• Correct if necessary.— ITEM CHECKS PAGE
E_5JA.book Page 2 Wednesday, September 13, 2000 6:06 PM
Page 38 of 104
5-1
5
EAU00372
5-OPERATION AND IMPORTANT RIDING POINTS
EAU00373
WARNING
@ l
Become thoroughly familiar
with all operating controls and
their functions before riding.
Consult a Yamaha dealer re-
garding any control or function
that you do not thoroughly un-
derstand.
l
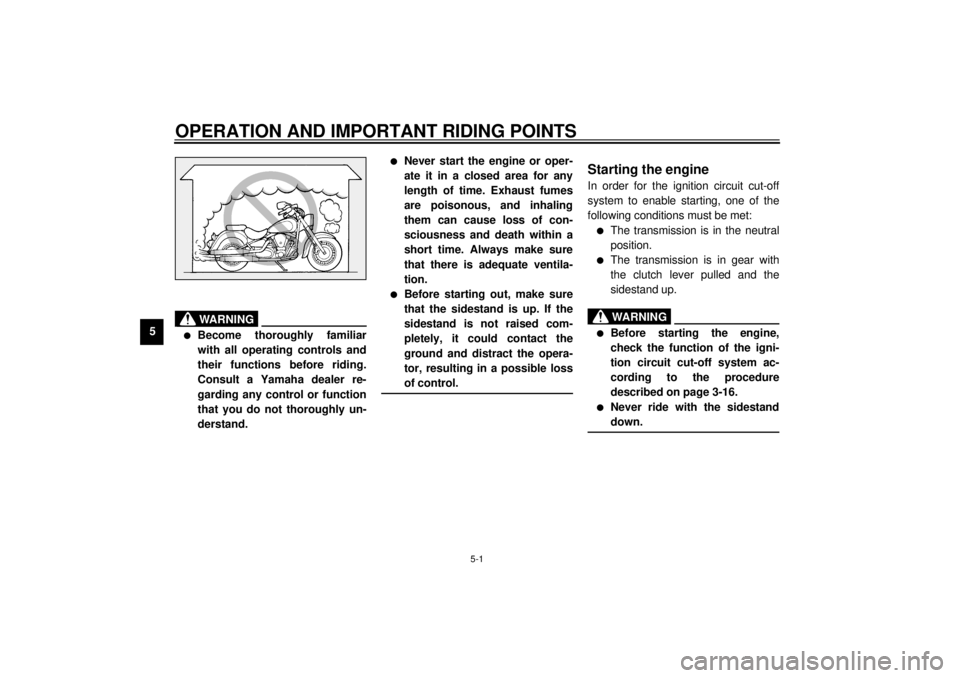
Never start the engine or oper-
ate it in a closed area for any
length of time. Exhaust fumes
are poisonous, and inhaling
them can cause loss of con-
sciousness and death within a
short time. Always make sure
that there is adequate ventila-
tion.
l
Before starting out, make sure
that the sidestand is up. If the
sidestand is not raised com-
pletely, it could contact the
ground and distract the opera-
tor, resulting in a possible loss
of control.
@
EAU03515*
Starting the engine In order for the ignition circuit cut-off
system to enable starting, one of the
following conditions must be met:l
The transmission is in the neutral
position.
l
The transmission is in gear with
the clutch lever pulled and the
sidestand up.
EW000054
WARNING
@ l
Before starting the engine,
check the function of the igni-
tion circuit cut-off system ac-
cording to the procedure
described on page 3-16.
l
Never ride with the sidestand
down.
@
E_5JA.book Page 1 Wednesday, September 13, 2000 6:06 PM
Page 43 of 104
OPERATION AND IMPORTANT RIDING POINTS
5-6
5
EAU00457
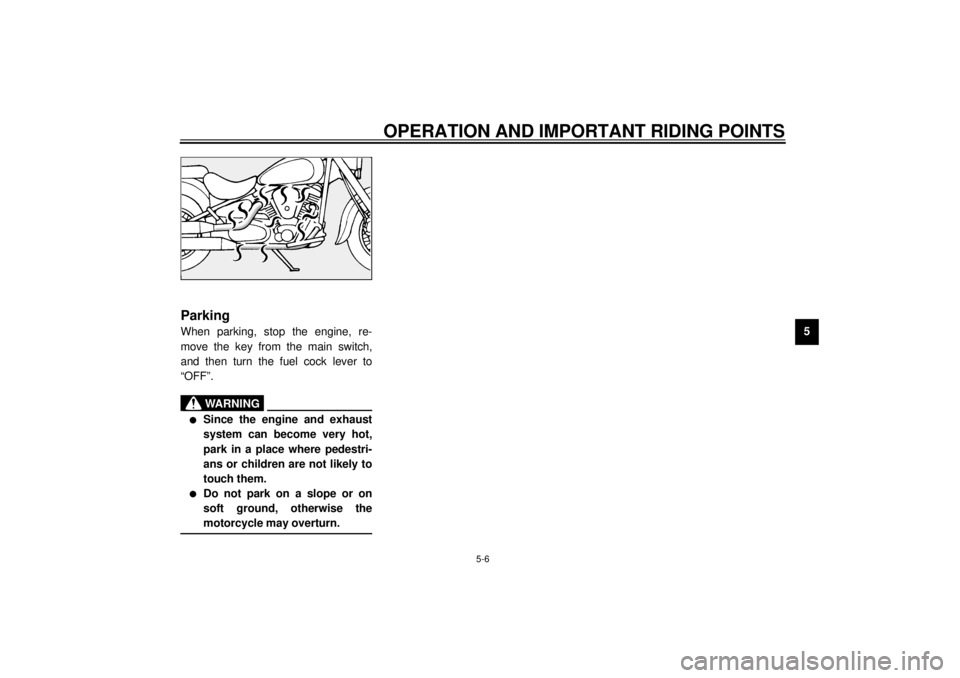
Parking When parking, stop the engine, re-
move the key from the main switch,
and then turn the fuel cock lever to
“OFF”.
EW000058
WARNING
@ l
Since the engine and exhaust
system can become very hot,
park in a place where pedestri-
ans or children are not likely to
touch them.
l
Do not park on a slope or on
soft ground, otherwise the
motorcycle may overturn.
@
E_5JA.book Page 6 Wednesday, September 13, 2000 6:06 PM
Page 46 of 104

6-1
6
EAU00462
6-PERIODIC MAINTENANCE AND MINOR REPAIR
EAU00464
Safety is an obligation of the owner.
Periodic inspection, adjustment and lu-
brication will keep your vehicle in the
safest and most efficient condition pos-
sible. The most important points of in-
spection, adjustment, and lubrication
are explained on the following pages.
The intervals given in the periodic
maintenance and lubrication chart
should be simply considered as a gen-
eral guide under normal riding condi-
tions. However, DEPENDING ON THE
WEATHER, TERRAIN, GEOGRAPHI-
CAL LOCATION, AND INDIVIDUAL
USE, THE MAINTENANCE INTER-VALS MAY NEED TO BE SHORT-
ENED.
EW000060
WARNING
@ If you are not familiar with motor-
cycle maintenance work, have a
Yamaha dealer do it for you. @
EAU03394
Owner’s tool kit The owner’s tool kit is located under
the rider seat. (See page 3-12 for rider
seat removal and installation proce-
dures.)
The service information included in this
manual and the tools provided in the
owner’s tool kit are intended to assist
you in the performance of preventive
maintenance and minor repairs. How-
ever, additional tools such as a torque
wrench may be necessary to perform
certain maintenance work correctly.1. Owner’s tool kit
E_5JA.book Page 1 Wednesday, September 13, 2000 6:06 PM
Page 47 of 104
PERIODIC MAINTENANCE AND MINOR REPAIR
6-2
6
NOTE:@ If you do not have the tools or experi-
ence required for a particular job, have
a Yamaha dealer perform it for you. @
EW000063
WARNING
@ Modifications not approved by
Yamaha may cause loss of perfor-
mance and render the vehicle un-
safe for use. Consult a Yamaha
dealer before attempting any chang-
es. @
E_5JA.book Page 2 Wednesday, September 13, 2000 6:06 PM
Page 63 of 104
PERIODIC MAINTENANCE AND MINOR REPAIR
6-18
6
EW000082
WARNING
@ l
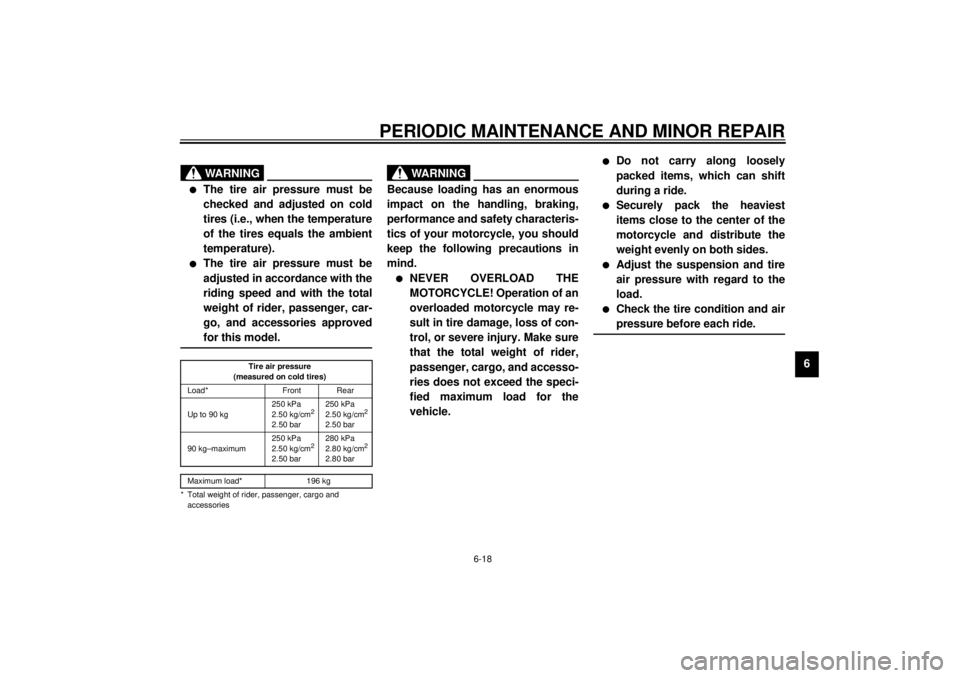
The tire air pressure must be
checked and adjusted on cold
tires (i.e., when the temperature
of the tires equals the ambient
temperature).
l
The tire air pressure must be
adjusted in accordance with the
riding speed and with the total
weight of rider, passenger, car-
go, and accessories approved
for this model.
@CE-01E
CE-07EEWA00012
WARNING
@ Because loading has an enormous
impact on the handling, braking,
performance and safety characteris-
tics of your motorcycle, you should
keep the following precautions in
mind. l
NEVER OVERLOAD THE
MOTORCYCLE! Operation of an
overloaded motorcycle may re-
sult in tire damage, loss of con-
trol, or severe injury. Make sure
that the total weight of rider,
passenger, cargo, and accesso-
ries does not exceed the speci-
fied maximum load for the
vehicle.
l
Do not carry along loosely
packed items, which can shift
during a ride.
l
Securely pack the heaviest
items close to the center of the
motorcycle and distribute the
weight evenly on both sides.
l
Adjust the suspension and tire
air pressure with regard to the
load.
l
Check the tire condition and air
pressure before each ride.
@
Tire air pressure
(measured on cold tires)
Load* Front Rear
Up to 90 kg250 kPa
2.50 kg/cm
2
2.50 bar250 kPa
2.50 kg/cm
2
2.50 bar
90 kg–maximum250 kPa
2.50 kg/cm
2
2.50 bar280 kPa
2.80 kg/cm
2
2.80 bar
Maximum load* 196 kg
* Total weight of rider, passenger, cargo and
accessories
E_5JA.book Page 18 Wednesday, September 13, 2000 6:06 PM
Page 64 of 104
PERIODIC MAINTENANCE AND MINOR REPAIR
6-19
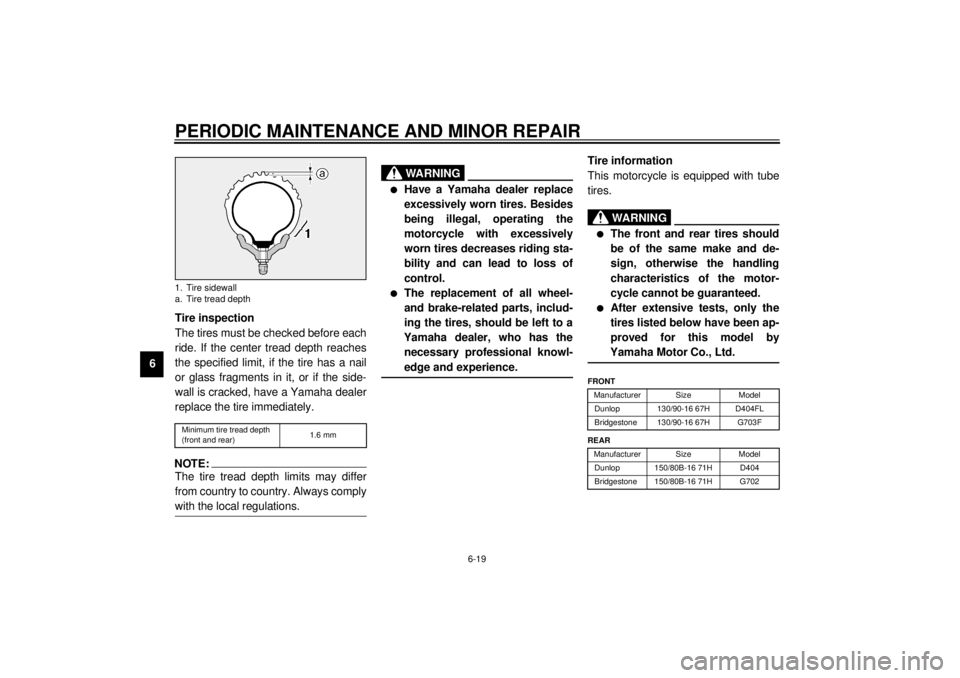
6Tire inspection
The tires must be checked before each
ride. If the center tread depth reaches
the specified limit, if the tire has a nail
or glass fragments in it, or if the side-
wall is cracked, have a Yamaha dealer
replace the tire immediately.
CE-08ENOTE:@ The tire tread depth limits may differ
from country to country. Always comply
with the local regulations. @
EW000079
WARNING
@ l
Have a Yamaha dealer replace
excessively worn tires. Besides
being illegal, operating the
motorcycle with excessively
worn tires decreases riding sta-
bility and can lead to loss of
control.
l
The replacement of all wheel-
and brake-related parts, includ-
ing the tires, should be left to a
Yamaha dealer, who has the
necessary professional knowl-
edge and experience.
@
Tire information
This motorcycle is equipped with tube
tires.
EW000078
WARNING
@ l
The front and rear tires should
be of the same make and de-
sign, otherwise the handling
characteristics of the motor-
cycle cannot be guaranteed.
l
After extensive tests, only the
tires listed below have been ap-
proved for this model by
Yamaha Motor Co., Ltd.
@CE-10E
1. Tire sidewall
a. Tire tread depthMinimum tire tread depth
(front and rear)1.6 mm
FRONT
Manufacturer Size Model
Dunlop 130/90-16 67H D404FL
Bridgestone 130/90-16 67H G703F
REAR
Manufacturer Size Model
Dunlop 150/80B-16 71H D404
Bridgestone 150/80B-16 71H G702
E_5JA.book Page 19 Wednesday, September 13, 2000 6:06 PM
Page 65 of 104
PERIODIC MAINTENANCE AND MINOR REPAIR
6-20
6
EAU00681
WARNING
@ l
Have a Yamaha dealer replace
excessively worn tires. Besides
being illegal, operating the
motorcycle with excessively
worn tires decreases riding sta-
bility and can lead to loss of
control.
l
The replacement of all wheel-
and brake-related parts, includ-
ing the tires, should be left to a
Yamaha dealer, who has the
necessary professional knowl-
edge and experience.
l
It is not recommended to patch
a punctured tube. If unavoid-
able, however, patch the tube
very carefully and replace it as
soon as possible with a high-
quality product.
@
EAU00685
Spoke wheels To maximize the performance, durabil-
ity, and safe operation of your motor-
cycle, note the following points
regarding the specified wheels.l
The wheel rims should be checked
for cracks, bends or warpage, and
the spokes for looseness or dam-
age before each ride. If any dam-
age is found, have a Yamaha
dealer replace the wheel. Do not
attempt even the smallest repair to
the wheel. A deformed or cracked
wheel must be replaced.
l
The wheel should be balanced
whenever either the tire or wheel
has been changed or replaced. An
unbalanced wheel can result in
poor performance, adverse han-
dling characteristics, and a short-
ened tire life.
l
Ride at moderate speeds after
changing a tire since the tire sur-
face must first be “broken in” for it
to develop its optimal characteris-
tics.
E_5JA.book Page 20 Wednesday, September 13, 2000 6:06 PM
Page 67 of 104
PERIODIC MAINTENANCE AND MINOR REPAIR
6-22
6
EAU00696
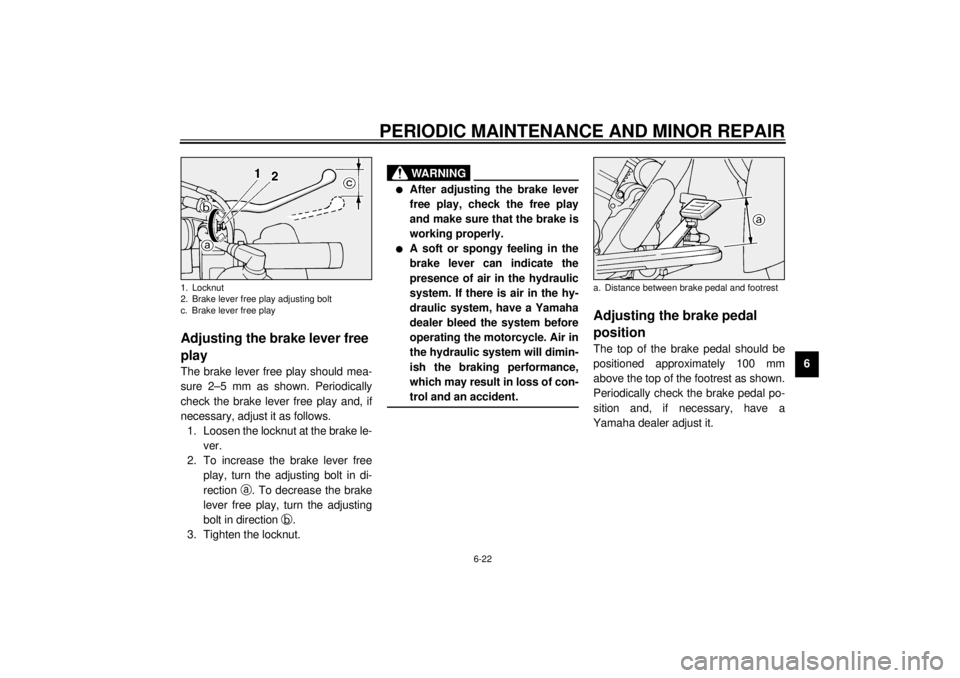
Adjusting the brake lever free
play The brake lever free play should mea-
sure 2–5 mm as shown. Periodically
check the brake lever free play and, if
necessary, adjust it as follows.
1. Loosen the locknut at the brake le-
ver.
2. To increase the brake lever free
play, turn the adjusting bolt in di-
rection
a. To decrease the brake
lever free play, turn the adjusting
bolt in direction
b.
3. Tighten the locknut.
EW000099
WARNING
@ l
After adjusting the brake lever
free play, check the free play
and make sure that the brake is
working properly.
l
A soft or spongy feeling in the
brake lever can indicate the
presence of air in the hydraulic
system. If there is air in the hy-
draulic system, have a Yamaha
dealer bleed the system before
operating the motorcycle. Air in
the hydraulic system will dimin-
ish the braking performance,
which may result in loss of con-
trol and an accident.
@
EAU01746
Adjusting the brake pedal
position The top of the brake pedal should be
positioned approximately 100 mm
above the top of the footrest as shown.
Periodically check the brake pedal po-
sition and, if necessary, have a
Yamaha dealer adjust it.
1. Locknut
2. Brake lever free play adjusting bolt
c. Brake lever free play
a. Distance between brake pedal and footrest
E_5JA.book Page 22 Wednesday, September 13, 2000 6:06 PM
Page 68 of 104
PERIODIC MAINTENANCE AND MINOR REPAIR
6-23
6
EW000109
WARNING
@ A soft or spongy feeling in the brake
pedal can indicate the presence of
air in the hydraulic system. If there
is air in the hydraulic system, have a
Yamaha dealer bleed the system be-
fore operating the motorcycle. Air in
the hydraulic system will diminish
the braking performance, which
may result in loss of control and an
accident. @
EAU00713
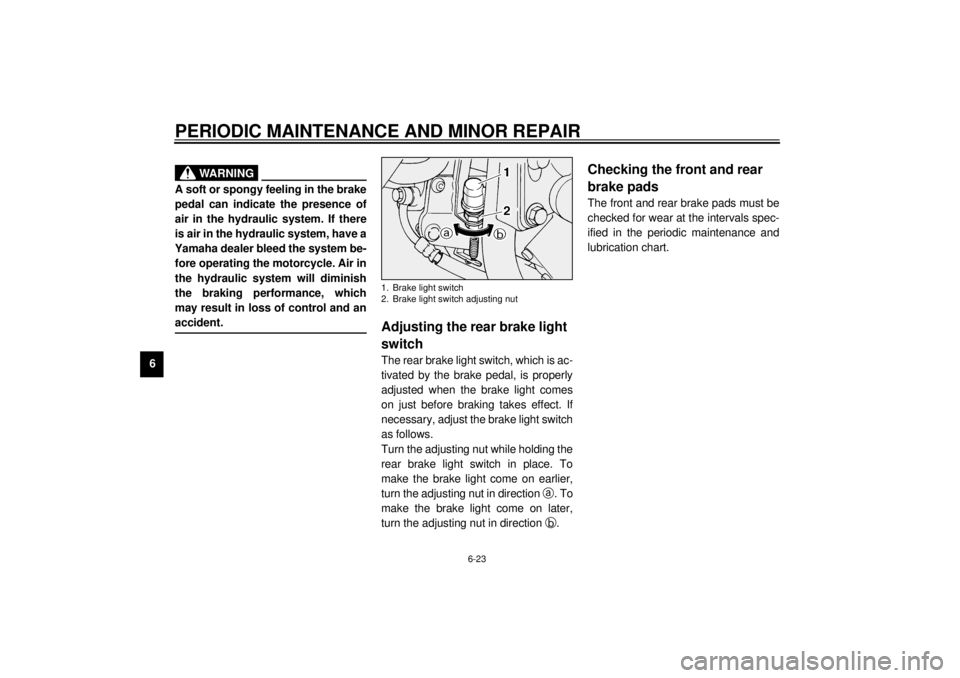
Adjusting the rear brake light
switch The rear brake light switch, which is ac-
tivated by the brake pedal, is properly
adjusted when the brake light comes
on just before braking takes effect. If
necessary, adjust the brake light switch
as follows.
Turn the adjusting nut while holding the
rear brake light switch in place. To
make the brake light come on earlier,
turn the adjusting nut in direction
a. To
make the brake light come on later,
turn the adjusting nut in direction
b.
EAU00721
Checking the front and rear
brake pads The front and rear brake pads must be
checked for wear at the intervals spec-
ified in the periodic maintenance and
lubrication chart.
1. Brake light switch
2. Brake light switch adjusting nut
E_5JA.book Page 23 Wednesday, September 13, 2000 6:06 PM