light YAMAHA XV535 2000 User Guide
[x] Cancel search | Manufacturer: YAMAHA, Model Year: 2000, Model line: XV535, Model: YAMAHA XV535 2000Pages: 87, PDF Size: 17.84 MB
Page 35 of 87
L
5-5
OPERATION AND IMPORTANT RIDING POINTS
/Net/layout8/layout_G2/work/Imai_work/OM-PS/AA9149_XV535-E6/English/E-5.frame
EAU00424
Tips for reducing fuel
consumption
Your motorcycleÕs fuel consumption
depends to a large extent on your
riding style. The following tips can help
reduce fuel consumption:
lWarm up the engine before riding.
lTurn off the starter (choke) as
soon as possible.
lShift up swiftly and avoid high en-
gine speeds during acceleration.
lDo not double-clutch or rev the en-
gine while shifting down and avoid
high engine speeds with no load
on the engine.
lTurn off the engine instead of let-
ting it idle for an extended length
of time, i.e. in traffic jams, at traffic
lights or railroad crossings.
EAU00436
Engine break-in
There is never a more important period
in the life of your motorcycle than the
period between zero and 1,000 km. For
this reason we ask that you carefully
read the following material. Because
the engine is brand new, you must not
put an excessive load on it for the first
1,000 km. The various parts in the en-
gine wear and polish themselves to the
correct operating clearances. During
this period, prolonged full throttle oper-
ation, or any condition which might re-
sult in excessive heating of the engine,
must be avoided.
EAU00444
0 ~ 150 km
Avoid operation above 1/3 throttle.
Stop the engine and let it cool for 5 to
10 minutes after every hour of opera-
tion. Vary the speed of the motorcycle
from time to time. Do not operate it at
one set throttle position.
150 ~ 500 km
Avoid prolonged operation above
1/2 throttle. Rev the motorcycle freely
through the gears, but do not use full
throttle at any time.
500 ~ 1,000 km
Avoid cruising speeds in excess of
3/4 throttle.
EC000056
CAUTION:
After 1,000 km of operation, be sure
to replace the engine oil, oil filter
and final gear oil.
Page 38 of 87
R
PERIODIC MAINTENANCE AND MINOR REPAIR
/Net/layout8/layout_G2/work/Imai_work/OM-PS/AA9149_XV535-E6/English/E-6TOC.frame
Tool kit ................................................................ 6-1
Periodic maintenance and lubrication................. 6-2
Spark plugs ........................................................ 6-5
Engine oil............................................................ 6-7
Final gear oil ....................................................... 6-9
Air filter ............................................................. 6-10
Carburetor adjustment ...................................... 6-12
Idle speed adjustment ...................................... 6-13
Throttle cable free play inspection .................... 6-13
Valve clearance adjustment ............................. 6-14
Tires ................................................................. 6-14
Wheels ............................................................. 6-16
Clutch lever free play adjustment ..................... 6-17
Front brake lever free play adjustment ............. 6-17
Rear brake pedal height and free play
adjustment ...................................................... 6-18
Brake light switch adjustment ........................... 6-19
Checking the front brake pads and
rear brake shoes ............................................ 6-19Inspecting the brake fluid level.......................... 6-20
Brake fluid replacement .................................... 6-21
Cable inspection and lubrication ....................... 6-21
Throttle cable and grip lubrication ..................... 6-22
Brake and shift pedal lubrication ....................... 6-22
Brake and clutch lever lubrication ..................... 6-22
Sidestand lubrication......................................... 6-23
Rear suspension lubrication.............................. 6-23
Front fork inspection ......................................... 6-23
Steering inspection ........................................... 6-24
Wheel bearings ................................................. 6-24
Battery............................................................... 6-25
Fuse replacement ............................................. 6-27
Headlight bulb replacement .............................. 6-27
Turn signal and taillight bulb replacement ........ 6-29
Troubleshooting ................................................ 6-29
Troubleshooting chart ....................................... 6-30
Page 43 of 87
L
6-5
PERIODIC MAINTENANCE AND MINOR REPAIR
/Net/layout8/layout_G2/work/Imai_work/OM-PS/AA9149_XV535-E6/English/E-6.frame
2 1
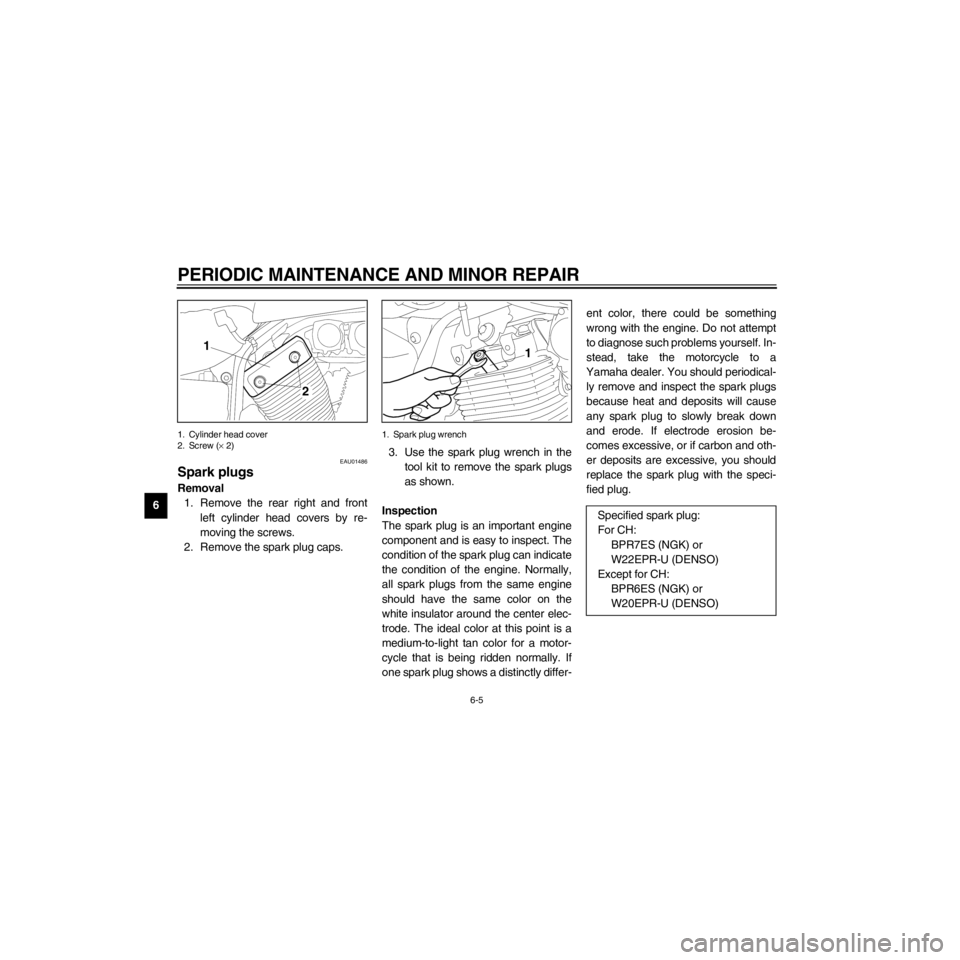
1. Cylinder head cover
2. Screw (´ 2)
EAU01486
Spark plugs
Removal
1. Remove the rear right and front
left cylinder head covers by re-
moving the screws.
2. Remove the spark plug caps.
1
1. Spark plug wrench
3. Use the spark plug wrench in the
tool kit to remove the spark plugs
as shown.
Inspection
The spark plug is an important engine
component and is easy to inspect. The
condition of the spark plug can indicate
the condition of the engine. Normally,
all spark plugs from the same engine
should have the same color on the
white insulator around the center elec-
trode. The ideal color at this point is a
medium-to-light tan color for a motor-
cycle that is being ridden normally. If
one spark plug shows a distinctly differ-ent color, there could be something
wrong with the engine. Do not attempt
to diagnose such problems yourself. In-
stead, take the motorcycle to a
Yamaha dealer. You should periodical-
ly remove and inspect the spark plugs
because heat and deposits will cause
any spark plug to slowly break down
and erode. If electrode erosion be-
comes excessive, or if carbon and oth-
er deposits are excessive, you should
replace the spark plug with the speci-
fied plug.
Specified spark plug:
For CH:
BPR7ES (NGK) or
W22EPR-U (DENSO)
Except for CH:
BPR6ES (NGK) or
W20EPR-U (DENSO)
Page 45 of 87
L
6-7
PERIODIC MAINTENANCE AND MINOR REPAIR
/Net/layout8/layout_G2/work/Imai_work/OM-PS/AA9149_XV535-E6/English/E-6.frame
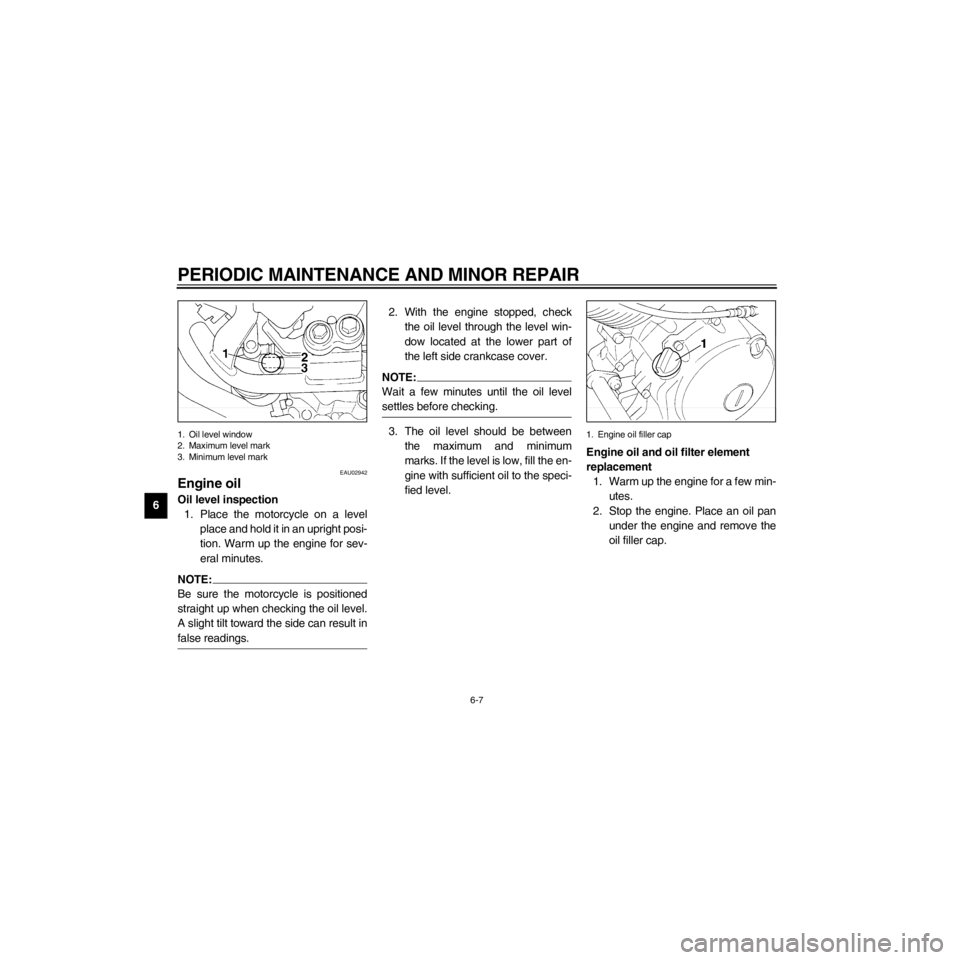
1. Oil level window
2. Maximum level mark
3. Minimum level mark
EAU02942
Engine oil
Oil level inspection
1. Place the motorcycle on a level
place and hold it in an upright posi-
tion. Warm up the engine for sev-
eral minutes.
NOTE:
Be sure the motorcycle is positioned
straight up when checking the oil level.
A slight tilt toward the side can result in
false readings.2. With the engine stopped, check
the oil level through the level win-
dow located at the lower part of
the left side crankcase cover.
NOTE:
Wait a few minutes until the oil level
settles before checking.
3. The oil level should be between
the maximum and minimum
marks. If the level is low, fill the en-
gine with sufficient oil to the speci-
fied level.
1. Engine oil filler cap
Engine oil and oil filter element
replacement
1. Warm up the engine for a few min-
utes.
2. Stop the engine. Place an oil pan
under the engine and remove the
oil filler cap.
Page 49 of 87
L
6-11
PERIODIC MAINTENANCE AND MINOR REPAIR
/Net/layout8/layout_G2/work/Imai_work/OM-PS/AA9149_XV535-E6/English/E-6.frame
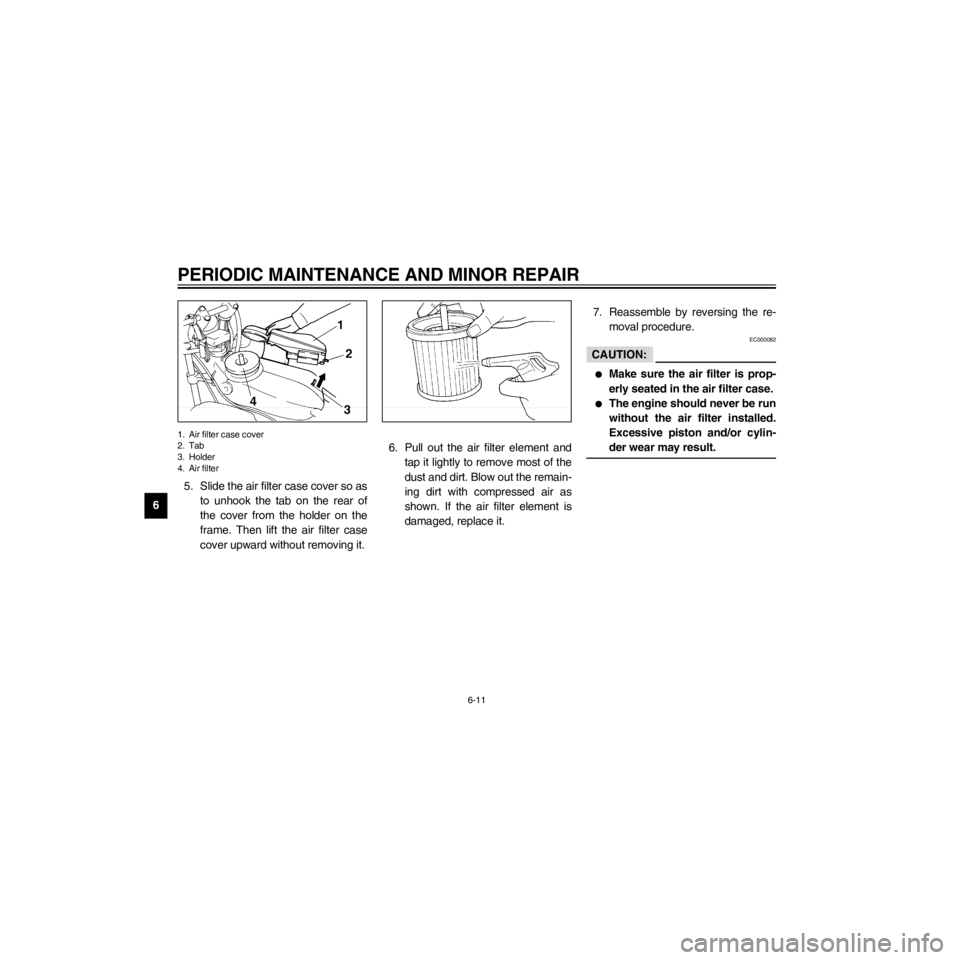
1. Air filter case cover
2. Tab
3. Holder
4. Air filter
5. Slide the air filter case cover so as
to unhook the tab on the rear of
the cover from the holder on the
frame. Then lift the air filter case
cover upward without removing it.
6. Pull out the air filter element and
tap it lightly to remove most of the
dust and dirt. Blow out the remain-
ing dirt with compressed air as
shown. If the air filter element is
damaged, replace it.7. Reassemble by reversing the re-
moval procedure.
EC000082
CAUTION:
lMake sure the air filter is prop-
erly seated in the air filter case.
lThe engine should never be run
without the air filter installed.
Excessive piston and/or cylin-
der wear may result.
Page 57 of 87
L
6-19
PERIODIC MAINTENANCE AND MINOR REPAIR
/Net/layout8/layout_G2/work/Imai_work/OM-PS/AA9149_XV535-E6/English/E-6.frame
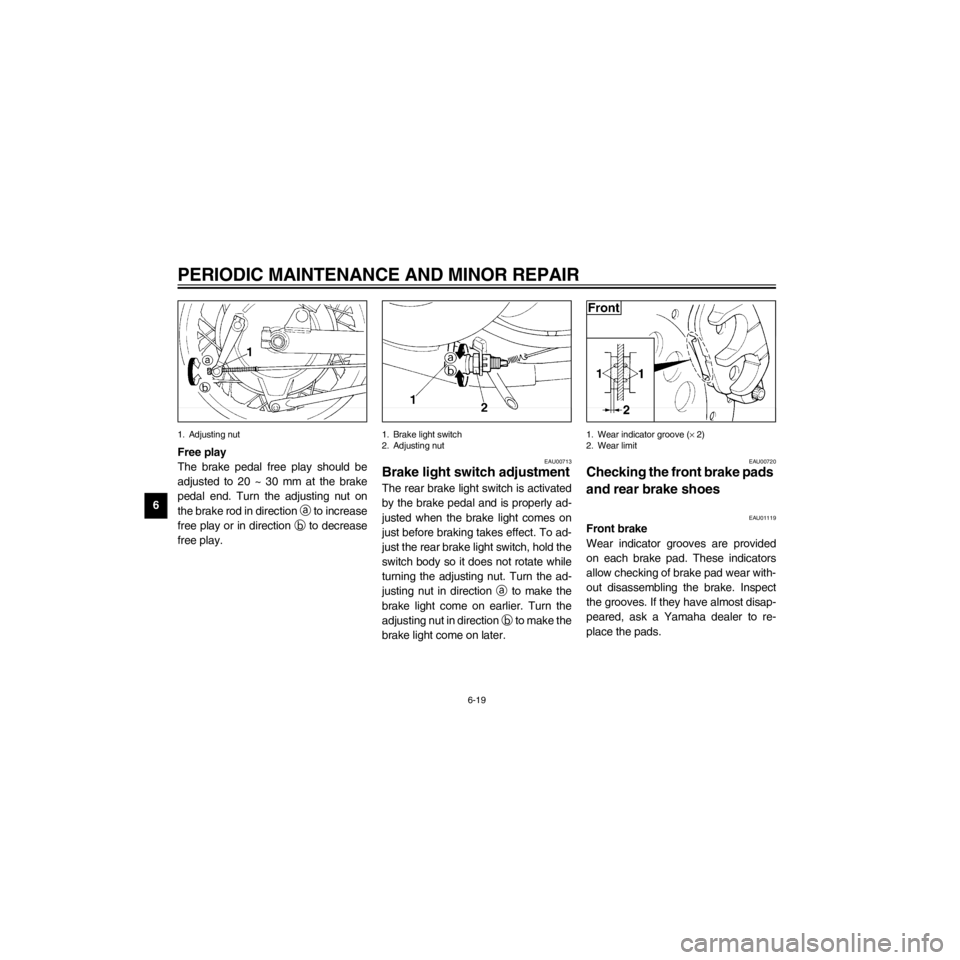
1. Adjusting nut
Free play
The brake pedal free play should be
adjusted to 20 ~ 30 mm at the brake
pedal end. Turn the adjusting nut on
the brake rod in direction a
to increase
free play or in direction b
to decrease
free play.
1. Brake light switch
2. Adjusting nut
EAU00713
Brake light switch adjustment
The rear brake light switch is activated
by the brake pedal and is properly ad-
justed when the brake light comes on
just before braking takes effect. To ad-
just the rear brake light switch, hold the
switch body so it does not rotate while
turning the adjusting nut. Turn the ad-
justing nut in direction a
to make the
brake light come on earlier. Turn the
adjusting nut in direction b
to make the
brake light come on later.
1. Wear indicator groove (´ 2)
2. Wear limit
EAU00720
Checking the front brake pads
and rear brake shoes
EAU01119
Front brake
Wear indicator grooves are provided
on each brake pad. These indicators
allow checking of brake pad wear with-
out disassembling the brake. Inspect
the grooves. If they have almost disap-
peared, ask a Yamaha dealer to re-
place the pads.
Page 65 of 87

L
6-27
PERIODIC MAINTENANCE AND MINOR REPAIR
/Net/layout8/layout_G2/work/Imai_work/OM-PS/AA9149_XV535-E6/English/E-6.frame
1. Main fuse
2. Headlight fuse
3. Signaling system fuse
4. Ignition fuse
5. Spare fuse (´ 2)
EAU00818
Fuse replacement
The fuse box is located under the rider
seat. If any fuse is blown, turn off the
main switch and the switch of the circuit
in question. Install a new fuse of the
specified amperage. Turn on the
switches and check if the electrical de-
vice operates. If the fuse immediately
blows again, consult a Yamaha dealer.
EC000103
CAUTION:
Do not use fuses of higher amper-
age rating than those recommend-
ed. Substitution of a fuse of
improper rating can cause extensive
electrical system damage and pos-
sibly a fire.
Specified fuses:
Main fuse: 30 A
Headlight fuse: 15 A
Signaling system fuse: 15 A
Ignition fuse: 15 A
1. Screw (´ 2)
EAU01524
Headlight bulb replacement
This motorcycle is equipped with a
quartz bulb headlight.
If the headlight bulb burns out, replace
the bulb as follows:
1. Remove the headlight unit screws.
Page 66 of 87

R
6-28
PERIODIC MAINTENANCE AND MINOR REPAIR
/Net/layout8/layout_G2/work/Imai_work/OM-PS/AA9149_XV535-E6/English/E-6.frame
1. Connector
2. Bulb cover
2. Remove the connector, the head-
light unit and then the bulb cover.
1. Bulb holder
3. Turn the bulb holder counterclock-
wise to remove it and remove the
defective bulb.
EW000119
Keep flammable products and your
hands away from a bulb while it is
on, as it is hot. Do not touch a bulb
until it cools down.
4. Put a new bulb into position and
secure it in place with the bulb
holder.
1. DonÕt touch
EC000105
CAUTION:
Avoid touching the glass part of a
bulb. Keep it free from oil; other-
wise, the transparency of the glass,
life of the bulb, and luminous flux
will be adversely affected. If oil gets
on a bulb, thoroughly clean it with a
cloth moistened with alcohol or lac-
quer thinner.
5. Install the bulb cover, connector
and headlight unit.
Ask a Yamaha dealer to adjust the
headlight beam if necessary.
Page 67 of 87
L
6-29
PERIODIC MAINTENANCE AND MINOR REPAIR
/Net/layout8/layout_G2/work/Imai_work/OM-PS/AA9149_XV535-E6/English/E-6.frame
1
1
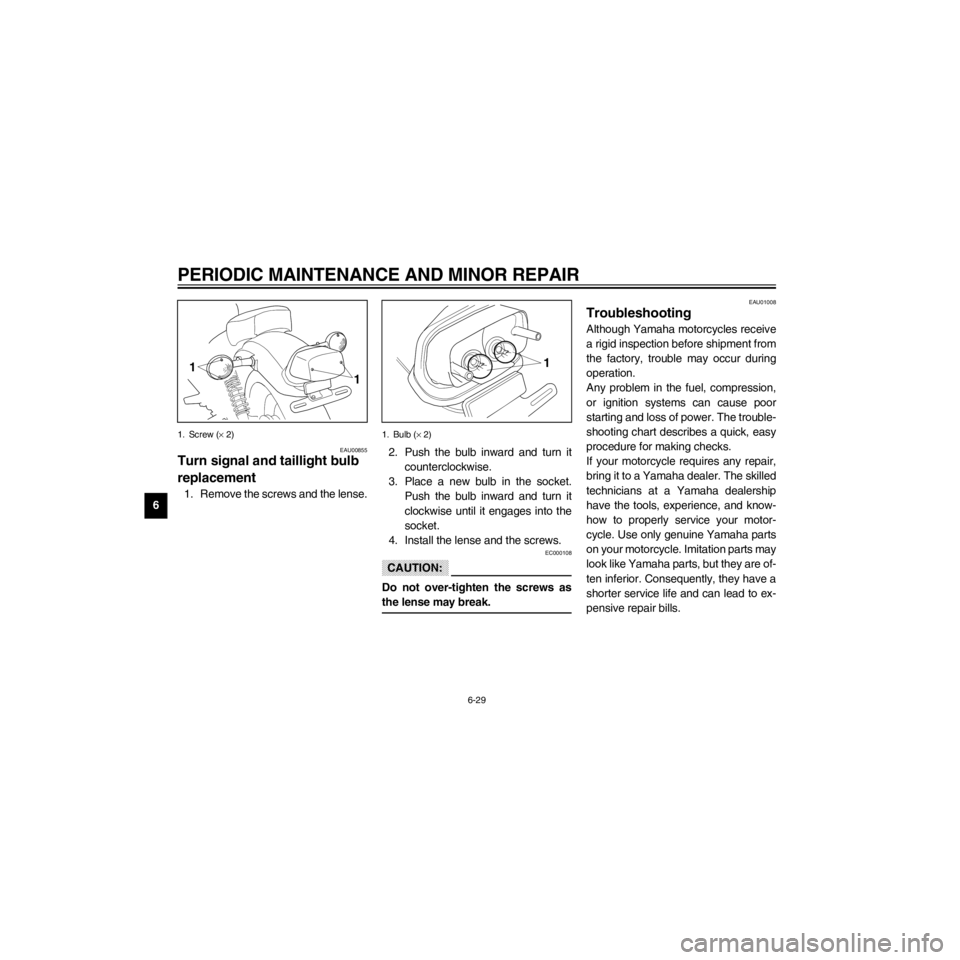
1. Screw (´ 2)
EAU00855
Turn signal and taillight bulb
replacement
1. Remove the screws and the lense.
1
1. Bulb (´ 2)
2. Push the bulb inward and turn it
counterclockwise.
3. Place a new bulb in the socket.
Push the bulb inward and turn it
clockwise until it engages into the
socket.
4. Install the lense and the screws.
EC000108
CAUTION:
Do not over-tighten the screws as
the lense may break.
EAU01008
Troubleshooting
Although Yamaha motorcycles receive
a rigid inspection before shipment from
the factory, trouble may occur during
operation.
Any problem in the fuel, compression,
or ignition systems can cause poor
starting and loss of power. The trouble-
shooting chart describes a quick, easy
procedure for making checks.
If your motorcycle requires any repair,
bring it to a Yamaha dealer. The skilled
technicians at a Yamaha dealership
have the tools, experience, and know-
how to properly service your motor-
cycle. Use only genuine Yamaha parts
on your motorcycle. Imitation parts may
look like Yamaha parts, but they are of-
ten inferior. Consequently, they have a
shorter service life and can lead to ex-
pensive repair bills.
Page 72 of 87
R
7-2
MOTORCYCLE CARE AND STORAGE
/Net/layout8/layout_G2/work/Imai_work/OM-PS/AA9149_XV535-E6/English/E-7.frame
ECA00010
CAUTION:
lAvoid using strong acidic wheel
cleaners, especially on spoked
wheels. If you do use such
products for hard-to-remove
dirt, do not leave it on any long-
er than instructed, then thor-
oughly rinse it off with water,
immediately dry the area and
apply a corrosion protection
spray.
lImproper cleaning can damage
windshields, cowlings, panels
and other plastic parts. Use
only a soft, clean cloth or
sponge with mild detergent and
water to clean plastic.
lDo not use any harsh chemical
products on plastic parts. Be
sure to avoid using cloths or
sponges which have been in
contact with strong or abrasive
cleaning products, solvent or
thinner, fuel (gasoline), rust re-
movers or inhibitors, brake flu-
id, antifreeze or electrolyte.
lDo not use high-pressure wash-
ers or steam-jet cleaners since
they cause water seepage and
deterioration in the following ar-
eas: seals (of wheel bearings,
swingarm bearings, forks and
brakes), electric components
(couplers, connectors, instru-
ments, switches and lights),
breather hoses and vents.
lFor motorcycles equipped with
a windshield: Do not use strong
cleaners or hard sponges as
they will cause dulling or
scratching. Some cleaning
compounds for plastic may
leave scratches on the wind-
shield. Test the product on a
small hidden part of the wind-
shield to make sure they do not
leave any marks. If the wind-
shield is scratched, use a quali-
ty plastic polishing compound
after washing.
After riding in the rain, near the sea or
on salt-sprayed roads
Since sea salt or salt sprayed on the
roads in the winter are extremely corro-
sive in combination with water, carry
out the following steps after each ride
in the rain, near the sea or on salt-
sprayed roads. (Salt sprayed in the
winter may remain on the roads well
into spring.)