check engine YAMAHA XVS1100 2000 Owners Manual
[x] Cancel search | Manufacturer: YAMAHA, Model Year: 2000, Model line: XVS1100, Model: YAMAHA XVS1100 2000Pages: 96, PDF Size: 13.11 MB
Page 17 of 96
INSTRUMENT AND CONTROL FUNCTIONS
3-2
3
EAU01590
(Parking)
The steering is locked in this position,
and the taillight and auxiliary light come
on but all other circuits are off. The key
can be removed in this position.
To use the parking position, first lock
the steering, then turn the key to “ ”.
Do not use this position for an extend-
ed length of time as the battery may
discharge.
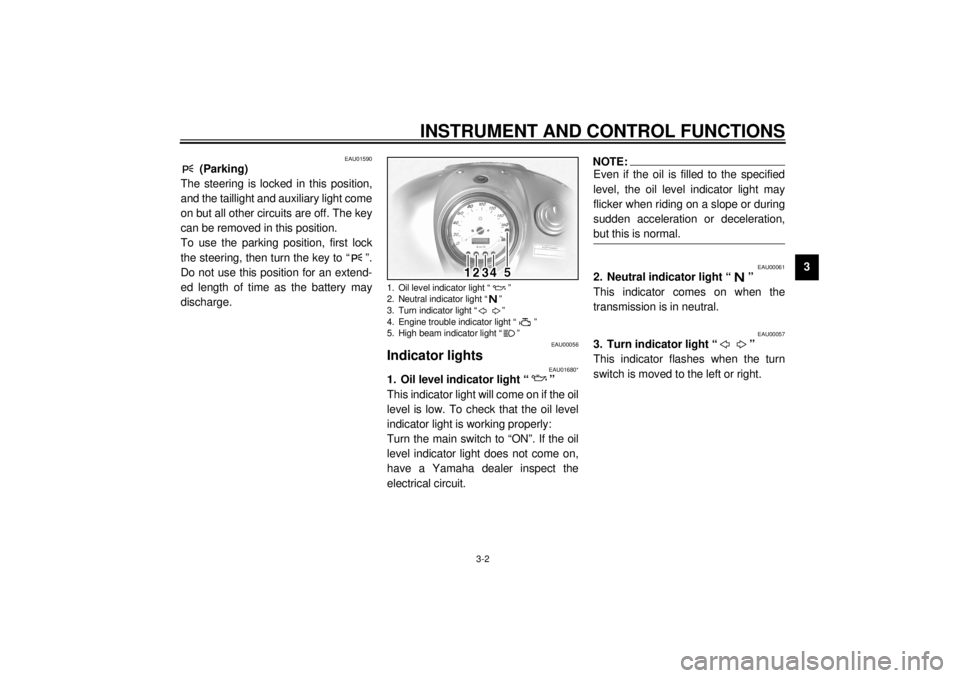
EAU00056
Indicator lights
EAU01680*
1. Oil level indicator light “ ”
This indicator light will come on if the oil
level is low. To check that the oil level
indicator light is working properly:
Turn the main switch to “ON”. If the oil
level indicator light does not come on,
have a Yamaha dealer inspect the
electrical circuit.
NOTE:@ Even if the oil is filled to the specified
level, the oil level indicator light may
flicker when riding on a slope or during
sudden acceleration or deceleration,
but this is normal. @
EAU00061
2. Neutral indicator light “ ”
This indicator comes on when the
transmission is in neutral.
EAU00057
3. Turn indicator light “ ”
This indicator flashes when the turn
switch is moved to the left or right.
1. Oil level indicator light “ ”
2. Neutral indicator light “ ”
3. Turn indicator light “ ”
4. Engine trouble indicator light “ ”
5. High beam indicator light “ ”
E_5el_Functions.fm Page 2 Monday, May 1, 2000 9:38 AM
Page 18 of 96

INSTRUMENT AND CONTROL FUNCTIONS
3-3
3
EAU01672*
4. Engine trouble indicator light
“”
This indicator light will come on or flash
if trouble occurs in a monitoring circuit.
In such a case, take the motorcycle to a
Yamaha dealer to have the self-diag-
nostic systems checked.
To check that the engine trouble indica-
tor light is working properly:
Turn the main switch to “ON”. If the en-
gine trouble indicator light does not
come on, have a Yamaha dealer in-
spect the electrical circuit.
EAU00063
5. High beam indicator light “ ”
This indicator comes on when the
headlight high beam is used.
EAU01202
SpeedometerThis speedometer is equipped with an
odometer and a trip meter. Pushing the
“TRIP” button will change the display
from one to the other. When set to
“ODO”, it indicates the motorcycle’s to-
tal mileage. When set to “TRIP”, it indi-
cates the motorcycle’s mileage since
the trip meter was last reset. Use the
trip meter to estimate how far you can
ride on a tank of fuel. This information
will enable you to plan fuel stops in the
future.To reset the trip meter to “0”, push the
“TRIP” button until it displays “TRIP”,
then push it once again and hold it
down for at least one second.
NOTE:@ This motorcycle does not have a ta-
chometer. However, it is equipped with
an engine speed limiter, which pre-
vents the engine speed from exceed-
ing approximately 6,800 r/min and the
vehicle from exceeding a top riding
speed of approximately 175 km/h. @
1. Trip button
2. Odometer/Trip meter
E_5el_Functions.fm Page 3 Monday, May 1, 2000 9:38 AM
Page 31 of 96

INSTRUMENT AND CONTROL FUNCTIONS
3-16
3
EAU00331
Sidestand/clutch switch
operation checkCheck the operation of the sidestand
switch and clutch switch against the in-
formation below.CD-11E
EW000045
WARNING
@ If improper operation is noted, con-
sult a Yamaha dealer immediately. @
TURN THE MAIN SWITCH TO “ON”
AND THE ENGINE STOP SWITCH TO
“”.TRANSMISSION IS IN GEAR AND
SIDESTAND IS UP.PULL IN CLUTCH LEVER AND
PUSH THE START SWITCH.ENGINE WILL START.SIDESTAND IS DOWN.CLUTCH SWITCH IS OK.
ENGINE WILL STALL.SIDESTAND SWITCH IS OK.
E_5el_Functions.fm Page 16 Monday, May 1, 2000 9:38 AM
Page 34 of 96

4-1
4
EAU01114
4-PRE-OPERATION CHECKSOwners are personally responsible for their vehicle’s condition. Your motorcycle’s vital functions can start to deteriorate
quickly and unexpectedly, even if it remains unused (for instance, if it is exposed to the elements). Any damage, fluid leak or
loss of tire pressure could have serious consequences. Therefore, it is very important that, in addition to a thorough visual in-
spection, you check the following points before each ride.
EAU00340
PRE-OPERATION CHECK LIST
ITEM CHECKS PAGE
Front brake• Check operation, free play, fluid level and vehicle for fluid leakage.
• Fill with DOT 4 brake fluid if necessary.6-16 ~ 6-20
Rear brake• Check operation, free play, fluid level and vehicle for fluid leakage.
• Fill with DOT 4 brake fluid if necessary.6-17 ~ 6-20
Clutch• Check operation condition and free play.
• Adjust if necessary.6-15
Throttle grip and housing• Check for smooth operation.
• Lubricate if necessary.6-12, 6-20
Engine oil• Check oil level.
• Fill with oil if necessary.6-7 ~ 6-9
Final gear oil• Check vehicle for leakage. 6-9 ~ 6-10
Wheels and tires• Check tire pressure, wear, damage and spoke tightness.
• Tighten spokes if necessary.6-13 ~ 6-15
Control cable• Check for smooth operation.
• Lubricate if necessary.6-20
Brake and shift pedal shafts• Check for smooth operation.
• Lubricate if necessary.6-21
Brake and clutch lever pivots• Check for smooth operation.
• Lubricate if necessary.6-21
Sidestand pivot• Check for smooth operation.
• Lubricate if necessary.6-21
E_5el_Preop.fm Page 1 Monday, May 1, 2000 9:39 AM
Page 38 of 96

5-1
5
EAU00372
5-OPERATION AND IMPORTANT RIDING POINTS
EAU00373
WARNING
@ l
Before riding this motorcycle,
become thoroughly familiar
with all operating controls and
their functions. Consult a
Yamaha dealer regarding any
control or function that you do
not thoroughly understand.
l
Never start your engine or let it
run for any length of time in a
closed area. The exhaust fumes
are poisonous and can cause
loss of consciousness and
death within a short time. Al-
ways operate your motorcycle
in an area with adequate ventila-
tion.
l
Before starting out, always be
sure the sidestand is up. Failure
to retract the sidestand com-
pletely can result in a serious
accident when you try to turn a
corner.
@
EAU01714
Starting the engineNOTE:@ This motorcycle is equipped with an ig-
nition circuit cut-off system. The engine
can be started only under one of the
following conditions:l
The transmission is in neutral.
l
The sidestand is up, the transmis-
sion is in gear and the clutch is dis-
engaged.
The motorcycle must not be ridden
when the sidestand is down.
@
EW000054
WARNING
@ Before going through the following
steps, check the function of the
sidestand switch and clutch switch.
(Refer to page 3-16.) @
E_5el_Operation.fm Page 1 Monday, May 1, 2000 9:43 AM
Page 40 of 96
OPERATION AND IMPORTANT RIDING POINTS
5-3
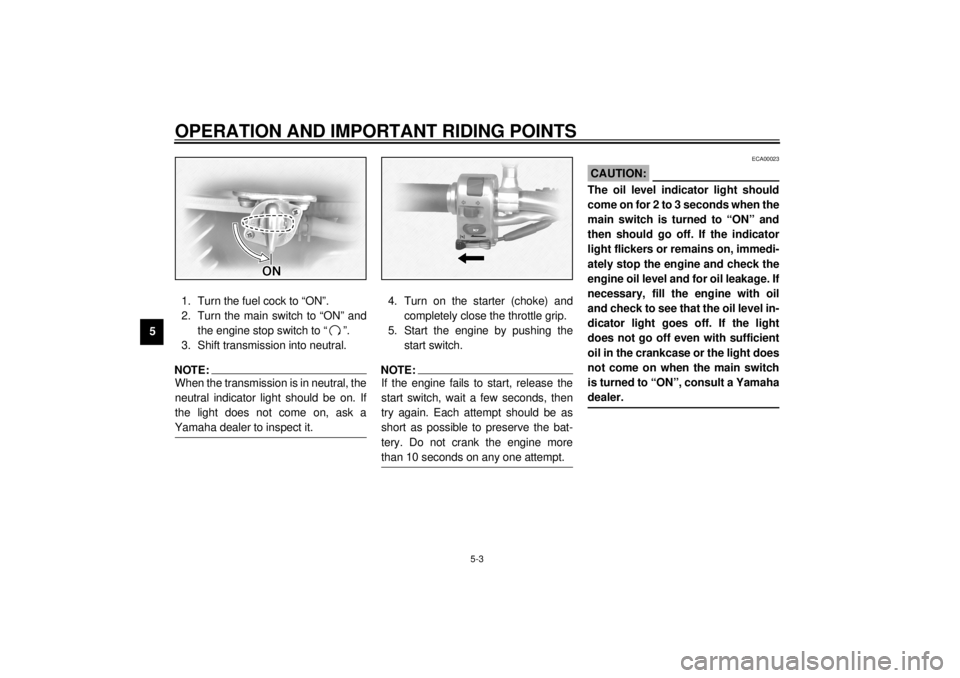
51. Turn the fuel cock to “ON”.
2. Turn the main switch to “ON” and
the engine stop switch to “ ”.
3. Shift transmission into neutral.
NOTE:@ When the transmission is in neutral, the
neutral indicator light should be on. If
the light does not come on, ask a
Yamaha dealer to inspect it. @
4. Turn on the starter (choke) and
completely close the throttle grip.
5. Start the engine by pushing the
start switch.NOTE:@ If the engine fails to start, release the
start switch, wait a few seconds, then
try again. Each attempt should be as
short as possible to preserve the bat-
tery. Do not crank the engine more
than 10 seconds on any one attempt. @
ECA00023
CAUTION:@ The oil level indicator light should
come on for 2 to 3 seconds when the
main switch is turned to “ON” and
then should go off. If the indicator
light flickers or remains on, immedi-
ately stop the engine and check the
engine oil level and for oil leakage. If
necessary, fill the engine with oil
and check to see that the oil level in-
dicator light goes off. If the light
does not go off even with sufficient
oil in the crankcase or the light does
not come on when the main switch
is turned to “ON”, consult a Yamaha
dealer. @
E_5el_Operation.fm Page 3 Monday, May 1, 2000 9:43 AM
Page 45 of 96
6
PERIODIC MAINTENANCE AND MINOR REPAIR
Tool kit................................................................... 6-1
Periodic maintenance and lubrication ................... 6-2
Panel removal and installation .............................. 6-5
Panel A ................................................................. 6-5
Spark plugs........................................................... 6-6
Engine oil .............................................................. 6-7
Final gear oil ......................................................... 6-9
Air filter ............................................................... 6-10
Carburetor adjustment ........................................ 6-11
Idle speed adjustment ........................................ 6-11
Throttle cable free play inspection ...................... 6-12
Valve clearance adjustment ................................ 6-12
Tires .................................................................... 6-13
Wheels ................................................................ 6-15
Clutch lever free play adjustment........................ 6-15
Front brake lever free play adjustment ................ 6-16
Rear brake pedal height adjustment ................... 6-17
Brake light switch adjustment ............................. 6-17Checking the front and rear brake pads ............. 6-18
Inspecting the brake fluid level ........................... 6-19
Brake fluid replacement ..................................... 6-20
Cable inspection and lubrication ........................ 6-20
Throttle cable and grip lubrication ...................... 6-20
Brake and shift pedal lubrication ........................ 6-21
Brake and clutch lever lubrication ...................... 6-21
Sidestand lubrication.......................................... 6-21
Front fork inspection ........................................... 6-22
Steering inspection ............................................ 6-22
Wheel bearings .................................................. 6-23
Battery................................................................ 6-23
Fuse replacement .............................................. 6-25
Headlight bulb replacement ............................... 6-27
Turn signal and taillight bulb replacement .......... 6-28
Troubleshooting .................................................. 6-29
Troubleshooting chart ......................................... 6-30
E_5el_PeriodicTOC.fm Page 1 Monday, May 1, 2000 9:43 AM
Page 48 of 96

PERIODIC MAINTENANCE AND MINOR REPAIR
6-3
6
11
*Wheel bearings• Check bearing for looseness or damage.
• Replace if necessary. ÖÖ
12*Swingarm• Check swingarm pivoting point for play.
• Correct if necessary.
• Lubricate with molybdenum disulfide grease every 24,000 km or
24 months (whichever comes first).ÖÖ
13*Steering bearings• Check bearing play and steering for roughness.
• Correct accordingly.
• Lubricate with lithium soap base grease every 24,000 km
or 24 months (whichever comes first).ÖÖ
14*Chassis fasteners• Make sure that all nuts, bolts and screws are properly tightened.
• Tighten if necessary.ÖÖ
15 Sidestand• Check operation.
• Lubricate and repair if necessary.ÖÖ
16*Sidestand switch• Check operation.
• Replace if necessary.ÖÖÖ
17*Front fork• Check operation and for oil leakage.
• Correct accordingly.ÖÖ
18*Rear shock absorber
assembly• Check operation and shock absorber for oil leakage.
• Replace shock absorber assembly if necessary. ÖÖ
19*Carburetors• Check engine idling speed, synchronization and starter operation.
• Adjust if necessary.ÖÖÖ
20 Engine oil• Check oil level and vehicle for oil leakage.
• Correct if necessary.
• Change. (Warm engine before draining.)ÖÖÖ
21 Engine oil filter element•Replace.ÖÖ NO. ITEM CHECKS AND MAINTENANCE JOBSINITIAL
(1,000 km)EVERY
6,000 km
or
6 months
(whichever
comes first)12,000 km
or
12 months
(whichever
comes first)
E_5el_Periodic.fm Page 3 Monday, May 1, 2000 9:44 AM
Page 52 of 96
PERIODIC MAINTENANCE AND MINOR REPAIR
6-7
6Installation
1. Measure the electrode gap with a
wire thickness gauge and, if nec-
essary, adjust the gap to specifica-
tion.
2. Clean the gasket surface. Wipe off
any grime from the threads.
3. Install the spark plugs and tighten
to the specified torque.
NOTE:@ If a torque wrench is not available when
you are installing a spark plug, a good
estimate of the correct torque is 1/4 to
1/2 turn past finger tight. Have the
spark plug tightened to the specified
torque as soon as possible. @4. Install the spark plug caps and the
cylinder head covers.
EAU01712
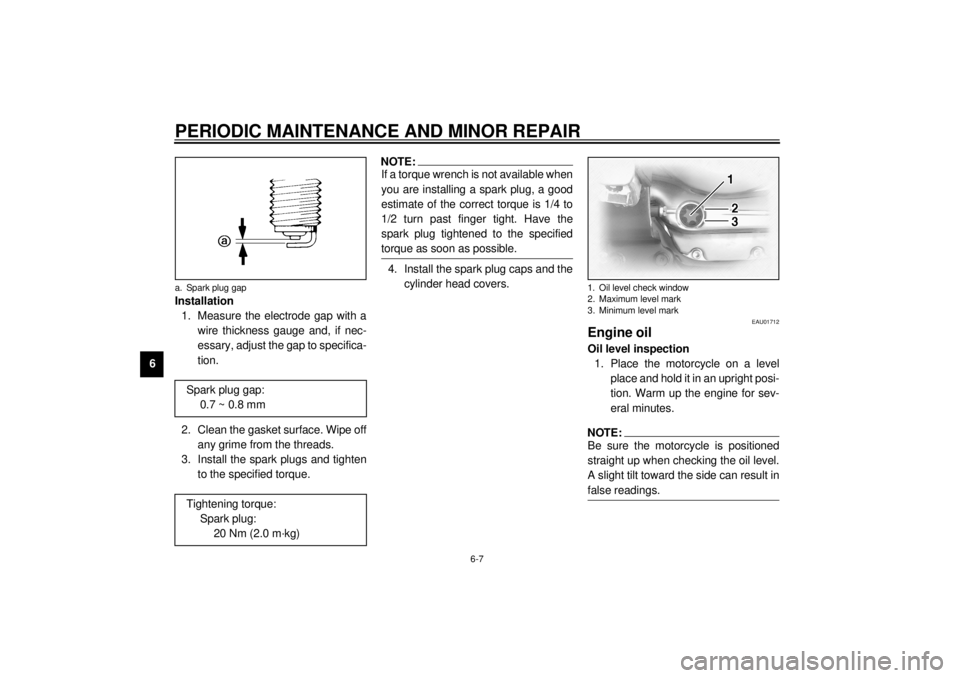
Engine oilOil level inspection
1. Place the motorcycle on a level
place and hold it in an upright posi-
tion. Warm up the engine for sev-
eral minutes.NOTE:@ Be sure the motorcycle is positioned
straight up when checking the oil level.
A slight tilt toward the side can result in
false readings. @
a. Spark plug gapSpark plug gap:
0.7 ~ 0.8 mm
Tightening torque:
Spark plug:
20 Nm (2.0 m·kg)
1. Oil level check window
2. Maximum level mark
3. Minimum level mark
E_5el_Periodic.fm Page 7 Monday, May 1, 2000 9:44 AM
Page 53 of 96
PERIODIC MAINTENANCE AND MINOR REPAIR
6-8
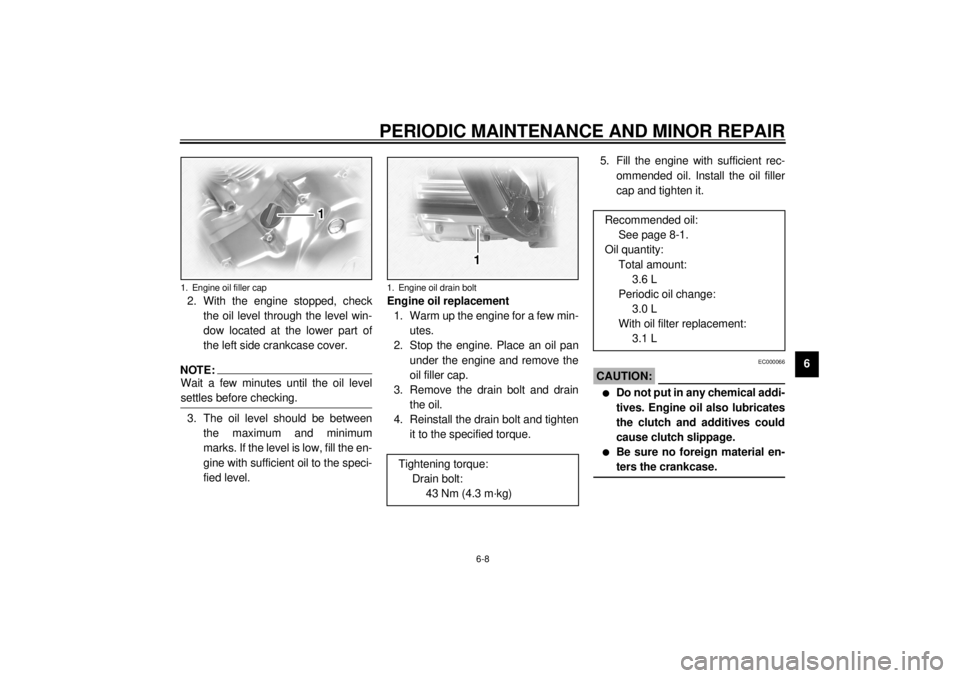
6 2. With the engine stopped, check
the oil level through the level win-
dow located at the lower part of
the left side crankcase cover.
NOTE:@ Wait a few minutes until the oil level
settles before checking. @3. The oil level should be between
the maximum and minimum
marks. If the level is low, fill the en-
gine with sufficient oil to the speci-
fied level.Engine oil replacement
1. Warm up the engine for a few min-
utes.
2. Stop the engine. Place an oil pan
under the engine and remove the
oil filler cap.
3. Remove the drain bolt and drain
the oil.
4. Reinstall the drain bolt and tighten
it to the specified torque.5. Fill the engine with sufficient rec-
ommended oil. Install the oil filler
cap and tighten it.
EC000066
CAUTION:@ l
Do not put in any chemical addi-
tives. Engine oil also lubricates
the clutch and additives could
cause clutch slippage.
l
Be sure no foreign material en-
ters the crankcase.
@
1. Engine oil filler cap
1. Engine oil drain boltTightening torque:
Drain bolt:
43 Nm (4.3 m·kg)
Recommended oil:
See page 8-1.
Oil quantity:
Total amount:
3.6 L
Periodic oil change:
3.0 L
With oil filter replacement:
3.1 L
E_5el_Periodic.fm Page 8 Monday, May 1, 2000 9:44 AM