warning light YAMAHA XVS1100 2000 Owners Manual
[x] Cancel search | Manufacturer: YAMAHA, Model Year: 2000, Model line: XVS1100, Model: YAMAHA XVS1100 2000Pages: 96, PDF Size: 13.11 MB
Page 16 of 96

3-1
3
EAU00027
3-INSTRUMENT AND CONTROL FUNCTIONS
EAU00029
Main switch/Steering lockThe main switch controls the ignition
and lighting systems. Its operation is
described below.
EAU00036
ON
Electrical circuits are switched on. The
engine can be started. The key cannot
be removed in this position.
EAU00038
OFF
All electrical circuits are switched off.
The key can be removed in this posi-
tion.
EAU00040
LOCK
The steering is locked in this position
and all electrical circuits are switched
off. The key can be removed in this po-
sition. To lock the steering, turn the
handlebars all the way to the left. While
pushing the key into the main switch,
turn it from “OFF” to “LOCK” and re-
move it. To release the lock, turn the
key to “OFF” while pushing.
EW000016
WARNING
@ Never turn the key to “OFF” or
“LOCK” when the motorcycle is
moving. The electrical circuits will
be switched off which may result in
loss of control or an accident. Be
sure the motorcycle is stopped be-
fore turning the key to “OFF” or
“LOCK”. @1. Push
2. Turn
E_5el_Functions.fm Page 1 Monday, May 1, 2000 9:38 AM
Page 35 of 96

PRE-OPERATION CHECKS
4-2
4
NOTE:Pre-operation checks should be made each time the motorcycle is used. Such an inspection can be thoroughly accom-
plished in a very short time; and the added safety it assures is more than worth the time involved.
WARNING
If any item in the PRE-OPERATION CHECK is not working properly, have it inspected and repaired before operating
the motorcycle.Chassis fasteners• Make sure that all nuts, bolts and screws are properly tightened.
• Tighten if necessary.—
Fuel• Check fuel level.
• Fill with fuel if necessary.3-7 ~ 3-8
Lights, signals and switches• Check for proper operation. 6-27 ~ 6-28 ITEM CHECKS PAGE
E_5el_Preop.fm Page 2 Monday, May 1, 2000 9:39 AM
Page 54 of 96

PERIODIC MAINTENANCE AND MINOR REPAIR
6-9
66. Start the engine and warm it up for
a few minutes. While warming up,
check for oil leakage. If oil leakage
is found, stop the engine immedi-
ately and check for the cause.
NOTE:@ After the engine is started, the oil level
indicator light should go off if oil is filled
to the specified level. @
EC000067
CAUTION:@ If the indicator light flickers or re-
mains on, immediately stop the en-
gine and consult with a Yamaha
dealer. @Engine oil filter replacement
It is recommended that the oil filter be
changed by an authorized Yamaha
dealer due to necessary disassembly
of components that is only covered in
the service manual.
EAU02943
Final gear oil
EW000066
WARNING
@ Do not let foreign material enter the
final gear case. Be sure oil does not
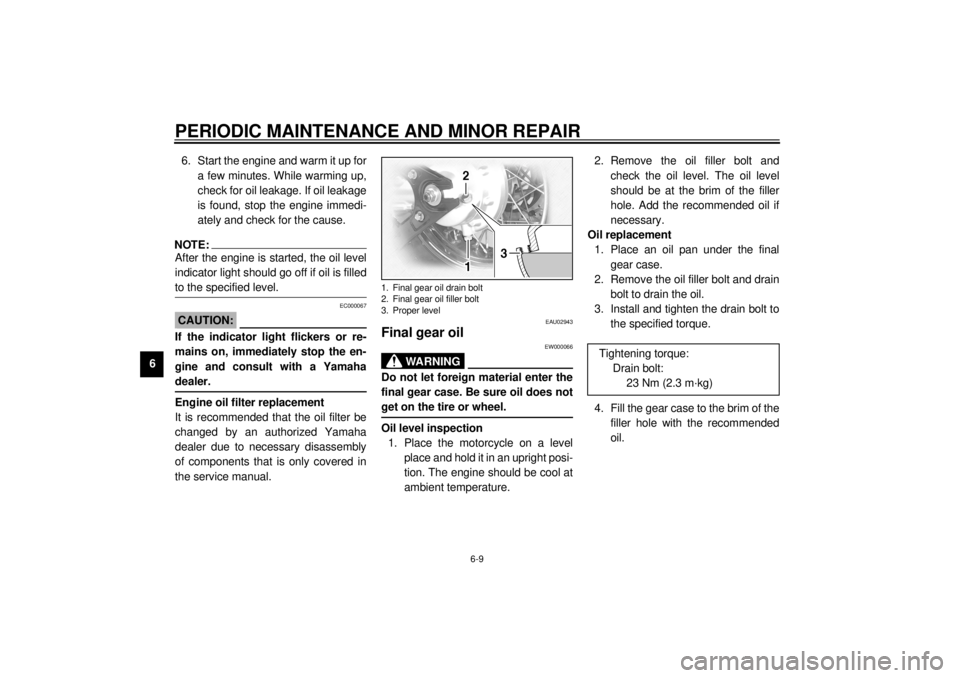
get on the tire or wheel. @Oil level inspection
1. Place the motorcycle on a level
place and hold it in an upright posi-
tion. The engine should be cool at
ambient temperature.2. Remove the oil filler bolt and
check the oil level. The oil level
should be at the brim of the filler
hole. Add the recommended oil if
necessary.
Oil replacement
1. Place an oil pan under the final
gear case.
2. Remove the oil filler bolt and drain
bolt to drain the oil.
3. Install and tighten the drain bolt to
the specified torque.
4. Fill the gear case to the brim of the
filler hole with the recommended
oil.1. Final gear oil drain bolt
2. Final gear oil filler bolt
3. Proper level
Tightening torque:
Drain bolt:
23 Nm (2.3 m·kg)
E_5el_Periodic.fm Page 9 Monday, May 1, 2000 9:44 AM
Page 62 of 96

PERIODIC MAINTENANCE AND MINOR REPAIR
6-17
6
EAU01746
Rear brake pedal height
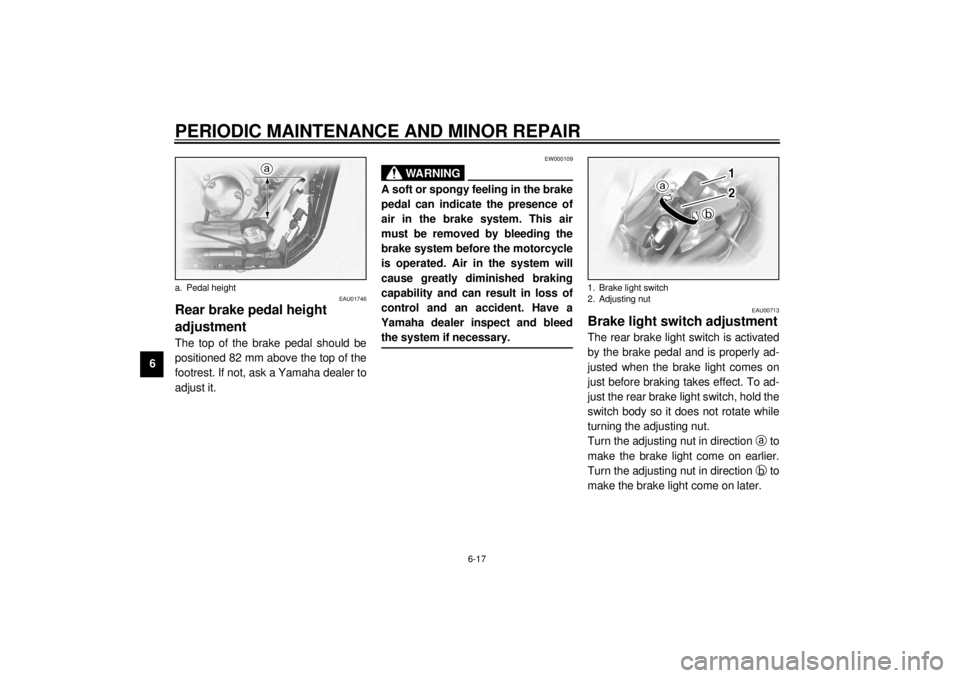
adjustmentThe top of the brake pedal should be
positioned 82 mm above the top of the
footrest. If not, ask a Yamaha dealer to
adjust it.
EW000109
WARNING
@ A soft or spongy feeling in the brake
pedal can indicate the presence of
air in the brake system. This air
must be removed by bleeding the
brake system before the motorcycle
is operated. Air in the system will
cause greatly diminished braking
capability and can result in loss of
control and an accident. Have a
Yamaha dealer inspect and bleed
the system if necessary. @
EAU00713
Brake light switch adjustmentThe rear brake light switch is activated
by the brake pedal and is properly ad-
justed when the brake light comes on
just before braking takes effect. To ad-
just the rear brake light switch, hold the
switch body so it does not rotate while
turning the adjusting nut.
Turn the adjusting nut in direction
a to
make the brake light come on earlier.
Turn the adjusting nut in direction
b to
make the brake light come on later.
a. Pedal height
1. Brake light switch
2. Adjusting nut
E_5el_Periodic.fm Page 17 Monday, May 1, 2000 9:44 AM
Page 72 of 96

PERIODIC MAINTENANCE AND MINOR REPAIR
6-27
6
EAU00833
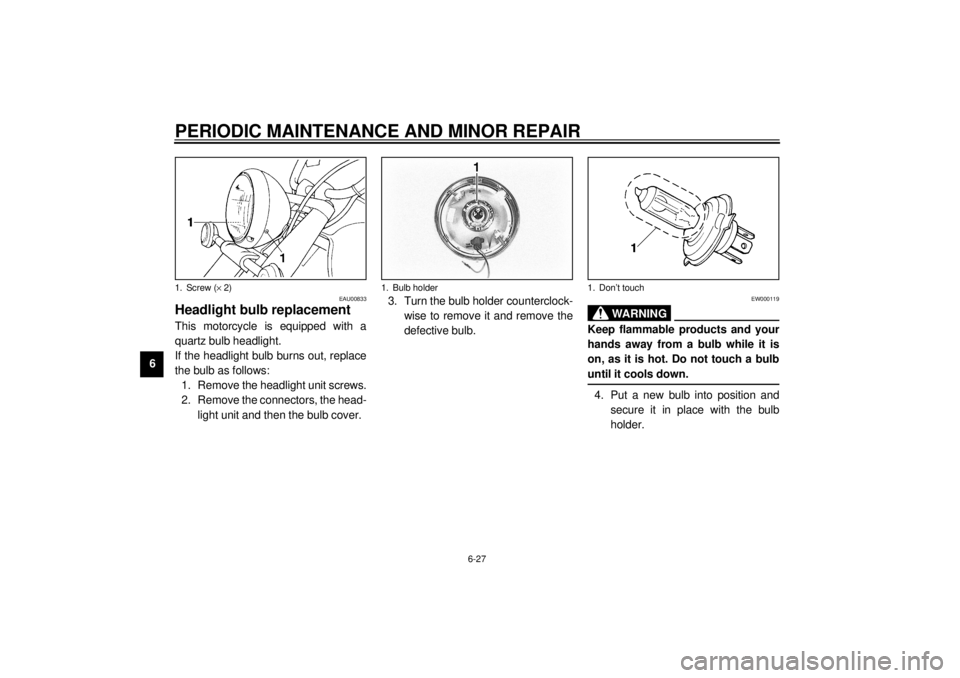
Headlight bulb replacementThis motorcycle is equipped with a
quartz bulb headlight.
If the headlight bulb burns out, replace
the bulb as follows:
1. Remove the headlight unit screws.
2. Remove the connectors, the head-
light unit and then the bulb cover.3. Turn the bulb holder counterclock-
wise to remove it and remove the
defective bulb.
EW000119
WARNING
@ Keep flammable products and your
hands away from a bulb while it is
on, as it is hot. Do not touch a bulb
until it cools down. @4. Put a new bulb into position and
secure it in place with the bulb
holder.
1. Screw (´ 2)
1. Bulb holder
1. Don’t touch
E_5el_Periodic.fm Page 27 Monday, May 1, 2000 9:44 AM