turn signal YAMAHA XVS125 2002 Owners Manual
[x] Cancel search | Manufacturer: YAMAHA, Model Year: 2002, Model line: XVS125, Model: YAMAHA XVS125 2002Pages: 86, PDF Size: 1.63 MB
Page 7 of 86

Tires ...............................................................6-15
Spoke wheels ................................................6-18
Adjusting the clutch lever free play ................6-19
Adjusting the brake lever free play ................6-20
Adjusting the brake pedal position and free
play ..............................................................6-20
Adjusting the rear brake light switch ..............6-22
Checking the front brake pads and rear
brake shoes .................................................6-22
Checking the brake fluid level ........................6-23
Changing the brake fluid ................................6-24
Drive chain slack ............................................6-25
Lubricating the drive chain .............................6-27
Checking and lubricating the cables ..............6-27
Checking and lubricating the throttle grip
and cable .....................................................6-28
Checking and lubricating the brake and
shift pedals ...................................................6-28
Checking and lubricating the brake and
clutch levers .................................................6-29
Checking and lubricating the sidestand .........6-29
Checking the front fork ...................................6-29
Checking the steering ....................................6-30
Checking the wheel bearings .........................6-31
Battery ...........................................................6-31
Replacing the fuses .......................................6-33Replacing the headlight bulb .........................6-34
Replacing a turn signal light bulb ...................6-36
Replacing the tail/brake light bulb ..................6-37
Supporting the motorcycle .............................6-37
Front wheel ....................................................6-38
Rear wheel .....................................................6-40
Troubleshooting .............................................6-41
Troubleshooting chart ....................................6-42
MOTORCYCLE CARE AND STORAGE ...........7-1
Care .................................................................7-1
Storage ............................................................7-4
SPECIFICATIONS .............................................8-1
Specifications ...................................................8-1
Conversion table ..............................................8-5
CONSUMER INFORMATION ............................9-1
Identification numbers ......................................9-1
Key identification number ................................9-1
Vehicle identification number ...........................9-1
Model label ......................................................9-2
TABLE OF CONTENTS
789
5JX-28199-E2 honbun 10/11/01 2:14 PM Page 6
Page 13 of 86

3-2
EAU03034
Indicator and warning lights
Indicator lights
EAU00063
High beam indicator light “&”
High beam indicator light
This indicator light comes on when
the high beam of the headlight is
switched on.
EAU00057
Turn signal indicator light “5”
Turn signal indicator light
This indicator light flashes when the
turn signal switch is pushed to the left
or right.
EAU00061
Neutral indicator light “N”
Neutral indicator light
This indicator light comes on when
the transmission is in the neutral
position.
EAU04243
Engine trouble warning light “”
Engine trouble warning light
This warning light comes on or flash-
es when an electrical circuit monitor-
ing the engine is defective. When this
occurs, have a Yamaha dealer check
the self-diagnosis system.NOTE:
This warning light comes on for a few
seconds when the key is turned to
“ON”, but this does not indicate a
malfunction.
EAU01087
Speedometer unit The speedometer unit is equipped
with a speedometer, an odometer
and a tripmeter. The speedometer
shows riding speed. The odometer
shows the total distance traveled.
The tripmeter shows the distance
traveled since it was last set to zero
with the reset knob. The tripmeter
can be used to estimate the distance
that can be traveled with a full tank of
fuel. This information will enable you
to plan future fuel stops.
INSTRUMENT AND CONTROL FUNCTIONS
3
2040
600
km/h80
100
120140160
12 34
2040600
km/h80
100
120140160
1
23
4
1. High beam indicator light “&”
2. Turn signal indicator light “5”
3. Neutral indicator light “N”
4. Engine trouble warning light “”
1. Speedometer
2. Odometer
3. Tripmeter
4. Reset knob
5JX-28199-E2 honbun 10/11/01 2:14 PM Page 12
Page 14 of 86

3-3
INSTRUMENT AND CONTROL FUNCTIONS
3
NOTE:
Only for the German model equipped
with a speed limiter:
The speed limiter prevents the motor-
cycle from exceeding a riding speed
of 80 km/h.
EAU00109
Anti-theft alarm (optional)
Anti-theft alarm (optional)
This motorcycle can be equipped
with an optional anti-theft alarm by a
Yamaha dealer. Contact a Yamaha
dealer for more information.
EAU00118
Handlebar switches
Handlebar switchesEAU00119
Pass switch “&”
Pass switch
Press this switch to flash the head-
light.
EAU03888
Dimmer switch “&/%”
Dimmer switch
Set this switch to “&” for the high
beam and to “%” for the low beam.
1
2
3
4
1. Pass switch“&”
2. Dimmer switch“&/%”
3. Turn signal switch“4/6”
4. Horn switch “*”
5JX-28199-E2 honbun 10/11/01 2:14 PM Page 13
Page 15 of 86

3-4
EAU03889
Turn signal switch “4/6”
Turn signal switch
To signal a right-hand turn, push this
switch to “6”. To signal a left-hand
turn, push this switch to “4”. When
released, the switch returns to the
center position. To cancel the turn
signal lights, push the switch in after
it has returned to the center position.
EAU00129
Horn switch “*”
Horn switch
Press this switch to sound the horn.
EAU03890
Engine stop switch “#/$”
Engine stop switch
Set this switch to “#” before starting
the engine. Set this switch to “$” to
stop the engine in case of an emer-
gency, such as when the motorcycle
overturns or when the throttle cable is
stuck.
EAU03898
Light switch “9/
'
/:”
Light switch
Set this switch to “
'
” to turn on
the auxiliary light, meter lighting and
taillight. Set the switch to “:” to turn
on the headlight also. Set the switch
to “9” to turn off all the lights.
EAU00143
Start switch “,”
Start switch
Push this switch to crank the engine
with the starter.
EC000005
cCSee page 5-1 for starting instruc-
tions prior to starting the engine.
INSTRUMENT AND CONTROL FUNCTIONS
3
1
2
3
4
1
2
3
1. Pass switch“&”
2. Dimmer switch“&/%”
3. Turn signal switch“4/6”
4. Horn switch “*”1. Engine stop switch“#/$”
2. Light switch“9/
'
/:”
3. Start switch “,”
5JX-28199-E2 honbun 10/11/01 2:14 PM Page 14
Page 64 of 86

6-33
PERIODIC MAINTENANCE AND MINOR REPAIR
6
EAU04190
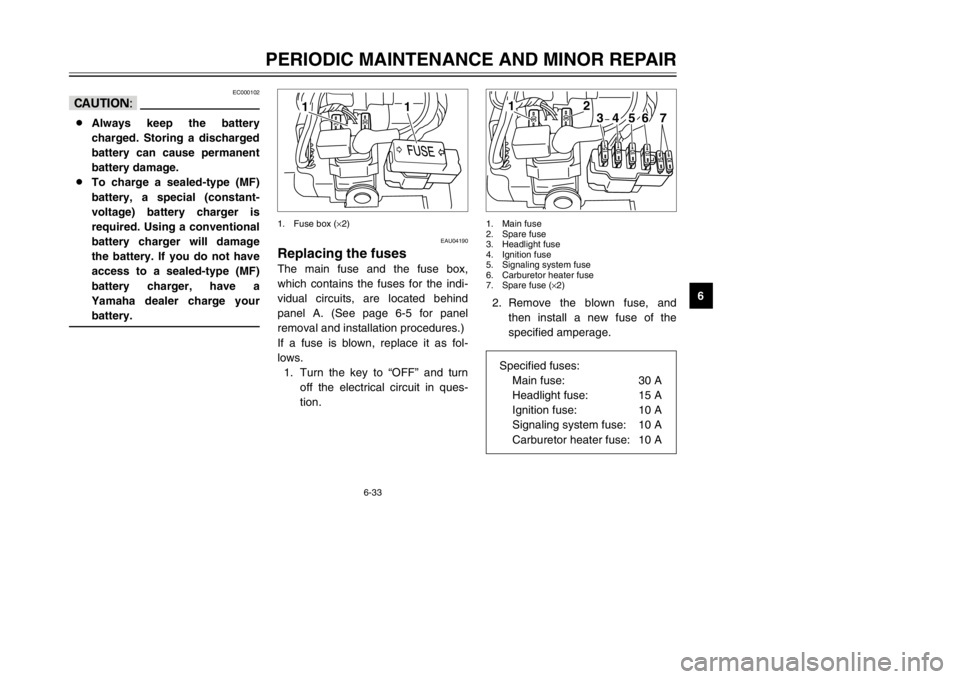
Replacing the fuses
Fuses, replacing
The main fuse and the fuse box,
which contains the fuses for the indi-
vidual circuits, are located behind
panel A. (See page 6-5 for panel
removal and installation procedures.)
If a fuse is blown, replace it as fol-
lows.
1. Turn the key to “OFF” and turn
off the electrical circuit in ques-
tion.
EC000102
cC8Always keep the battery
charged. Storing a discharged
battery can cause permanent
battery damage.
8To charge a sealed-type (MF)
battery, a special (constant-
voltage) battery charger is
required. Using a conventional
battery charger will damage
the battery. If you do not have
access to a sealed-type (MF)
battery charger, have a
Yamaha dealer charge your
battery.
2. Remove the blown fuse, and
then install a new fuse of the
specified amperage.
1
1
7
3
56
4
2
1
1. Fuse box (×2) 1. Main fuse
2. Spare fuse
3. Headlight fuse
4. Ignition fuse
5. Signaling system fuse
6. Carburetor heater fuse
7. Spare fuse (×2)
Specified fuses:
Main fuse: 30 A
Headlight fuse: 15 A
Ignition fuse: 10 A
Signaling system fuse: 10 A
Carburetor heater fuse: 10 A
5JX-28199-E2 honbun 10/11/01 2:14 PM Page 63
Page 67 of 86

6-36
PERIODIC MAINTENANCE AND MINOR REPAIR
6
EAU03218
Replacing a turn signal light
bulb1. Remove the turn signal lens by
removing the screws.2. Remove the defective bulb by
pushing it in and turning it coun-
terclockwise.
3. Insert a new bulb into the socket,
push it in, and then turn it clock-
wise until it stops.
4. Install the lens by installing the
screws.
EC000108
cCDo not overtighten the screws,
otherwise the lens may break.
2
1
1
1. Lens
2. Screw (×2)1. Bulb
6. Install the headlight unit by
installing the screws.
7. Have a Yamaha dealer adjust
the headlight beam if necessary.
5JX-28199-E2 honbun 10/11/01 2:14 PM Page 66
Page 82 of 86

8-4
SPECIFICATIONS
8
Battery
Type GT6B-3
Voltage, capacity 12 V, 6 Ah
Headlight typeHalogen bulb
Bulb voltage, wattage ×quantity
Headlight 12 V, 60/55 W ×1
Tail/brake light 12 V, 5/21 W ×1
Front turn signal light 12 V, 21 W ×2
Rear turn signal light 12 V, 21 W ×2
Auxiliary light 12 V, 4 W ×1
Meter lighting 12 V, 1.7 W ×1
Neutral indicator light 12 V, 1.7 W ×1
High beam indicator light 12 V, 1.7 W ×1
Turn indicator light 12 V, 1.7 W ×1
Engine indicator light 12 V, 1.7 W ×1
Fuses
Main fuse 30 A
Headlight fuse 15 A
Signaling system fuse 10 A
Ignition fuse 10 A
Carburetor heater fuse 10 A
5JX-28199-E2 honbun 10/11/01 2:14 PM Page 81