key YAMAHA XVS650 2001 Owners Manual
[x] Cancel search | Manufacturer: YAMAHA, Model Year: 2001, Model line: XVS650, Model: YAMAHA XVS650 2001Pages: 106, PDF Size: 16.06 MB
Page 4 of 106
EAU00005
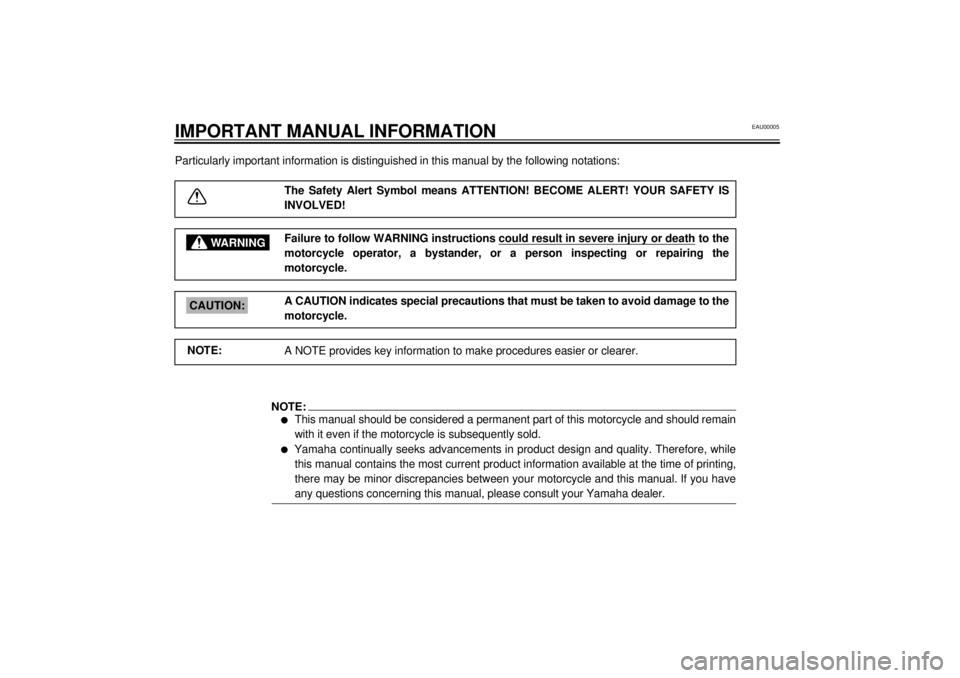
IMPORTANT MANUAL INFORMATIONParticularly important information is distinguished in this manual by the following notations:
The Safety Alert Symbol means ATTENTION! BECOME ALERT! YOUR SAFETY IS
INVOLVED!
WARNING
Failure to follow WARNING instructions could result in severe injury or death
to the
motorcycle operator, a bystander, or a person inspecting or repairing the
motorcycle.
CAUTION:A CAUTION indicates special precautions that must be taken to avoid damage to the
motorcycle.NOTE:
A NOTE provides key information to make procedures easier or clearer.
NOTE:@ l
This manual should be considered a permanent part of this motorcycle and should remain
with it even if the motorcycle is subsequently sold.
l
Yamaha continually seeks advancements in product design and quality. Therefore, while
this manual contains the most current product information available at the time of printing,
there may be minor discrepancies between your motorcycle and this manual. If you have
any questions concerning this manual, please consult your Yamaha dealer.
@
E_5bn.book Page 1 Wednesday, October 4, 2000 7:51 PM
Page 18 of 106
3-1
3
EAU00027
3-INSTRUMENT AND CONTROL FUNCTIONS
EAU00029
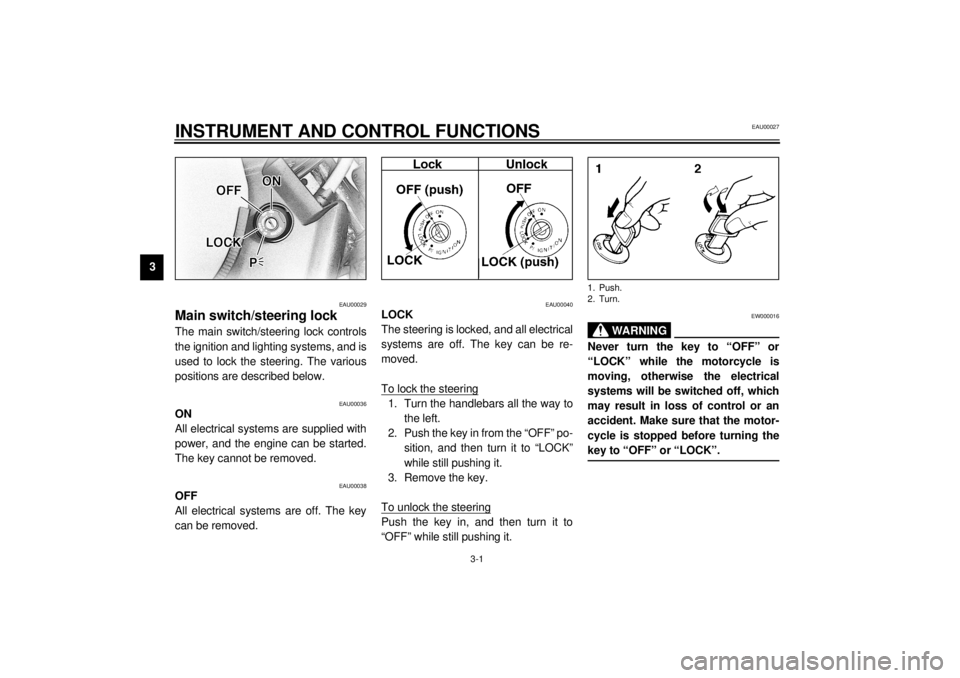
Main switch/steering lock The main switch/steering lock controls
the ignition and lighting systems, and is
used to lock the steering. The various
positions are described below.
EAU00036
ON
All electrical systems are supplied with
power, and the engine can be started.
The key cannot be removed.
EAU00038
OFF
All electrical systems are off. The key
can be removed.
EAU00040
LOCK
The steering is locked, and all electrical
systems are off. The key can be re-
moved.
To lock the steering1. Turn the handlebars all the way to
the left.
2. Push the key in from the “OFF” po-
sition, and then turn it to “LOCK”
while still pushing it.
3. Remove the key.
To unlock the steeringPush the key in, and then turn it to
“OFF” while still pushing it.
EW000016
WARNING
@ Never turn the key to “OFF” or
“LOCK” while the motorcycle is
moving, otherwise the electrical
systems will be switched off, which
may result in loss of control or an
accident. Make sure that the motor-
cycle is stopped before turning the
key to “OFF” or “LOCK”. @1. Push.
2. Turn.
E_5bn.book Page 1 Wednesday, October 4, 2000 7:51 PM
Page 19 of 106
INSTRUMENT AND CONTROL FUNCTIONS
3-2
3
EAU00044
(Parking)
The steering is locked, and the taillight
is on, but all other electrical systems
are off. The key can be removed.
The steering must be locked before the
key can be turned to “ ”.
ECA00043
CAUTION:@ Do not use the parking position for
an extended length of time, other-
wise the battery may discharge. @
EAU03034
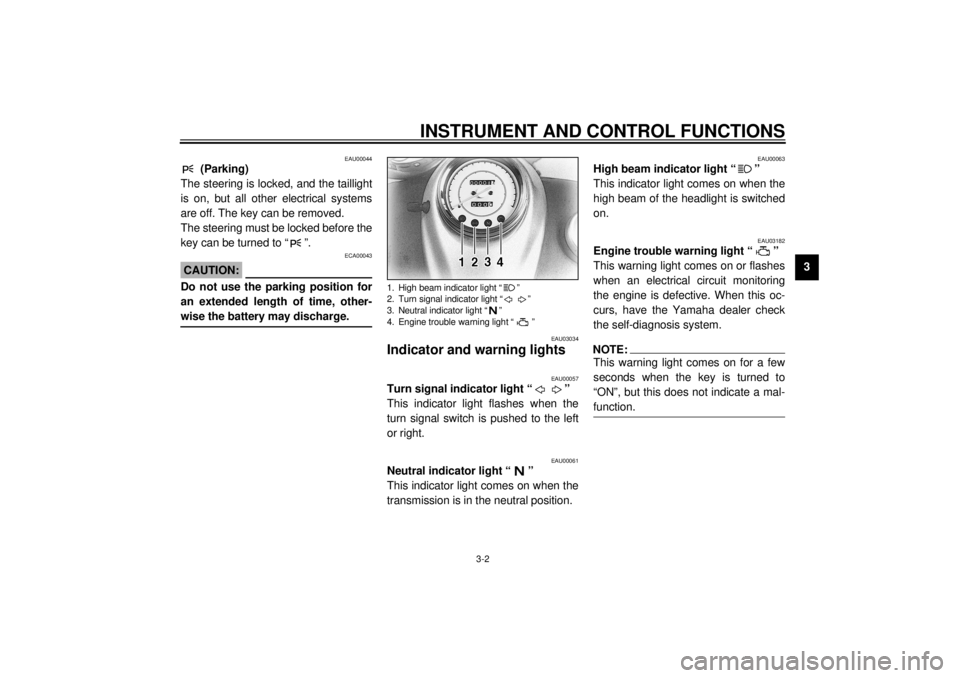
Indicator and warning lights
EAU00057
Turn signal indicator light “ ”
This indicator light flashes when the
turn signal switch is pushed to the left
or right.
EAU00061
Neutral indicator light “ ”
This indicator light comes on when the
transmission is in the neutral position.
EAU00063
High beam indicator light “ ”
This indicator light comes on when the
high beam of the headlight is switched
on.
EAU03182
Engine trouble warning light “ ”
This warning light comes on or flashes
when an electrical circuit monitoring
the engine is defective. When this oc-
curs, have the Yamaha dealer check
the self-diagnosis system.NOTE:@ This warning light comes on for a few
seconds when the key is turned to
“ON”, but this does not indicate a mal-
function. @
1. High beam indicator light “ ”
2. Turn signal indicator light “ ”
3. Neutral indicator light “ ”
4. Engine trouble warning light “ ”
E_5bn.book Page 2 Wednesday, October 4, 2000 7:51 PM
Page 24 of 106

INSTRUMENT AND CONTROL FUNCTIONS
3-7
3
EAU00169
Fuel tank cap To remove the fuel tank cap
Insert the key into the lock and turn it
1/4 turn clockwise. The lock will be re-
leased and the fuel tank cap can be
removed.
To install the fuel tank cap
1. Insert the fuel tank cap into the
tank opening with the key inserted
in the lock and with the “ ” mark
facing forward.
2. Turn the key counterclockwise to
the original position, and then re-
move it.
NOTE:@ The fuel tank cap cannot be installed
unless the key is in the lock. In addition,
the key cannot be removed if the cap is
not properly installed and locked. @
EW000024
WARNING
@ Make sure that the fuel tank cap is
properly installed before riding. @
EAU01183
Fuel Make sure that there is sufficient fuel in
the tank. Fill the fuel tank to the bottom
of the filler tube as shown in the illustra-
tion.
EW000130
WARNING
@ l
Do not overfill the fuel tank, oth-
erwise it may overflow when the
fuel warms up and expands.
l
Avoid spilling fuel on the hot
engine.
@
1. “ ”mark
2. Unlock.
1. Fuel tank filler tube
2. Fuel level
E_5bn.book Page 7 Wednesday, October 4, 2000 7:51 PM
Page 29 of 106

INSTRUMENT AND CONTROL FUNCTIONS
3-12
3
To install the rider seat
1. Insert the projection on the front of
the rider seat into the holder as
shown, place the seat in the origi-
nal position, and then install the
bolt.
2. Install the passenger seat.NOTE:_ Make sure that the seats are properly
secured before riding. _
EAU00260
Helmet holder To open the helmet holder, insert the
key into the lock, and then turn the key
as shown.
To lock the helmet holder, place it in
the original position, and then remove
the key.
EW000030
WARNING
@ Never ride with a helmet attached to
the helmet holder, since the helmet
may hit objects, causing loss of
control and possibly an accident. @
1. Seat holder
2. ProjectionXVS650A
1. Helmet holder
2. Unlock.
E_5bn.book Page 12 Wednesday, October 4, 2000 7:51 PM
Page 30 of 106

INSTRUMENT AND CONTROL FUNCTIONS
3-13
3
EAU01869
Storage compartment The storage compartment is located on
the left side of the motorcycle.To open the storage compartment
1. Slide the lock cover open, insert
the key into the lock, and then turn
it clockwise.
2. Pull the storage compartment cov-
er out as shown.To close the storage compartment
1. Place the storage compartment
cover in its original position as
shown.
2. Turn the key counterclockwise, re-
move it, and then close the lock
cover.1. Storage compartment cover
2. Storage compartment lock cover
3. Storage compartment lock
1. Storage compartment
2. Storage compartment cover
E_5bn.book Page 13 Wednesday, October 4, 2000 7:51 PM
Page 34 of 106
INSTRUMENT AND CONTROL FUNCTIONS
3-17
3
CD-01E
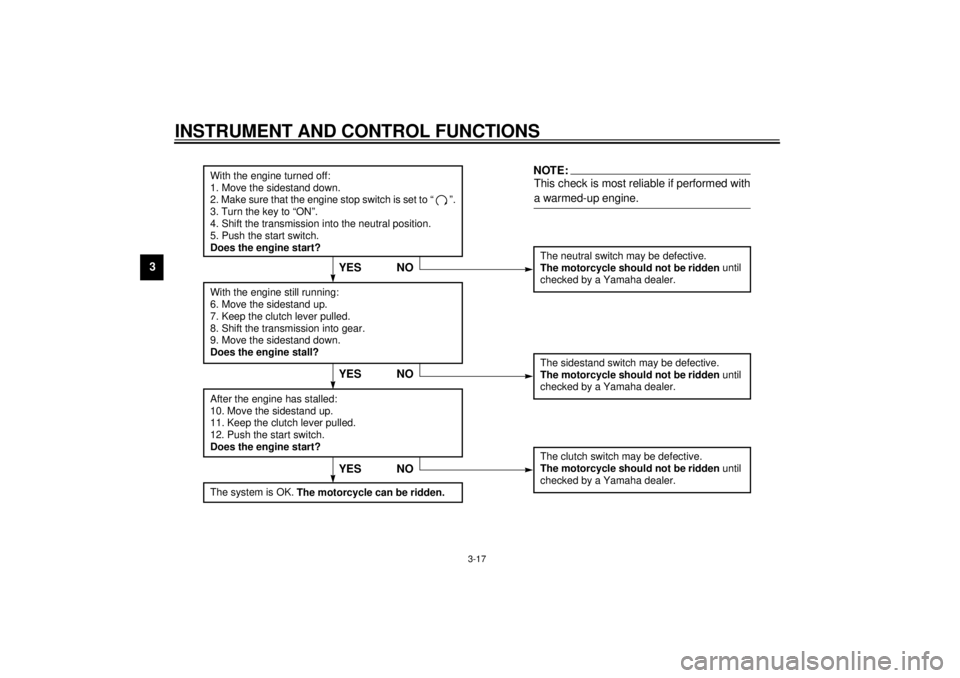
With the engine turned off:
1. Move the sidestand down.
2. Make sure that the engine stop switch is set to “ ”.
3. Turn the key to “ON”.
4. Shift the transmission into the neutral position.
5. Push the start switch.
Does the engine start?
The neutral switch may be defective.
The motorcycle should not be ridden until
checked by a Yamaha dealer.
With the engine still running:
6. Move the sidestand up.
7. Keep the clutch lever pulled.
8. Shift the transmission into gear.
9. Move the sidestand down.
Does the engine stall?After the engine has stalled:
10. Move the sidestand up.
11. Keep the clutch lever pulled.
12. Push the start switch.
Does the engine start?
The sidestand switch may be defective.
The motorcycle should not be ridden until
checked by a Yamaha dealer.The clutch switch may be defective.
The motorcycle should not be ridden until
checked by a Yamaha dealer.
NO
NOTE:This check is most reliable if performed with
a warmed-up engine.
YESYES NO
The system is OK.
The motorcycle can be ridden.
YES NO
E_5bn.book Page 17 Wednesday, October 4, 2000 7:51 PM
Page 40 of 106
5-1
5
EAU00372
5-OPERATION AND IMPORTANT RIDING POINTS
EAU00373
WARNING
@ l
Become thoroughly familiar
with all operating controls and
their functions before riding.
Consult a Yamaha dealer re-
garding any control or function
that you do not thoroughly un-
derstand.
l
Never start the engine or oper-
ate it in a closed area for any
length of time. Exhaust fumes
are poisonous, and inhaling
them can cause loss of con-
sciousness and death within a
short time. Always make sure
that there is adequate ventila-
tion.
l
Before starting out, make sure
that the sidestand is up. If the
sidestand is not raised com-
pletely, it could contact the
ground and distract the opera-
tor, resulting in a possible loss
of control.
@
EAU03461*
Starting the engine In order for the ignition circuit cut-off
system to enable starting, one of the
following conditions must be met:l
The transmission is in the neutral
position.
l
The transmission is in gear with
the clutch lever pulled and the sid-
estand up.
EW000054
WARNING
@ l
Before starting the engine,
check the function of the igni-
tion circuit cut-off system ac-
cording to the procedure
described on page 3-17.
l
Never ride with the sidestand
down.
@
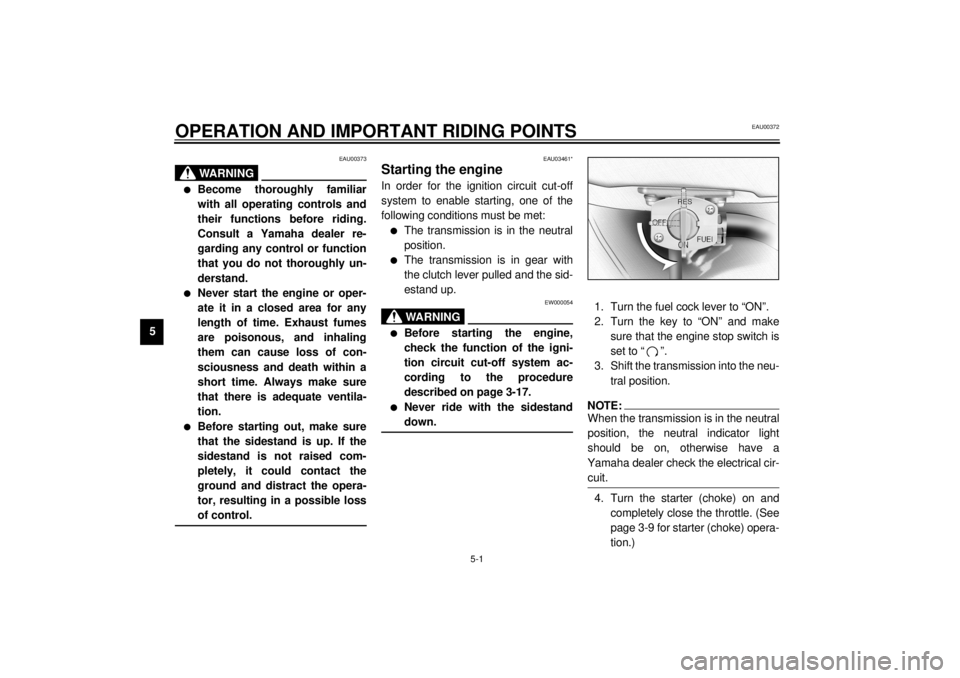
1. Turn the fuel cock lever to “ON”.
2. Turn the key to “ON” and make
sure that the engine stop switch is
set to “ ”.
3. Shift the transmission into the neu-
tral position.NOTE:@ When the transmission is in the neutral
position, the neutral indicator light
should be on, otherwise have a
Yamaha dealer check the electrical cir-
cuit. @4. Turn the starter (choke) on and
completely close the throttle. (See
page 3-9 for starter (choke) opera-
tion.)
E_5bn.book Page 1 Wednesday, October 4, 2000 7:51 PM
Page 44 of 106

OPERATION AND IMPORTANT RIDING POINTS
5-5
5
EAU00457
Parking When parking, stop the engine, re-
move the key from the main switch,
and then turn the fuel cock lever to
“OFF”.
EW000058
WARNING
@ l
Since the engine and exhaust
system can become very hot,
park in a place where pedestri-
ans or children are not likely to
touch them.
l
Do not park on a slope or on
soft ground, otherwise the
motorcycle may overturn.
@E_5bn.book Page 5 Wednesday, October 4, 2000 7:51 PM
Page 76 of 106
PERIODIC MAINTENANCE AND MINOR REPAIR
6-31
6
EAU00825
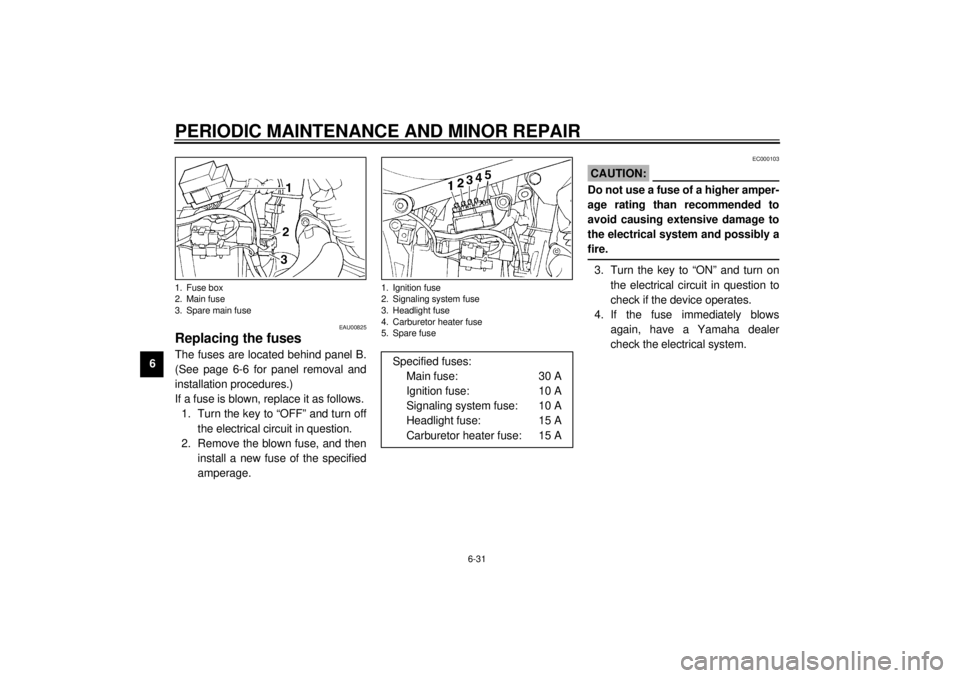
Replacing the fuses The fuses are located behind panel B.
(See page 6-6 for panel removal and
installation procedures.)
If a fuse is blown, replace it as follows.
1. Turn the key to “OFF” and turn off
the electrical circuit in question.
2. Remove the blown fuse, and then
install a new fuse of the specified
amperage.
EC000103
CAUTION:@ Do not use a fuse of a higher amper-
age rating than recommended to
avoid causing extensive damage to
the electrical system and possibly a
fire. @3. Turn the key to “ON” and turn on
the electrical circuit in question to
check if the device operates.
4. If the fuse immediately blows
again, have a Yamaha dealer
check the electrical system.
1. Fuse box
2. Main fuse
3. Spare main fuse
1. Ignition fuse
2. Signaling system fuse
3. Headlight fuse
4. Carburetor heater fuse
5. Spare fuse
Specified fuses:
Main fuse: 30 A
Ignition fuse: 10 A
Signaling system fuse: 10 A
Headlight fuse: 15 A
Carburetor heater fuse: 15 A
E_5bn.book Page 31 Wednesday, October 4, 2000 7:51 PM