ABS YAMAHA XVZ1300A 2000 Owners Manual
[x] Cancel search | Manufacturer: YAMAHA, Model Year: 2000, Model line: XVZ1300A, Model: YAMAHA XVZ1300A 2000Pages: 91, PDF Size: 15.45 MB
Page 12 of 91
DESCRIPTION
2-2
2
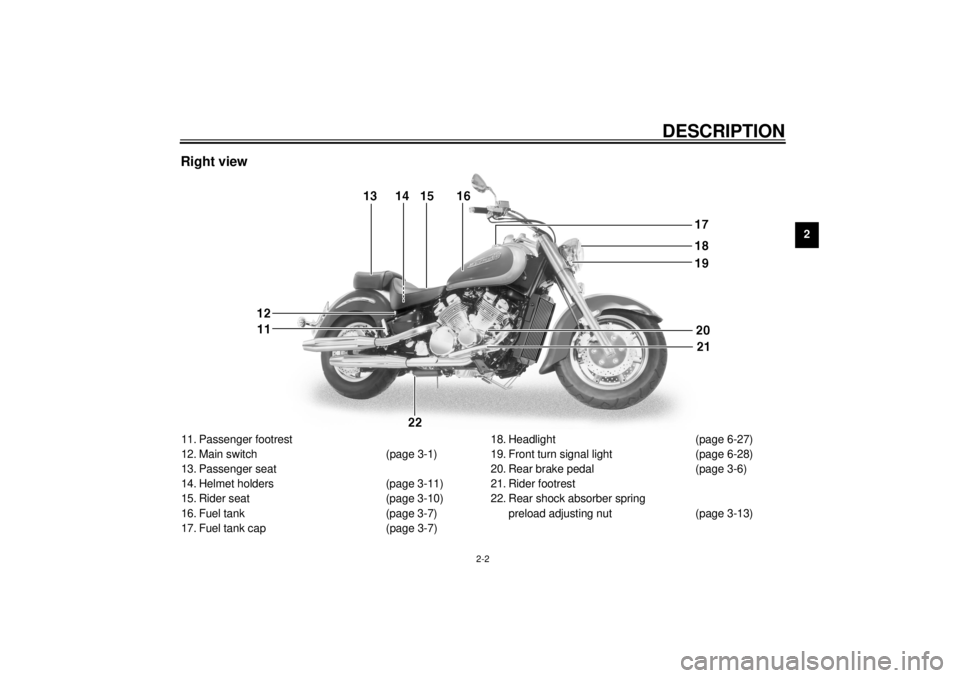
Right view11. Passenger footrest
12. Main switch (page 3-1)
13. Passenger seat
14. Helmet holders (page 3-11)
15. Rider seat (page 3-10)
16. Fuel tank (page 3-7)
17. Fuel tank cap (page 3-7)18. Headlight (page 6-27)
19. Front turn signal light (page 6-28)
20. Rear brake pedal (page 3-6)
21. Rider footrest
22. Rear shock absorber spring
preload adjusting nut (page 3-13)
E_4YP_Description.fm Page 2 Wednesday, October 6, 1999 10:03 AM
Page 14 of 91
3
INSTRUMENT AND CONTROL FUNCTIONS
Main switch......................................................................................... 3-1
Indicator lights .................................................................................... 3-1
Speedometer...................................................................................... 3-3
Antitheft alarm (optional) .................................................................... 3-3
Handlebar switches ............................................................................ 3-4
Clutch lever ........................................................................................ 3-5
Shift pedal .......................................................................................... 3-6
Front brake lever................................................................................. 3-6
Rear brake pedal ................................................................................ 3-6
Fuel tank cap...................................................................................... 3-7
Fuel .................................................................................................... 3-7
Fuel cock ............................................................................................ 3-8
Starter (choke) knob........................................................................... 3-9
Steering lock ...................................................................................... 3-9
Rider seat ......................................................................................... 3-10
Helmet holders ................................................................................. 3-11
Adjusting front fork preload .............................................................. 3-12
Adjusting rear shock absorber preload ............................................ 3-13
Sidestand ......................................................................................... 3-15
Sidestand/clutch switch operation check.......................................... 3-15
E_4YP_FunctionsTOC.fm Page 1 Wednesday, October 6, 1999 10:03 AM
Page 27 of 91
INSTRUMENT AND CONTROL FUNCTIONS
3-13
3
EAU01694
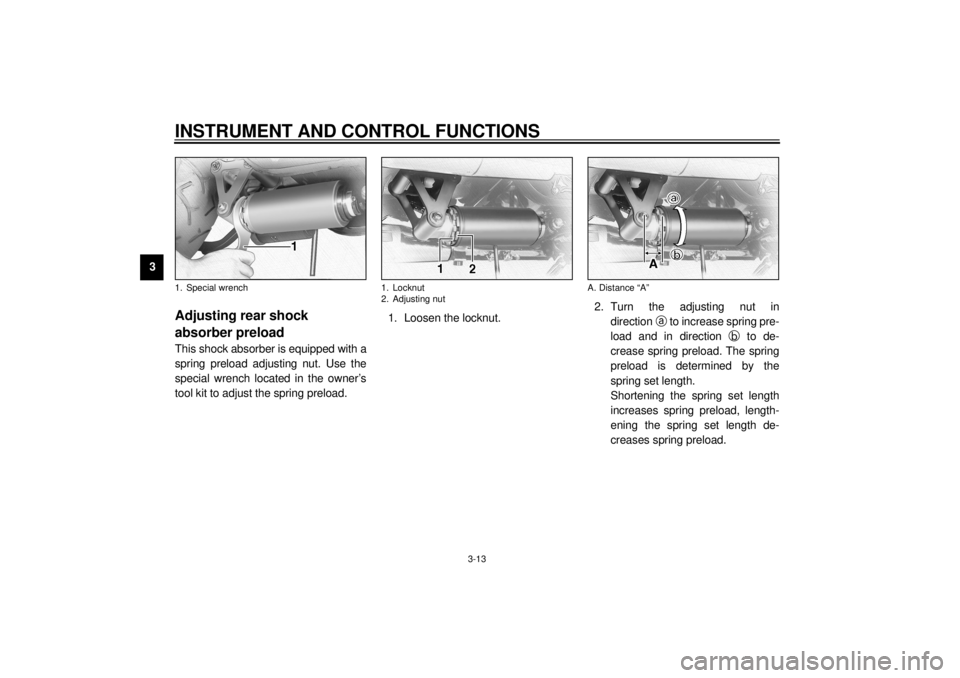
Adjusting rear shock
absorber preloadThis shock absorber is equipped with a
spring preload adjusting nut. Use the
special wrench located in the owner’s
tool kit to adjust the spring preload.1. Loosen the locknut.2. Turn the adjusting nut in
direction
a to increase spring pre-
load and in direction
b to de-
crease spring preload. The spring
preload is determined by the
spring set length.
Shortening the spring set length
increases spring preload, length-
ening the spring set length de-
creases spring preload.1. Special wrench
1. Locknut
2. Adjusting nut
A. Distance “A”
E_4YP_Functions.fm Page 13 Wednesday, October 6, 1999 10:03 AM
Page 28 of 91
INSTRUMENT AND CONTROL FUNCTIONS
3-14
3
EC000015
CAUTION:@ Never attempt to turn an adjuster
beyond the maximum or minimum
setting. @3. Tighten the locknut to the speci-
fied torque.
EC000018
CAUTION:@ Always tighten the locknut against
the spring adjusting nut and tighten
the locknut to the specified torque. @
EAU00315
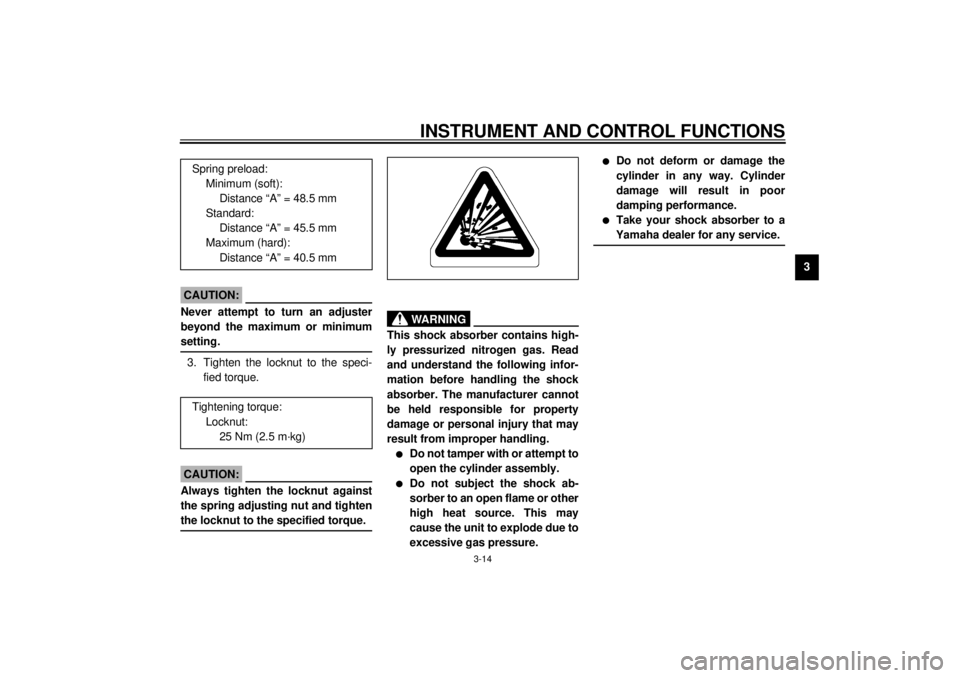
WARNING
@ This shock absorber contains high-
ly pressurized nitrogen gas. Read
and understand the following infor-
mation before handling the shock
absorber. The manufacturer cannot
be held responsible for property
damage or personal injury that may
result from improper handling.l
Do not tamper with or attempt to
open the cylinder assembly.
l
Do not subject the shock ab-
sorber to an open flame or other
high heat source. This may
cause the unit to explode due to
excessive gas pressure.
l
Do not deform or damage the
cylinder in any way. Cylinder
damage will result in poor
damping performance.
l
Take your shock absorber to a
Yamaha dealer for any service.
@
Spring preload:
Minimum (soft):
Distance “A” = 48.5 mm
Standard:
Distance “A” = 45.5 mm
Maximum (hard):
Distance “A” = 40.5 mm
Tightening torque:
Locknut:
25 Nm (2.5 m·kg)
E_4YP_Functions.fm Page 14 Wednesday, October 6, 1999 10:03 AM
Page 46 of 91

PERIODIC MAINTENANCE AND MINOR REPAIR
6-4
6
10
*Tires• Check tread depth and for damage.
• Replace if necessary.
• Check air pressure.
• Correct if necessary.ÖÖ
11*Wheel bearings• Check bearing for looseness or damage.
• Replace if necessary. ÖÖ
12*Swingarm• Check swingarm pivoting point for play.
• Correct if necessary.
• Lubricate with molybdenum disulfide grease every 24,000 km or
24 months (whichever comes first).Ă–Ă–
13*Steering bearings• Check bearing play and steering for roughness.
• Correct accordingly.
• Lubricate with lithium soap base grease every 24,000 km
or 24 months (whichever comes first).Ă–Ă–
14*Chassis fasteners• Make sure that all nuts, bolts and screws are properly tightened.
• Tighten if necessary.ÖÖ
15 Sidestand• Check operation.
• Lubricate and repair if necessary.ÖÖ
16*Sidestand switch• Check operation.
• Replace if necessary.ÖÖÖ
17*Front fork• Check operation and for oil leakage.
• Correct accordingly.ÖÖ
18*Rear shock absorber
assembly• Check operation and shock absorber for oil leakage.
• Replace shock absorber assembly if necessary. ÖÖ
19*Rear suspension relay
arm and connecting arm
pivoting points• Check operation.
• Lubricate with molybdenum disulfide grease every 24,000 km or
24 months (whichever comes first).Ă–Ă– NO. ITEM CHECKS AND MAINTENANCE JOBSINITIAL
(1,000 km)EVERY
6,000 km
or
6 months
(whichever
comes first)12,000 km
or
12 months
(whichever
comes first)
* Since these items require special tools, data and technical skills, they should be serviced by a Yamaha dealer.
E_4YP_Periodic.fm Page 4 Wednesday, October 6, 1999 10:05 AM
Page 77 of 91
MOTORCYCLE CARE AND STORAGE
7-3
71. Clean your motorcycle with cold
water and soap after the engine
has cooled down.
ECA00012
CAUTION:@ Do not use warm water since it in-
creases the corrosive action of the
salt. @2. Be sure to apply a corrosion pro-
tection spray on all (even chrome-
and nickel-plated) metal surfaces
to prevent corrosion.After cleaning
1. Dry the motorcycle with a chamois
or an absorbing cloth.
2. Use a chrome polish to shine
chrome, aluminum and stainless-
steel parts, including the exhaust
system. (Even the thermally in-
duced discoloring of stainless-
steel exhaust systems can be re-
moved through polishing.)
3. To prevent corrosion, it is recom-
mended to apply a corrosion pro-
tection spray on all (even chrome-
and nickel-plated) metal surfaces.
4. Use spray oil as a universal clean-
er to remove any remaining dirt.
5. Touch up minor paint damage
caused by stones, etc.
6. Wax all painted surfaces.
7. Let the motorcycle dry completely
before storing it or covering it.
EWA00001
WARNING
@ Make sure that there is no oil or wax
on the brakes and tires. If neces-
sary, clean the brake discs and lin-
ings with a regular brake disc
cleaner or acetone, and wash the
tires with warm water and mild soap.
Then, carefully test the motorcycle
for its braking performance and cor-
nering behavior. @
E_4YP_Cleaning.fm Page 3 Wednesday, October 6, 1999 10:06 AM
Page 83 of 91

SPECIFICATIONS
8-3
8
Maximum load* 203 kg
Air pressure (cold tire)
Up to 90 kg load*
Front 250 kPa (2.50 kg/cm
2, 2.50 bar)
Rear 250 kPa (2.50 kg/cm2, 2.50 bar)
90 kg load ~ maximum load*
Front 250 kPa (2.50 kg/cm2, 2.50 bar)
Rear 280 kPa (2.80 kg/cm2, 2.80 bar)
* Load is the total weight of cargo, rider, passenger and accesso-
ries.
Wheels
Front
Ty p e C a s t
Size 16 ´ MT3.50
Rear
Ty p e C a s t
Size 15M/C ´ MT4.00
Brakes
Front
Type Dual disc brake
Operation Right hand operation
Fluid DOT 4Rear
Type Single disc brake
Operation Right foot operation
Fluid DOT 4
Suspension
Fr o n t
Ty p e Te l e s c o p i c f o r k
Rear
Type Swingarm (link suspension)
Shock absorber
Front Coil-air spring / oil damper
Rear Coil spring / gas-oil damper
Wheel travel
Front 140 mm
Rear 95 mm
Electrical sysyem
Ignition system T.C.I. (digital)
Charging system
Type A.C. magneto
Standard output 14 V, 23 A @ 5,000 r/min
Battery
Type YTX20L-BS
Voltage, capacity 12 V, 18 AH
E_4YP_Spec.fm Page 3 Wednesday, October 6, 1999 10:06 AM
Page 89 of 91
10-INDEXAAdjusting front fork preload .................... 3-12
Adjusting rear shock absorber
preload ................................................ 3-13
Antitheft alarm (optional) ..........................3-3BBattery ................................................... 6-23
Brake and clutch lever lubrication........... 6-22
Brake and shift pedal lubrication ............ 6-21
Brake fluid replacement ......................... 6-21
Brake light switch adjustment ................. 6-18CCarburetor adjustment ........................... 6-11
Care.........................................................7-1
Checking the front and
rear brake pads ................................... 6-19
Clutch lever ..............................................3-5
Clutch lever free play adjustment ........... 6-16
Controls/Instruments ................................2-3
Coolant .................................................. 6-10DDimmer switch .........................................3-4EEngine break-in........................................5-5
Engine oil .................................................6-7
Engine overheat indicator light .................3-2
Engine stop switch ...................................3-5FFinal gear oil .......................................... 6-10
Front brake lever ......................................3-6
Front brake lever free play
adjustment .......................................... 6-17
Front fork inspection .............................. 6-23
Fuel ......................................................... 3-7
Fuel cock ................................................. 3-8
Fuel level indicator light ........................... 3-1
Fuel tank cap ........................................... 3-7
Fuse replacement.................................. 6-25GGive safety the right of way ..................... 1-1HHandlebar switches ................................. 3-4
Dimmer switch ................................... 3-4
Engine stop switch ............................. 3-5
Horn switch ........................................ 3-4
Lights switch ...................................... 3-5
Pass switch ........................................ 3-4
Start switch ........................................ 3-5
Turn signal switch .............................. 3-4
Headlight bulb replacement ................... 6-27
Helmet holders ...................................... 3-11
High beam indicator light ......................... 3-1
Horn switch ............................................. 3-4IIdentification number records................... 9-1
Idle speed adjustment ........................... 6-11
Indicator lights ......................................... 3-1
Engine overheat indicator light ........... 3-2
Fuel level indicator light ...................... 3-1
High beam indicator light .................... 3-1
Neutral indicator light.......................... 3-1
Oil level indicator light .........................3-2
Overdrive / Engine trouble
indicator light....................................3-2
Turn indicator light ..............................3-2
Inspecting the brake fluid level ...............6-19
KKey identification number .........................9-1LLeft view...................................................2-1
Lights switch ............................................3-5MMain switch ..............................................3-1
Model label ..............................................9-2NNeutral indicator light ...............................3-1OOil level indicator light ..............................3-2
Overdrive / Engine trouble indicator
light ........................................................3-2PParking.....................................................5-6
Pass switch ..............................................3-4
Periodic maintenance and lubrication .......6-3
Pre-operation check list ............................4-1RRear brake pedal .....................................3-6
Rear brake pedal height adjustment.......6-17
Rider seat ..............................................3-10
Right view ................................................2-2
E_4YPIX.fm Page 1 Wednesday, October 6, 1999 10:07 AM