ignition YAMAHA XVZ1300TF 2000 Owners Manual
[x] Cancel search | Manufacturer: YAMAHA, Model Year: 2000, Model line: XVZ1300TF, Model: YAMAHA XVZ1300TF 2000Pages: 121, PDF Size: 19.23 MB
Page 15 of 121
3-1
3
EAU00027
3-INSTRUMENT AND CONTROL FUNCTIONS
EAU00029*
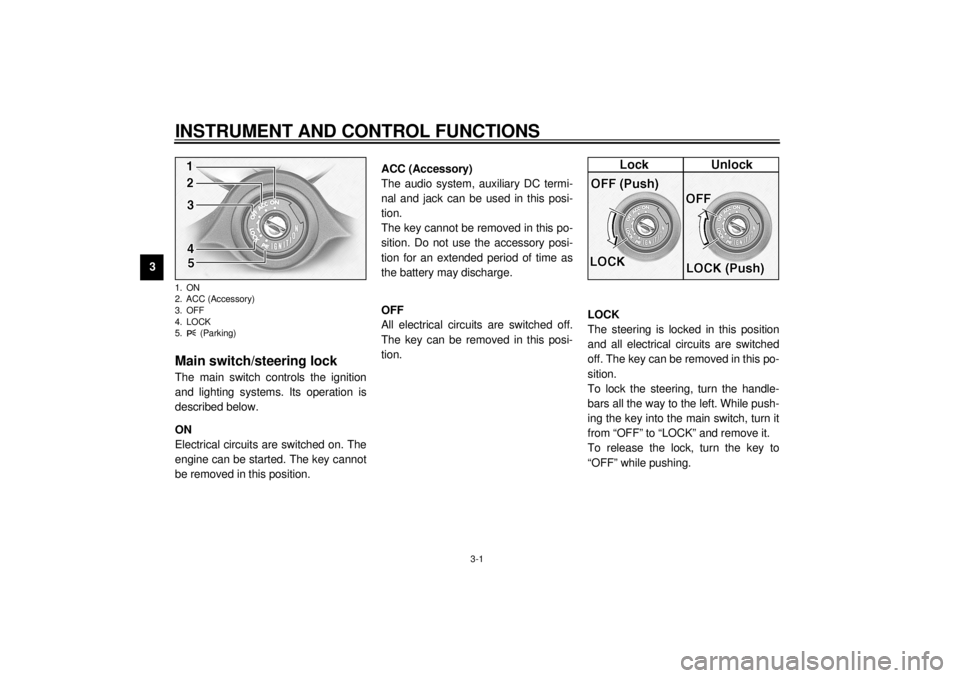
Main switch/steering lockThe main switch controls the ignition
and lighting systems. Its operation is
described below.
EAU00036
ON
Electrical circuits are switched on. The
engine can be started. The key cannot
be removed in this position.
EAU01842
ACC (Accessory)
The audio system, auxiliary DC termi-
nal and jack can be used in this posi-
tion.
The key cannot be removed in this po-
sition. Do not use the accessory posi-
tion for an extended period of time as
the battery may discharge.
EAU00038
OFF
All electrical circuits are switched off.
The key can be removed in this posi-
tion.
EAU00040*
LOCK
The steering is locked in this position
and all electrical circuits are switched
off. The key can be removed in this po-
sition.
To lock the steering, turn the handle-
bars all the way to the left. While push-
ing the key into the main switch, turn it
from “OFF” to “LOCK” and remove it.
To release the lock, turn the key to
“OFF” while pushing.
1. ON
2. ACC (Accessory)
3. OFF
4. LOCK
5. (Parking)E_5jc_Functions.fm Page 1 Saturday, October 16, 1999 1:08 PM
Page 24 of 121
INSTRUMENT AND CONTROL FUNCTIONS
3-10
3
EAU00138
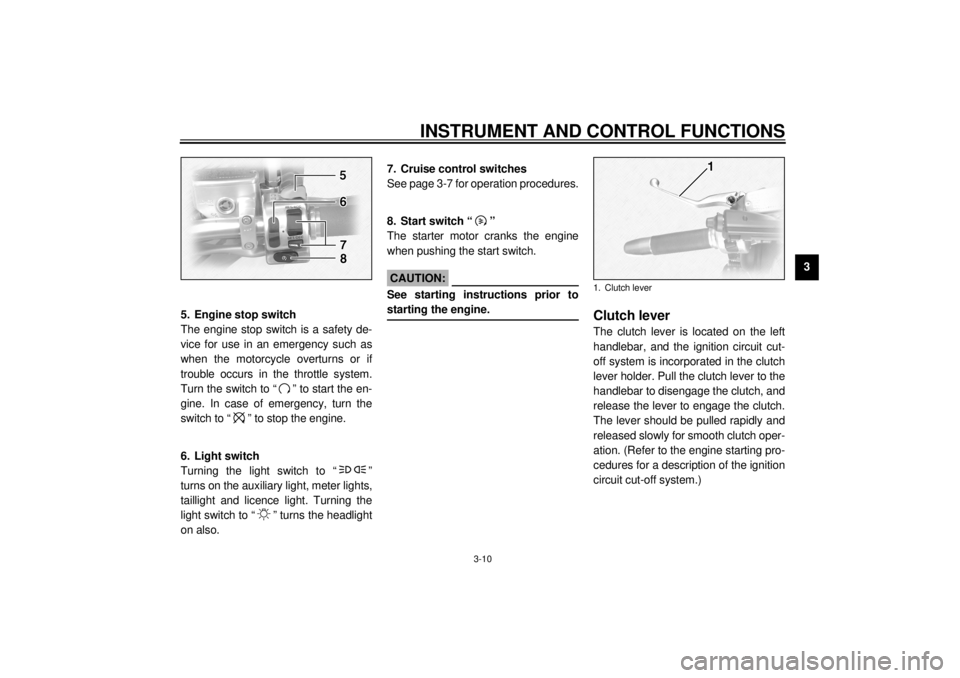
5. Engine stop switch
The engine stop switch is a safety de-
vice for use in an emergency such as
when the motorcycle overturns or if
trouble occurs in the throttle system.
Turn the switch to “ ” to start the en-
gine. In case of emergency, turn the
switch to “ ” to stop the engine.
EAU01871
6. Light switch
Turning the light switch to “ ”
turns on the auxiliary light, meter lights,
taillight and licence light. Turning the
light switch to “ ” turns the headlight
on also.
EAU01859
7. Cruise control switches
See page 3-7 for operation procedures.
EAU00143
8. Start switch “ ”
The starter motor cranks the engine
when pushing the start switch.
EC000005
CAUTION:@ See starting instructions prior to
starting the engine. @
EAU00152
Clutch leverThe clutch lever is located on the left
handlebar, and the ignition circuit cut-
off system is incorporated in the clutch
lever holder. Pull the clutch lever to the
handlebar to disengage the clutch, and
release the lever to engage the clutch.
The lever should be pulled rapidly and
released slowly for smooth clutch oper-
ation. (Refer to the engine starting pro-
cedures for a description of the ignition
circuit cut-off system.)1. Clutch lever
E_5jc_Functions.fm Page 10 Saturday, October 16, 1999 1:08 PM
Page 35 of 121
INSTRUMENT AND CONTROL FUNCTIONS
3-21
3
EAU01879*
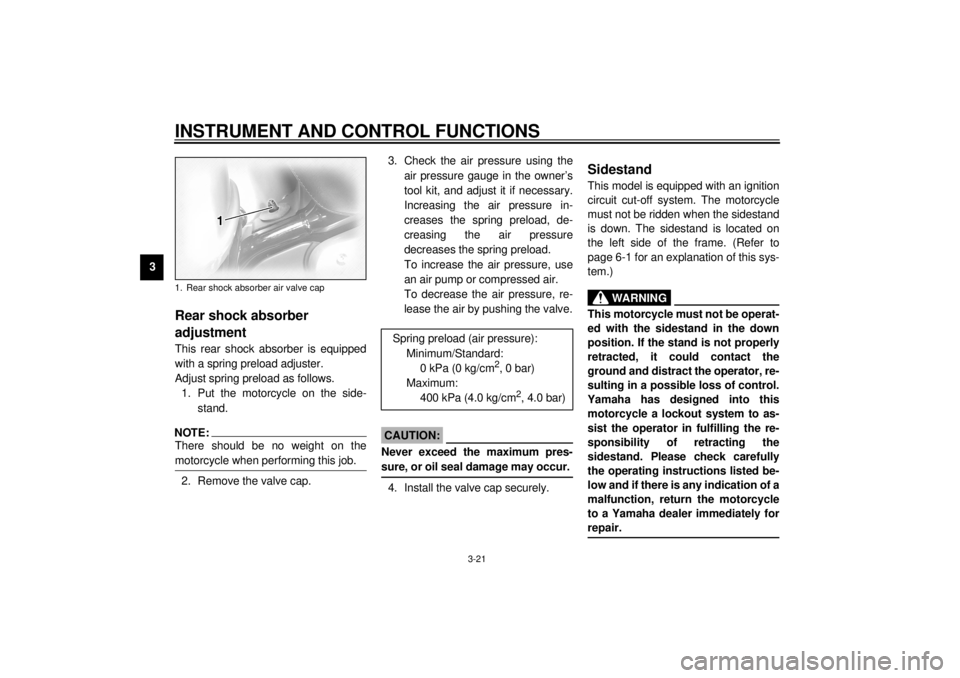
Rear shock absorber
adjustmentThis rear shock absorber is equipped
with a spring preload adjuster.
Adjust spring preload as follows.
1. Put the motorcycle on the side-
stand.NOTE:@ There should be no weight on the
motorcycle when performing this job. @2. Remove the valve cap.3. Check the air pressure using the
air pressure gauge in the owner’s
tool kit, and adjust it if necessary.
Increasing the air pressure in-
creases the spring preload, de-
creasing the air pressure
decreases the spring preload.
To increase the air pressure, use
an air pump or compressed air.
To decrease the air pressure, re-
lease the air by pushing the valve.
EC000012
CAUTION:@ Never exceed the maximum pres-
sure, or oil seal damage may occur. @4. Install the valve cap securely.
EAU00330
SidestandThis model is equipped with an ignition
circuit cut-off system. The motorcycle
must not be ridden when the sidestand
is down. The sidestand is located on
the left side of the frame. (Refer to
page 6-1 for an explanation of this sys-
tem.)
EW000044
WARNING
@ This motorcycle must not be operat-
ed with the sidestand in the down
position. If the stand is not properly
retracted, it could contact the
ground and distract the operator, re-
sulting in a possible loss of control.
Yamaha has designed into this
motorcycle a lockout system to as-
sist the operator in fulfilling the re-
sponsibility of retracting the
sidestand. Please check carefully
the operating instructions listed be-
low and if there is any indication of a
malfunction, return the motorcycle
to a Yamaha dealer immediately for
repair. @
1. Rear shock absorber air valve cap
Spring preload (air pressure):
Minimum/Standard:
0 kPa (0 kg/cm
2, 0 bar)
Maximum:
400 kPa (4.0 kg/cm
2, 4.0 bar)
E_5jc_Functions.fm Page 21 Saturday, October 16, 1999 1:08 PM
Page 61 of 121
6-1
6
EAU00372
6-OPERATION AND IMPORTANT RIDING POINTS
EAU00373
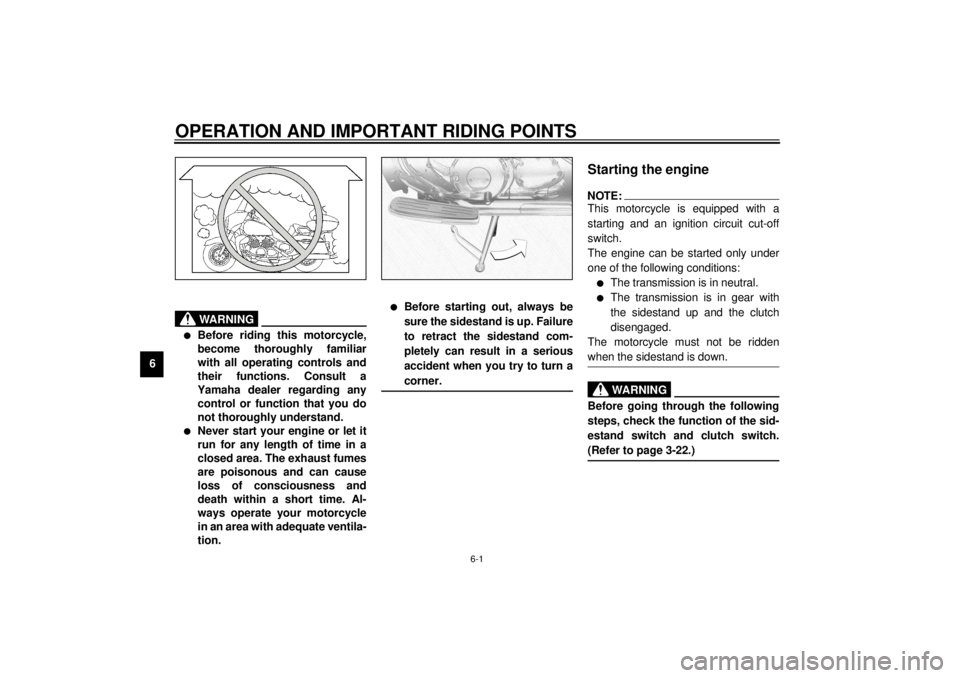
WARNING
@ l
Before riding this motorcycle,
become thoroughly familiar
with all operating controls and
their functions. Consult a
Yamaha dealer regarding any
control or function that you do
not thoroughly understand.
l
Never start your engine or let it
run for any length of time in a
closed area. The exhaust fumes
are poisonous and can cause
loss of consciousness and
death within a short time. Al-
ways operate your motorcycle
in an area with adequate ventila-
tion.
l
Before starting out, always be
sure the sidestand is up. Failure
to retract the sidestand com-
pletely can result in a serious
accident when you try to turn a
corner.
@
EAU01837
Starting the engineNOTE:@ This motorcycle is equipped with a
starting and an ignition circuit cut-off
switch.
The engine can be started only under
one of the following conditions:l
The transmission is in neutral.
l
The transmission is in gear with
the sidestand up and the clutch
disengaged.
The motorcycle must not be ridden
when the sidestand is down.
@
EW000054
WARNING
@ Before going through the following
steps, check the function of the sid-
estand switch and clutch switch.
(Refer to page 3-22.) @
E_5jc_Operation.fm Page 1 Saturday, October 16, 1999 1:10 PM
Page 65 of 121
OPERATION AND IMPORTANT RIDING POINTS
6-5
6
EAU01171
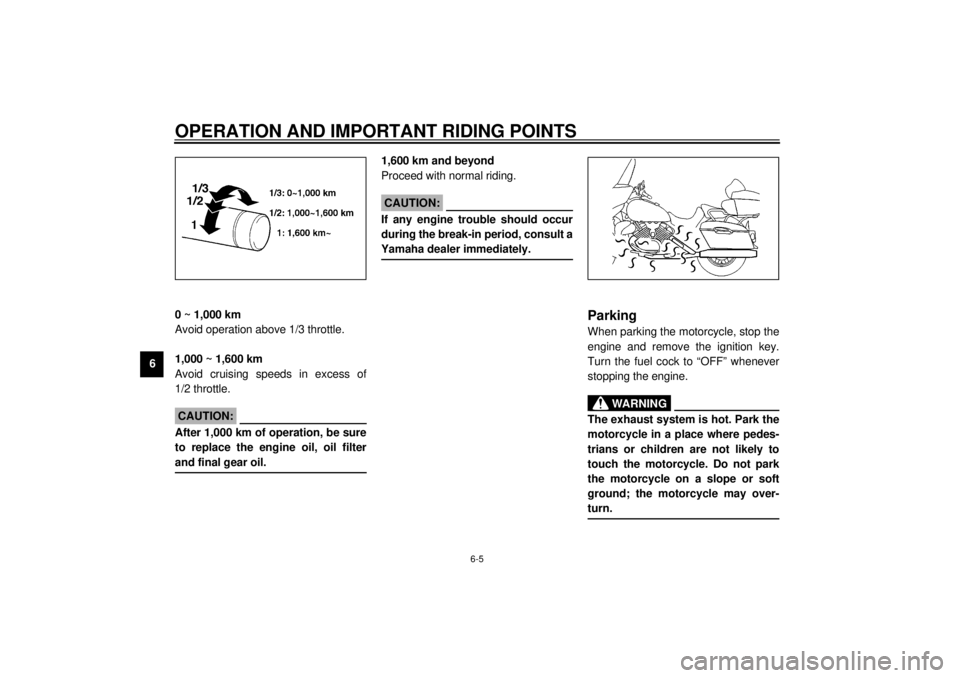
0 ~ 1,000 km
Avoid operation above 1/3 throttle.
1,000 ~ 1,600 km
Avoid cruising speeds in excess of
1/2 throttle.
EC000056
CAUTION:@ After 1,000 km of operation, be sure
to replace the engine oil, oil filter
and final gear oil. @
1,600 km and beyond
Proceed with normal riding.
EC000049
CAUTION:@ If any engine trouble should occur
during the break-in period, consult a
Yamaha dealer immediately. @
EAU00457
ParkingWhen parking the motorcycle, stop the
engine and remove the ignition key.
Turn the fuel cock to “OFF” whenever
stopping the engine.
EW000058
WARNING
@ The exhaust system is hot. Park the
motorcycle in a place where pedes-
trians or children are not likely to
touch the motorcycle. Do not park
the motorcycle on a slope or soft
ground; the motorcycle may over-
turn. @
E_5jc_Operation.fm Page 5 Saturday, October 16, 1999 1:10 PM
Page 97 of 121
PERIODIC MAINTENANCE AND MINOR REPAIR
7-31
7
EAU01801
Fuse replacementIf a fuse is blown, turn off the main
switch and the switch of the circuit in
question. Install a new fuse of proper
amperage. Turn on the switches and
see if the electrical device operates. If
the fuse immediately blows again, con-
sult a Yamaha dealer.
EC000103
CAUTION:@ Do not use fuses of higher amper-
age rating than those recommend-
ed. Substitution of a fuse of
improper rating can cause extensive
electrical system damage and pos-
sibly a fire. @
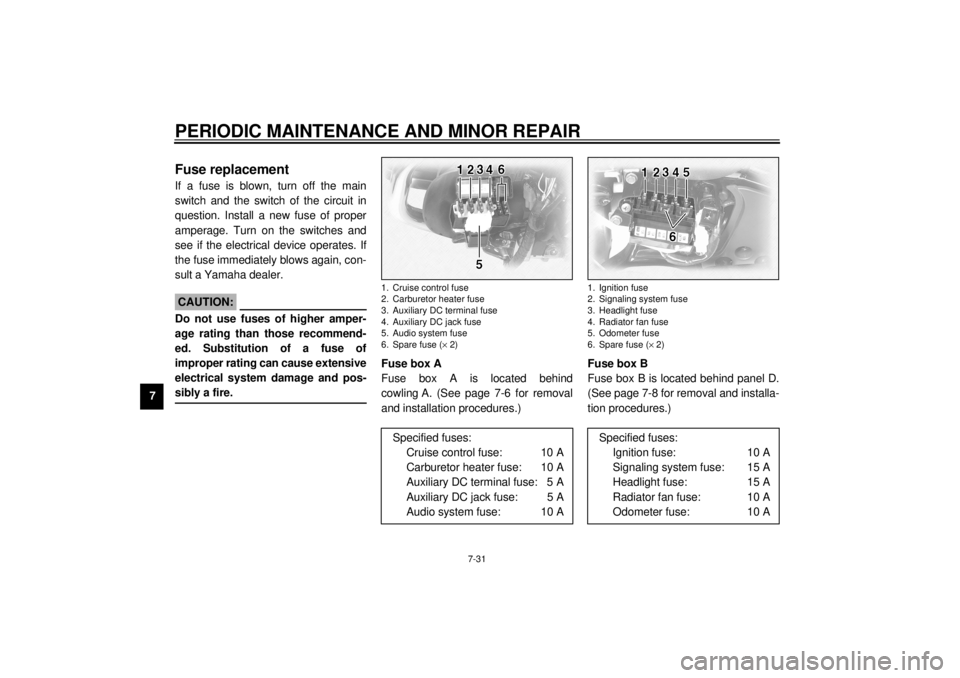
Fuse box A
Fuse box A is located behind
cowling A. (See page 7-6 for removal
and installation procedures.)Fuse box B
Fuse box B is located behind panel D.
(See page 7-8 for removal and installa-
tion procedures.)1. Cruise control fuse
2. Carburetor heater fuse
3. Auxiliary DC terminal fuse
4. Auxiliary DC jack fuse
5. Audio system fuse
6. Spare fuse (´ 2)
Specified fuses:
Cruise control fuse: 10 A
Carburetor heater fuse: 10 A
Auxiliary DC terminal fuse: 5 A
Auxiliary DC jack fuse: 5 A
Audio system fuse: 10 A
1. Ignition fuse
2. Signaling system fuse
3. Headlight fuse
4. Radiator fan fuse
5. Odometer fuse
6. Spare fuse (´ 2)
Specified fuses:
Ignition fuse: 10 A
Signaling system fuse: 15 A
Headlight fuse: 15 A
Radiator fan fuse: 10 A
Odometer fuse: 10 A
E_5jc_Periodic.fm Page 31 Saturday, October 16, 1999 1:10 PM
Page 100 of 121
PERIODIC MAINTENANCE AND MINOR REPAIR
7-34
7
EAU01624
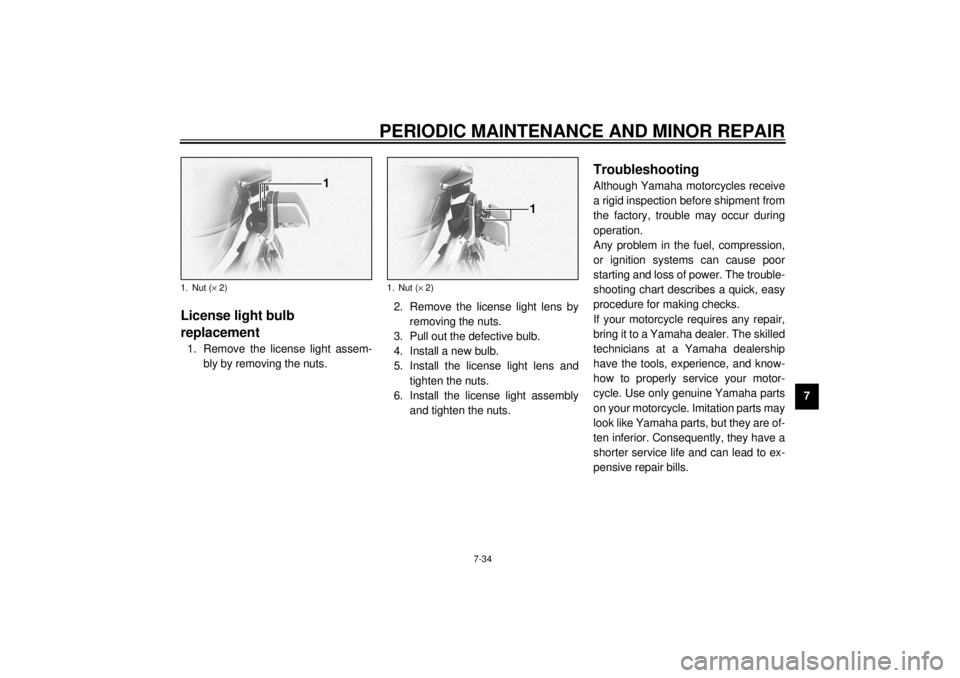
License light bulb
replacement1. Remove the license light assem-
bly by removing the nuts.2. Remove the license light lens by
removing the nuts.
3. Pull out the defective bulb.
4. Install a new bulb.
5. Install the license light lens and
tighten the nuts.
6. Install the license light assembly
and tighten the nuts.
EAU01008
TroubleshootingAlthough Yamaha motorcycles receive
a rigid inspection before shipment from
the factory, trouble may occur during
operation.
Any problem in the fuel, compression,
or ignition systems can cause poor
starting and loss of power. The trouble-
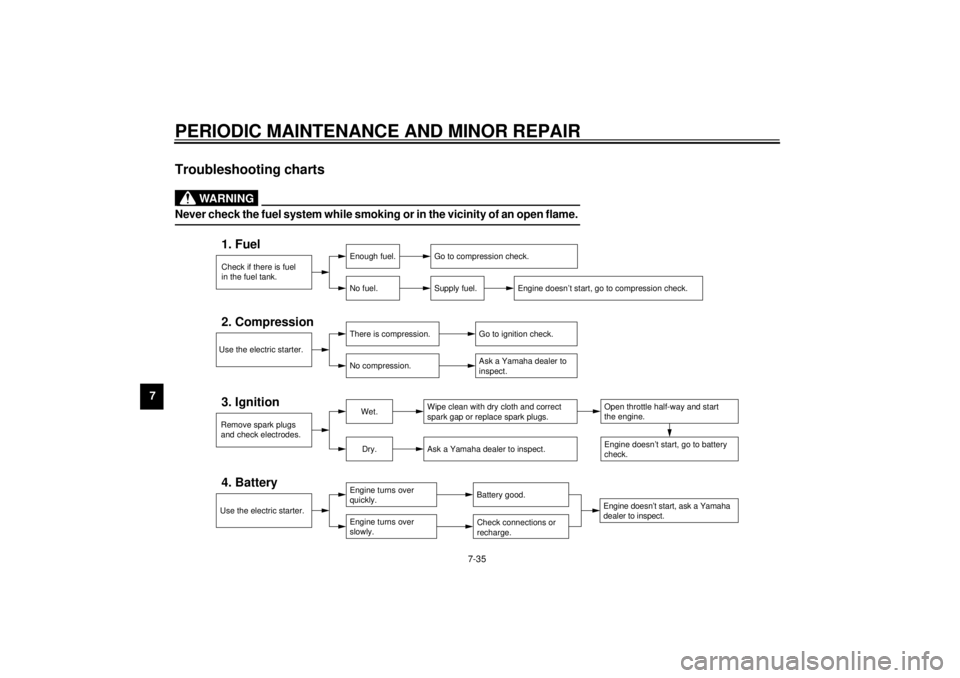
shooting chart describes a quick, easy
procedure for making checks.
If your motorcycle requires any repair,
bring it to a Yamaha dealer. The skilled
technicians at a Yamaha dealership
have the tools, experience, and know-
how to properly service your motor-
cycle. Use only genuine Yamaha parts
on your motorcycle. Imitation parts may
look like Yamaha parts, but they are of-
ten inferior. Consequently, they have a
shorter service life and can lead to ex-
pensive repair bills.
1. Nut (´ 2)
1. Nut (´ 2)
E_5jc_Periodic.fm Page 34 Saturday, October 16, 1999 1:10 PM
Page 101 of 121
PERIODIC MAINTENANCE AND MINOR REPAIR
7-35
7
EAU02990*
Troubleshooting charts
EW000125
WARNING
@ Never check the fuel system while smoking or in the vicinity of an open flame. @
Check if there is fuel
in the fuel tank.1. Fuel
Enough fuel.
No fuel.
Go to compression check.
Supply fuel.
Engine doesn’t start, go to compression check.
Use the electric starter.2. Compression
There is compression.
No compression.
Go to ignition check.
Ask a Yamaha dealer to
inspect.
Remove spark plugs
and check electrodes.3. Ignition
Wet.
Dry.
Wipe clean with dry cloth and correct
spark gap or replace spark plugs.
Ask a Yamaha dealer to inspect.
Engine doesn’t start, ask a Yamaha
dealer to inspect.Engine doesn’t start, go to battery
check.Open throttle half-way and start
the engine.
Use the electric starter.4. Battery
Engine turns over
quickly.
Engine turns over
slowly.
Battery good.Check connections or
recharge.
E_5jc_Periodic.fm Page 35 Saturday, October 16, 1999 1:10 PM
Page 113 of 121

SPECIFICATIONS
9-3
9
Maximum load* 190 kg
Air pressure (cold tire)
Up to 90 kg load*
Front 250 kPa (2.50 kg/cm
2, 2.50 bar)
Rear 250 kPa (2.50 kg/cm2, 2.50 bar)
90 kg load ~ maximum
load*
Front 250 kPa (2.50 kg/cm2, 2.50 bar)
Rear 280 kPa (2.80 kg/cm2, 2.80 bar)
* Load is total weight of cargo, rider, passenger and accessories.
Wheels
Front
Ty p e C a s t
Size 16 ´ MT 3.50
Rear
Ty p e C a s t
Size 15M/C ´ MT 4.00
Brakes
Front
Type Dual disc brake
Operation Right hand operation
Fluid DOT 4Rear
Type Single disc brake
Operation Right foot operation
Fluid DOT 4
Suspension
Fr o n t
Ty p e Te l e s c o p i c f o r k
Rear
Type Swingarm (link suspension)
Shock absorber
Front Coil-air spring/oil damper
Rear Coil-air spring/oil damper
Wheel travel
Front 140 mm
Rear 105 mm
Electrical
Ignition system T.C.I. (digital)
Charging system
Type A.C. magneto
Standard output 14 V, 29 A @ 5,000 r/min
Battery
Type YTX20L-BS
Voltage, capacity 12 V, 18 AH
E_5jc_Spec.fm Page 3 Saturday, October 16, 1999 1:12 PM
Page 114 of 121

SPECIFICATIONS
9-4
9
Headlight typeQuar tz bulb (halogen)
Bulb voltage, wattage ´ quantity
Headlight 12 V, 60/55 W ´ 1
Tail/brake light 12 V, 5/21 W ´ 1
Turn signal light 12 V, 21 W ´ 4
Auxiliary light 12 V, 4 W ´ 1
Licence light 12 V, 5 W ´ 2
Neutral indicator light 12 V, 1.7 W ´ 1
High beam indicator light 12 V, 1.7 W ´ 1
Oil level indicator light 12 V, 1.7 W ´ 1
Turn indicator light 12 V, 1.7 W ´ 2
Fuel level indicator light 14 V, 3 W ´ 1
Coolant temperature indicator
light 12 V, 1.7 W ´ 1
Engine trouble indicator light 12 V, 1.7 W ´ 1
Overdrive indicator light 12 V, 1.7 W ´ 1
Cruise control “SET” indicator
light 12 V, 1.7 W ´ 1
Cruise control “RES” indicator
light 12 V, 1.7 W ´ 1
Cruise control “ON” indicator
light 12 V, 1.7 W ´ 1Audio system amplifier
Output power
Speaker 14 W ´ 4
Headset 1 W ´ 2
Auto-volume range 5 steps
Output impedance
Speaker 4 W
Headset 8 W ~ 16 W
Fuses
Main fuse 30 A
Headlight fuse 15 A
Signaling system fuse 15 A
Ignition fuse 10 A
Radiator fan fuse 10 A
Odometer fuse 10 A
Cruise control fuse 10 A
Carburetor heater fuse 10 A
Audio system fuse 10 A
Auxiliary DC jack fuse 5 A
Auxiliary DC terminal fuse 5 A
E_5jc_Spec.fm Page 4 Saturday, October 16, 1999 1:12 PM