battery YAMAHA YBR125 2004 Owners Manual
[x] Cancel search | Manufacturer: YAMAHA, Model Year: 2004, Model line: YBR125, Model: YAMAHA YBR125 2004Pages: 83, PDF Size: 3.16 MB
Page 12 of 83
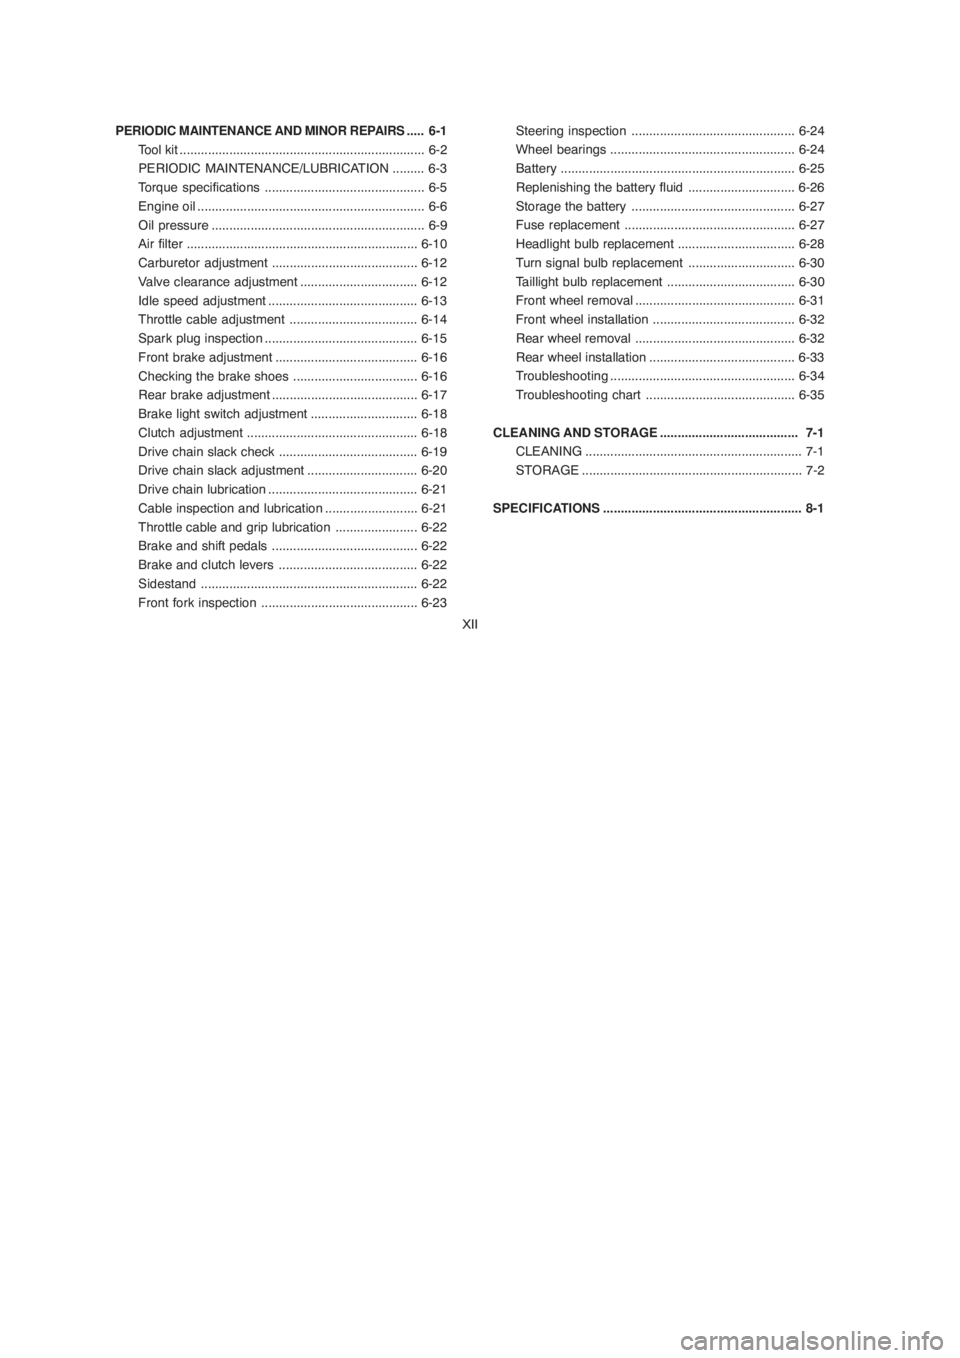
PERIODIC MAINTENANCE AND MINOR REPAIRS..... 6-1
Tool kit..................................................................... 6-2
PERIODIC MAINTENANCE/LUBRICATION......... 6-3
Torque specifications............................................. 6-5
Engine oil................................................................ 6-6
Oil pressure............................................................ 6-9
Air filter.................................................................6-10
Carburetor adjustment.........................................6-12
Valve clearance adjustment.................................6-12
Idle speed adjustment..........................................6-13
Throttle cable adjustment....................................6-14
Spark plug inspection...........................................6-15
Front brake adjustment........................................6-16
Checking the brake shoes ...................................6-16
Rear brake adjustment.........................................6-17
Brake light switch adjustment ..............................6-18
Clutch adjustment................................................ 6-18
Drive chain slack check.......................................6-19
Drive chain slack adjustment...............................6-20
Drive chain lubrication..........................................6-21
Cable inspection and lubrication.......................... 6-21
Throttle cable and grip lubrication .......................6-22
Brake and shift pedals .........................................6-22
Brake and clutch levers .......................................6-22
Sidestand.............................................................6-22
Front fork inspection............................................6-23Steering inspection.............................................. 6-24
Wheel bearings.................................................... 6-24
Battery.................................................................. 6-25
Replenishing the battery fluid .............................. 6-26
Storage the battery.............................................. 6-27
Fuse replacement................................................ 6-27
Headlight bulb replacement................................. 6-28
Turn signal bulb replacement.............................. 6-30
Taillight bulb replacement.................................... 6-30
Front wheel removal............................................. 6-31
Front wheel installation........................................ 6-32
Rear wheel removal............................................. 6-32
Rear wheel installation......................................... 6-33
Troubleshooting.................................................... 6-34
Troubleshooting chart.......................................... 6-35
CLEANING AND STORAGE....................................... 7-1
CLEANING............................................................. 7-1
STORAGE.............................................................. 7-2
SPECIFICATIONS ........................................................ 8-1
XII
CONTENTS
DESCRIPTION............................................................. 1-1
MACHINE IDENTIFICATION....................................... 2-1
Vehicle identikfication number ............................... 2-1
Engine serial number............................................ 2-1
CONTROL FUNCTIONS.............................................. 3-1
Main switch ............................................................ 3-1
Indicator lights ........................................................ 3-2
Speedometer..........................................................3-3
Fuel gauge............................................................. 3-3
Handlebar switches over left .................................. 3-4
Handlebar switches over right.............................. 3-5
Clutch lever............................................................ 3-6
Shift pedal............................................................. 3-6
Front brake lever................................................... 3-7
Rear brake pedal................................................... 3-7
Fuel tank cap......................................................... 3-8
Fuel cock............................................................... 3-9
Starter lever......................................................... 3-10
Kick starter .......................................................... 3-10
Steering lock....................................................... 3-11
Seat......................................................................3-12
Side covers......................................................... 3-13
Rear shock absorber adjustment ....................... 3-14
XIPRE-OPERATION CHECKS........................................ 4-1
Engine oil................................................................ 4-3
Tires........................................................................4-3
Fitting/Fasteners....................................................4-6
Switches................................................................ 4-6
Wheels ......................................................... 4-6
Fuel ........................................................... 4-7
OPERATION AND IMPORTANT RIDING POINTS....... 5-1
Starting a cold engine........................................... 5-2
Starting a warm engine .......................................... 5-2
Warming up the engine .......................................... 5-2
Shifting ................................................................... 5-3
Tips for reduccing fuel consumption...................... 5-4
Engine Break-in...................................................... 5-4
Parking ................................................................... 5-5
Page 13 of 83
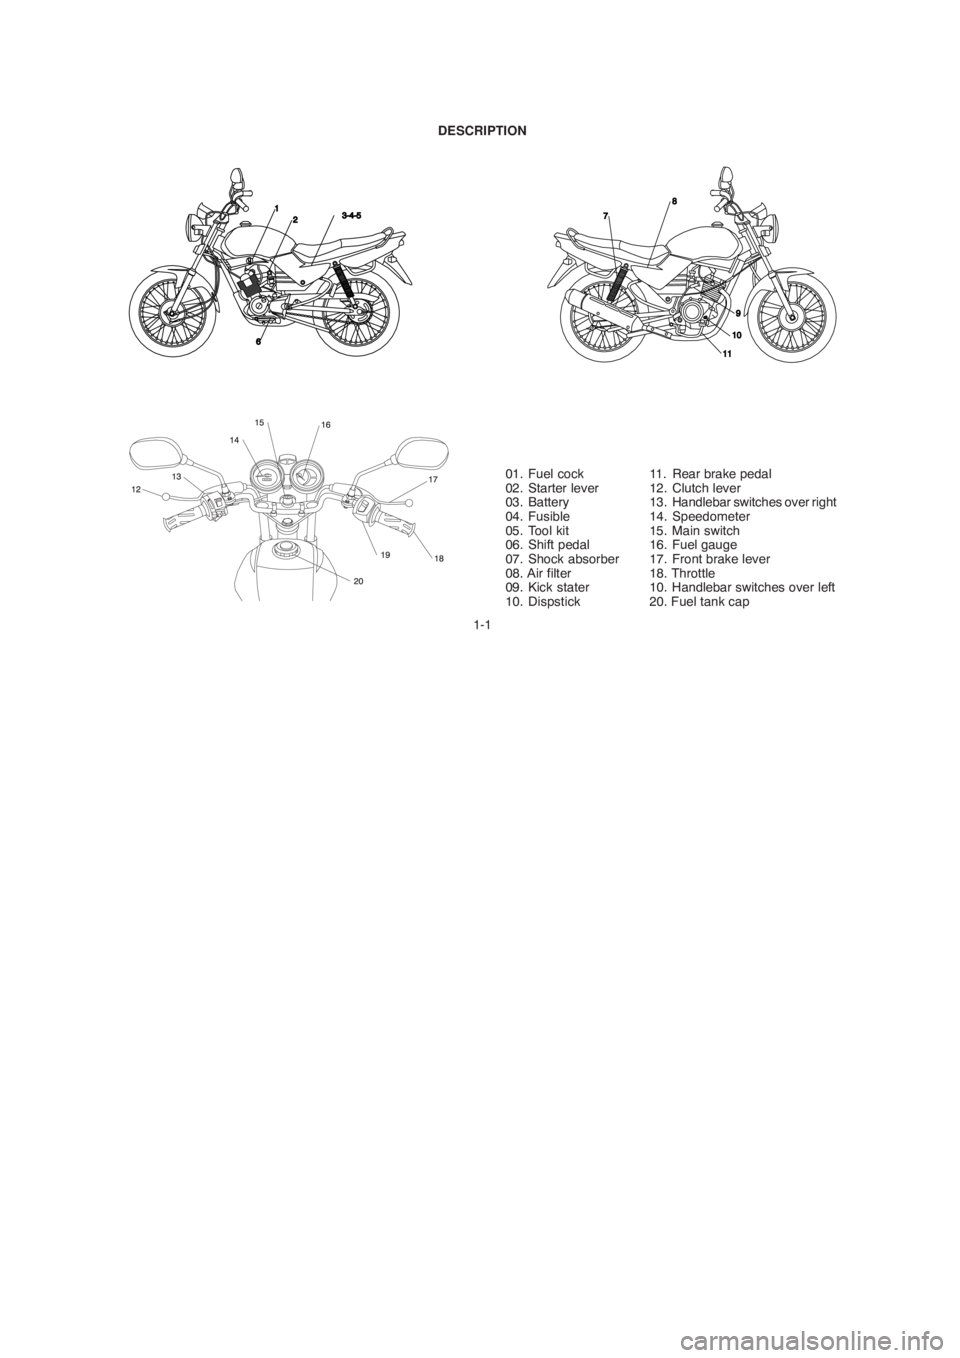
1-1 DESCRIPTION
01. Fuel cock
02. Starter lever
03. Battery
04. Fusible
05. Tool kit
06. Shift pedal
07. Shock absorber
08. Air filter
09. Kick stater
10. Dispstick11. Rear brake pedal
12. Clutch lever
13. Handlebar switches over right
14. Speedometer
15. Main switch
16. Fuel gauge
17. Front brake lever
18. Throttle
10. Handlebar switches over left
20. Fuel tank cap
Page 30 of 83

4-2 NOTE:
Pre-operation checks should be made each time the motorcycle is used. Such an inspection can be thoroughly accomplished
in a very short time; and the added safety it assures is more than worth the time involved. If any maintenance service or
adjustment is needed, consult the chart above to refer to the pages in which the service or adjustment is described.
1. The engine, exhaust pipe, and muffler will be very hot after the engine has been run.
Be careful not to touch them or to allow any clothing item to contact them during inspection or repair.
2. If any item is not working properly, have it inspected and repaired before operating the motorcycle.
ITEMROUTINE
PAGE
Sidestand
Fittings / FastenersCheck all chassi fittings and fasteners.
Tighten / Adjust, if necessary
Check fuel level / top up as required.
Fuel tank
Lights, signals and switches
BatteryCheck electrolyte level.
Replenish with ìdistilled waterî if necessary.6-22
4-6 , 6-5
4-6 , 6-28 ~ 6-30
6-25 ~ 6-276-22
4-7
Check for proper operation
Front brake and clutch
lever pivotsCheck for smooth operation.
Lubricate if necessary
Check for smooth operation.
Lubricate if necessary
6-22 Check for smooth operation.
Lubricate if necessary Rear brake and shift pedal
shafts
WARNING:
Page 36 of 83
5-11. Be very careful if you are carrying object while riding
the motorcycle
2. Be vareful not to put any object near battery
terminals.
Electrical failure or acid corrosion may occur.
OPERATION AND IMPORTANT RIDING POINTS
Before riding this motorcycle, become thoroughly
familiar with all operating controls and their functions.
Consult a Yamaha dealer regarding any control or
function that you do not thoroughly understand.
Never start your engine or let it run for any
length of time in a closed area.
The exhaust fumes are poisonous and can cause loss
of consciousness and death within a short time. Always
operate your machine in an area with adequate
ventilation.
Before starting out, always be sure the sidestand is up.
Failure to retract the sidestand completely can result
in a serious accident when you try to turn a corner.
CAUTION:
CAUTION:
Page 43 of 83
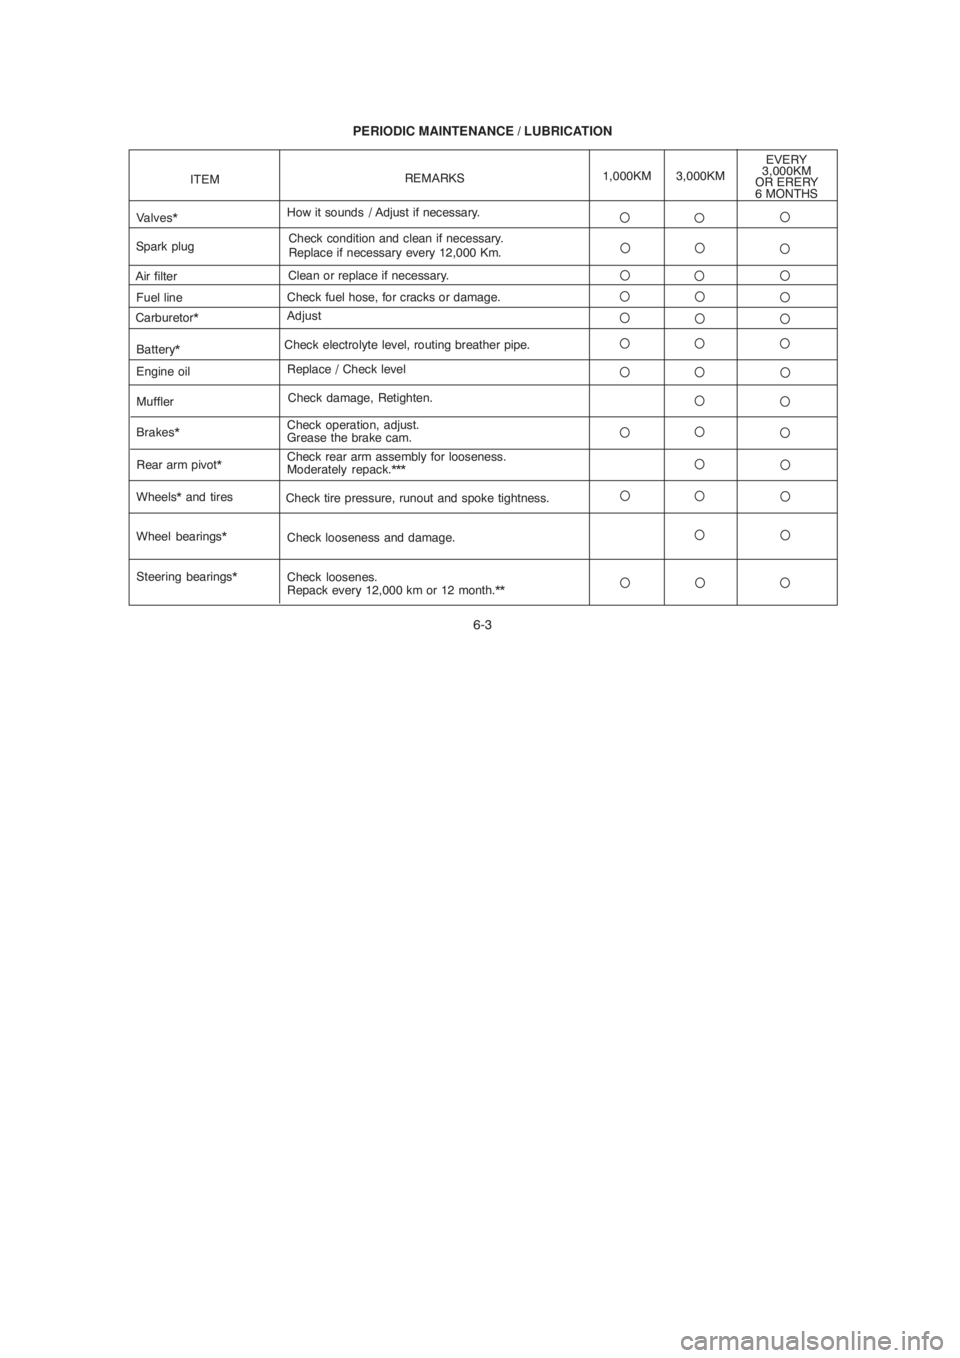
6-3 PERIODIC MAINTENANCE / LUBRICATION
Wheel bearings* Battery*
Check looseness and damage. Check electrolyte level, routing breather pipe.
ITEM
How it sounds
/ Adjust if necessary.
REMARKS1,000KM
Fuel line Air filter
Carburetor*Valves*
Muffler
Brakes* Engine oil
Steering bearings* Rear arm pivot*Check fuel hose, for cracks or damage.Clean or replace if necessary.
Adjust
Check damage, Retighten.
Check operation, adjust.
Grease the brake cam. Replace / Check level
Check loosenes.
Repack every 12,000 km or 12 month.** Check rear arm assembly for looseness.
Moderately repack.***
EVERY
3,000KM
OR ERERY
6 MONTHS
Wheels* and tires
Check tire pressure, runout and spoke tightness.
Spark plugCheck condition and clean if necessary.
Replace if necessary every 12,000 Km.
3,000KM
Page 65 of 83
6-25
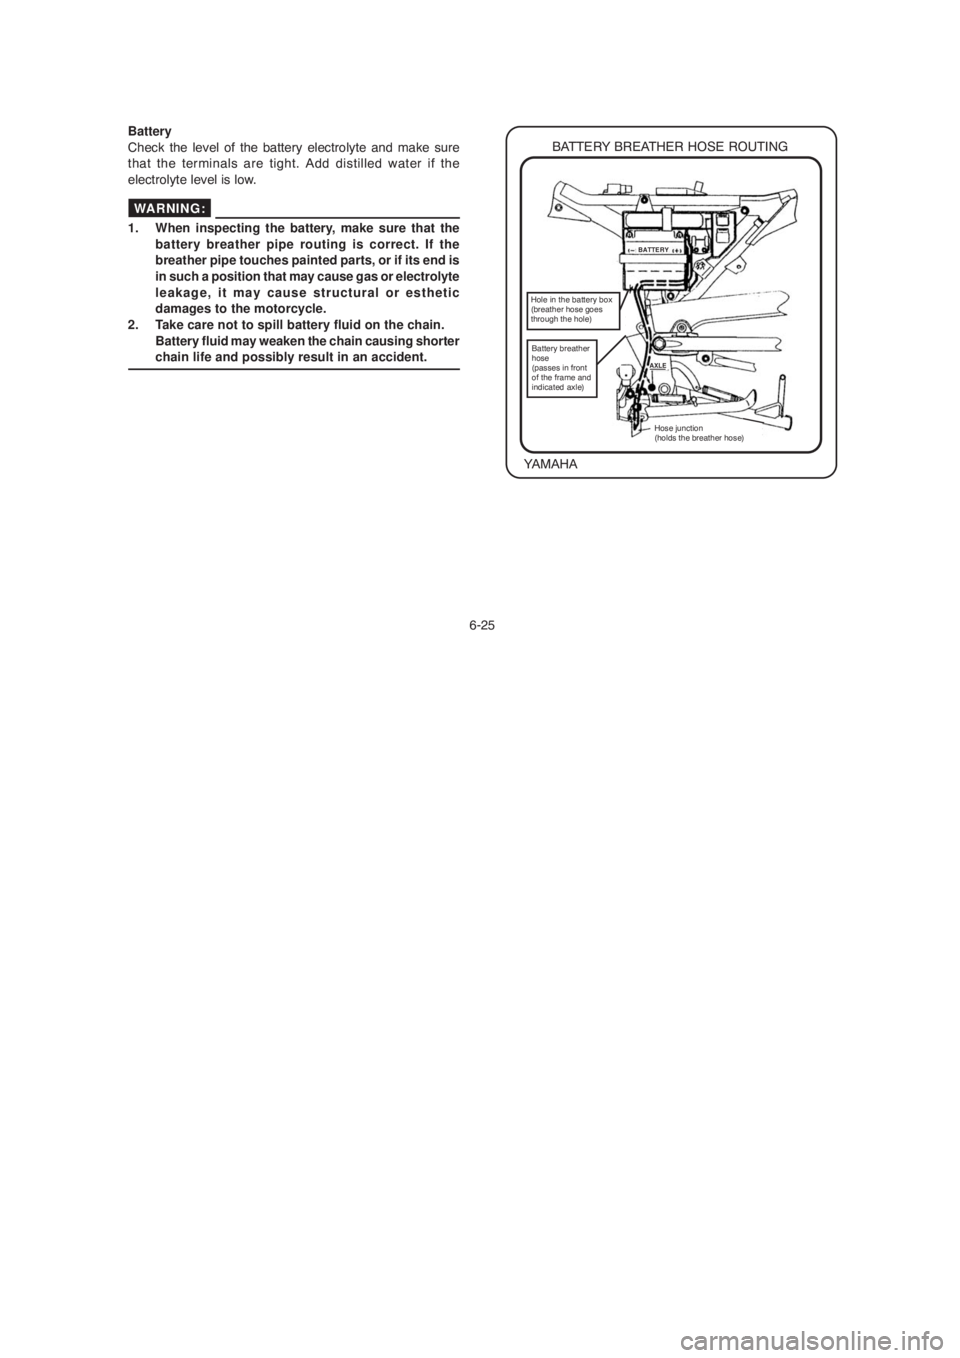
BATTERY BREATHER HOSE ROUTING
YAMAHA Battery
Check the level of the battery electrolyte and make sure
that the terminals are tight. Add distilled water if the
electrolyte level is low.
1. When inspecting the battery, make sure that the
battery breather pipe routing is correct. If the
breather pipe touches painted parts, or if its end is
in such a position that may cause gas or electrolyte
leakage, it may cause structural or esthetic
damages to the motorcycle.
2. Take care not to spill battery fluid on the chain.
Battery fluid may weaken the chain causing shorter
chain life and possibly result in an accident.
WARNING:
BATTERY
AXLE
Hole in the battery box
(breather hose goes
through the hole)
Battery breather
hose
(passes in front
of the frame and
indicated axle)
Hose junction
(holds the breather hose)
Page 66 of 83
6-26
Battery electrolyte is poisonous and dangerous,
causing severe burns, etc. It contains sulfuric acid.
Avoid contact with skin, eyes or clothing.
Antidote:
EXTERNAL: Flush with water.
INTERNAL: Drink large quantities of water or milk.
Follow with milk of magnesia, beaten egg, or vegetable
oil. Call a physician immediately.
EYES: Flush with water for 15 minutes and get prompt
medical attention.
Batteries produce explosive gases. Keep sparks, flame,
cigarrettes, etc., away. Ventilate when charging or using
it in an enclosed space. Always shield your eyes when
working near batteries.
KEEP OUT OF REACH OF CHILDREN.
A poorly maintained battery will corrode and discharge
quickly. The battery fluid should be checked at least once
a month.
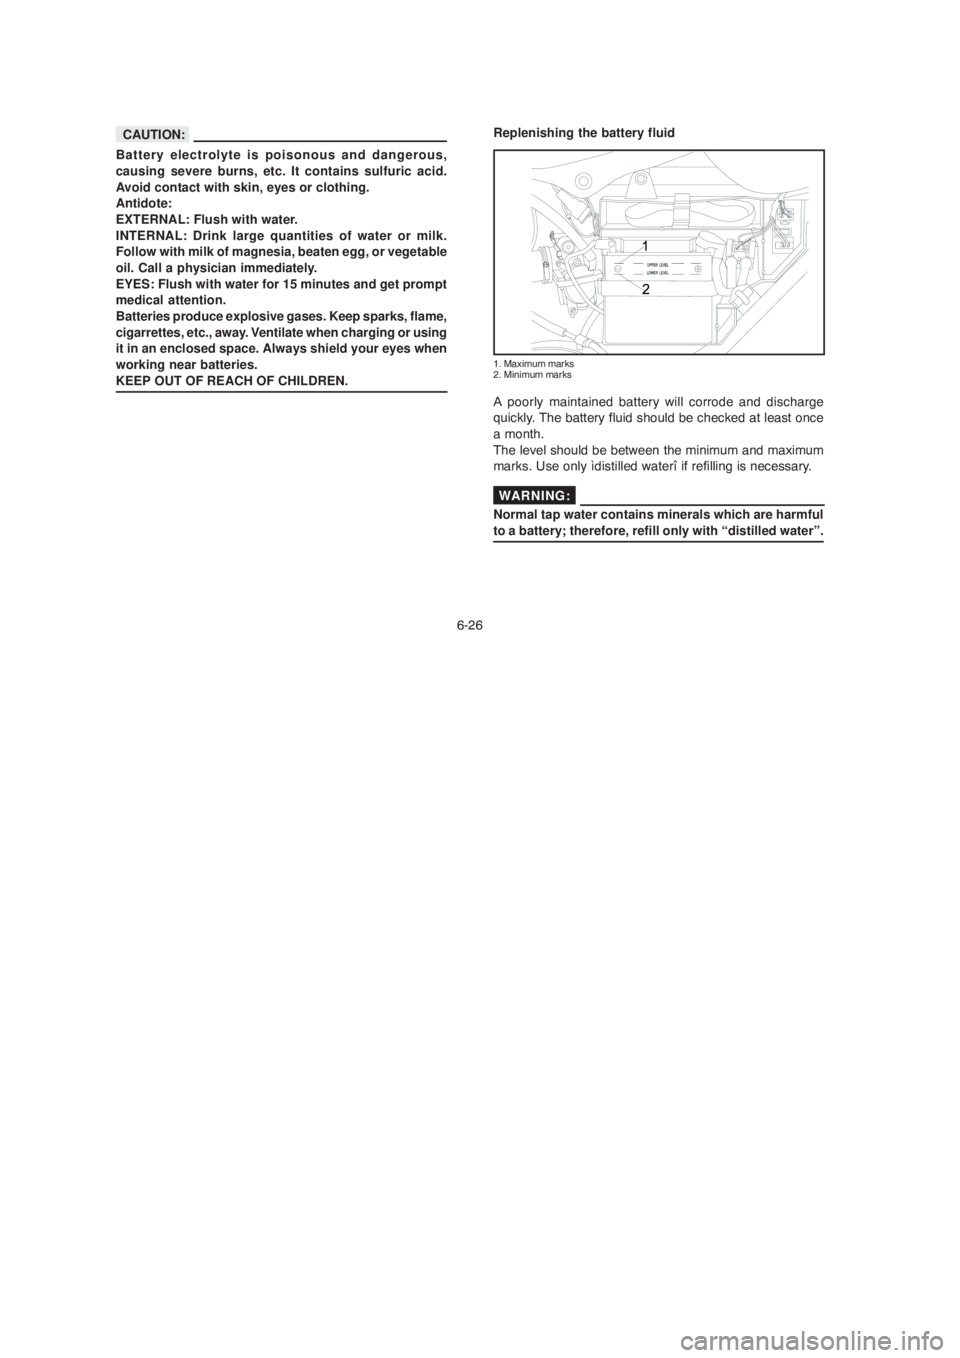
The level should be between the minimum and maximum
marks. Use only ìdistilled waterî if refilling is necessary.
Normal tap water contains minerals which are harmful
to a battery; therefore, refill only with “distilled water”. Replenishing the battery fluid
1. Maximum marks
2. Minimum marks
CAUTION:
WARNING:
Page 67 of 83
Storage the battery
1. When the motorcycle is not used for a month or longer,
remove the battery and store it in a cool, dark place.
Completely recharge the battery before reinstallation.
2. If the baterry needs to be stored for a longer period
than the period mentioned above, check the specific
gravity at least once a month, and recharge it when the
specific gravity is below normal.
3. Always make sure the connections are correct when
reinstalling the battery. The red (positive) lead is for the
+ terminal and the black (negative) lead is for the -
terminal. Always connect the red (positive) lead first,
then connect the black (negative) lead. Make sure that
the battery breather pipe is correctly routed, free of
obstructions, and in good condition.
6-27
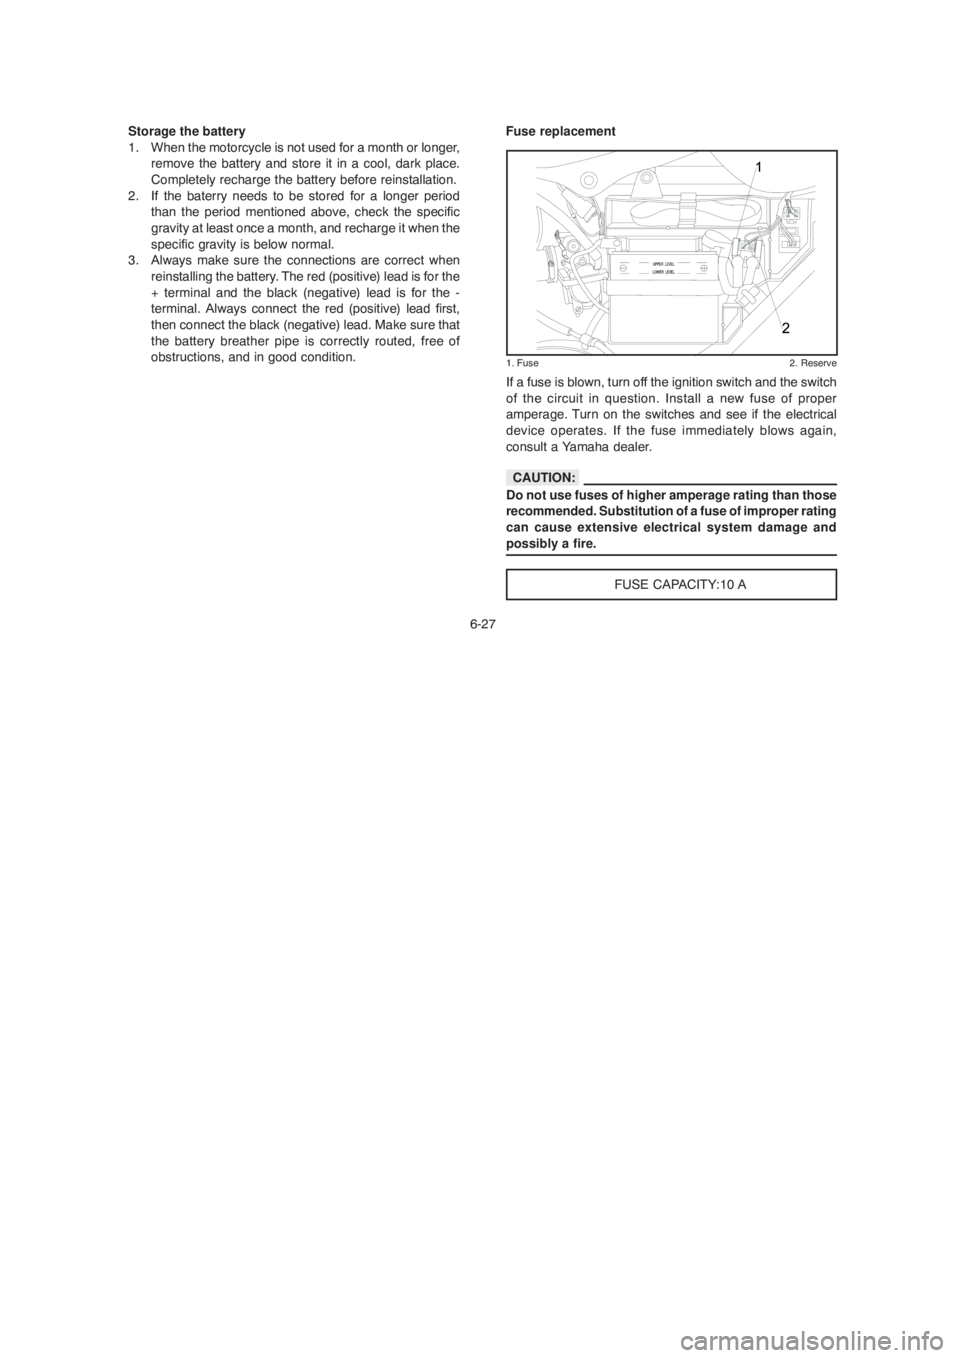
If a fuse is blown, turn off the ignition switch and the switch
of the circuit in question. Install a new fuse of proper
amperage. Turn on the switches and see if the electrical
device operates. If the fuse immediately blows again,
consult a Yamaha dealer.
WARNING:
Do not use fuses of higher amperage rating than those
recommended. Substitution of a fuse of improper rating
can cause extensive electrical system damage and
possibly a fire.
FUSE CAPACITY:10 A Fuse replacement
1. Fuse 2. Reserve
CAUTION:
Page 75 of 83
6-35Never check the fuel system while smoking or in the
vicinity of an open flame.
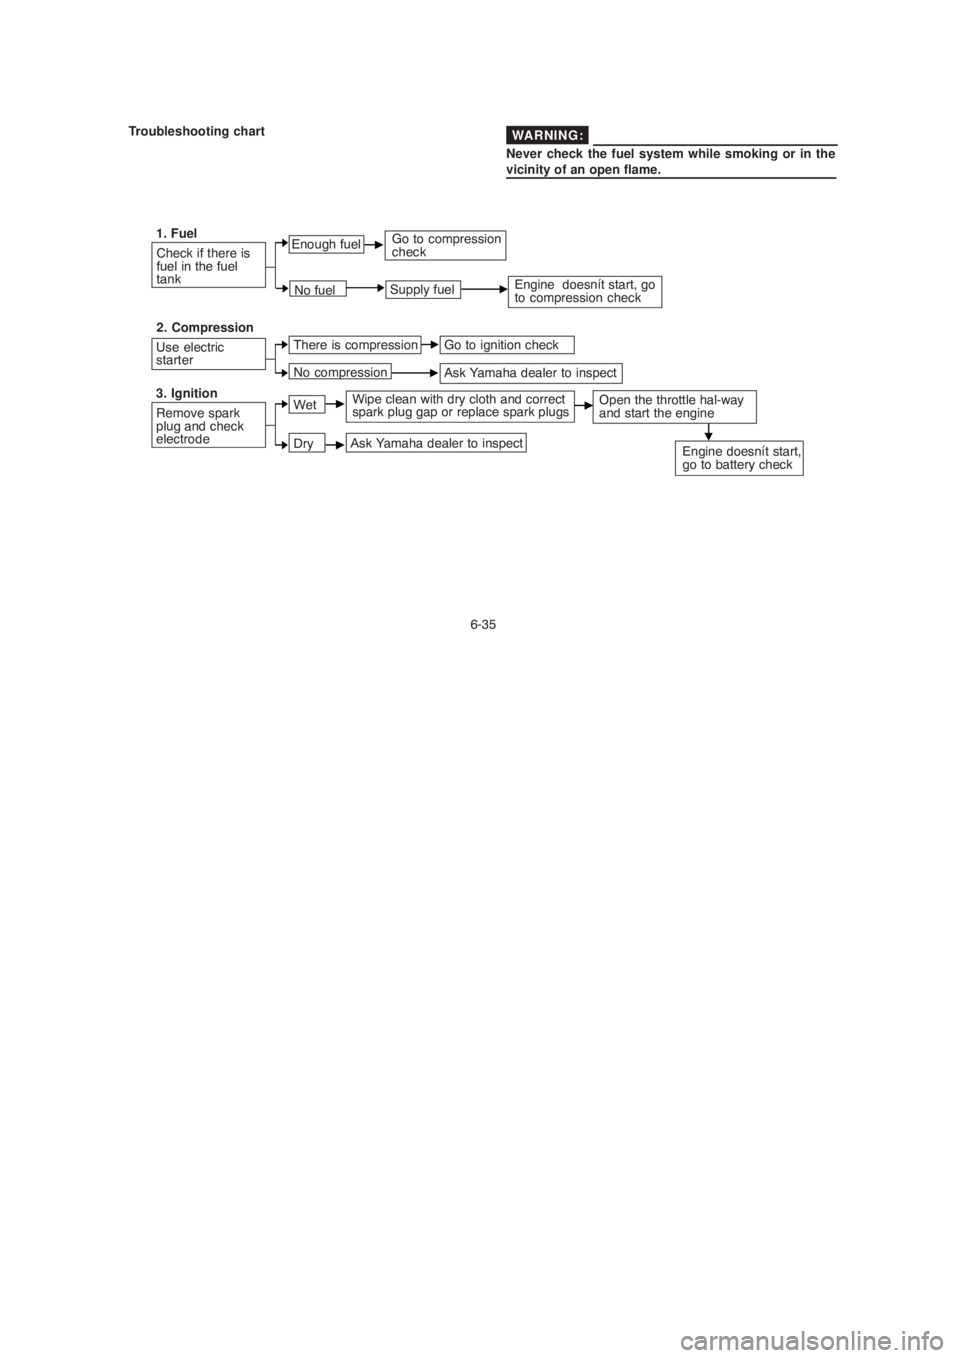
Check if there is
fuel in the fuel
tank
Use electric
starter
Remove spark
plug and check
electrode 1. Fuel
2. Compression
3. IgnitionEnough fuel
No fuel
There is compression
No compression
Wet
DrySupply fuel
Go to ignition check
Ask Yamaha dealer to inspect
Wipe clean with dry cloth and correct
spark plug gap or replace spark plugs
Ask Yamaha dealer to inspect
Troubleshooting chart
Go to compression
check
Engine doesnít start, go
to compression check
Open the throttle hal-way
and start the engine
Engine doesnít start,
go to battery check
WARNING:
Page 77 of 83
7-2 B. STORAGE
Long term storage (30 days or more) of your machine will
require some preventive procedures to guard against
deterioration. After thoroughly cleaning the machine,
prepare for storage as follows:
1. Drain the fuel tank, fuel lines, and carburetor float
bowl(s).
2. Remove the spark plug(s), pour about one tablespoon
of SAE 20W50 motor oil in the spark plug hole(s) and
reinstall the spark plug(s).
Kick the engine over several times (with the
ignition off) to coat the cylinder walls with oil.
3. Remove the drive chain. Clean it thoroughly with
solvent and lubricate it.
Reinstall the chain or store it in a plastic bag
(tied to frame for safe-keeping).
4. Lubricate all control cables.
5. Block up the frame to raise both wheels off the
ground.
6. Tie a plastic bag over the exhaust pipe outlet to
prevent moisture from entering.7. If storing in a humid or salt-air atmosphere, coat
all exposed metal surfaces with a light film of
oil. Do not apply oil to any rubber parts or the
seat cover.
8. Remove the battery and charge it. Store it in a dry place
and recharge it once a month. Do not store the battery
in an excessively warm or cold place (less than 0∫C
(30∫F) or more than 30∫C (90∫F).
NOTE:
Make any necessary repairs before storing the machine.