brakes YAMAHA YBR125 2004 Owners Manual
[x] Cancel search | Manufacturer: YAMAHA, Model Year: 2004, Model line: YBR125, Model: YAMAHA YBR125 2004Pages: 83, PDF Size: 3.16 MB
Page 29 of 83
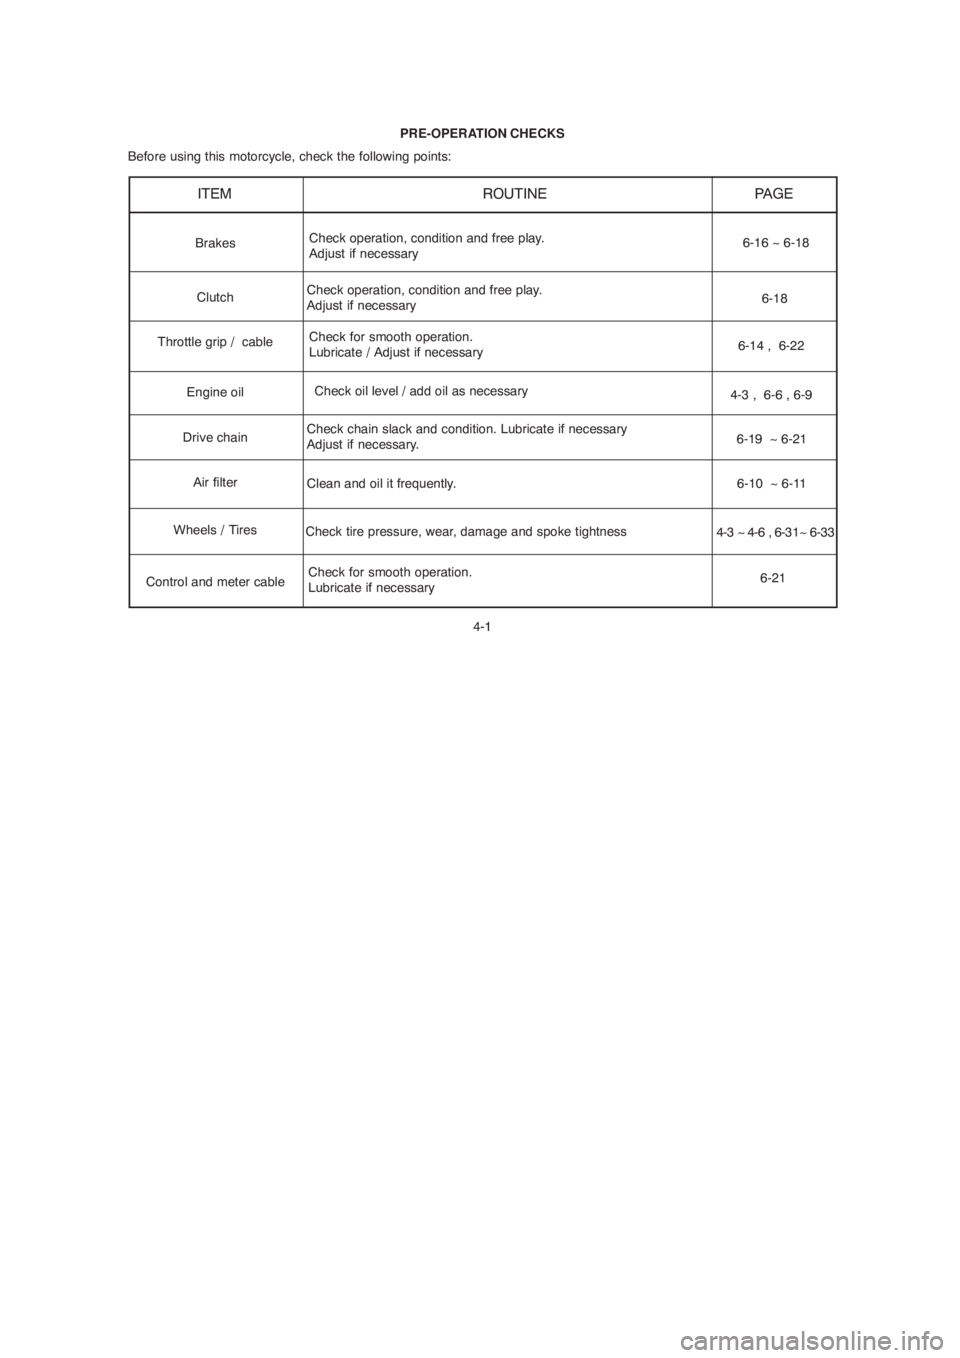
PRE-OPERATION CHECKS
Before using this motorcycle, check the following points:
ITEM ROUTINE
PAGE
Check operation, condition and free play.
Adjust if necessary
Clutch
Throttle grip / cableCheck for smooth operation.
Lubricate / Adjust if necessary
Check oil level / add oil as necessary
Engine oil
Drive chainCheck chain slack and condition. Lubricate if necessary
Adjust if necessary.
Air filter
Control and meter cableCheck tire pressure, wear, damage and spoke tightness
Check for smooth operation.
Lubricate if necessary6-16 ~ 6-18
6-14 , 6-22
4-3 , 6-6 , 6-9
6-19 ~ 6-21
6-10 ~ 6-11
4-3 ~ 4-6 , 6-31~ 6-33
6-21 Check operation, condition and free play.
Adjust if necessary
Wheels / Tires
Clean and oil it frequently.6-18 Brakes
4-1
Page 34 of 83

4-6
1. It is dangerous to ride with a worn-out tire. When
the tire tread begin to show signs of wear, replace
the tire immediately. Brakes, tires and related wheel
parts should be left to a Yamaha dealer.
2. Patching a punctured tube is not recommended. If
it is absolutely necessary to do so, use great care
and replace the tube as soon as possible with a
good quality replacement.
Fitting/Fasteners
Alway check the tightness of chassis fittings and fasteners
before a ride. Use the chart on page 6-5 to find the correct
torque.
Switches
Check the operation of the starter switch, main switch,
ì Engine Stopî switch.
WARNING:Wheels
To ensure maximum performance, long service, and safe
operation, note the following:
1. Always inspect the wheels before a ride. Check for
cracks, bends, or warpage of the wheel; be sure the
spokes are tight and undamaged. If any abnormal
condition exists in a wheel, consult a Yamaha dealer or
other qualified mechanic. Do not attempt even small
repairs to the wheel. If a wheel is deformed or cracked,
it must be replaced.
2. Tires and wheels should be balanced whenever either
one is changed or replaced. Failure to have a wheel
balanced can result in poor performance, adverse
handling characteristics, and shortened tire life.
3. After installing a tire, ride conservatively to allow the
tire to seat itself on the rim properly. Failure to allow
proper seating may cause tire failure, resulting in
damage to the motorcycle and injury to the rider.
Page 43 of 83
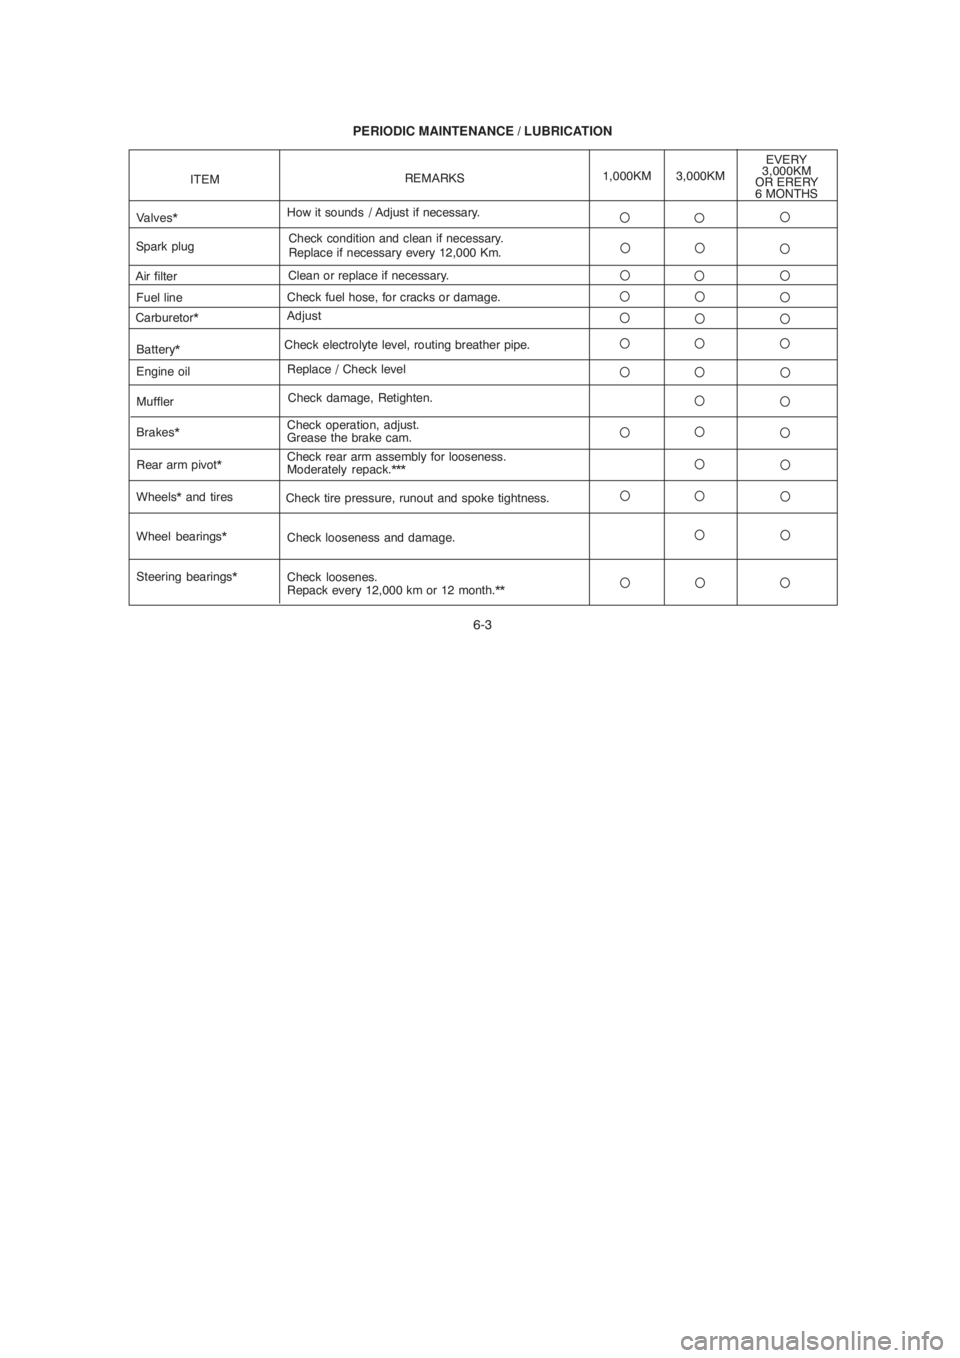
6-3 PERIODIC MAINTENANCE / LUBRICATION
Wheel bearings* Battery*
Check looseness and damage. Check electrolyte level, routing breather pipe.
ITEM
How it sounds
/ Adjust if necessary.
REMARKS1,000KM
Fuel line Air filter
Carburetor*Valves*
Muffler
Brakes* Engine oil
Steering bearings* Rear arm pivot*Check fuel hose, for cracks or damage.Clean or replace if necessary.
Adjust
Check damage, Retighten.
Check operation, adjust.
Grease the brake cam. Replace / Check level
Check loosenes.
Repack every 12,000 km or 12 month.** Check rear arm assembly for looseness.
Moderately repack.***
EVERY
3,000KM
OR ERERY
6 MONTHS
Wheels* and tires
Check tire pressure, runout and spoke tightness.
Spark plugCheck condition and clean if necessary.
Replace if necessary every 12,000 Km.
3,000KM
Page 56 of 83
6-16
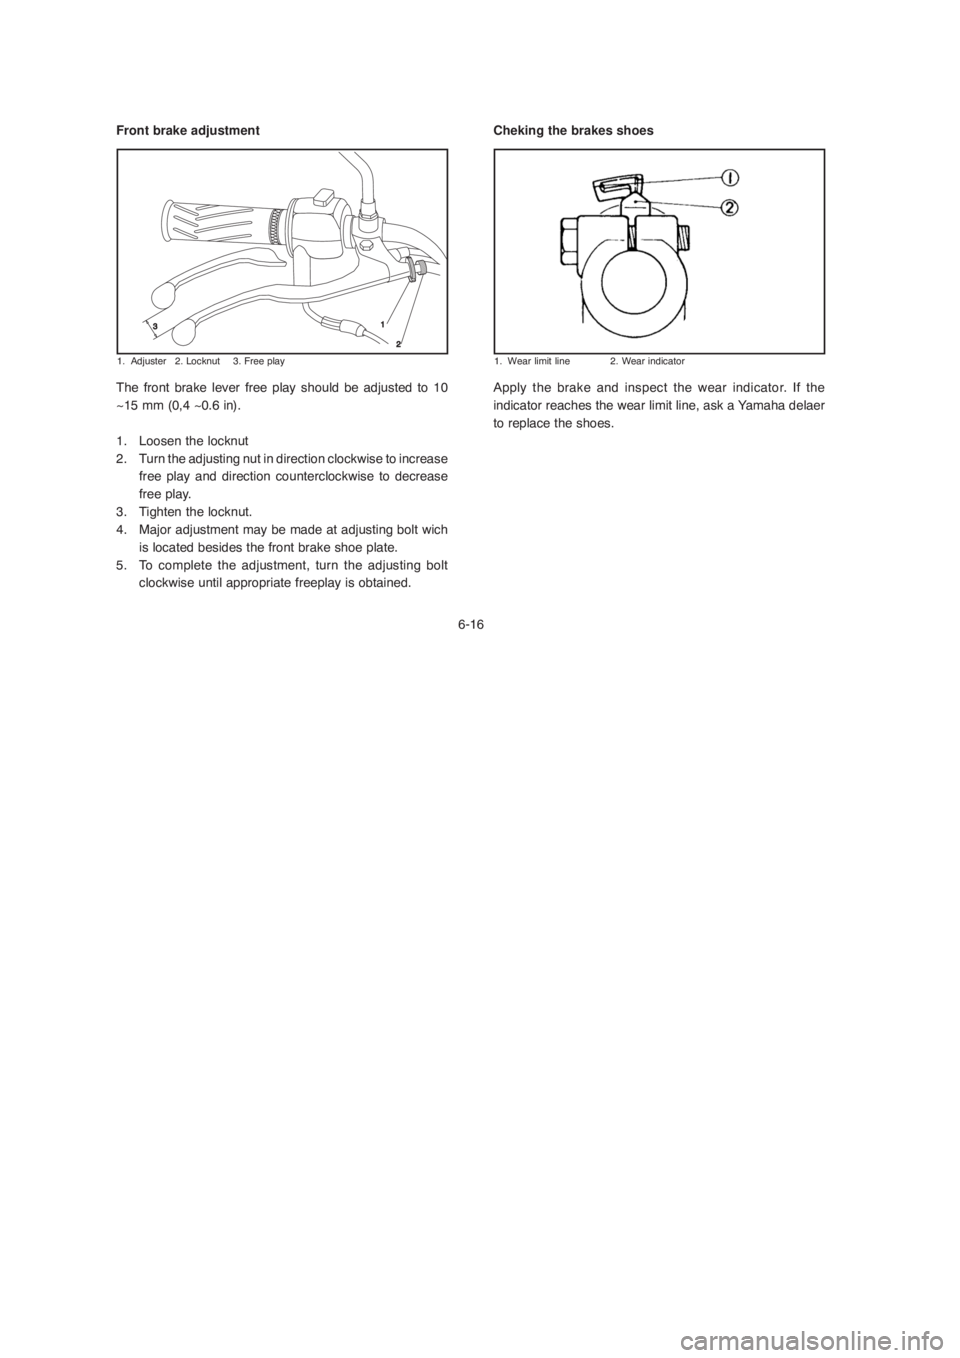
Front brake adjustment
1. Adjuster 2. Locknut 3. Free play
The front brake lever free play should be adjusted to 10
~15 mm (0,4 ~0.6 in).
1. Loosen the locknut
2. Turn the adjusting nut in direction clockwise to increase
free play and direction counterclockwise to decrease
free play.
3. Tighten the locknut.
4. Major adjustment may be made at adjusting bolt wich
is located besides the front brake shoe plate.
5. To complete the adjustment, turn the adjusting bolt
clockwise until appropriate freeplay is obtained.
Cheking the brakes shoes
1. Wear limit line 2. Wear indicator
Apply the brake and inspect the wear indicator. If the
indicator reaches the wear limit line, ask a Yamaha delaer
to replace the shoes.
Page 76 of 83
7-1 CLEANING AND STORAGE
A. CLEANING
Frequent, thorough cleaning of your motorcycle will not only
enhance its appearance but will improve its general
performance and extend the useful life of many components.
1. Before cleaning the motorcycle:
a. Block off the end of the exhaust pipe to prevent water
entry; a plastic bag and strong rubber band may be
used.
b. Make sure the spark plug and all filler caps are properly
installed.
2. If the engine case is excessively greasy, apply
degreaser with a paint brush. Do not apply degreaser
to the chain, sprockets, or wheel axles.
3. Rinse the dirt and degreaser off with a garden hose,
Use only enough pressure to do the job.
Excessive hose pressure may cause water seepage and
deterioration of wheel bearings, front fork, brakes,
transmission seals and electrical parts.Many expensive repair bills have resulted from improper
high pressure detergent applications such as those
available in coin-operated car washers.
4. Once the majority of the dirt has been hosed off, wash
all surfaces with warm water and mild, detergent-type
soap. An old toothbrush or bottle brush is handy for
hard-to-get-at places.
5. Rinse the motorcycle off immediately with clean water
and dry all surfaces with a chamois, clean towel, or
soft absorbent cloth.
6. Dry the chain and lubricate it to prevent rust.
7. Clean the seat with a vinyl upholstery cleaner to keep
the cover pliable and glossy.
8. Automotive-type wax may be applied to all painted and
chrome-plated surfaces. Avoid combination cleaner-
waxes. Many contain abrasives which may mar the paint
or protective finish. When finished, start the engine and
let it idle for several minutes.
CAUTION:
CAUTION:
Page 81 of 83
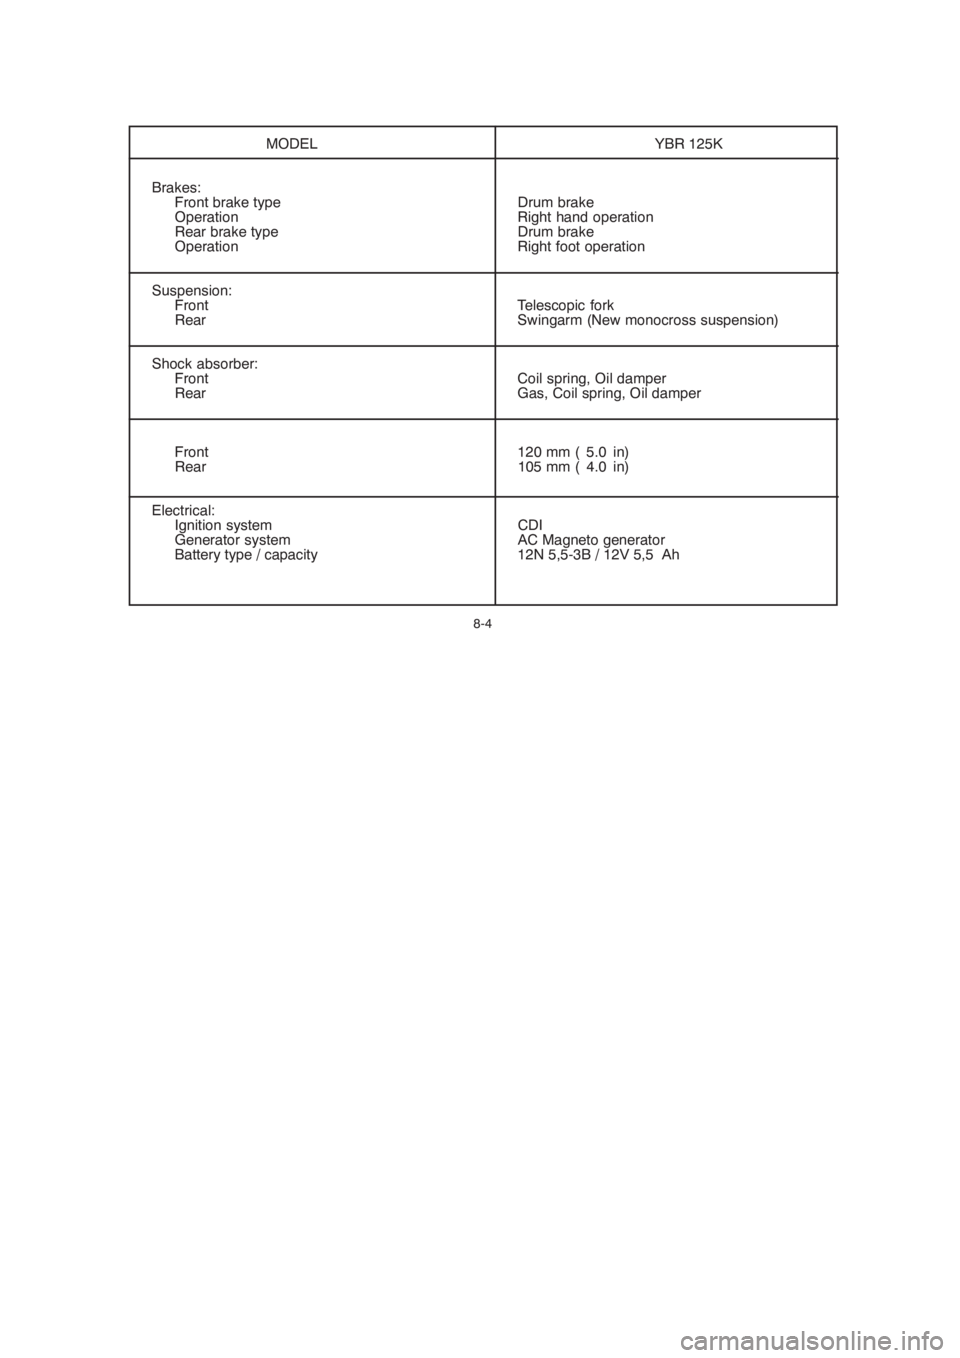
8-4
MODEL YBR 125K
Brakes:
Front brake type Drum brake
Operation Right hand operation
Rear brake type Drum brake
Operation Right foot operation
Suspension:
Front Telescopic fork
Rear Swingarm (New monocross suspension)
Shock absorber:
Front Coil spring, Oil damper
Rear Gas, Coil spring, Oil damper
Front 120 mm ( 5.0 in)
Rear 105 mm ( 4.0 in)
Electrical:
Ignition system CDI
Generator system AC Magneto generator
Battery type / capacity 12N 5,5-3B / 12V 5,5 Ah