check engine YAMAHA YBR125 2009 Owner's Manual
[x] Cancel search | Manufacturer: YAMAHA, Model Year: 2009, Model line: YBR125, Model: YAMAHA YBR125 2009Pages: 80, PDF Size: 2.77 MB
Page 67 of 80

PERIODIC MAINTENANCE AND ADJUSTMENT
6-36
6
EAUT1981
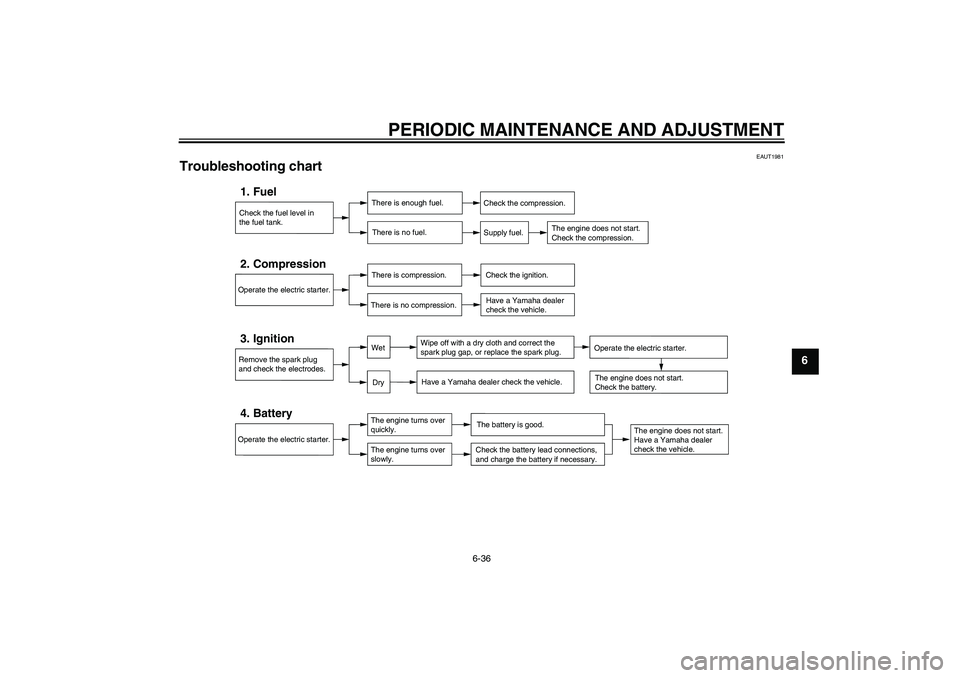
Troubleshooting chart
Check the fuel level in
the fuel tank.1. Fuel
There is enough fuel.
There is no fuel.
Check the compression.
Supply fuel.
The engine does not start.
Check the compression.
Operate the electric starter.2. Compression
There is compression.
There is no compression.
Check the ignition.
Have a Yamaha dealer
check the vehicle.
Remove the spark plug
and check the electrodes.3. Ignition
Wipe off with a dry cloth and correct the
spark plug gap, or replace the spark plug.
Have a Yamaha dealer check the vehicle.
The engine does not start.
Have a Yamaha dealer
check the vehicle.
The engine does not start.
Check the battery.
Operate the electric starter.4. Battery
The engine turns over
quickly.
The engine turns over
slowly.
The battery is good.Check the battery lead connections,
and charge the battery if necessary.
DryWet
Operate the electric starter.
U3D9E2E0.book Page 36 Thursday, November 6, 2008 10:54 AM
Page 71 of 80

MOTORCYCLE CARE AND STORAGE
7-4
7 3. Perform the following steps to pro-
tect the cylinder, piston rings, etc.
from corrosion.
a. Remove the spark plug cap
and spark plug.
b. Pour a teaspoonful of engine oil
into the spark plug bore.
c. Install the spark plug cap onto
the spark plug, and then place
the spark plug on the cylinder
head so that the electrodes are
grounded. (This will limit spark-
ing during the next step.)
d. Turn the engine over several
times with the starter. (This will
coat the cylinder wall with oil.)
e. Remove the spark plug cap
from the spark plug, and then
install the spark plug and the
spark plug cap. WARNING! To
prevent damage or injury
from sparking, make sure to
ground the spark plug elec-
trodes while turning the en-
gine over.
[EWA10951]
4. Lubricate all control cables and the
pivoting points of all levers and
pedals as well as of the side-
stand/centerstand.5. Check and, if necessary, correct
the tire air pressure, and then lift
the motorcycle so that both of its
wheels are off the ground. Alterna-
tively, turn the wheels a little every
month in order to prevent the tires
from becoming degraded in one
spot.
6. Cover the muffler outlet with a
plastic bag to prevent moisture
from entering it.
7. Remove the battery and fully
charge it. Store it in a cool, dry
place and charge it once a month.
Do not store the battery in an ex-
cessively cold or warm place [less
than 0 °C (30 °F) or more than 30
°C (90 °F)]. For more information
on storing the battery, see page
6-26.
TIPMake any necessary repairs beforestoring the motorcycle.
U3D9E2E0.book Page 4 Thursday, November 6, 2008 10:54 AM
Page 77 of 80

INDEX
AAir filter element, cleaning .................... 6-10
Auxiliary light bulb, replacing ................ 6-31BBattery .................................................. 6-26
Brake and clutch levers, checking
and lubricating .................................... 6-23
Brake and shift pedals, checking
and lubricating .................................... 6-23
Brake fluid, changing ............................ 6-19
Brake fluid level, checking .................... 6-18
Brake lever ............................................. 3-5
Brake pads and shoes, checking.......... 6-18
Brake pedal ............................................ 3-6
Brake pedal free play, adjusting ........... 6-17CCables, checking and lubricating .......... 6-22
Care ........................................................ 7-1
Carrier................................................... 3-10
Catalytic converters ................................ 3-8
Centerstand and sidestand, checking
and lubricating .................................... 6-24
Clutch lever............................................. 3-5
Clutch lever free play, adjusting ........... 6-15DDimmer switch ........................................ 3-4
Drive chain, cleaning and lubricating .... 6-21
Drive chain slack .................................. 6-20EEngine break-in ...................................... 5-3
Engine idling speed, checking .............. 6-12
Engine oil ................................................ 6-9
Engine trouble warning light ................... 3-2
FFront brake lever free play, checking .... 6-16
Front fork, checking...............................6-25
Fuel ......................................................... 3-7
Fuel consumption, tips for reducing ........ 5-2
Fuel gauge .............................................. 3-4
Fuel tank cap........................................... 3-6
Fuse, replacing...................................... 6-28HHandlebar switches ................................. 3-4
Headlight bulb, replacing....................... 6-29
High beam indicator light......................... 3-2
Horn switch ............................................. 3-4IIdentification numbers ............................. 9-1
Ignition circuit cut-off system ................. 3-11
Indicator and warning lights .................... 3-2KKey identification number ........................ 9-1
Kickstarter ............................................... 3-9LLuggage strap holders .......................... 3-10MMain switch/steering lock ........................ 3-1
Maintenance and lubrication, periodic..... 6-3
Maintenance, emission control system ... 6-2
Matte color, caution .................................7-1
Model label .............................................. 9-2NNeutral indicator light .............................. 3-2PPanels, removing and installing .............. 6-6
Parking ....................................................5-3
Part locations .......................................... 2-1
RRear brake light switch, adjusting ......... 6-17SSafety information ................................... 1-1
Self-diagnosis device .............................. 3-3
Shifting .................................................... 5-2
Shift pedal ............................................... 3-5
Shock absorber assemblies, adjusting ... 3-9
Sidestand .............................................. 3-10
Spark plug, checking .............................. 6-7
Specifications.......................................... 8-1
Speedometer unit ................................... 3-3
Starting the engine.................................. 5-1
Start switch ............................................. 3-4
Steering, checking ................................ 6-26
Storage ................................................... 7-3
Swingarm pivots, lubricating ................. 6-25TTachometer............................................. 3-3
Tail/brake light bulb, replacing .............. 6-30
Throttle cable free play, adjusting ......... 6-12
Throttle grip and cable, checking
and lubricating .................................... 6-22
Tires ...................................................... 6-13
Tool kit .................................................... 6-1
Troubleshooting .................................... 6-35
Troubleshooting chart ........................... 6-36
Turn signal indicator light ........................ 3-2
Turn signal light bulb, replacing ............ 6-31
Turn signal switch ................................... 3-4VValve clearance .................................... 6-13
Vehicle identification number .................. 9-1
U3D9E2E0.book Page 1 Thursday, November 6, 2008 10:54 AM