check engine YAMAHA YFM660R 2005 User Guide
[x] Cancel search | Manufacturer: YAMAHA, Model Year: 2005, Model line: YFM660R, Model: YAMAHA YFM660R 2005Pages: 432, PDF Size: 17.18 MB
Page 273 of 432

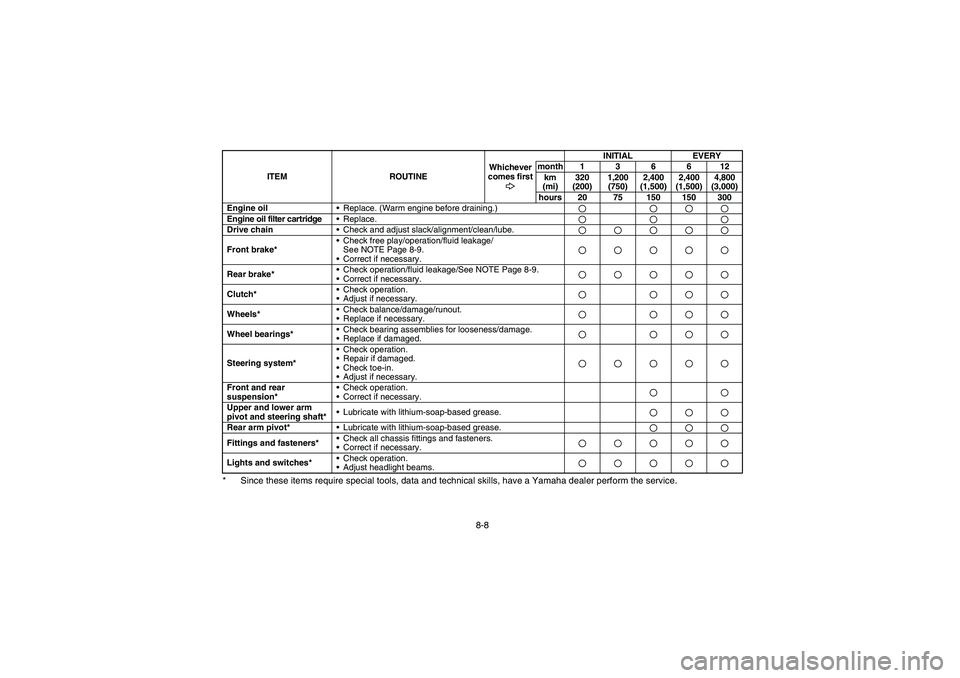
8-8 * Since these items require special tools, data and technical skills, have a Yamaha dealer perform the service.
Engine oil
Replace. (Warm engine before draining.)Engine oil filter cartridge
Replace.Drive chain
Check and adjust slack/alignment/clean/lube.Front brake*Check free play/operation/fluid leakage/
See NOTE Page 8-9.
Correct if necessary.Rear brake*Check operation/fluid leakage/See NOTE Page 8-9.
Correct if necessary.Clutch*Check operation.
Adjust if necessary.Wheels*Check balance/damage/runout.
Replace if necessary.Wheel bearings*Check bearing assemblies for looseness/damage.
Replace if damaged.Steering system*Check operation.
Repair if damaged.
Check toe-in.
Adjust if necessary.Front and rear
suspension*Check operation.
Correct if necessary.Upper and lower arm
pivot and steering shaft*Lubricate with lithium-soap-based grease.Rear arm pivot*
Lubricate with lithium-soap-based grease.Fittings and fasteners*Check all chassis fittings and fasteners.
Correct if necessary.Lights and switches*Check operation.
Adjust headlight beams.
ITEM ROUTINEWhichever
comes firstINITIAL EVERY
month136612
km
(mi)320
(200)1,200
(750)2,400
(1,500)2,400
(1,500)4,800
(3,000)
hours 20 75 150 150 300
U5LP64.book Page 8 Thursday, April 1, 2004 4:53 PM
Page 284 of 432

8-19 1. Engine oil tank
2. Engine oil tank filler cap
3. Dipstick
4. Maximum level mark
5. Minimum level mark
1. Réservoir d’huile de moteur
2. Bouchon de remplissage de l’huile de moteur
3. Jauge
4. Repère de niveau maximum
5. Repère de niveau minimum
1. Depósito de aceite de motor
2. Tapa de relleno del depósito de aceite de motor
3. Varilla de medición
4. Marca de nivel máximo
5. Marca de nivel mínimo
EBU12382
Engine oil and oil filter cartridge
The engine oil level should be checked before
each ride. In addition, the oil must be changed and
the oil filter cartridge replaced at the intervals
specified in the periodic maintenance and lubrica-
tion chart.
To check the engine oil level
1. Place the ATV on a level surface.
2. Start the engine, warm it up until the engine
oil has reached a normal temperature of
60°C, let it continue to idle for twenty to thirty
seconds. During this period, rev the engine
two or three times to approximately
3,000 r/min, and then turn the engine off.NOTE:_ To achieve the proper engine oil temperature for
an accurate oil level reading, the engine must
have first completely cooled down, and then
warmed up again for several minutes to normal
operating temperature. _
U5LP64.book Page 19 Thursday, April 1, 2004 4:53 PM
Page 286 of 432

8-21
3. Wait a few minutes until the oil settles, re-
move the engine oil tank filler cap, wipe the
dipstick clean with a clean rag, insert it back
into the filler hole (without screwing it in), and
then remove it again to check the oil level.NOTE:_ The engine oil should be between the minimum
and maximum level marks. _4. If the engine oil is below the minimum level
mark, add sufficient oil of the recommended
type to raise it to the correct level.NOTE:_ When adding oil, be careful not to overfill the en-
gine oil tank; the oil level rises faster starting from
the half-level-portion on the dipstick. _5. Insert the dipstick into the oil filler hole, and
then tighten the oil filler cap.
U5LP64.book Page 21 Thursday, April 1, 2004 4:53 PM
Page 290 of 432

8-25 1. Crankcase engine oil drain bolt
1. Boulon de vidange d’huile du carter
1. Perno de drenaje de aceite de motor del cárter
1. Engine oil tank drain bolt
1. Boulon de vidange du réservoir d’huile de moteur
1. Perno de drenaje del depósito aceite de motor
4. Remove the crankcase engine oil drain bolt.
5. Remove the engine oil tank filler cap and the
oil tank drain bolt.
6. Check the washers for damage, and replace
if necessary.NOTE:_ Skip steps 7–9 if the oil filter cartridge is not being
replaced. _
U5LP64.book Page 25 Thursday, April 1, 2004 4:53 PM
Page 294 of 432

8-29
11. Pour only 1.75 L of the specified amount of
recommended engine oil through the engine
oil tank filler hole, insert the dipstick, and then
tighten the oil tank filler cap.
12. Start the engine, rev it several times, and
then turn it off.
13. Remove the engine oil tank filler cap, and
then gradually fill the oil tank with the remain-
ing oil quantity while regularly checking the oil
level on the dipstick.
14. Install the engine oil tank filler cap.Tightening torques:
Crankcase engine oil drain bolt:
30 Nm (3.0 m·kgf)
Engine oil tank drain bolt:
25 Nm (2.5 m·kgf)
U5LP64.book Page 29 Thursday, April 1, 2004 4:53 PM
Page 298 of 432

8-33
15. Start the engine, and then let it idle for seve-
ral minutes while checking it for oil leakage. If
oil is leaking, immediately turn the engine off
and check for the cause.
16. Turn the engine off, and then check the oil
level and correct it if necessary.
17. Install the engine guard by installing the bolts.
U5LP64.book Page 33 Thursday, April 1, 2004 4:53 PM
Page 300 of 432

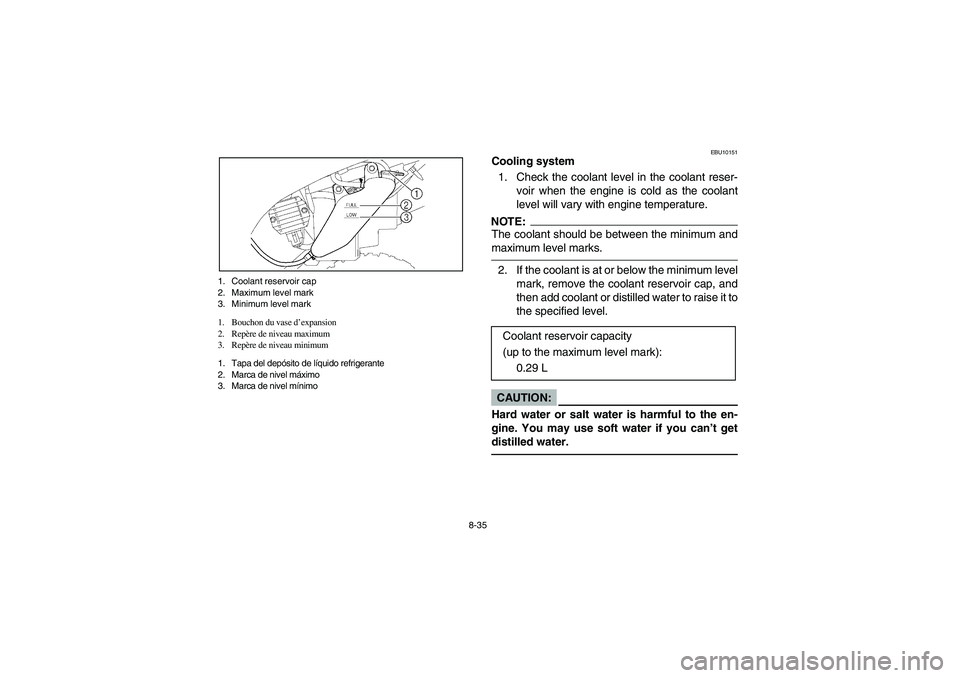
8-35 1. Coolant reservoir cap
2. Maximum level mark
3. Minimum level mark
1. Bouchon du vase d’expansion
2. Repère de niveau maximum
3. Repère de niveau minimum
1. Tapa del depósito de líquido refrigerante
2. Marca de nivel máximo
3. Marca de nivel mínimo
EBU10151
Cooling system
1. Check the coolant level in the coolant reser-
voir when the engine is cold as the coolant
level will vary with engine temperature.NOTE:_ The coolant should be between the minimum and
maximum level marks. _2. If the coolant is at or below the minimum level
mark, remove the coolant reservoir cap, and
then add coolant or distilled water to raise it to
the specified level.CAUTION:_ Hard water or salt water is harmful to the en-
gine. You may use soft water if you can’t get
distilled water. _
Coolant reservoir capacity
(up to the maximum level mark):
0.29 L
U5LP64.book Page 35 Thursday, April 1, 2004 4:53 PM
Page 310 of 432

8-45
CAUTION:_ Hard water or salt water is harmful to the en-
gine. You may use soft water if you cannot get
distilled water. _12. Install the radiator cap and the coolant reser-
voir cap.
13. Start the engine and let it idle for several min-
utes. Stop the engine, and then check the
coolant level in the radiator. If it is low, add
more coolant until it reaches the top of the ra-
diator.
14. Check the coolant level in the reservoir. If it is
low, add coolant to the maximum level mark.
15. Start the engine and then check for coolant
leakage.NOTE:_ If any leakage is found, have a Yamaha dealer
check the cooling system. _16. Install the panel.
U5LP64.book Page 45 Thursday, April 1, 2004 4:53 PM
Page 318 of 432

8-53 1. Check hose
1. Flexible de contrôle
1. Manguito de comprobación
1. Air filter case cover 2. Holder (× 6)
1. Couvercle du boîtier de filtre à air 2. Support (× 6)
1. Tapa de la caja del filtro 2. Soporte (× 6)
EBU12121
Air filter element cleaningNOTE:_ There is a check hose at the bottom of the air filter
case. If dust or water collects in this hose, empty
the hose and clean the air filter element and air fil-
ter case. _1. Remove the seat. (See page 4-33 for seat re-
moval and installation procedures.)
2. Remove the air filter case cover by unhook-
ing the holders.
3. Remove the air filter element.
4. Remove the air filter element from its frame.
5. Wash the air filter element gently but thor-
oughly in solvent.
WARNING
_ Always use parts cleaning solvent to clean the
air filter element. Never use low flash point sol-
vents or gasoline to clean the air filter element
because the engine could catch fire or ex-
plode. _
U5LP64.book Page 53 Thursday, April 1, 2004 4:53 PM
Page 322 of 432

8-57 1. Hose
1. Flexible
1. Manguera
11. Install the air filter case cover and be sure to
connect the hose.
12. Install the seat.NOTE:_ The air filter element should be cleaned every 20–
40 hours. It should be cleaned and lubricated more
often if the machine is operated in extremely dusty
areas. Each time air filter element maintenance is
performed, check the air inlet to the air filter case
for obstructions. Check the air filter element rubber
joint to the carburetor and manifold fittings for an
airtight seal. Tighten all fittings securely to avoid
the possibility of unfiltered air entering the engine. _CAUTION:_ Never operate the engine with the air filter ele-
ment removed. This will allow unfiltered air to
enter, causing rapid engine wear and possible
engine damage. Additionally, operation with-
out the air filter element will affect carburetor
jetting with subsequent poor performance and
possible engine overheating. _
U5LP64.book Page 57 Thursday, April 1, 2004 4:53 PM