stop start YAMAHA YFM700R 2006 Owners Manual
[x] Cancel search | Manufacturer: YAMAHA, Model Year: 2006, Model line: YFM700R, Model: YAMAHA YFM700R 2006Pages: 424, PDF Size: 3.86 MB
Page 62 of 424

4-5
EBU16010
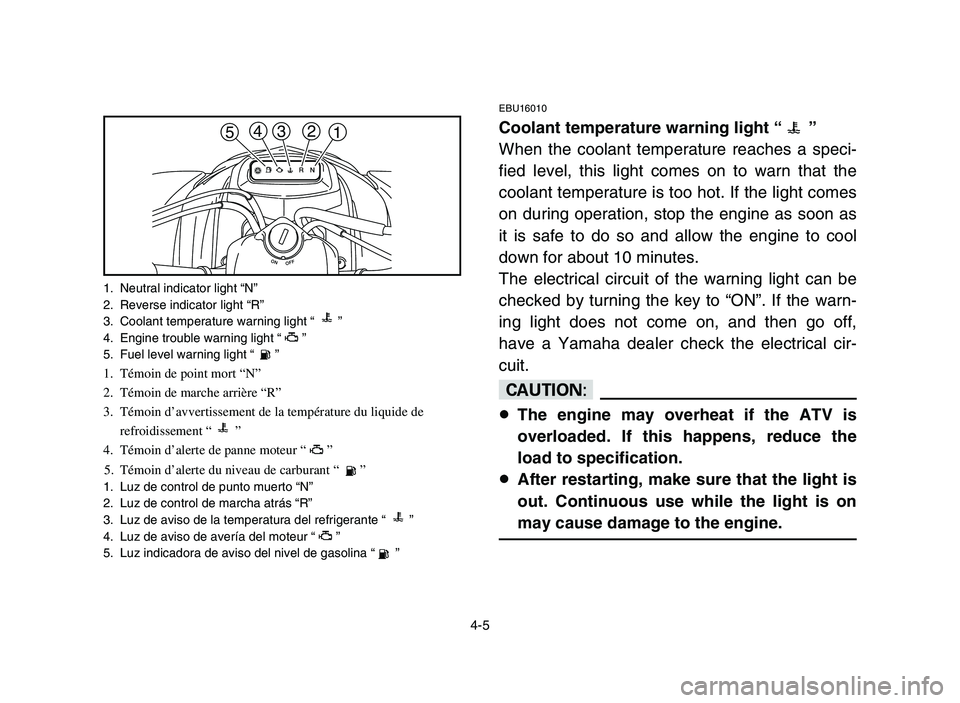
Coolant temperature warning light “ ”
When the coolant temperature reaches a speci-
fied level, this light comes on to warn that the
coolant temperature is too hot. If the light comes
on during operation, stop the engine as soon as
it is safe to do so and allow the engine to cool
down for about 10 minutes.
The electrical circuit of the warning light can be
checked by turning the key to “ON”. If the warn-
ing light does not come on, and then go off,
have a Yamaha dealer check the electrical cir-
cuit.
cC
8The engine may overheat if the ATV is
overloaded. If this happens, reduce the
load to specification.
8After restarting, make sure that the light is
out. Continuous use while the light is on
may cause damage to the engine.
1 2 3 4
5
1. Neutral indicator light “N”
2. Reverse indicator light “R”
3. Coolant temperature warning light “ ”
4. Engine trouble warning light “ ”
5. Fuel level warning light “ ”
1. Témoin de point mort “N”
2. Témoin de marche arrière “R”
3. Témoin d’avvertissement de la température du liquide de
refroidissement “ ”
4. Témoin d’alerte de panne moteur “ ”
5. Témoin d’alerte du niveau de carburant “ ”
1. Luz de control de punto muerto “N”
2. Luz de control de marcha atrás “R”
3. Luz de aviso de la temperatura del refrigerante “ ”
4. Luz de aviso de avería del moteur “ ”
5. Luz indicadora de aviso del nivel de gasolina “ ”
1S3-9-60 4 6/7/05 9:37 AM Page 4-5
Page 66 of 424

4-9
1
2
3
1. Light switch “LIGHTS”
2. Engine stop switch “ENG. STOP”
3. Start switch “START”
1. Contacteur d’éclairage “LIGHTS”
2. Coupe-circuit du moteur “ENG. STOP”
3. Contacteur du démarreur “START”
1. Interruptor de luces “LIGHTS”
2. Interruptor de paro del motor “ENG. STOP”
3. Interruptor de arranque “START”
EBU00530
Handlebar switches
EBU11560
Light switch “LIGHTS”
Set the switch to the “LO” position to turn on the
low beam and the taillight.
Set the switch to the “HI” position to turn on the
high beam and the taillight.
Set the switch to the “OFF” position to turn off all
of the lights.
cC
Do not use the headlights with the engine
turned off for more than thirty minutes. The
battery may discharge to the point that the
starter motor will not operate properly. If this
should happen, remove the battery and
recharge it.
1S3-9-60 4 6/7/05 9:37 AM Page 4-9
Page 68 of 424

4-11
EBU11580
Engine stop switch “ENG. STOP”
Make sure that the engine stop switch is in the
“RUN” position before starting the engine. The
engine stop switch controls ignition and can be
used at all times to stop the engine, especially in
an emergency. The engine will not start or run
when the engine stop switch is turned to “OFF”.
EBU06470
Start switch “START”
The starter motor cranks the engine when this
switch is pushed.
cC
See the starting instructions on page 6-3
prior to starting the engine.
1
2
3
1. Light switch “LIGHTS”
2. Engine stop switch “ENG. STOP”
3. Start switch “START”
1. Contacteur d’éclairage “LIGHTS”
2. Coupe-circuit du moteur “ENG. STOP”
3. Contacteur du démarreur “START”
1. Interruptor de luces “LIGHTS”
2. Interruptor de paro del motor “ENG. STOP”
3. Interruptor de arranque “START”
1S3-9-60 4 6/7/05 9:37 AM Page 4-11
Page 69 of 424

4-12
FBU11580
Coupe-circuit du moteur “ENG. STOP”
S’assurer que le coupe-circuit du moteur est
placé sur “RUN” avant de mettre le moteur en
marche. Le coupe-circuit du moteur contrôle
l’allumage et peut à tout moment servir à couper
le moteur. Il est particulièrement utile en cas
d’urgence. Le moteur ne se met pas en marche
ou ne tourne pas quand son coupe-circuit est sur
“OFF”.
FBU06470
Contacteur du démarreur “START”
Pour mettre le moteur en marche, enfoncer le
contacteur du démarreur.
fF
Il convient de lire les instructions de démar-
rage à la page 6-4 avant de mettre le moteur
en marche.
SBU11580
Interruptor de parada del motor “ENG.
STOP”
Asegúrese de que el interruptor de parada del
motor esté en la posición “RUN” antes de arran-
car el motor. El interruptor de parada del motor
controla el encendido y puede utilizarse para
parar el motor en cualquier momento, especial-
mente en casos de emergencia. Cuando se gira
el interruptor de parada a la posición “OFF”, el
motor no puede ser puesto en marcha ni funcio-
nar.
SBU06470
Interruptor de arranque “START”
Cuando se pulsa este interruptor el motor de
arranque hace virar el motor de la máquina.
yY
Antes de poner en marcha el motor, vea las
instrucciones sobre el arranque en la página
6-4.
1S3-9-60 4 6/7/05 9:37 AM Page 4-12
Page 134 of 424

6-3
EBU15901
Starting the engine
w
Always make sure all control cables work
smoothly before you begin riding in cold
weather. If the control cables are frozen or
do not work smoothly, you could be unable
to control the ATV, which could lead to an
accident or collision.
1. Set the parking brake.
2. Turn the main switch to “ON” and the
engine stop switch to “RUN”.
cC
The engine trouble warning light and the fuel
level warning light should come on, and then
go off.
If a warning light does not go off, see page
4-7 for the corresponding warning light cir-
cuit check.
3. Shift the transmission into neutral.
1S3-9-60 5-6 6/7/05 10:22 AM Page 6-3
Page 144 of 424

6-13
1
2 3 4 5N1R
1. Shift pedal N. Neutral position
R. Reverse position
1. Pédale de sélection N. Point mort
R. Marche arrière
1. Pedal del cambio N. Punto muerto
R. Posición de marcha atrás
EBU11730
Shifting
This model has a 5-speed forward and 1-speed
reverse transmission. The transmission allows
you to control the amount of power you have
available at a given speed or for starting, accel-
erating, climbing hills, etc. To shift into neutral,
return the throttle lever to the closed position,
apply the clutch and repeatedly depress the shift
pedal until it stops. When it stops, it will be in
first gear. Raise the pedal slightly to neutral.
cC
8Do not coast for long periods with the
engine off, and do not tow the machine a
long distance. Even in neutral position, the
transmission is only properly lubricated
when the engine is running. Inadequate
lubrication may cause damage.
8Always use the clutch when changing
gears. The engine, transmission and drive
train are not designed to withstand the
shock of forced shifting and can be dam-
aged by shifting without the clutch.
1S3-9-60 5-6 6/7/05 10:22 AM Page 6-13
Page 222 of 424

7-53
If your ATV has stalled or stopped and you
believe you can continue up the hill, restart care-
fully to make sure you do not lift the front wheels
which could cause you to lose control. If you are
unable to continue up the hill, dismount the ATV
on the uphill side. Physically turn the ATV
around and then descend the hill.
If you start to roll backwards, DO NOT use the
rear brake to stop or try to put the ATV in gear.
The ATV could easily tip over backwards.
Instead, apply the front brake gradually, or dis-
mount the ATV immediately on the uphill side.
1S3-9-60 7 4/26/05 6:27 PM Page 196
Page 246 of 424

7-77
8If your ATV starts to slide sideways:
Steer in the direction of the slide if you have
the room.
Applying the brakes or accelerating is not rec-
ommended until you have corrected the slide.
(See pages 7-71–7-73.)
8If your ATV can’t make it up a hill you are try-
ing to climb:
Turn the ATV around if you still have forward
speed. If not, stop, dismount on the uphill side
of the ATV and physically turn the ATV
around. If the ATV starts to slip backwards
DO NOT USE THE REAR BRAKE - the ATV
may tip over on top of you. Dismount the ATV
on the uphill side. (See pages 7-47–7-55.)
1S3-9-60 7 4/26/05 6:27 PM Page 220
Page 296 of 424

8-47
12. Install the radiator cap and the coolant
reservoir cap.
13. Start the engine and let it idle for several
minutes. Stop the engine, and then check
the coolant level in the radiator. If it is low,
add more coolant until it reaches the top of
the radiator.
14. Check the coolant level in the reservoir. If it
is low, add coolant to the maximum level
mark.
15. Start the engine and then check for coolant
leakage.
NOTE:
If any leakage is found, have a Yamaha dealer
check the cooling system.
16. Install the panel.
1S3-9-60 8 6/7/05 10:25 AM Page 8-47
Page 396 of 424

9-5
8. Automotive type wax may be applied to all
painted and chrome plated surfaces.
Avoid combination cleaner-waxes. Many
contain abrasives which may mar the paint
or protective finish.
When finished, start the engine and let it
idle for several minutes.
w
Wet brakes may have reduced stopping abili-
ty, increasing the chance of an accident.
Test the brakes after washing. Apply the
brakes several times at slow speeds to let
friction dry out the linings.
1S3-9-60 9-11 4/27/05 2:13 PM Page 9-5