tires YAMAHA YFM700R 2011 User Guide
[x] Cancel search | Manufacturer: YAMAHA, Model Year: 2011, Model line: YFM700R, Model: YAMAHA YFM700R 2011Pages: 154, PDF Size: 5.03 MB
Page 83 of 154
7-19
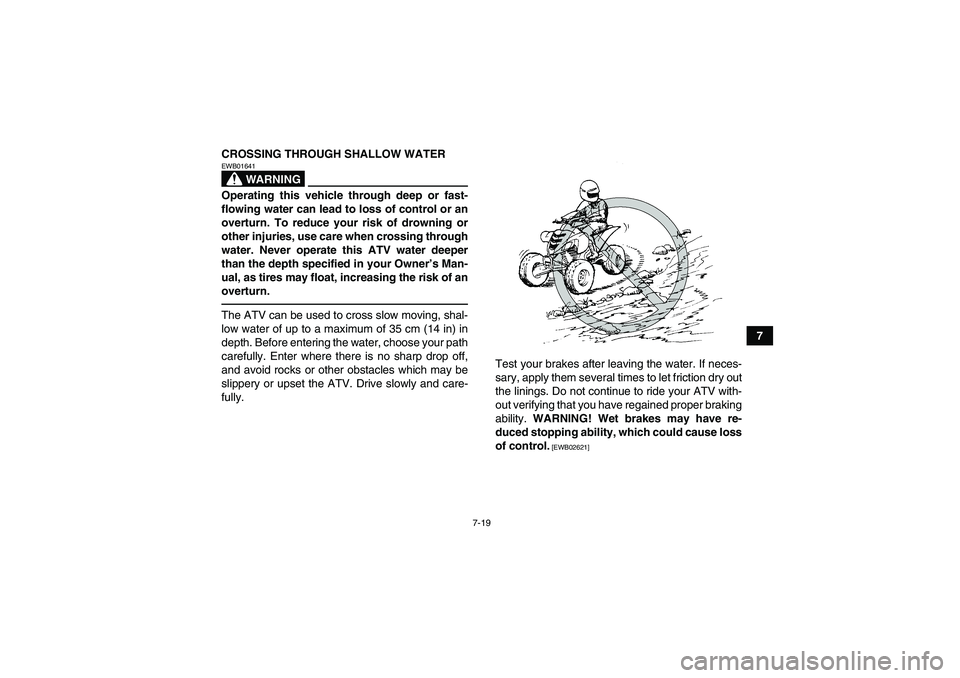
7 CROSSING THROUGH SHALLOW WATER
WARNING
EWB01641Operating this vehicle through deep or fast-
flowing water can lead to loss of control or an
overturn. To reduce your risk of drowning or
other injuries, use care when crossing through
water. Never operate this ATV water deeper
than the depth specified in your Owner’s Man-
ual, as tires may float, increasing the risk of an
overturn.The ATV can be used to cross slow moving, shal-
low water of up to a maximum of 35 cm (14 in) in
depth. Before entering the water, choose your path
carefully. Enter where there is no sharp drop off,
and avoid rocks or other obstacles which may be
slippery or upset the ATV. Drive slowly and care-
fully.Test your brakes after leaving the water. If neces-
sary, apply them several times to let friction dry out
the linings. Do not continue to ride your ATV with-
out verifying that you have regained proper braking
ability. WARNING! Wet brakes may have re-
duced stopping ability, which could cause loss
of control.
[EWB02621]
U1AS61E0.book Page 19 Thursday, February 11, 2010 2:17 PM
Page 93 of 154
8-6
8
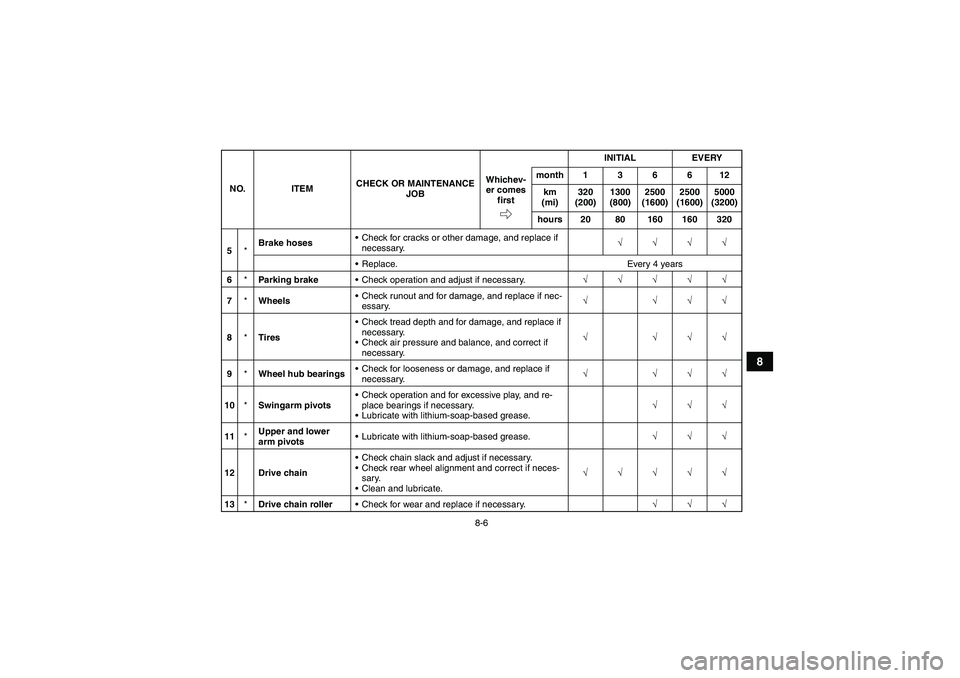
5*Brake hosesCheck for cracks or other damage, and replace if
necessary.√√√√
Replace. Every 4 years
6*Parking brakeCheck operation and adjust if necessary.√√√√√
7*WheelsCheck runout and for damage, and replace if nec-
essary.√ √√√
8*TiresCheck tread depth and for damage, and replace if
necessary.
Check air pressure and balance, and correct if
necessary.√ √√√
9*Wheel hub bearingsCheck for looseness or damage, and replace if
necessary.√ √√√
10*Swingarm pivotsCheck operation and for excessive play, and re-
place bearings if necessary.
Lubricate with lithium-soap-based grease.√√√
11*Upper and lower
arm pivotsLubricate with lithium-soap-based grease.√√√
12 Drive chainCheck chain slack and adjust if necessary.
Check rear wheel alignment and correct if neces-
sary.
Clean and lubricate.√√√√√
13*Drive chain rollerCheck for wear and replace if necessary.√√√ NO. ITEMCHECK OR MAINTENANCE
JOBINITIAL EVERY
Whichev-
er comes
firstmonth136612
km
(mi)320
(200)1300
(800)2500
(1600)2500
(1600)5000
(3200)
hours 20 80 160 160 320
U1AS61E0.book Page 6 Thursday, February 11, 2010 2:17 PM
Page 123 of 154
8-36
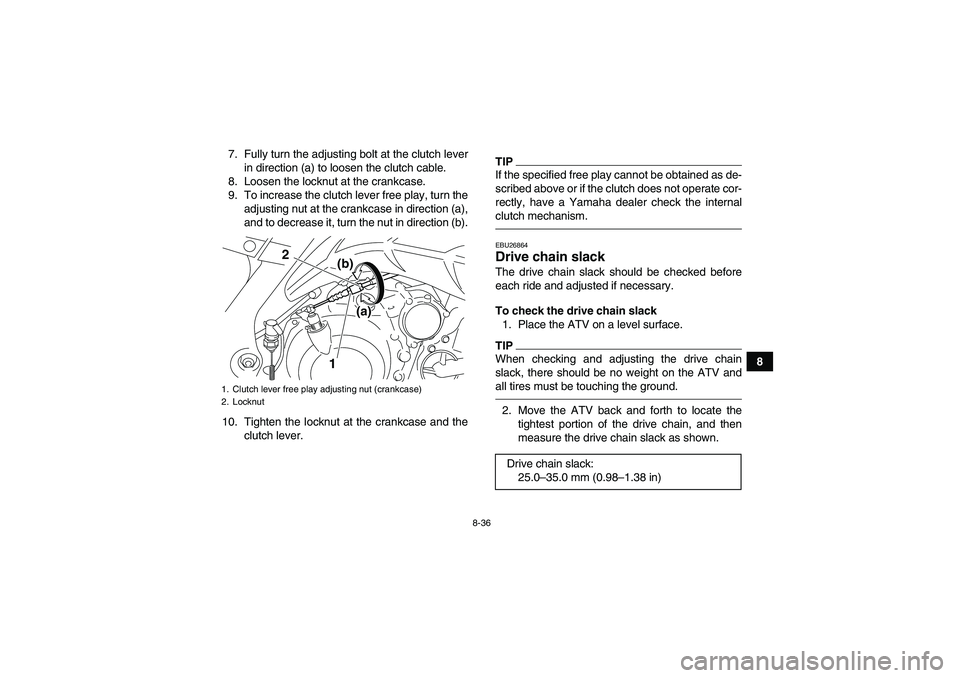
8 7. Fully turn the adjusting bolt at the clutch lever
in direction (a) to loosen the clutch cable.
8. Loosen the locknut at the crankcase.
9. To increase the clutch lever free play, turn the
adjusting nut at the crankcase in direction (a),
and to decrease it, turn the nut in direction (b).
10. Tighten the locknut at the crankcase and the
clutch lever.
TIPIf the specified free play cannot be obtained as de-
scribed above or if the clutch does not operate cor-
rectly, have a Yamaha dealer check the internal
clutch mechanism.EBU26864Drive chain slack The drive chain slack should be checked before
each ride and adjusted if necessary.
To check the drive chain slack
1. Place the ATV on a level surface.TIPWhen checking and adjusting the drive chain
slack, there should be no weight on the ATV and
all tires must be touching the ground.2. Move the ATV back and forth to locate the
tightest portion of the drive chain, and then
measure the drive chain slack as shown.
1. Clutch lever free play adjusting nut (crankcase)
2. Locknut
1 2
(a)
(b)
Drive chain slack:
25.0–35.0 mm (0.98–1.38 in)
U1AS61E0.book Page 36 Thursday, February 11, 2010 2:17 PM
Page 142 of 154

9-2
9
EBU27261Storage Short-term
Always store your ATV in a cool, dry place and, if
necessary, protect it against dust with a porous
cover. NOTICE: Storing the ATV in a poorly ven-
tilated room or covering it with a tarp while it is
still wet, will allow water and humidity to seep
in and cause rust. To prevent corrosion, avoid
damp cellars, stables (because of the presence
of ammonia) and areas where strong chemi-
cals are stored.
[ECB00721]
Long-term
Before storing your ATV for several months:
1. Follow all the instructions in the “Cleaning”
section of this chapter.
2. Fill up the fuel tank and add fuel stabilizer (if
available) to prevent the fuel from deteriorat-
ing.3. Perform the following steps to protect the cyl-
inder, piston rings, etc. from corrosion.
a. Remove the spark plug cap and spark
plug.
b. Pour a teaspoonful of engine oil into the
spark plug bore.
c. Install the spark plug cap onto the spark
plug, and then place the spark plug on the
cylinder head so that the electrodes are
grounded. (This will limit sparking during
the next step.)
d. Turn the engine over several times with the
starter. (This will coat the cylinder wall with
oil.)
e. Remove the spark plug cap from the spark
plug, and then install the spark plug and
the spark plug cap.
4. Lubricate all control cables and the pivoting
points of all levers and pedals.
5. Check and, if necessary, correct the tire air
pressure, and then block up the ATV so that
all of its wheels are off the ground. Alternative-
ly, turn the wheels a little every month in order
to prevent the tires from becoming degraded
in one spot. Specified amount:
7.5 ml of stabilizer to each liter of fuel (or 1
oz of stabilizer to each gallon of fuel)U1AS61E0.book Page 2 Thursday, February 11, 2010 2:17 PM
Page 146 of 154
10-3
10
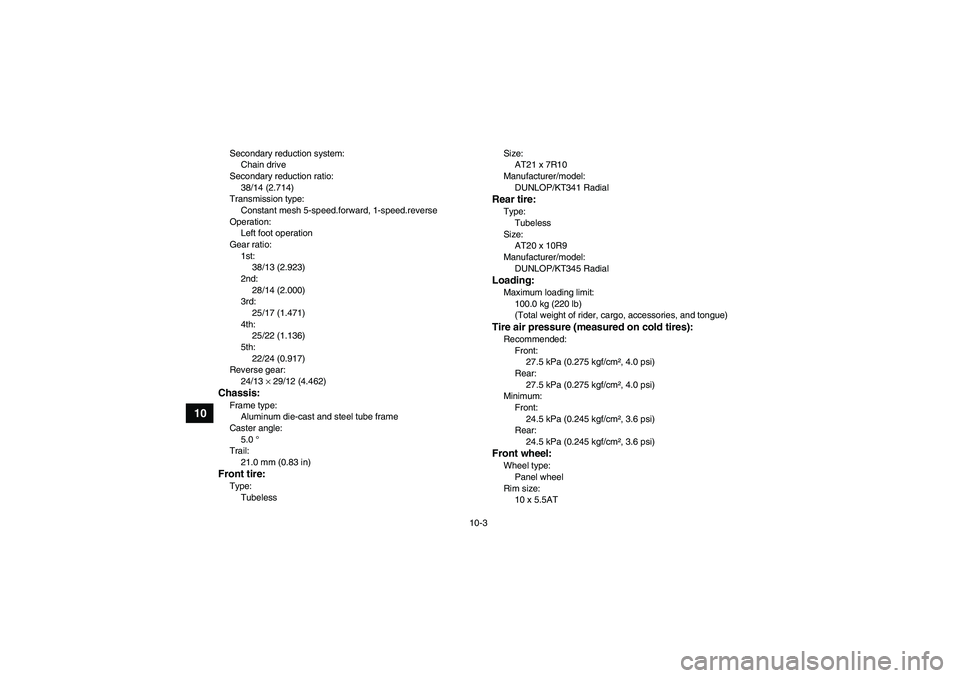
Secondary reduction system:
Chain drive
Secondary reduction ratio:
38/14 (2.714)
Transmission type:
Constant mesh 5-speed.forward, 1-speed.reverse
Operation:
Left foot operation
Gear ratio:
1st:
38/13 (2.923)
2nd:
28/14 (2.000)
3rd:
25/17 (1.471)
4th:
25/22 (1.136)
5th:
22/24 (0.917)
Reverse gear:
24/13 × 29/12 (4.462)Chassis:Frame type:
Aluminum die-cast and steel tube frame
Caster angle:
5.0 °
Trail:
21.0 mm (0.83 in)Front tire:Type:
TubelessSize:
AT21 x 7R10
Manufacturer/model:
DUNLOP/KT341 Radial
Rear tire:Type:
Tubeless
Size:
AT20 x 10R9
Manufacturer/model:
DUNLOP/KT345 RadialLoading:Maximum loading limit:
100.0 kg (220 lb)
(Total weight of rider, cargo, accessories, and tongue)Tire air pressure (measured on cold tires):Recommended:
Front:
27.5 kPa (0.275 kgf/cm², 4.0 psi)
Rear:
27.5 kPa (0.275 kgf/cm², 4.0 psi)
Minimum:
Front:
24.5 kPa (0.245 kgf/cm², 3.6 psi)
Rear:
24.5 kPa (0.245 kgf/cm², 3.6 psi)Front wheel:Wheel type:
Panel wheel
Rim size:
10 x 5.5AT
U1AS61E0.book Page 3 Thursday, February 11, 2010 2:17 PM
Page 152 of 154

Maintenance chart, emission control system ................. 8-3
Model label ................................................................... 11-2
Multi-function display ...................................................... 4-3NNeutral indicator light ..................................................... 4-2OOwner’s manual and tool kit ........................................... 8-2PPanel, removing and installing ....................................... 8-9
Parking ........................................................................... 6-5
Parking brake free play, adjusting ................................ 8-33
Parking brake lever ........................................................ 4-9
Parking on a slope ......................................................... 6-6
Part locations ................................................................. 3-1RReverse indicator light .................................................... 4-2
Reverse knob ............................................................... 4-10
Reverse knob and driving in reverse .............................. 6-4
Reverse lock release cable, adjusting .......................... 8-28
Riding your ATV ............................................................. 7-1SSafety information .......................................................... 2-1
Seat .............................................................................. 4-13
Shifting ........................................................................... 6-2
Shift pedal .................................................................... 4-10
Shift pedal, checking .................................................... 8-40
Shock absorber assemblies, adjusting the front .......... 4-14
Shock absorber assembly, adjusting the rear .............. 4-19
Spark arrester, cleaning ............................................... 8-24
Spark plug, checking ...................................................... 8-9
Specifications ............................................................... 10-1
Speed limiter .................................................................. 4-7Start switch ..................................................................... 4-6
Steering shaft, lubricating ............................................. 8-43
Storage ........................................................................... 9-2
Suspension, lubricating the upper and lower arm
pivots ......................................................................... 8-42
Suspension relay arm and connecting arm pivoting
points, lubricating the rear ......................................... 8-41
Swingarm pivots, lubricating ........................................ 8-41
TTail/brake light .............................................................. 8-50
Throttle cable free play, adjusting ................................ 8-27
Throttle lever ........................................................... 4-6, 5-5
Tires ............................................................................... 5-5
Troubleshooting ........................................................... 8-51
Troubleshooting charts ................................................. 8-52VValve clearance ............................................................ 8-28
Vehicle identification number ....................................... 11-1WWheel hub bearings, checking ..................................... 8-40
Wheel, installing ........................................................... 8-50
Wheel, removing .......................................................... 8-50
U1AS61E0.book Page 2 Thursday, February 11, 2010 2:17 PM