check oil YAMAHA YFM700R 2020 User Guide
[x] Cancel search | Manufacturer: YAMAHA, Model Year: 2020, Model line: YFM700R, Model: YAMAHA YFM700R 2020Pages: 156, PDF Size: 4.19 MB
Page 111 of 156

9-24
9
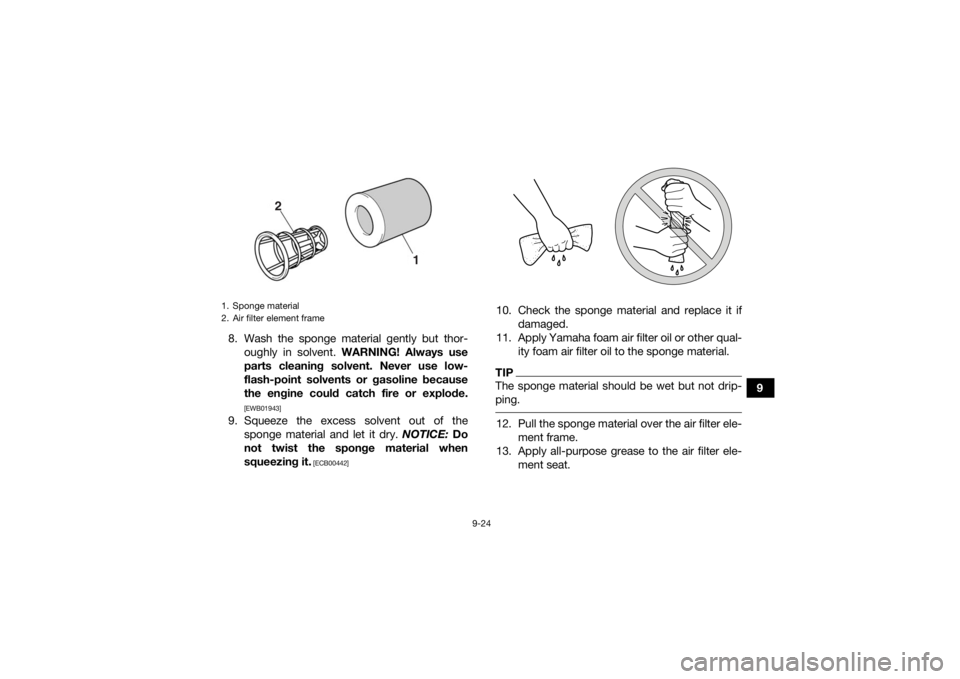
8. Wash the sponge material gently but thor-
oughly in solvent. WARNING! Always use
parts cleaning solvent. Never use low-
flash-point solvents or gasoline because
the engine could catch fire or explode.
[EWB01943]
9. Squeeze the excess solvent out of the sponge material and let it dry. NOTICE: Do
not twist the sponge material when
squeezing it.
[ECB00442]
10. Check the sponge material and replace it if damaged.
11. Apply Yamaha foam air filter oil or other qual- ity foam air filter oil to the sponge material.TIPThe sponge material should be wet but not drip-
ping. 12. Pull the sponge material over the air filter ele-ment frame.
13. Apply all-purpose grease to the air filter ele- ment seat.
1. Sponge material
2. Air filter element frame
2
1
UBCX60E0.book Page 24 Friday, April 19, 2019 9:09 AM
Page 121 of 156

9-34
9
Insufficient brake fluid may allow air to enter
the brake system, reducing braking perfor-
mance.
Clean the filler cap before removing. Use
only DOT 4 brake fluid from a sealed contain-
er.
Use only the specified brake fluid; otherwise,
the rubber seals may deteriorate, causing
leakage.
Refill with the same type of brake fluid. Add-
ing a brake fluid other than DOT 4 may result
in a harmful chemical reaction.
Be careful that water does not enter the
brake fluid reservoir when refilling. Water will
significantly lower the boiling point of the flu-
id and may result in vapor lock.
NOTICEECB01161Brake fluid may damage painted surfaces or
plastic parts. Always clean up spilled fluid im-
mediately. As the brake pads wear, it is normal for the brake
fluid level to gradually go down. A low brake fluid
level may indicate worn brake pads and/or brake
system leakage; therefore, be sure to check the brake pads for wear and the brake system for
leakage. If the brake fluid level goes down sud-
denly, have a Yamaha dealer check the cause be-
fore further riding.
EBU24293Changing the brake fluidHave a Yamaha dealer change the brake fluid at
the intervals specified in the periodic maintenance
and lubrication chart. In addition, have the oil seals
of the master cylinders and calipers as well as the
brake hoses replaced at the intervals listed below
or whenever they are damaged or leaking.
Oil seals: Replace every two years.
Brake hoses: Replace every four years.
UBCX60E0.book Page 34 Friday, April 19, 2019 9:09 AM
Page 129 of 156

9-42
9
2. Wipe the drive chain dry.
3. Thoroughly lubricate the drive chain with a
special O-ring chain lubricant. NOTICE: Do
not use engine oil or any other lubricants
for the drive chain, as they may contain
substances that could damage the O-
rings.
[ECB00582]
EBU24905
Checking and lubricating the cablesThe operation and the condition of all control ca-
bles should be checked before each ride, and the
cables and cable ends should be lubricated if nec- essary. If a cable is damaged or does not move
smoothly, have a Yamaha dealer check or replace
it.
WARNING
EWB02582
Inspect cables frequently and replace if
damaged. Corrosion can result when the ca-
ble sheaths become damaged, and cables
can also become frayed or kinked, which
could restrict the operation of controls and
lead to an accident or injury.
Always make sure all control cables work
smoothly before you begin riding in cold
weather. If the control cables are frozen or
do not work smoothly, you could be unable
to control the ATV, which could lead to an
accident or collision.
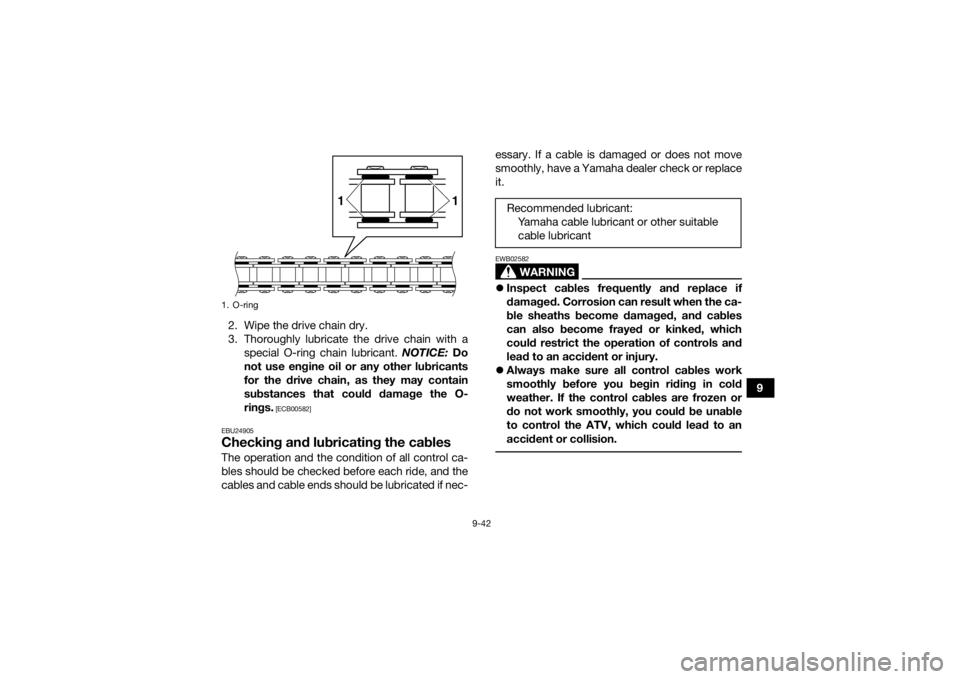
1. O-ring
1
1
Recommended lubricant:
Yamaha cable lubricant or other suitable cable lubricant
UBCX60E0.book Page 42 Friday, April 19, 2019 9:09 AM
Page 134 of 156

9-47
9
TIPFor parts equipped with a grease nipple, use a
grease gun. EBU30037BatteryThis model is equipped with a 12-volt VRLA
(valve-regulated lead-acid) battery. There is no
need to check the electrolyte or to add distilled
water. However, the battery lead connections
need to be checked and tightened, and the bat-
tery terminals cleaned if corroded. If the battery
seems to have discharged, recharge it as soon as
possible.TIPWear gloves and eye protection in a ventilated
area away from sparks and open flames. Wash
hands after handling.
It is recommended to have the battery serviced
by a Yamaha dealer.
WARNING
EWB02161Battery electrolyte is poisonous and danger-
ous, as it contains sulfuric acid, which can cau-
se severe burns. Avoid contact with skin, eyes
or clothing. Always shield your eyes when
working near batteries.
Antidote:
EXTERNAL: Flush with water.
INTERNAL: Drink large quantities of water or
milk. Follow with milk of magnesia, beaten egg
or vegetable oil. Call a physician immediately.
EYES: Flush with water for 15 minutes and get
prompt medical attention.
Batteries produce explosive gases. Keep
sparks, flame, cigarettes or other sources of
ignition away. Ventilate when charging or using
in an enclosed space.
KEEP OUT OF REACH OF CHILDREN. To remove the battery
1. Remove the seat. (See page 5-12.)
2. Remove the battery holding plate (together with the battery cover) by removing the quick
fastener screws and the bolts.
UBCX60E0.book Page 47 Friday, April 19, 2019 9:09 AM
Page 153 of 156

12-1
12
INDEX
AAccessories and loading ................................................ 7-6
Air filter element, cleaning ........................................... 9-22BBattery ......................................................................... 9-47
Brake and clutch levers, checking and lubricating ...... 9-43
Brake fluid, changing ................................................... 9-34
Brake fluid level, checking ........................................... 9-31
Brake lever ..................................................................... 5-6
Brake lever free play, checking the front ..................... 9-35
Brake light switches ..................................................... 9-37
Brake pads, checking the front and rear ..................... 9-30
Brake pedal .................................................................... 5-7
Brake pedal, checking and lubricating ........................ 9-43
Brake pedal height, checking ...................................... 9-35
Brakes .......................................................................... 9-30
Brakes, front and rear .................................................... 6-4
Brake/tail light .............................................................. 9-54CCables, checking and lubricating ................................ 9-42
Chassis fasteners .......................................................... 6-7
Cleaning ....................................................................... 10-1
Clutch lever .................................................................... 5-5
Clutch lever free play, adjusting .................................. 9-38
Coolant .................................................................6-4, 9-18
Coolant temperature warning light ................................ 5-2DDrive chain ..................................................................... 6-5
Drive chain, lubricating ................................................ 9-41 Drive chain slack .......................................................... 9-39
EEngine break-in .............................................................. 7-5
Engine idling speed ..................................................... 9-28
Engine oil ....................................................................... 6-4
Engine oil and oil filter element .................................... 9-13
Engine, start ................................................................... 7-1
Engine stop switch ........................................................ 5-4
Engine trouble warning light .......................................... 5-3FFuel ....................................................................... 5-10, 6-4
Fuel level warning light .................................................. 5-2
Fuel tank cap ................................................................. 5-9
Fuses, replacing .......................................................... 9-50HHandlebar switches ....................................................... 5-3
Headlight beam, adjusting ........................................... 9-53
Headlight bulb, replacing ............................................. 9-52IIdentification numbers ................................................... 1-1
Indicator lights and warning lights ................................. 5-1
Instruments, lights and switches ................................... 6-7LLabel locations ............................................................... 2-1
Light switch ................................................................... 5-4MMain switch .................................................................... 5-1
Maintenance and lubrication chart ................................ 9-5
Maintenance chart, emission control system ................ 9-3
UBCX60E0.book Page 1 Friday, April 19, 2019 9:09 AM