engine YAMAHA YFM80R 2006 User Guide
[x] Cancel search | Manufacturer: YAMAHA, Model Year: 2006, Model line: YFM80R, Model: YAMAHA YFM80R 2006Pages: 344, PDF Size: 5.98 MB
Page 78 of 344
Since removal of this plate will result in a signifi-
cant increase in power, turn the speed limiter
completely back in again; adjust it out in stages
as you did before.
Adjusting for maximum throttle lever movement
without removing the air intake restrictor plate
will cause the engine to run roughly at higher
speeds.
For air intake restrictor plate removal instruc-
tions, see page 8-33.
w
Improper adjustment of the speed limiter and
throttle could cause throttle cable damage or
improper throttle operation. You could lose
control, have an accident or be injured. Do
not turn the speed adjuster out more than
20 mm or the throttle cable could be dam-
aged.
4-11
5TH-9-64 4~5 2/16/05 2:42 PM Page 10
Page 84 of 344
4-17
EBU00075
Parking brake
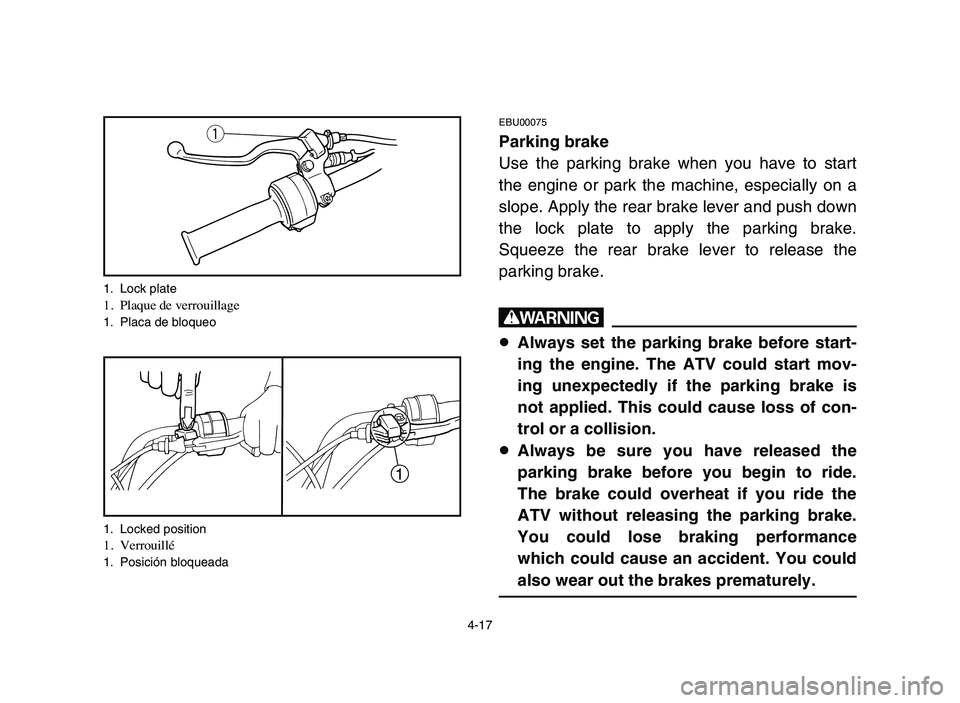
Use the parking brake when you have to start
the engine or park the machine, especially on a
slope. Apply the rear brake lever and push down
the lock plate to apply the parking brake.
Squeeze the rear brake lever to release the
parking brake.
w
8Always set the parking brake before start-
ing the engine. The ATV could start mov-
ing unexpectedly if the parking brake is
not applied. This could cause loss of con-
trol or a collision.
8Always be sure you have released the
parking brake before you begin to ride.
The brake could overheat if you ride the
ATV without releasing the parking brake.
You could lose braking performance
which could cause an accident. You could
also wear out the brakes prematurely.
q
1
1. Lock plate1. Plaque de verrouillage1. Placa de bloqueo
1. Locked position
1. Verrouillé1. Posición bloqueada
5TH-9-64 4~5 2/16/05 2:42 PM Page 16
Page 86 of 344
4-19
EBU00083
Shift pedal
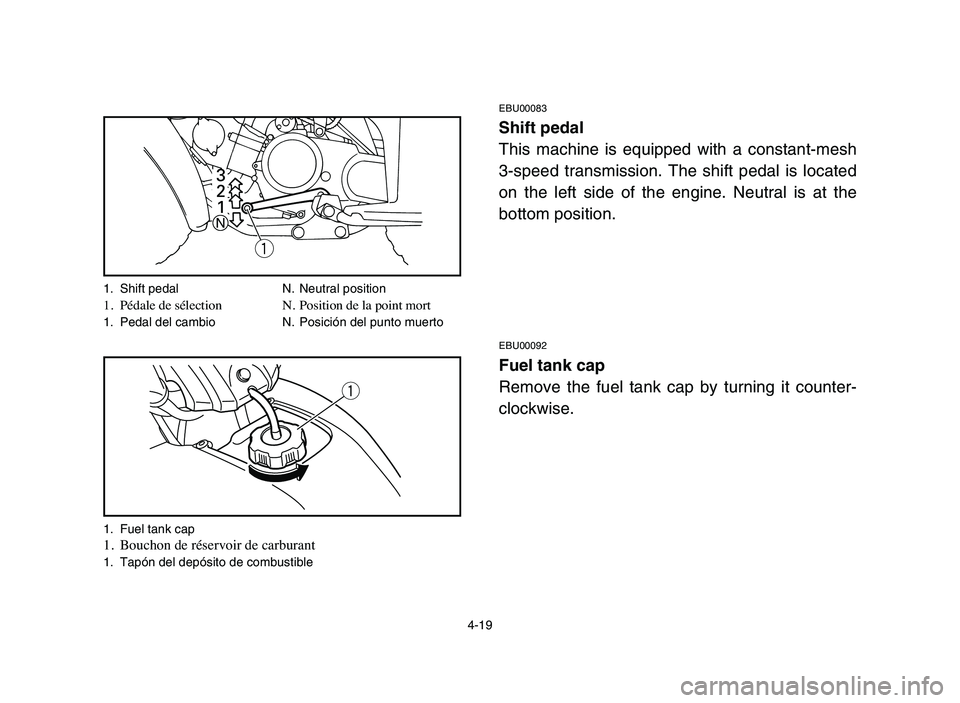
This machine is equipped with a constant-mesh
3-speed transmission. The shift pedal is located
on the left side of the engine. Neutral is at the
bottom position.
EBU00092
Fuel tank cap
Remove the fuel tank cap by turning it counter-
clockwise.
q
3
2
1
N
q
1. Shift pedal N. Neutral position1. Pédale de sélection N. Position de la point mort1. Pedal del cambio N. Posición del punto muerto
1. Fuel tank cap
1. Bouchon de réservoir de carburant1. Tapón del depósito de combustible
5TH-9-64 4~5 2/16/05 2:42 PM Page 18
Page 88 of 344
4-21
EBU00093
Fuel cock
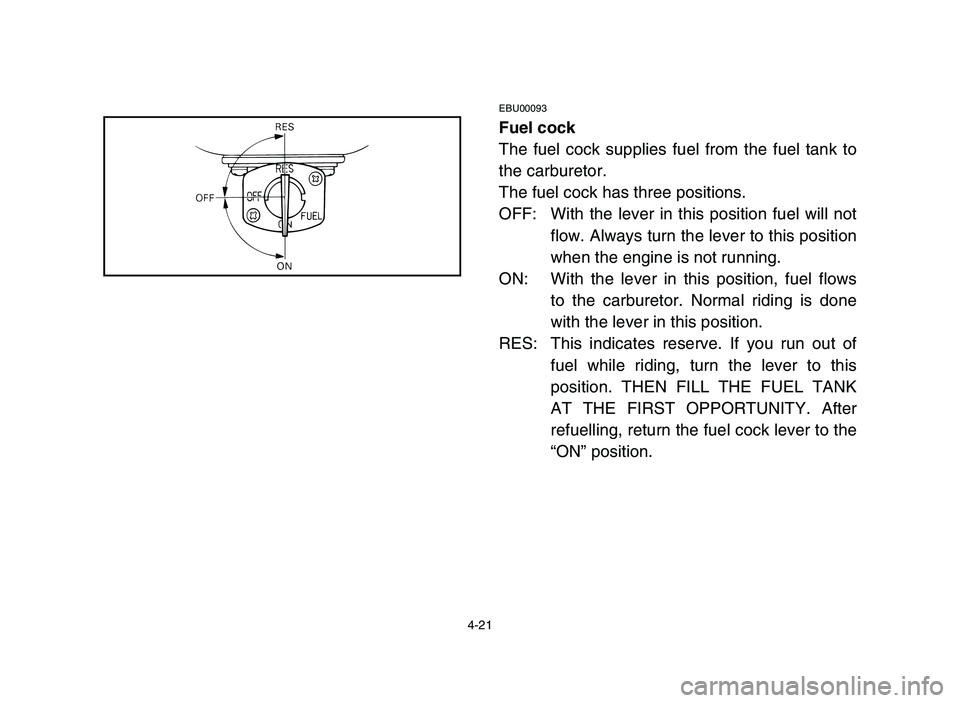
The fuel cock supplies fuel from the fuel tank to
the carburetor.
The fuel cock has three positions.
OFF: With the lever in this position fuel will not
flow. Always turn the lever to this position
when the engine is not running.
ON: With the lever in this position, fuel flows
to the carburetor. Normal riding is done
with the lever in this position.
RES: This indicates reserve. If you run out of
fuel while riding, turn the lever to this
position. THEN FILL THE FUEL TANK
AT THE FIRST OPPORTUNITY. After
refuelling, return the fuel cock lever to the
“ON” position.
5TH-9-64 4~5 2/16/05 2:42 PM Page 20
Page 90 of 344
4-23
EBU00096
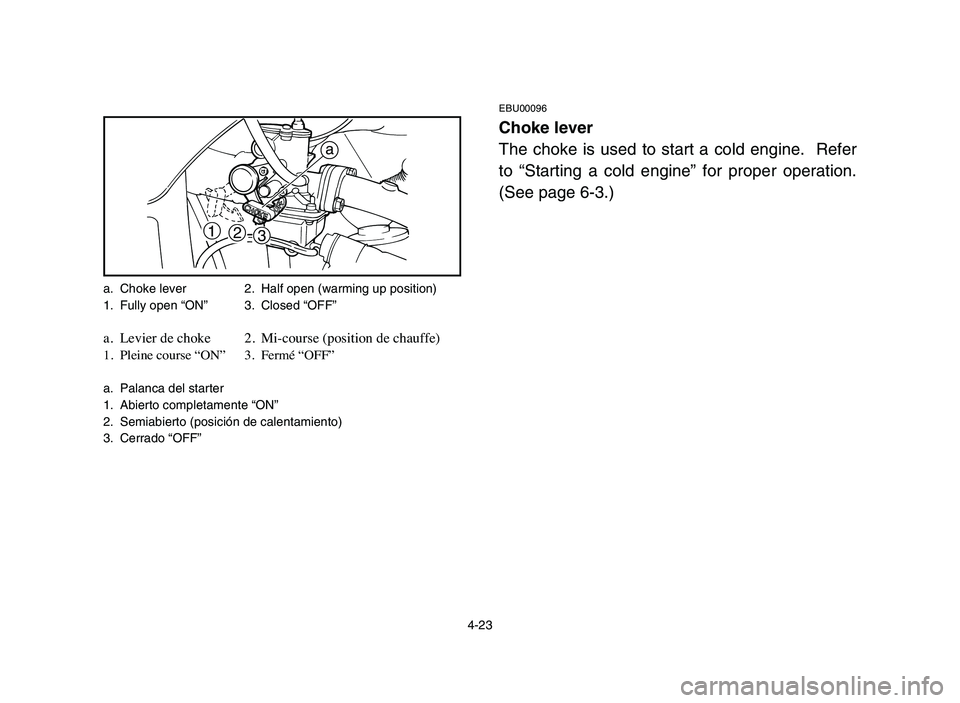
Choke lever
The choke is used to start a cold engine. Refer
to “Starting a cold engine” for proper operation.
(See page 6-3.)
a
1
2
3
a. Choke lever 2. Half open (warming up position)
1. Fully open “ON” 3. Closed “OFF”
a. Levier de choke 2. Mi-course (position de chauffe)1. Pleine course “ON” 3. Fermé “OFF”
a. Palanca del starter
1. Abierto completamente “ON”
2. Semiabierto (posición de calentamiento)
3. Cerrado “OFF”
5TH-9-64 4~5 2/16/05 2:42 PM Page 22
Page 94 of 344
5-1
EBU00113
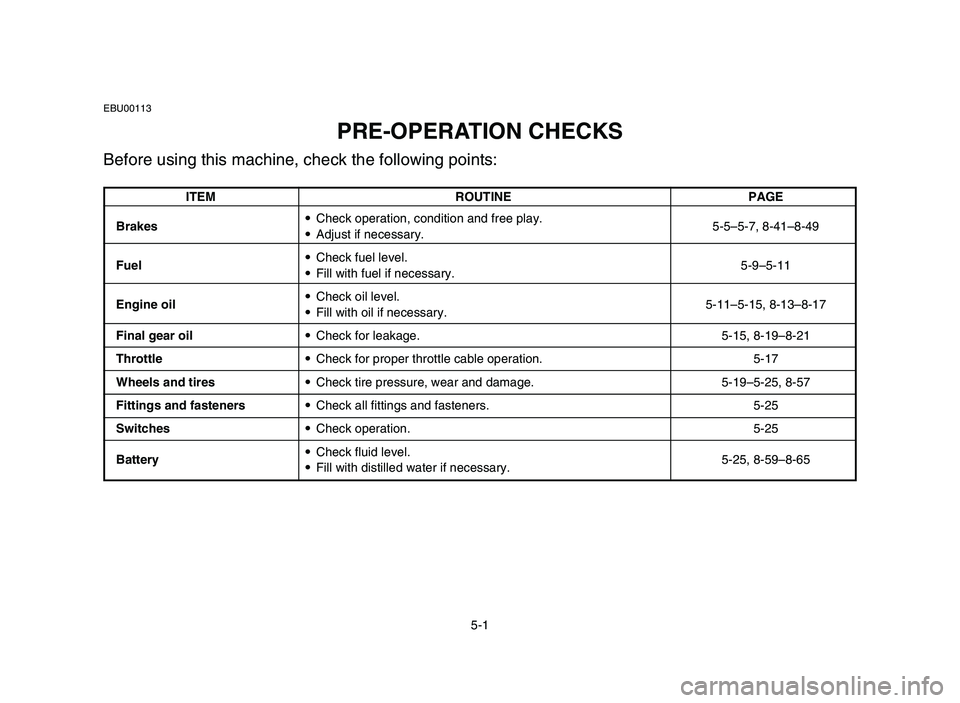
PRE-OPERATION CHECKS
Before using this machine, check the following points:
ITEM ROUTINE PAGE
Brakes9Check operation, condition and free play.
5-5–5-7, 8-41–8-49
9Adjust if necessary.
Fuel9Check fuel level.
9Fill with fuel if necessary.5-9–5-11
Engine oil9Check oil level.
9Fill with oil if necessary.5-11–5-15, 8-13–8-17
Final gear oil9Check for leakage. 5-15, 8-19–8-21
Throttle9Check for proper throttle cable operation. 5-17
Wheels and tires9Check tire pressure, wear and damage. 5-19–5-25, 8-57
Fittings and fasteners9Check all fittings and fasteners. 5-25
Switches9Check operation. 5-25
Battery9Check fluid level.
5-25, 8-59–8-65
9Fill with distilled water if necessary.
5TH-9-64 4~5 2/16/05 2:42 PM Page 26
Page 102 of 344
5-9
EBU09981
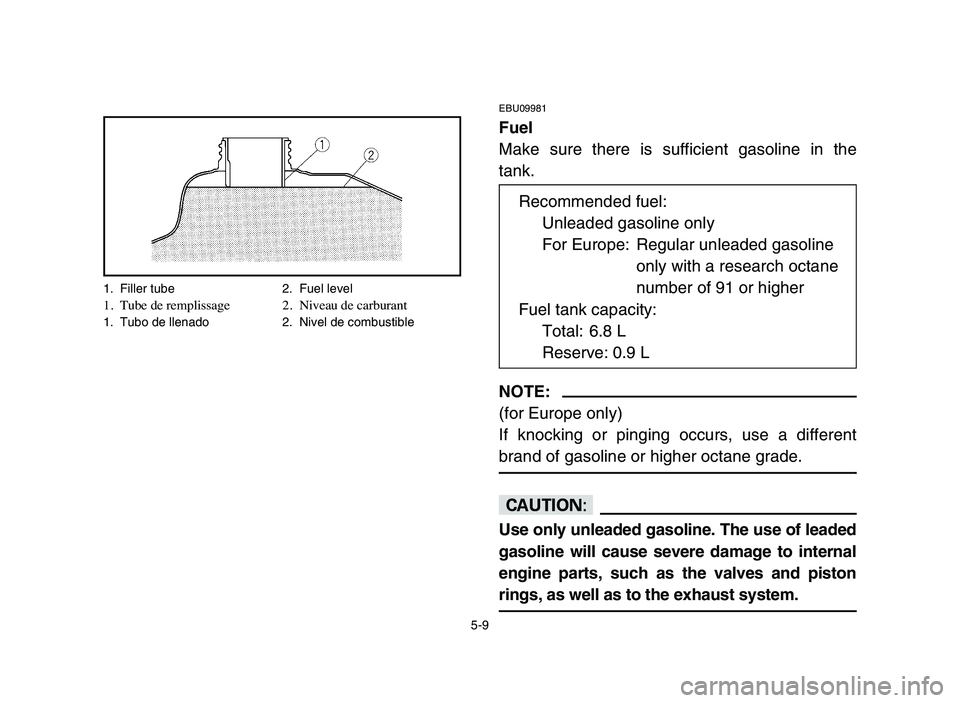
Fuel
Make sure there is sufficient gasoline in the
tank.
NOTE:
(for Europe only)
If knocking or pinging occurs, use a different
brand of gasoline or higher octane grade.
cC
Use only unleaded gasoline. The use of leaded
gasoline will cause severe damage to internal
engine parts, such as the valves and piston
rings, as well as to the exhaust system.
Recommended fuel:
Unleaded gasoline only
For Europe: Regular unleaded gasoline
only with a research octane
number of 91 or higher
Fuel tank capacity:
Total: 6.8 L
Reserve: 0.9 L
1. Filler tube 2. Fuel level1. Tube de remplissage 2. Niveau de carburant1. Tubo de llenado 2. Nivel de combustible
5TH-9-64 4~5 2/16/05 2:42 PM Page 34
Page 104 of 344
5-11
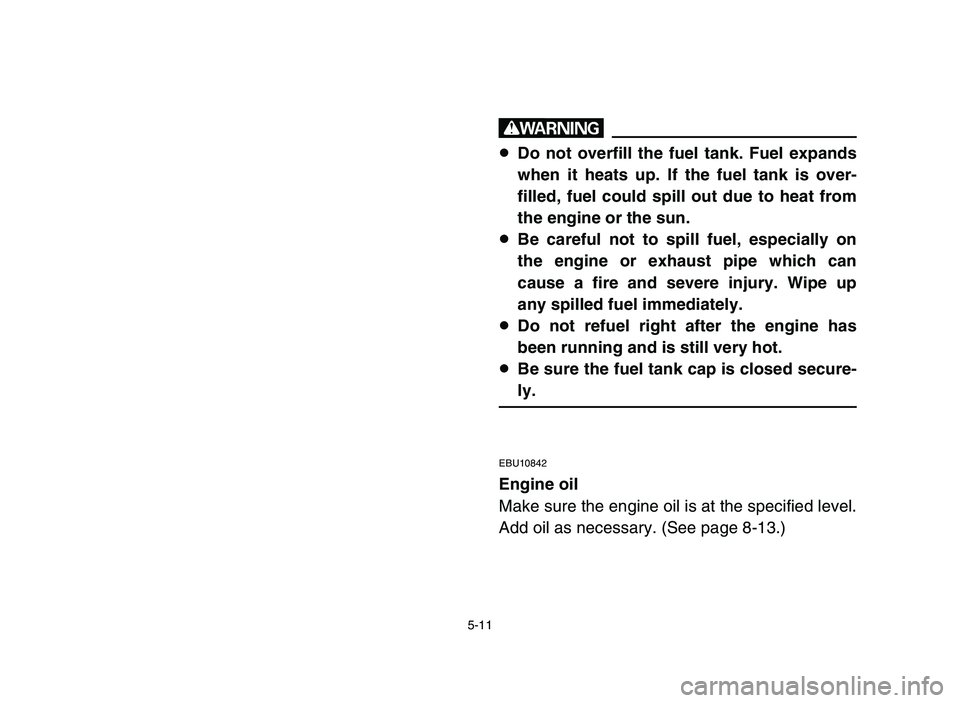
w
8Do not overfill the fuel tank. Fuel expands
when it heats up. If the fuel tank is over-
filled, fuel could spill out due to heat from
the engine or the sun.
8Be careful not to spill fuel, especially on
the engine or exhaust pipe which can
cause a fire and severe injury. Wipe up
any spilled fuel immediately.
8Do not refuel right after the engine has
been running and is still very hot.
8Be sure the fuel tank cap is closed secure-
ly.
EBU10842
Engine oil
Make sure the engine oil is at the specified level.
Add oil as necessary. (See page 8-13.)
5TH-9-64 4~5 2/16/05 2:42 PM Page 36
Page 106 of 344
5-13
cC
8In order to prevent clutch slippage (since
the engine oil also lubricates the clutch),
do not mix any chemical additives. Do not
use oils with a diesel specification of “CD”
or oils of a higher quality than specified. In
addition, do not use oils labeled “ENERGY
CONSERVING
II” or higher.
8Make sure that no foreign material enters
the crankcase.
Recommended engine oil type and quantity:
See page 10-2.
5TH-9-64 4~5 2/16/05 2:42 PM Page 38
Page 122 of 344
6-3
EBU00580
Starting a cold engine
w
Always make sure all control cables work
smoothly before you begin riding in cold
weather. If the control cables are frozen or
do not work smoothly, you could be unable
to control the ATV, which could lead to an
accident or collision.
1. Set the parking brake.
2. Turn the fuel cock to “ON”.
3. Turn the main switch to “ON” and the
engine stop switch to “RUN”.
4. Shift the transmission into neutral.
5TH-9-64 6 2/16/05 2:43 PM Page 2