air filter YAMAHA YFM80R 2006 Owners Manual
[x] Cancel search | Manufacturer: YAMAHA, Model Year: 2006, Model line: YFM80R, Model: YAMAHA YFM80R 2006Pages: 344, PDF Size: 5.98 MB
Page 19 of 344
OPERATION ............................................6-1
Starting a cold engine ...........................6-3
Starting a warm engine ......................6-11
Warming up ........................................6-11
Shifting ...............................................6-13
To start out and accelerate .................6-15
To decelerate .....................................6-19
Engine break-in ..................................6-21
Parking ...............................................6-25
Parking on a slope ..............................6-27
Accessories and loading ....................6-29
Riding Your ATV ......................................7-1
Getting to know your ATV.....................7-3
Ride with care and good
judgement ...........................................7-5
Be careful where you ride ...................7-27
Turning your ATV ...............................7-41
Climbing uphill ....................................7-45
Riding downhill ...................................7-57
Crossing a slope .................................7-61Crossing through shallow water .........7-65
Riding over rough terrain ....................7-69
Sliding and skidding ...........................7-71
What to do if ......................................7-75
What to do .........................................7-75
PERIODIC MAINTENANCE AND
ADJUSTMENT .........................................8-1
Owner’s manual and tool kit .................8-3
Periodic maintenance/lubrication .........8-7
Engine oil ............................................8-13
Final gear oil .......................................8-19
Spark plug inspection .........................8-23
Air filter cleaning .................................8-27
Air intake restrictor plate removal .......8-33
Carburetor adjustment ........................8-35
Idle speed adjustment ........................8-37
Valve clearance adjustment ...............8-39
Cam chain adjustment ........................8-39
Front and rear brake shoe
inspection .........................................8-416
7
8
5TH-9-64 ~3 3/1/05 7:49 PM Page 17
Page 224 of 344
7-67
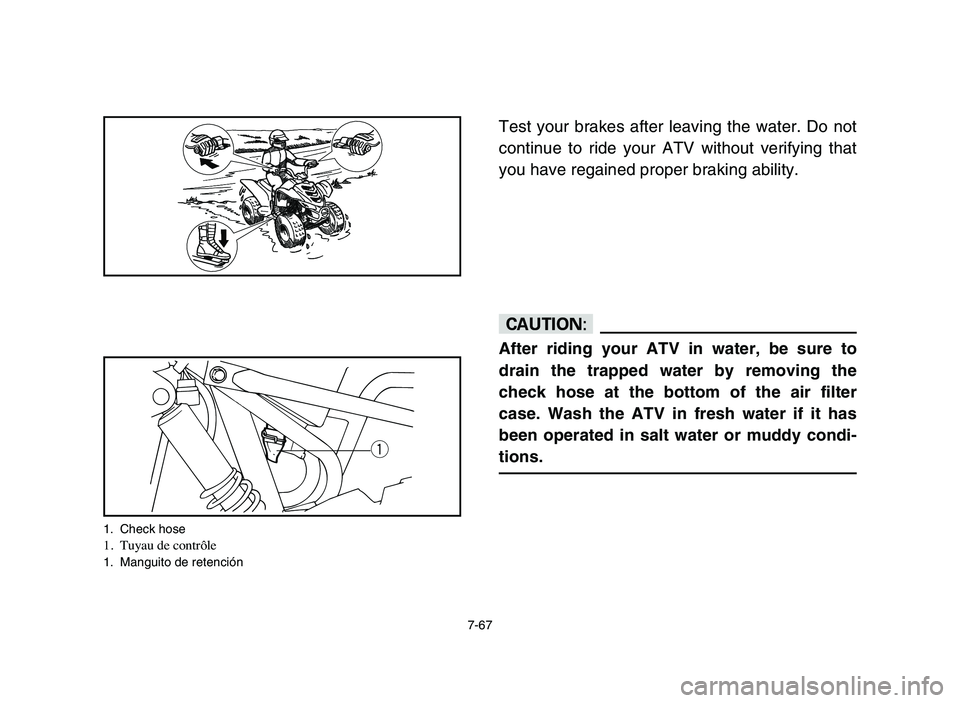
Test your brakes after leaving the water. Do not
continue to ride your ATV without verifying that
you have regained proper braking ability.
cC
After riding your ATV in water, be sure to
drain the trapped water by removing the
check hose at the bottom of the air filter
case. Wash the ATV in fresh water if it has
been operated in salt water or muddy condi-
tions.
q
1. Check hose1. Tuyau de contrôle1. Manguito de retención
5TH-9-64 7 2/16/05 2:44 PM Page 210
Page 244 of 344
8-7
EBU02621
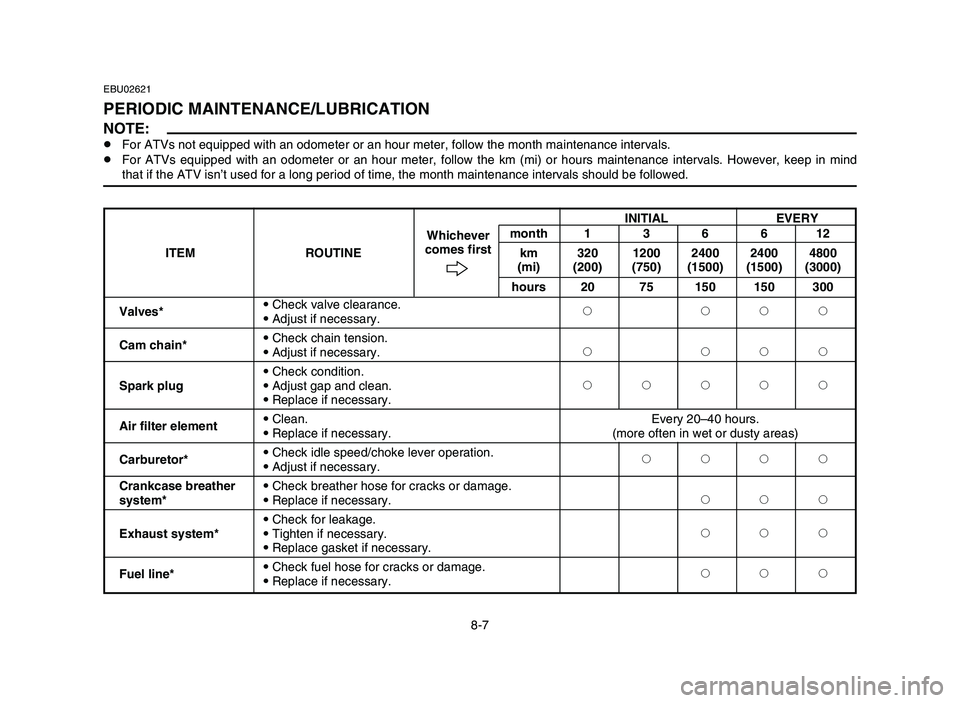
PERIODIC MAINTENANCE/LUBRICATION
NOTE:8For ATVs not equipped with an odometer or an hour meter, follow the month maintenance intervals.
8For ATVs equipped with an odometer or an hour meter, follow the km (mi) or hours maintenance intervals. However, keep in mind
that if the ATV isn’t used for a long period of time, the month maintenance intervals should be followed.
INITIAL EVERY
month 1 3 6 6 12
ITEM ROUTINEWhichever
km 320 1200 2400 2400 4800 comes first
(mi) (200) (750) (1500) (1500) (3000)
hours 20 75 150 150 300
Valves*9Check valve clearance.
9Adjust if necessary.2 222
Cam chain*9Check chain tension.
9Adjust if necessary.2 222
9Check condition.
Spark plug9Adjust gap and clean.22222
9Replace if necessary.
Air filter element9Clean. Every 20–40 hours.
9Replace if necessary. (more often in wet or dusty areas)
Carburetor*9Check idle speed/choke lever operation.
2222
9Adjust if necessary.
Crankcase breather9Check breather hose for cracks or damage.
system*9Replace if necessary.222
9Check for leakage.
Exhaust system*9Tighten if necessary.222
9Replace gasket if necessary.
Fuel line*9Check fuel hose for cracks or damage.
222
9Replace if necessary.
5TH-9-64 8 2/16/05 2:45 PM Page 8-7
Page 264 of 344

8-27
EBU10553
Air filter cleaning
NOTE:
There is a check hose at the bottom of the air fil-
ter case. If dust or water collects in this hose,
empty the hose and clean the air filter element
and air filter case.
1. Remove the front cover by removing the
bolts.
q
q
ww
1. Check hose1. Flexible de contrôle1. Manguito de retención
1. Front cover 2. Bolt (
×2)1. Cache avant 2. Boulon (×2)1. Cubierta delantera 2. Perno (×2)
5TH-9-64 8 2/16/05 2:45 PM Page 8-27
Page 266 of 344
w
q
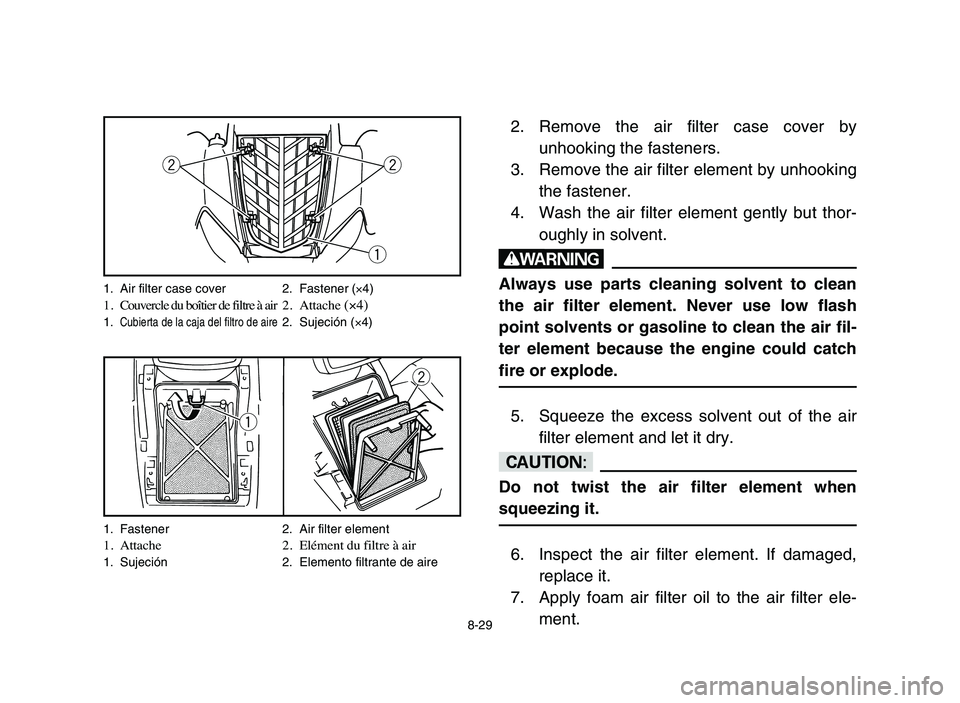
1. Fastener 2. Air filter element1. Attache 2. Elément du filtre à air1. Sujeción 2. Elemento filtrante de aire
8-29
2. Remove the air filter case cover by
unhooking the fasteners.
3. Remove the air filter element by unhooking
the fastener.
4. Wash the air filter element gently but thor-
oughly in solvent.
w
Always use parts cleaning solvent to clean
the air filter element. Never use low flash
point solvents or gasoline to clean the air fil-
ter element because the engine could catch
fire or explode.
5. Squeeze the excess solvent out of the air
filter element and let it dry.
cC
Do not twist the air filter element when
squeezing it.
6. Inspect the air filter element. If damaged,
replace it.
7. Apply foam air filter oil to the air filter ele-
ment.
q
ww
1. Air filter case cover 2. Fastener (×4)1. Couvercle du boîtier de filtre à air 2.Attache (×4)1.Cubierta de la caja del filtro de aire2. Sujeción (×4)
5TH-9-64 8 2/16/05 2:45 PM Page 8-29
Page 268 of 344
8-31
NOTE:
The air filter element should be wet but not drip-
ping.
8. Install the air filter element.
9. Install the air filter case cover by hooking
the fasteners onto the air filter case.
10. Install the front cover by installing the bolts.
NOTE:
The air filter element should be cleaned every
20-40 hours. It should be cleaned and lubricated
more often if the machine is operated in
extremely dusty areas. Each time air filter ele-
ment maintenance is performed, check the air
inlet of the air filter case for obstructions. Check
the air cleaner rubber joint to the carburetor and
manifold fittings for an airtight seal. Tighten all
fittings securely to avoid the possibility of unfil-
tered air entering the engine.
5TH-9-64 8 2/16/05 2:45 PM Page 8-31
Page 270 of 344

8-33
cC
Never operate the engine with the air filter ele-
ment removed. This will allow unfiltered air to
enter the engine, causing rapid engine wear
and possible engine damage. Additionally,
operation without the filter element will affect
carburetor jetting with subsequent poor per-
formance and possible engine overheating.
EBU01035
Air intake restrictor plate removal
To obtain full engine performance capability,
removing the air intake restrictor plate is
required.
1. Remove the air filter element. (See page
8-27 for removal and installation procedures.)
2. Remove the air intake restrictor plate.
NOTE:
Store the air intake restrictor plate with the
owner’s manual so you can install it whenever
you want to reduce the top speed available.
3. Install the air filter element.
q
1. Air intake restrictor plate1. Cache réducteur d’air admis1. Placa de restricción de admisión de aire
5TH-9-64 8 2/16/05 2:45 PM Page 8-33
Page 326 of 344
10-3
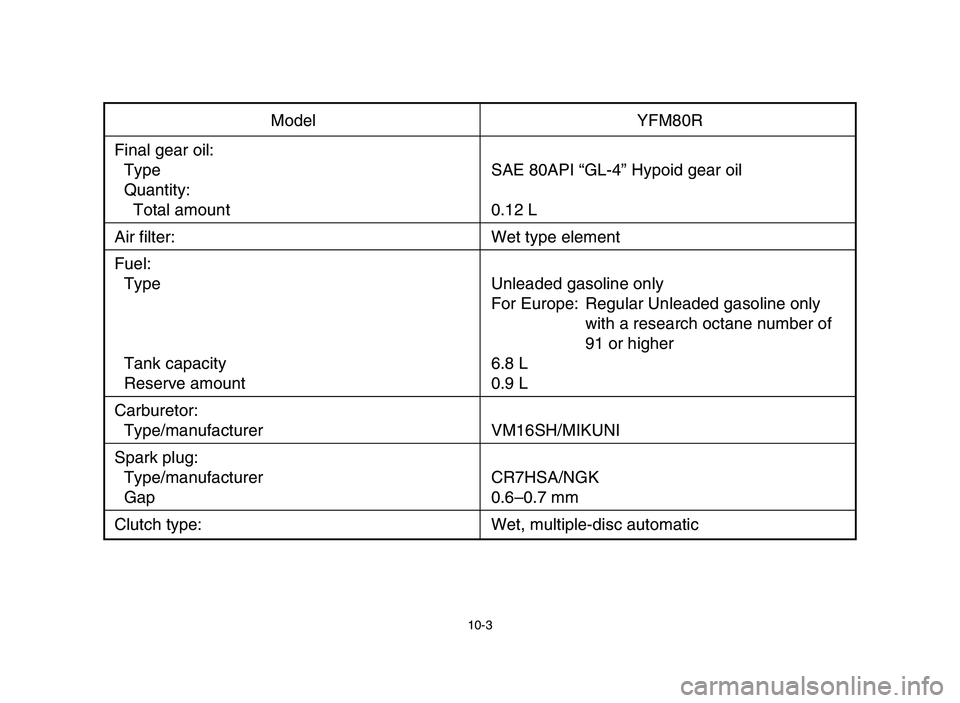
Model YFM80R
Final gear oil:
Type SAE 80API “GL-4” Hypoid gear oil
Quantity:
Total amount 0.12 L
Air filter: Wet type element
Fuel:
Type Unleaded gasoline only
For Europe: Regular Unleaded gasoline only
with a research octane number of
91 or higher
Tank capacity 6.8 L
Reserve amount 0.9 L
Carburetor:
Type/manufacturer VM16SH/MIKUNI
Spark plug:
Type/manufacturer CR7HSA/NGK
Gap 0.6–0.7 mm
Clutch type: Wet, multiple-disc automatic
5TH-9-64 9~ 3/1/05 7:50 PM Page 310