maintenance YAMAHA YFM90R 2020 User Guide
[x] Cancel search | Manufacturer: YAMAHA, Model Year: 2020, Model line: YFM90R, Model: YAMAHA YFM90R 2020Pages: 126, PDF Size: 5.66 MB
Page 82 of 126
8-5
8
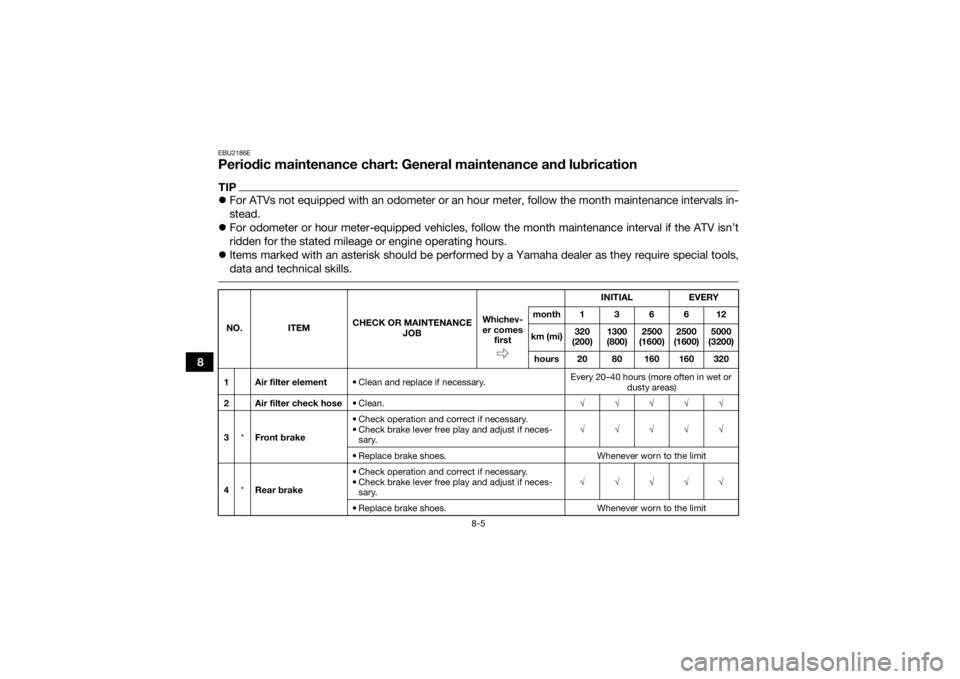
EBU2186EPeriodic maintenance chart: General maintenance and lubricationTIPFor ATVs not equipped with an odometer or an hour meter, follow the month maintenance intervals in-
stead.
For odometer or hour meter-equipped vehicles, follow the month maintenance interval if the ATV isn’t
ridden for the stated mileage or engine operating hours.
Items marked with an asterisk should be performed by a Yamaha dealer as they require special tools,
data and technical skills. NO. ITEM CHECK OR MAINTENANCE
JOB INITIAL
EVERY
Whichev-
er comes first month136612
km (mi) 320
(200) 1300
(800) 2500
(1600) 2500
(1600) 5000
(3200)
hours 20 80 160 160 320
1 Air filter element • Clean and replace if necessary. Every 20–40 hours (more often in wet or
dusty areas)
2 Air filter check hose • Clean. √√√√√
3 *Front brake • Check operation and correct if necessary.
• Check brake lever free play and adjust if neces-
sary. √√√√√
• Replace brake shoes. Whenever worn to the limit
4 *Rear brake • Check operation and correct if necessary.
• Check brake lever free play and adjust if neces-
sary. √√√√√
• Replace brake shoes. Whenever worn to the limit
UBD364E0.book Page 5 Monday, January 28, 2019 9:30 AM
Page 83 of 126

8-6
8
5*Wheels • Check runout and for damage, and replace if nec-
essary. √ √√√
6 *Tires • Check tread depth and for damage, and replace if
necessary.
• Check air pressure and balance, and correct if necessary. √ √√√
7 *Wheel hub bearings • Check for looseness or damage, and replace if
necessary. √ √√√
8 *Front arm pivots • Lubricate with lithium-soap-based grease. √√√
9 Drive chain • Check chain slack and adjust if necessary.
• Check rear wheel alignment and correct if neces-
sary.
• Clean and lubricate. √√√√√
10 *Drive chain rollers • Check for wear and replace if necessary. √√√
11 *V- b e l t • Check for wear, cracks or other damage, and re-
place if necessary. √ √√√
12 *Chassis fasteners • Make sure that all nuts, bolts, and screws are
properly tightened. √√√√√
13 *Shock absorber as-
semblies • Check operation and correct if necessary.
• Check for oil leakage and replace if necessary.
√√√
14 *Front knuckle piv-
ots • Lubricate with lithium-soap-based grease.
√√√
NO. ITEM
CHECK OR MAINTENANCE
JOB INITIAL EVERY
Whichev- er comes first month136612
km (mi) 320
(200) 1300
(800) 2500
(1600) 2500
(1600) 5000
(3200)
hours 20 80 160 160 320
UBD364E0.book Page 6 Monday, January 28, 2019 9:30 AM
Page 84 of 126

8-7
8
15*Steering shaft • Lubricate with lithium-soap-based grease. √√√
16 *Steering system • Check operation and repair or replace if dam-
aged.
• Check toe-in and adjust if necessary. √√√√√
17 Engine oil • Change.
• Check ATV for oil leakage, and correct if neces-
sary. √ √√√
18 Engine oil strainer • Clean. √√√
19 Transmission oil • Change.
• Check ATV for oil leakage, and correct if neces-
sary. √√
20 *Moving parts and
cables • Lubricate.
√√√√
21 *Throttle lever • Check operation.
• Check throttle lever free play, and adjust if neces-
sary.
• Lubricate cable and lever housing. √√√√√
22 *Brake switch • Check operation and correct if necessary. √√√√√
23 *Switches • Check operation and correct if necessary. √√√√√
NO. ITEM
CHECK OR MAINTENANCE
JOB INITIAL EVERY
Whichev-
er comes first month136612
km (mi) 320
(200) 1300
(800) 2500
(1600) 2500
(1600) 5000
(3200)
hours 20 80 160 160 320UBD364E0.book Page 7 Monday, January 28, 2019 9:30 AM
Page 85 of 126
8-8
8
EBU23062TIPSome maintenance items need more frequent service if you are riding in unusually wet, dusty, sandy or
muddy areas, or at full-throttle. UBD364E0.book Page 8 Monday, January 28, 2019 9:30 AM
Page 86 of 126
8-9
8
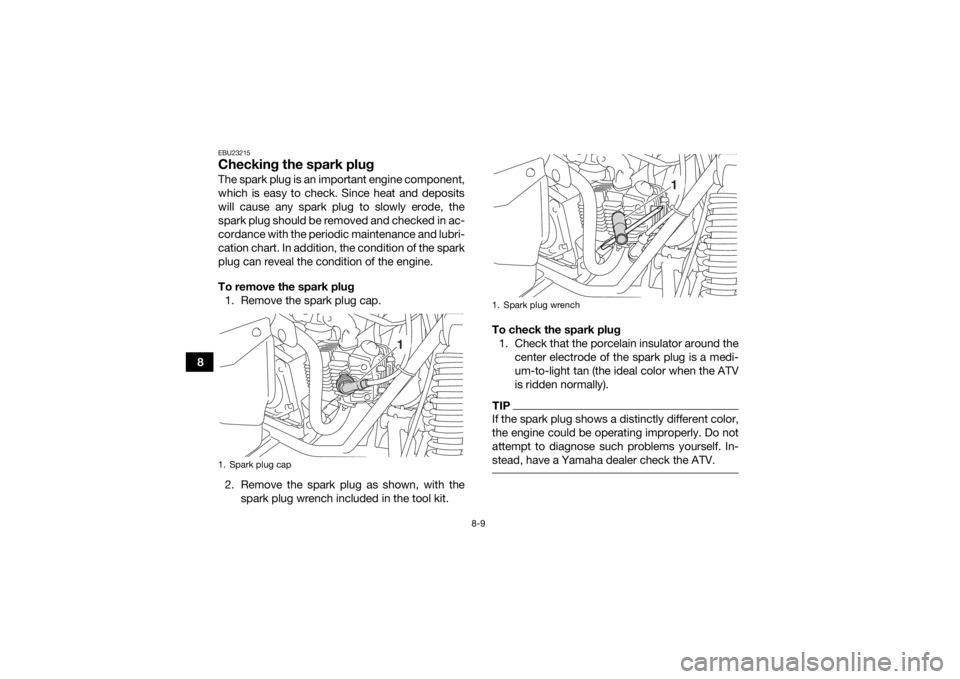
EBU23215Checking the spark plugThe spark plug is an important engine component,
which is easy to check. Since heat and deposits
will cause any spark plug to slowly erode, the
spark plug should be removed and checked in ac-
cordance with the periodic maintenance and lubri-
cation chart. In addition, the condition of the spark
plug can reveal the condition of the engine.
To remove the spark plug1. Remove the spark plug cap.
2. Remove the spark plug as shown, with the spark plug wrench included in the tool kit. To check the spark plug
1. Check that the porcelain insulator around the center electrode of the spark plug is a medi-
um-to-light tan (the ideal color when the ATV
is ridden normally).
TIPIf the spark plug shows a distinctly different color,
the engine could be operating improperly. Do not
attempt to diagnose such problems yourself. In-
stead, have a Yamaha dealer check the ATV.
1. Spark plug cap
1
1. Spark plug wrench
1
UBD364E0.book Page 9 Monday, January 28, 2019 9:30 AM
Page 87 of 126
8-10
8
2. Check the spark plug for electrode erosion
and excessive carbon or other deposits, and
replace it if necessary.
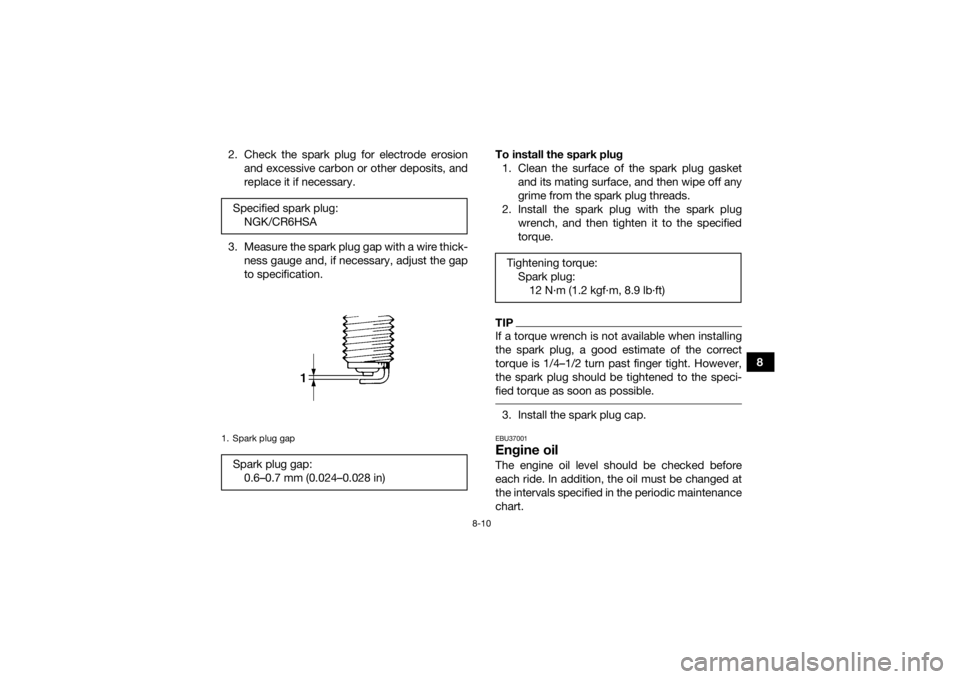
3. Measure the spark plug gap with a wire thick- ness gauge and, if necessary, adjust the gap
to specification. To install the spark plug
1. Clean the surface of the spark plug gasket and its mating surface, and then wipe off any
grime from the spark plug threads.
2. Install the spark plug with the spark plug wrench, and then tighten it to the specified
torque.
TIPIf a torque wrench is not available when installing
the spark plug, a good estimate of the correct
torque is 1/4–1/2 turn past finger tight. However,
the spark plug should be tightened to the speci-
fied torque as soon as possible. 3. Install the spark plug cap.EBU37001Engine oilThe engine oil level should be checked before
each ride. In addition, the oil must be changed at
the intervals specified in the periodic maintenance
chart.
Specified spark plug:
NGK/CR6HSA
1. Spark plug gapSpark plug gap:0.6–0.7 mm (0.024–0.028 in)
Tightening torque:Spark plug:12 N·m (1.2 kgf·m, 8.9 lb·ft)
UBD364E0.book Page 10 Monday, January 28, 2019 9:30 AM
Page 92 of 126
8-15
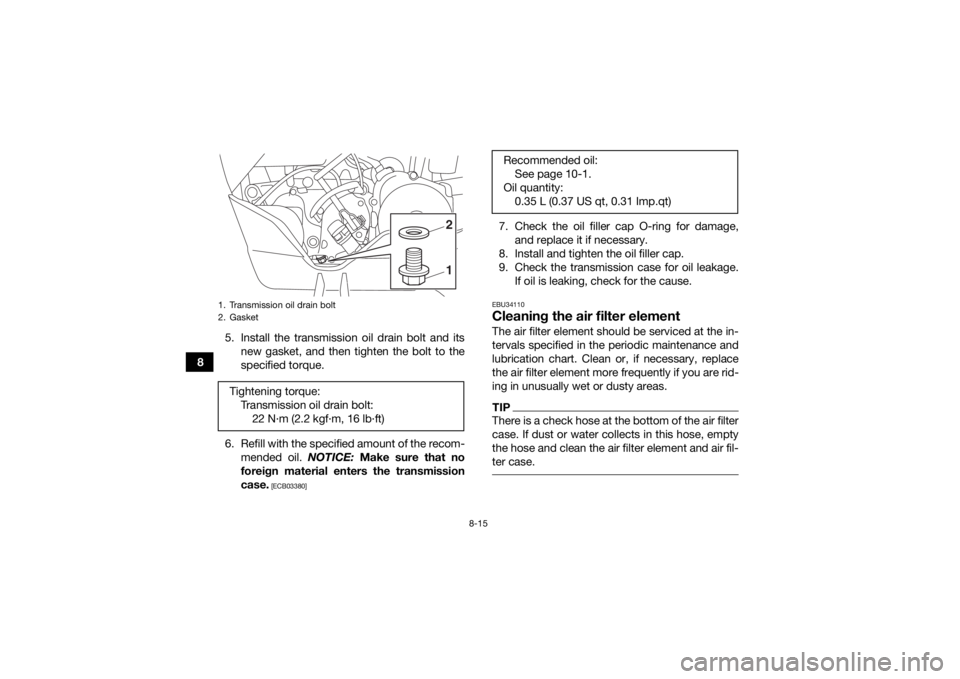
85. Install the transmission oil drain bolt and its
new gasket, and then tighten the bolt to the
specified torque.
6. Refill with the specified amount of the recom- mended oil. NOTICE: Make sure that no
foreign material enters the transmission
case.
[ECB03380]
7. Check the oil filler cap O-ring for damage, and replace it if necessary.
8. Install and tighten the oil filler cap.
9. Check the transmission case for oil leakage. If oil is leaking, check for the cause.EBU34110Cleaning the air filter elementThe air filter element should be serviced at the in-
tervals specified in the periodic maintenance and
lubrication chart. Clean or, if necessary, replace
the air filter element more frequently if you are rid-
ing in unusually wet or dusty areas.TIPThere is a check hose at the bottom of the air filter
case. If dust or water collects in this hose, empty
the hose and clean the air filter element and air fil-
ter case.
1. Transmission oil drain bolt
2. GasketTightening torque:Transmission oil drain bolt:22 N·m (2.2 kgf·m, 16 lb·ft)
12
Recommended oil:See page 10-1.
Oil quantity: 0.35 L (0.37 US qt, 0.31 Imp.qt)
UBD364E0.book Page 15 Monday, January 28, 2019 9:30 AM
Page 96 of 126
8-19
83. Tap the spark arrester lightly, and then use a
wire brush to remove any carbon deposits.
4. Insert the spark arrester into the muffler and align the bolt hole.
5. Install the tailpipe bolt and nut, and then tight- en the nut to the specified torque.
WARNING
EWB02342Always let the exhaust system cool prior to
touching exhaust components.
Do not start the engine with the spark arrester
removed. Sparks or exhaust particulate can
cause eye injury, burns, or start a fire. EBU23941Adjusting the carburetorThe carburetor should be checked and, if neces-
sary, adjusted at the intervals specified in the pe-
riodic maintenance and lubrication chart. The
carburetor is an important part of the engine and
requires very sophisticated adjustment. There-
fore, most carburetor adjustments should be left to a Yamaha dealer, who has the necessary pro-
fessional knowledge and experience. The adjust-
ment described in the following section, however,
may be performed by the owner as part of routine
maintenance.
NOTICEECB00481The carburetor has been set and extensively
tested at the Yamaha factory. Changing these
settings without sufficient technical knowl-
edge may result in poor performance of or
damage to the engine. EBU24001Adjusting the engine idling speedThe engine idling speed must be checked and, if
necessary, adjusted as follows at the intervals
specified in the periodic maintenance and lubrica-
tion chart.TIPA diagnostic tachometer is needed to make this
adjustment. 1. Start the engine and warm it up.
Tightening torque:
Tailpipe nut:10 N·m (1.0 kgf·m, 7.4 lb·ft)
UBD364E0.book Page 19 Monday, January 28, 2019 9:30 AM
Page 98 of 126
8-21
8Periodically check the throttle lever free play and
adjust if necessary.
TIPThe engine idling speed must be checked and ad-
justed before adjusting the throttle lever free play. 1. Slide the rubber cover away from the locknut.
2. Loosen the locknut.
3. To increase the throttle lever free play, turn
the throttle lever free play adjusting nut in di-
rection (a). To decrease the throttle lever free
play, turn the adjusting nut in direction (b).
4. Tighten the locknut.
5. Slide the rubber cover to its original position.EBU24061Valve clearanceThe valve clearance changes with use, resulting in
improper air-fuel mixture and/or engine noise. To
prevent this from occurring, the valve clearance
must be adjusted by a Yamaha dealer at the inter-
vals specified in the periodic maintenance and lu-
brication chart.
EBU29602BrakesReplacement of brake components requires pro-
fessional knowledge. Brake service should be
performed by a Yamaha dealer.
WARNING
EWB02572Operating with improperly serviced or adjust-
ed brakes could lead to a loss in braking ability
and an accident. EBU34511Checking the front and rear brake
shoesThe front and rear brake shoes must be checked
for wear at the intervals specified in the periodic
maintenance and lubrication chart. Without disas-
sembling the brake, this can be performed by
checking the position of the brake lever free play
adjusting bolts or nut.
Front brakes
To check front brake shoe wear, check the posi-
tion of the adjusting bolts. If a bolt extends more
than 12 mm (0.47 in) from its locknut, the brake
shoes need to be replaced.
UBD364E0.book Page 21 Monday, January 28, 2019 9:30 AM
Page 104 of 126
8-27
84. To tighten the drive chain, turn the drive chain
slack adjusting nut in direction (a). To loosen
the drive chain, turn the adjusting nut in direc-
tion (b) and push the rear wheels forward.
NOTICE: Improper drive chain slack will
overload the engine as well as other vital
parts of the ATV and can lead to drive
chain slippage or breakage. To prevent
this from occurring, keep the drive chain
slack within the specified limits.
[ECB00543]
5. Tighten the locknut, and then the bolts and nuts to their specified torques.
6. Adjust the rear brake lever free play. (See page 8-24.)
EBU24883Lubricating the drive chainThe drive chain must be cleaned and lubricated at
the intervals specified in the periodic maintenance
and lubrication chart, otherwise it will quickly wear
out, especially when riding in dusty or wet areas.
Service the drive chain as follows.NOTICEECB00562The drive chain must be lubricated after wash-
ing the ATV or riding in the rain or wet areas. 1. Clean the drive chain with kerosene and asmall soft brush. NOTICE: To prevent dam-
aging the O-rings, do not clean the drive
chain with steam cleaners, high-pressure
washers or inappropriate solvents.
[ECB00572]
Tightening torques: Locknut:22 N·m (2.2 kgf·m, 16 lb·ft)
Bolt: 45 N·m (4.5 kgf·m, 33 lb·ft)
Nut: 54 N·m (5.4 kgf·m, 40 lb·ft)
UBD364E0.book Page 27 Monday, January 28, 2019 9:30 AM