radiator YAMAHA YFZ450 2006 Manuale de Empleo (in Spanish)
[x] Cancel search | Manufacturer: YAMAHA, Model Year: 2006, Model line: YFZ450, Model: YAMAHA YFZ450 2006Pages: 444, tamaño PDF: 5.75 MB
Page 52 of 444
3-1
EBU00320
DESCRIPTION AND MACHINE
IDENTIFICATION
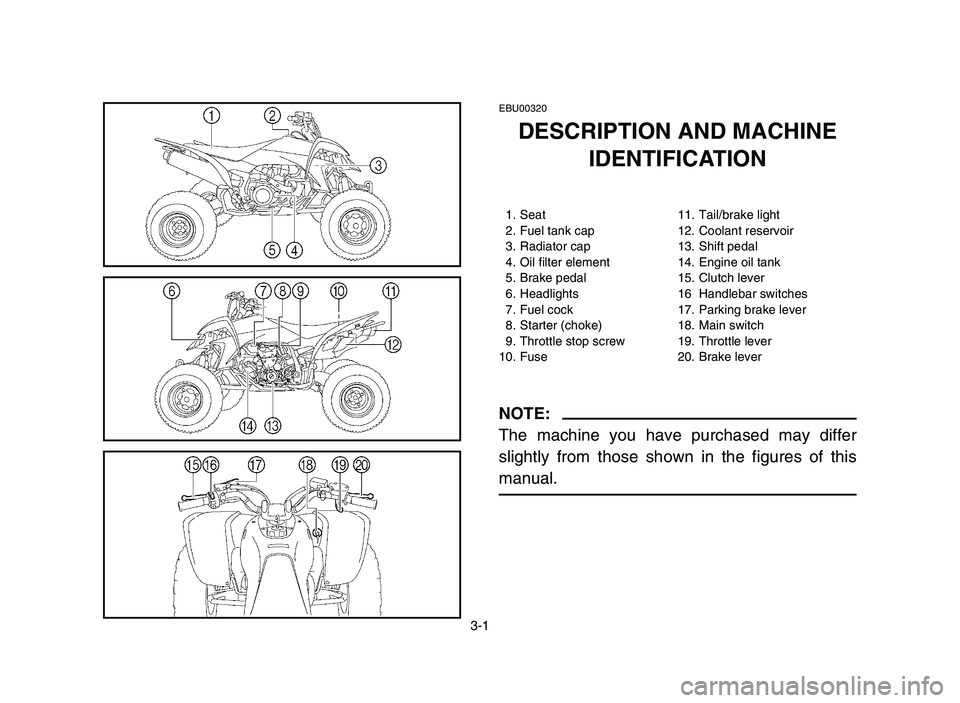
1. Seat 11. Tail/brake light
2. Fuel tank cap 12. Coolant reservoir
3. Radiator cap 13. Shift pedal
4. Oil filter element 14. Engine oil tank
5. Brake pedal 15. Clutch lever
6. Headlights 16 Handlebar switches
7. Fuel cock 17. Parking brake lever
8. Starter (choke) 18. Main switch
9. Throttle stop screw 19. Throttle lever
10. Fuse 20. Brake lever
NOTE:
The machine you have purchased may differ
slightly from those shown in the figures of this
manual.
5TG-9-63 1-3 9/16/05 4:28 PM Page 3-1
Page 132 of 444
5-21
w
Wait for the engine and radiator to cool
before removing the radiator cap. You could
be burned by hot fluid and steam blown out
under pressure. Always put a thick rag over
the cap when opening. Allow any remaining
pressure to escape before completely
removing the cap.
EBU04980
Chain
Check the general condition of the chain and
check the chain slack before every ride.
Lubricate and adjust the chain as necessary.
(See pages 8-105–8-113 for details.)
EBU10830
Throttle lever
Check to see that the throttle lever operates cor-
rectly. It must open smoothly and spring back to
the idle position when released. Have a Yamaha
dealer repair as necessary for proper operation.
5TG-9-63 5-6 10/26/05 4:53 PM Page 5-21
Page 302 of 444
8-45
NOTE:
8If water is added, have a Yamaha dealer
check the antifreeze content of the coolant as
soon as possible.
8The radiator fan operation is completely auto-
matic. It is switched on or off according to the
coolant temperature in the radiator.
If your ATV overheats, see page 8-150 for
details.
5TG-9-63 8 10/26/05 4:54 PM Page 8-45
Page 304 of 444
8-47
EBU14130
Changing the coolant
w
Wait for the engine and radiator to cool
before removing the radiator cap. You could
be burned by hot fluid and steam blown out
under pressure. Always put a thick rag over
the cap when opening. Allow any remaining
pressure to escape before completely
removing the cap.
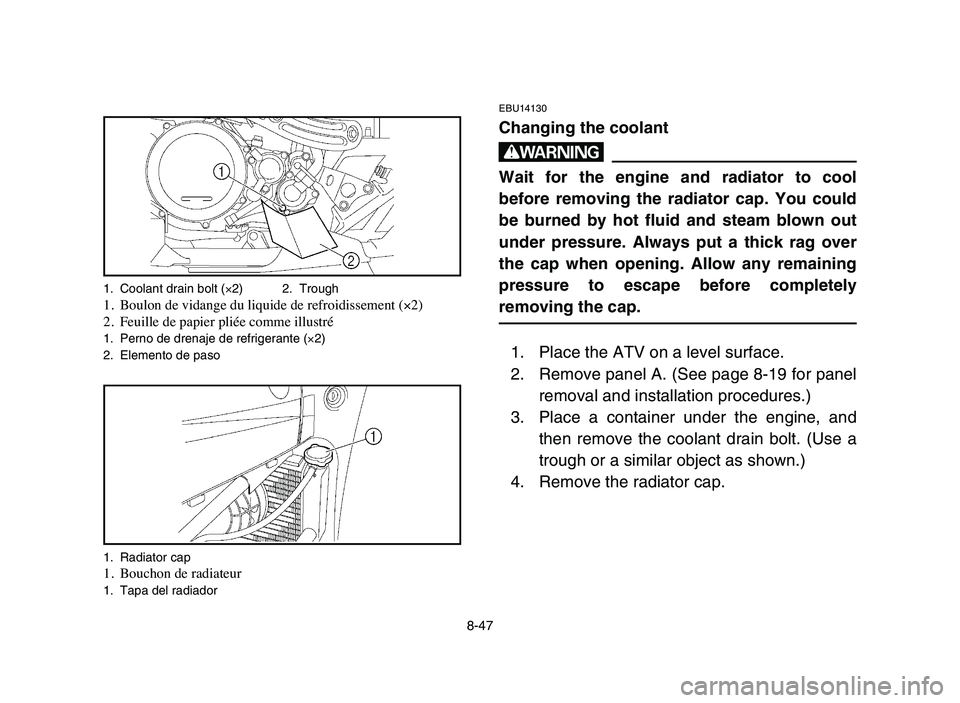
1. Place the ATV on a level surface.
2. Remove panel A. (See page 8-19 for panel
removal and installation procedures.)
3. Place a container under the engine, and
then remove the coolant drain bolt. (Use a
trough or a similar object as shown.)
4. Remove the radiator cap.
1. Coolant drain bolt (×2) 2. Trough1. Boulon de vidange du liquide de refroidissement (×2)
2. Feuille de papier pliée comme illustré
1. Perno de drenaje de refrigerante (×2)
2. Elemento de paso
1. Radiator cap
1. Bouchon de radiateur1. Tapa del radiador
5TG-9-63 8 10/26/05 4:54 PM Page 8-47
Page 306 of 444
8-49
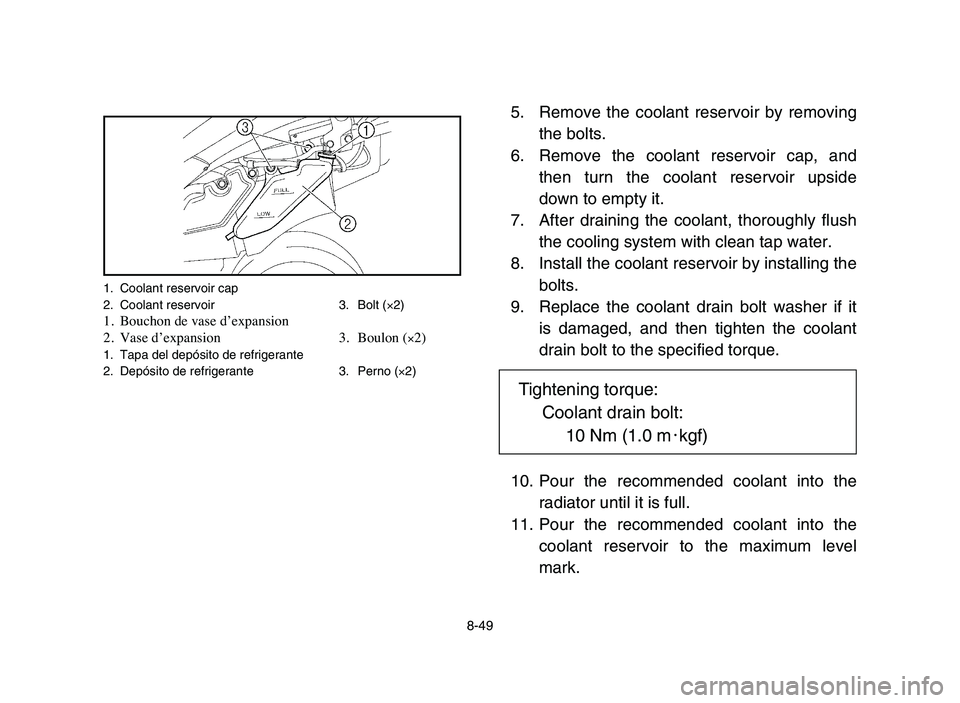
5. Remove the coolant reservoir by removing
the bolts.
6. Remove the coolant reservoir cap, and
then turn the coolant reservoir upside
down to empty it.
7. After draining the coolant, thoroughly flush
the cooling system with clean tap water.
8. Install the coolant reservoir by installing the
bolts.
9. Replace the coolant drain bolt washer if it
is damaged, and then tighten the coolant
drain bolt to the specified torque.
10. Pour the recommended coolant into the
radiator until it is full.
11. Pour the recommended coolant into the
coolant reservoir to the maximum level
mark.
1. Coolant reservoir cap
2. Coolant reservoir 3. Bolt (×2)
1. Bouchon de vase d’expansion
2. Vase d’expansion 3. Boulon (×2)1. Tapa del depósito de refrigerante
2. Depósito de refrigerante 3. Perno (×2)
Tightening torque:
Coolant drain bolt:
10 Nm (1.0 m0kgf)
5TG-9-63 8 10/26/05 4:54 PM Page 8-49
Page 310 of 444
8-53
cC
Hard water or salt water is harmful to the
engine. You may use soft water if you cannot
get distilled water.
12. Install the radiator cap and the coolant
reservoir cap.
13. Start the engine and let it idle for several
minutes. Stop the engine, and then check
the coolant level in the radiator. If it is low,
add more coolant until it reaches the top of
the radiator.
14. Check the coolant level in the reservoir. If it
is low, add coolant to the maximum level
mark.
15. Start the engine and then check for coolant
leakage.
NOTE:
If any leakage is found, have a Yamaha dealer
check the cooling system.
16. Install the panel.
5TG-9-63 8 10/26/05 4:54 PM Page 8-53
Page 407 of 444
8-150
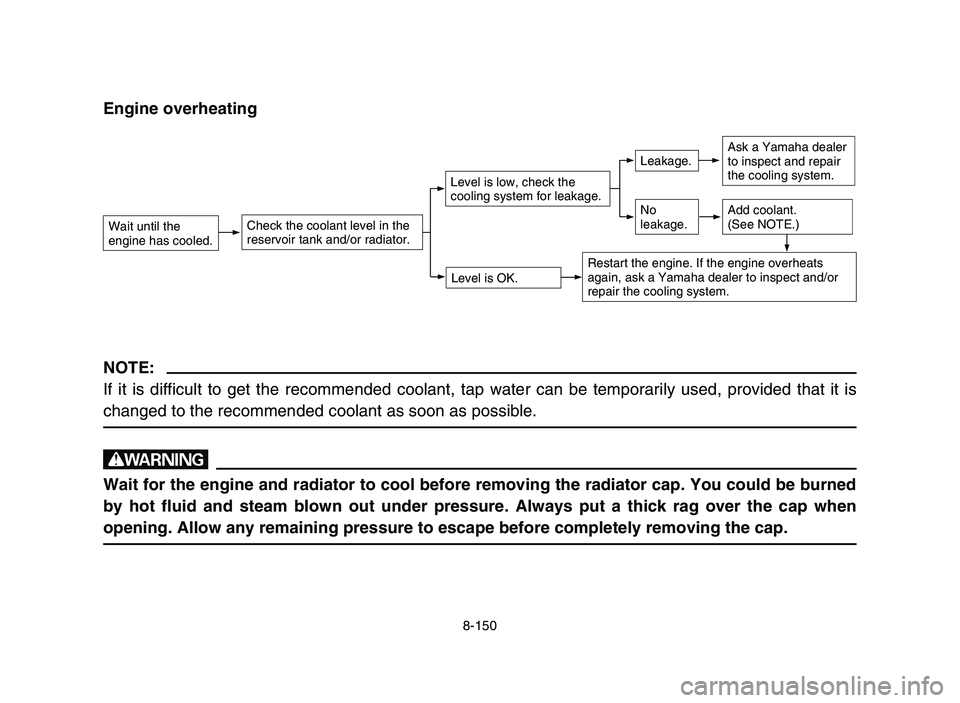
Engine overheating
NOTE:
If it is difficult to get the recommended coolant, tap water can be temporarily used, provided that it is
changed to the recommended coolant as soon as possible.
w
Wait for the engine and radiator to cool before removing the radiator cap. You could be burned
by hot fluid and steam blown out under pressure. Always put a thick rag over the cap when
opening. Allow any remaining pressure to escape before completely removing the cap.
Wait until the
engine has cooled.Check the coolant level in the
reservoir tank and/or radiator.
Level is OK.
Level is low, check the
cooling system for leakage.
No
leakage.
Leakage.Ask a Yamaha dealer
to inspect and repair
the cooling system.
Add coolant.
(See NOTE.)
Restart the engine. If the engine overheats
again, ask a Yamaha dealer to inspect and/or
repair the cooling system.
5TG-9-63 9-11 10/27/05 9:32 AM Page 8-150
Page 424 of 444
10-3
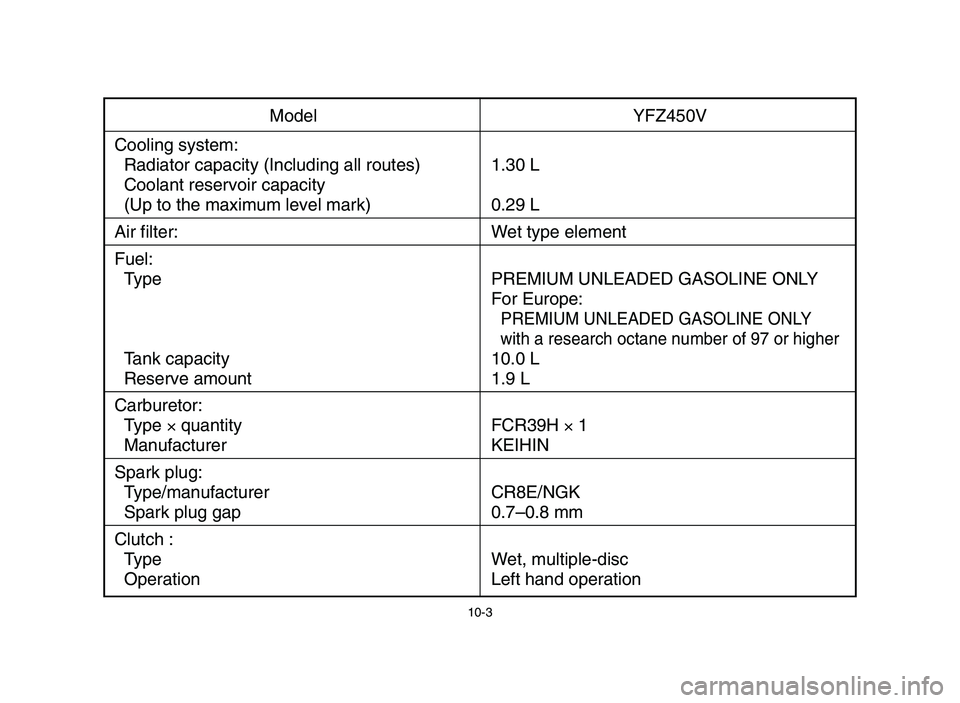
Model YFZ450V
Cooling system:
Radiator capacity (Including all routes) 1.30 L
Coolant reservoir capacity
(Up to the maximum level mark) 0.29 L
Air filter: Wet type element
Fuel:
Type PREMIUM UNLEADED GASOLINE ONLY
For Europe:
PREMIUM UNLEADED GASOLINE ONLY
with a research octane number of 97 or higher
Tank capacity 10.0 L
Reserve amount 1.9 L
Carburetor:
Type ×quantity FCR39H ×1
Manufacturer KEIHIN
Spark plug:
Type/manufacturer CR8E/NGK
Spark plug gap 0.7–0.8 mm
Clutch :
Type Wet, multiple-disc
Operation Left hand operation
5TG-9-63 9-11 10/27/05 9:32 AM Page 10-3