brake YAMAHA YFZ450 2013 Owners Manual
[x] Cancel search | Manufacturer: YAMAHA, Model Year: 2013, Model line: YFZ450, Model: YAMAHA YFZ450 2013Pages: 154, PDF Size: 3.77 MB
Page 8 of 154

EBU17420
TABLE OF CONTENTS
LOCATION OF THE WARNING AND
SPECIFICATION LABELS ............................ 1-1
SAFETY INFORMATION .............................. 2-1
DESCRIPTION .............................................. 3-1Left view ...................................................... 3-1
Right view.................................................... 3-1
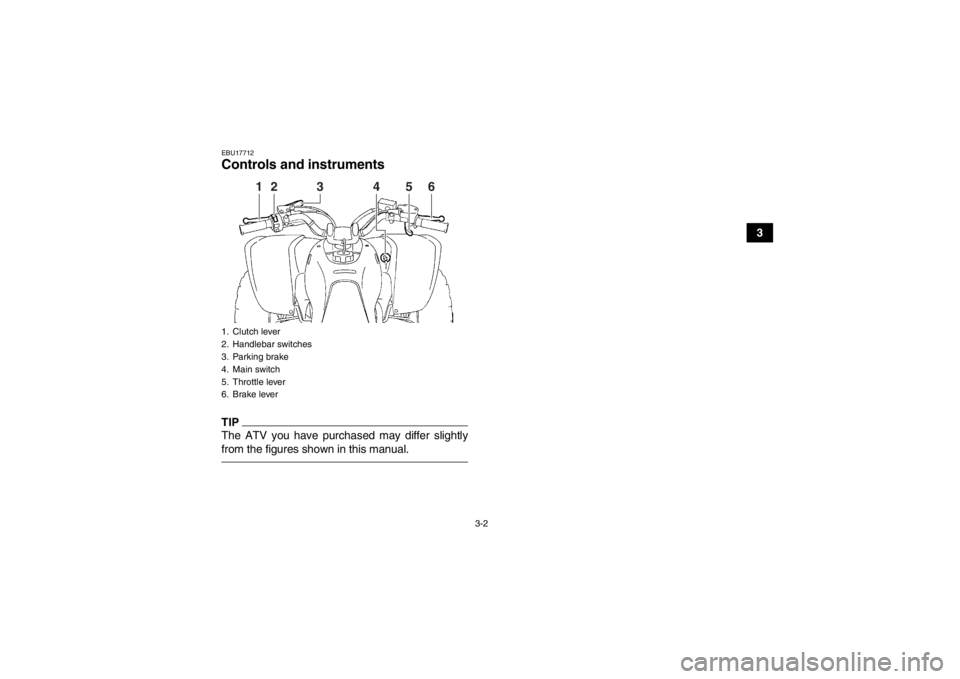
Controls and instruments ............................ 3-2
INSTRUMENT AND CONTROL
FUNCTIONS .................................................. 4-1 Main switch ................................................ 4-1
Indicator light and warning light .................. 4-2
Handlebar switches .................................... 4-3
Throttle lever .............................................. 4-3
Speed limiter .............................................. 4-4
Clutch lever ................................................ 4-5
Brake lever ................................................. 4-5
Brake pedal ................................................ 4-6
Parking brake lever .................................... 4-6
Shift pedal .................................................. 4-7
Fuel tank cap .............................................. 4-8
Fuel ............................................................ 4-8 Fuel cock ..................................................4-10
Starter (choke) ..........................................4-11
Seat ..........................................................4-12
Adjusting the front shock absorber
assemblies ..............................................4-13
Adjusting the rear shock absorber assembly .................................................4-14
PRE-OPERATION CHECKS ..........................5-1 Fuel .............................................................5-4
Engine oil ....................................................5-4
Coolant .......................................................5-4
Front and rear brakes .................................5-4
Throttle lever ...............................................5-5
Drive chain ..................................................5-5
Tires ............................................................5-5
Chassis fasteners .......................................5-7
Instruments, lights and switches .................5-7
OPERATION...................................................6-1 Starting a cold engine .................................6-1
Starting a warm engine ...............................6-3
Shifting ........................................................6-3
Engine break-in ...........................................6-5U1PD61E0.book Page 1 Tuesday, February 14, 2012 10:06 AM
Page 9 of 154

Parking ....................................................... 6-5
Parking on a slope ..................................... 6-6
Accessories and loading ............................ 6-7
RIDING YOUR ATV ...................................... 7-1 GETTING TO KNOW YOUR ATV............... 7-2
RIDE WITH CARE AND GOOD JUDGMENT .............................................. 7-2
BE CAREFUL WHERE YOU RIDE ............. 7-9
TURNING YOUR ATV .............................. 7-12
CLIMBING UPHILL ................................... 7-13
RIDING DOWNHILL.................................. 7-16
CROSSING A SLOPE............................... 7-18
CROSSING THROUGH SHALLOW WATER ................................................... 7-19
RIDING OVER ROUGH TERRAIN ........... 7-20
SLIDING AND SKIDDING ......................... 7-21
WHAT TO DO IF... .................................... 7-22
WHAT TO DO... ........................................ 7-22
PERIODIC MAINTENANCE AND
ADJUSTMENT ............................................... 8-1 Owner’s manual and tool kit ....................... 8-2
Periodic maintenance chart for the emission control system ................ 8-3
General maintenance and lubrication chart ......................................................... 8-5 Removing and installing the panel ..............8-9
Checking the spark plug ...........................8-10
Engine oil and oil filter element .................8-14
Coolant .....................................................8-20
Cleaning the air filter element ...................8-24
Cleaning the spark arrester ......................8-28
Adjusting the carburetor ............................8-30
Checking the engine idling speed .............8-30
Adjusting the throttle lever free play .........8-31
Valve clearance ........................................8-31
Brakes .......................................................8-32
Checking the front and rear brake pads ...8-32
Checking the brake fluid level ...................8-33
Changing the brake fluid ...........................8-36
Checking the front brake lever free play ...8-36
Checking the brake pedal height ..............8-36
Adjusting the parking brake free play .......8-37
Brake light switches ..................................8-38
Adjusting the clutch lever free play ...........8-39
Drive chain slack .......................................8-41
Lubricating the drive chain ........................8-43
Checking and lubricating the cables .........8-43
Checking and lubricating the brake and
clutch levers ............................................8-44
Checking the shift pedal ...........................8-45
Checking and lubricating the brake pedal .......................................................8-45
U1PD61E0.book Page 2 Tuesday, February 14, 2012 10:06 AM
Page 10 of 154

Checking the wheel hub bearings ............ 8-45
Lubricating the swingarm pivots ............... 8-46
Lubricating the upper and lower arm pivots ...................................................... 8-46
Lubricating the steering shaft ................... 8-47
Battery ...................................................... 8-48
Replacing the fuse ................................... 8-50
Replacing a headlight bulb ....................... 8-51
Adjusting a headlight beam ...................... 8-53
Replacing the tail/brake light bulb ............ 8-53
Removing a wheel .................................... 8-54
Installing a wheel ...................................... 8-55
Troubleshooting ....................................... 8-56
Troubleshooting charts ............................. 8-57
CLEANING AND STORAGE .......................... 9-1 Cleaning ..................................................... 9-1
Storage ....................................................... 9-2
SPECIFICATIONS ...................................... 10-1
CONSUMER INFORMATION ...................... 11-1 Identification numbers .............................. 11-1
U1PD61E0.book Page 3 Tuesday, February 14, 2012 10:06 AM
Page 22 of 154

2-3
2
●Always use proper procedures if you stall or roll
backwards when climbing a hill. To avoid stall-
ing, use the proper gear and maintain a steady
speed when climbing a hill. If you stall or roll
backwards, follow the special procedure for
braking described in this manual. Dismount on
the uphill side or to a side if pointed straight up-
hill. Turn the ATV around and remount, following
the procedure described in this manual.●Always check for obstacles before operating in a
new area.●Never attempt to operate over large obstacles,
such as large rocks or fallen trees. Always follow
proper procedures when operating over obsta-
cles as described in this manual.●Always be careful when skidding or sliding.
Learn to safely control skidding or sliding by
practicing at low speeds and on level, smooth
terrain. On extremely slippery surfaces, such as
ice, go slowly and be very cautious in order to re-
duce the chance of skidding or sliding out of con-
trol.●Never operate an ATV in fast flowing water or in
water deeper than that recommended in this
manual. Remember that wet brakes may havereduced stopping ability. Test your brakes after
leaving water. If necessary, apply them several
times to let friction dry out the linings.
●Always use the size and type of tires specified in
this manual.●Always maintain proper tire pressure as de-
scribed in this manual.●Never exceed the stated load capacity for an
ATV. Cargo should be properly distributed and
securely attached. Reduce speed and follow in-
structions in this manual for carrying cargo or
pulling a trailer. Allow greater distance for brak-
ing.●Do not operate your ATV during darkness un-
less it is equipped with a properly functioning
headlight. Off-road riding is inherently danger-
ous and additionally, off-road trails do not have
streetlights to guide you.●Never maintain an ATV without proper knowl-
edge. Contact an authorized ATV dealer to in-
form you on basic ATV maintenance. Certain
maintenance can only be carried out by certified
staff.
U1PD61E0.book Page 3 Tuesday, February 14, 2012 10:06 AM
Page 26 of 154
3-1
3
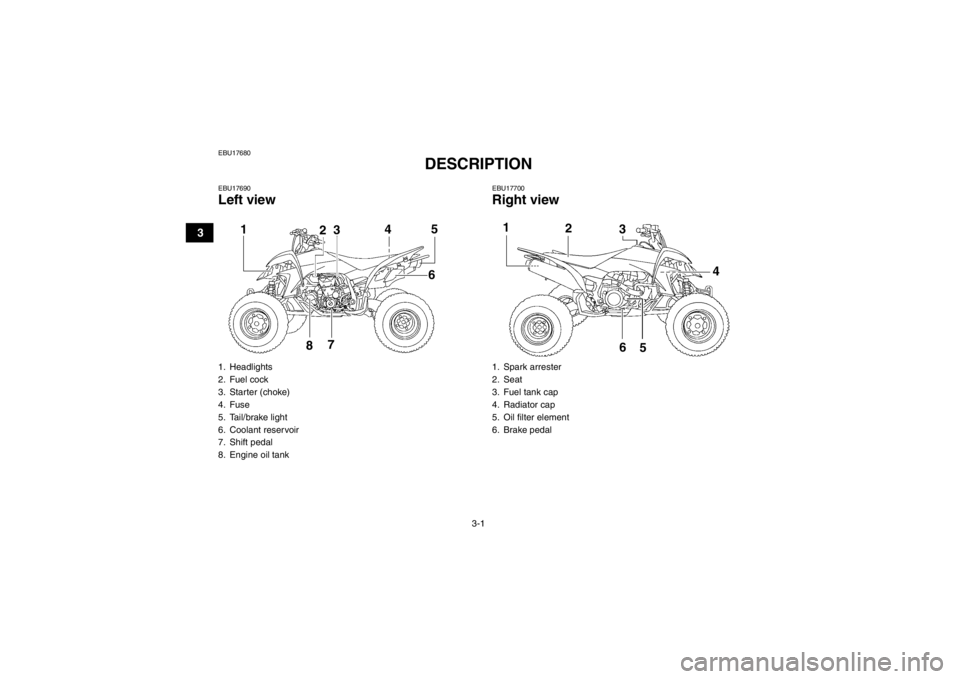
EBU17680
DESCRIPTION
EBU17690Left view
EBU17700Right view
1. Headlights
2. Fuel cock
3. Starter (choke)
4. Fuse
5. Tail/brake light
6. Coolant reservoir
7. Shift pedal
8. Engine oil tank
123 45
6
7
8
1. Spark arrester
2. Seat
3. Fuel tank cap
4. Radiator cap
5. Oil filter element
6. Brake pedal1
23
4
5
6
U1PD61E0.book Page 1 Tuesday, February 14, 2012 10:06 AM
Page 27 of 154
3-2
3
EBU17712Controls and instrumentsTIPThe ATV you have purchased may differ slightly
from the figures shown in this manual.1. Clutch lever
2. Handlebar switches
3. Parking brake
4. Main switch
5. Throttle lever
6. Brake lever
1
2
3
4
5
6
U1PD61E0.book Page 2 Tuesday, February 14, 2012 10:06 AM
Page 32 of 154
4-5
43. Tighten the locknut.
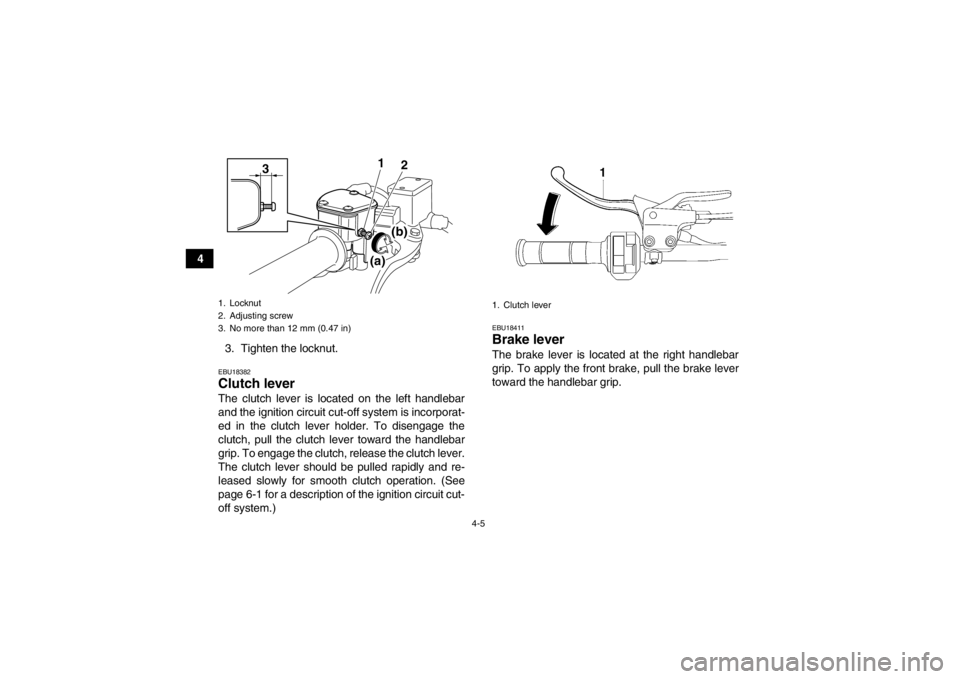
EBU18382Clutch lever The clutch lever is located on the left handlebar
and the ignition circuit cut-off system is incorporat-
ed in the clutch lever holder. To disengage the
clutch, pull the clutch lever toward the handlebar
grip. To engage the clutch, release the clutch lever.
The clutch lever should be pulled rapidly and re-
leased slowly for smooth clutch operation. (See
page 6-1 for a description of the ignition circuit cut-
off system.)
EBU18411Brake lever The brake lever is located at the right handlebar
grip. To apply the front brake, pull the brake lever
toward the handlebar grip.
1. Locknut
2. Adjusting screw
3. No more than 12 mm (0.47 in)
3 1
2
(a)(b)
1. Clutch lever
U1PD61E0.book Page 5 Tuesday, February 14, 2012 10:06 AM
Page 33 of 154
4-6
4
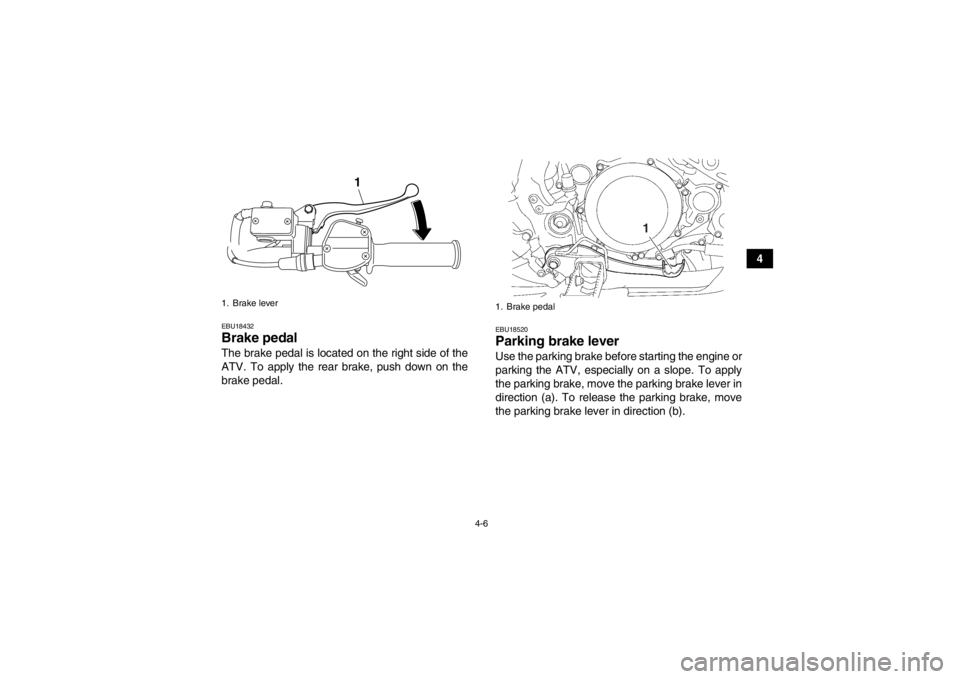
EBU18432Brake pedal The brake pedal is located on the right side of the
ATV. To apply the rear brake, push down on the
brake pedal.
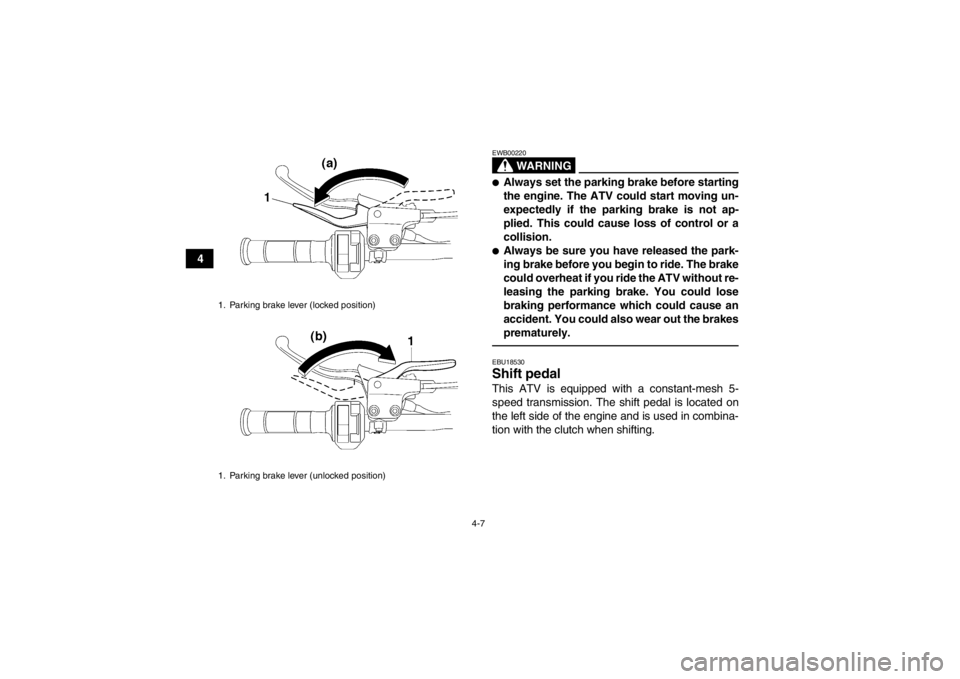
EBU18520Parking brake lever Use the parking brake before starting the engine or
parking the ATV, especially on a slope. To apply
the parking brake, move the parking brake lever in
direction (a). To release the parking brake, move
the parking brake lever in direction (b).
1. Brake lever
1
1. Brake pedal
1
U1PD61E0.book Page 6 Tuesday, February 14, 2012 10:06 AM
Page 34 of 154
4-7
4
WARNING
EWB00220●Always set the parking brake before starting
the engine. The ATV could start moving un-
expectedly if the parking brake is not ap-
plied. This could cause loss of control or a
collision.●Always be sure you have released the park-
ing brake before you begin to ride. The brake
could overheat if you ride the ATV without re-
leasing the parking brake. You could lose
braking performance which could cause an
accident. You could also wear out the brakes
prematurely.EBU18530Shift pedal This ATV is equipped with a constant-mesh 5-
speed transmission. The shift pedal is located on
the left side of the engine and is used in combina-
tion with the clutch when shifting.
1. Parking brake lever (locked position)
1. Parking brake lever (unlocked position)U1PD61E0.book Page 7 Tuesday, February 14, 2012 10:06 AM
Page 46 of 154

5-2
5
Front brake Check operation. If soft or spongy, have Yamaha dealer bleed hy-
draulic system.
Check brake pads for wear , and replace if necessary.
Check brake fluid level in reservoir, and add specified brake fluid to specified level if necessary.
Check hydraulic system for leakage. Correct if necessary. 5-4, 8-32, 8-33, 8-36
Rear brake Check operation. If soft or spongy, have Yamaha dealer bleed hy-
draulic system.
Check brake pads for wear , and replace if necessary.
Check brake fluid level in reservoir, and add specified brake fluid to specified level if necessary.
Check hydraulic system for leakage. Correct if necessary. 5-4, 8-32, 8-33, 8-36
Clutch Check operation, and correct if necessary.
Lubricate cable if necessary.
Check lever free play, and adjust if necessary. 8-39
Throttle lever Make sure that operation is smooth. Lubricate cable and lever hous-
ing if necessary.
Check lever free play, and adjust if necessary. 5-5, 8-31
Control cables Make sure that operation is smooth. Lubricate if necessary. 8-43
Drive chain Check chain slack, and adjust if necessary.
Check chain condition. Lubricate if necessary. 5-5, 8-41, 8-43
Wheels and tires Check wheel condition, and replace if damaged.
Check tire condition and tread depth. Replace if necessary.
Check air pressure. Correct if necessary. 5-5
Shift pedal Make sure that operation is smooth.
Correct if necessary.
8-45
Brake pedal Make sure that operation is smooth. Lubricate pedal pivoting point if
necessary. 8-45
ITEM ROUTINE PAGEU1PD61E0.book Page 2 Tuesday, February 14, 2012 10:06 AM