check engine YAMAHA YFZ450 2019 Owner's Manual
[x] Cancel search | Manufacturer: YAMAHA, Model Year: 2019, Model line: YFZ450, Model: YAMAHA YFZ450 2019Pages: 150, PDF Size: 4.07 MB
Page 102 of 150
8-19
811. Install the crankcase engine oil drain bolt, the
engine oil tank drain bolt and their new gas-
ket, and then tighten the bolts to their speci-
fied torques.
12. Refill with the specified amount of the recom- mended engine oil through the engine oil tank
filler hole.
TIPBe sure to wipe off spilled oil on any parts after the
engine and exhaust system have cooled down.
NOTICEECB00301In order to prevent clutch slippage (since the
engine oil also lubricates the clutch), do not
mix any chemical additives. Do not use oils
with a diesel specification of “CD” or oils of
a higher quality than specified. In addition,
do not use oils labeled “ENERGY CONSERV-
ING II” or higher.
Make sure that no foreign material enters the
crankcase. 13. Check the engine oil tank filler cap O-ring for
damage, and replace it if necessary.
14. Install and tighten the engine oil tank filler cap.
15. Start the engine, and then let it idle for several minutes while checking it for oil leakage. If oil
is leaking, immediately turn the engine off and
check for the cause.
16. Turn the engine off, and then check the oil level and correct it if necessary.
17. Install the engine guard by installing the bolts, and then tighten them to the specified torque.
NOTICE: Be sure to apply LOCTITE
® to the
engine guard bolts before installing them.
[ECB00372]
Tightening torques: Crankcase engine oil drain bolt:20 N·m (2.0 kgf·m, 15 lb·ft)
Engine oil tank drain bolt: 20 N·m (2.0 kgf·m, 15 lb·ft)
Recommended oil: See page 10-1.
Oil quantity: Without oil filter element replacement:1.40 L (1.48 US qt, 1.23 Imp.qt)
With oil filter element replacement: 1.45 L (1.53 US qt, 1.28 Imp.qt)
UBW262E0.book Page 19 Tuesday, April 3, 2018 10:59 AM
Page 103 of 150
8-20
8
EBU23472CoolantThe coolant level should be checked regularly. In
addition, the coolant must be changed at the in-
tervals specified in the periodic maintenance and
lubrication chart.TIPIf genuine Yamaha coolant is not available, use an
ethylene glycol antifreeze containing corrosion in-
hibitors for aluminum engines and mix with dis-
tilled water at a 1:1 ratio.
NOTICEECB02190Mix antifreeze with distilled water only. Howev-
er, if distilled water is not available, soft water
may be used for refilling. Do not use hard water
or salt water since they are harmful to the en-
gine. EBU27946To check the coolant level1. Park the ATV on a level surface.TIPThe coolant level must be checked on a cold en-
gine since the level varies with engine tempera-
ture. 2. Check the coolant level in the coolant reser- voir.TIPThe coolant should be between the minimum and
maximum level marks.
Tightening torque:Engine guard bolt:7 N·m (0.7 kgf·m, 5.2 lb·ft)
Recommended coolant: YAMALUBE coolant
Coolant quantity: Coolant reservoir (up to full level):0.25 L (0.26 US qt, 0.22 Imp.qt)
Radiator (including all routes): 1.25 L (1.32 US qt, 1.10 Imp.qt)
UBW262E0.book Page 20 Tuesday, April 3, 2018 10:59 AM
Page 104 of 150
8-21
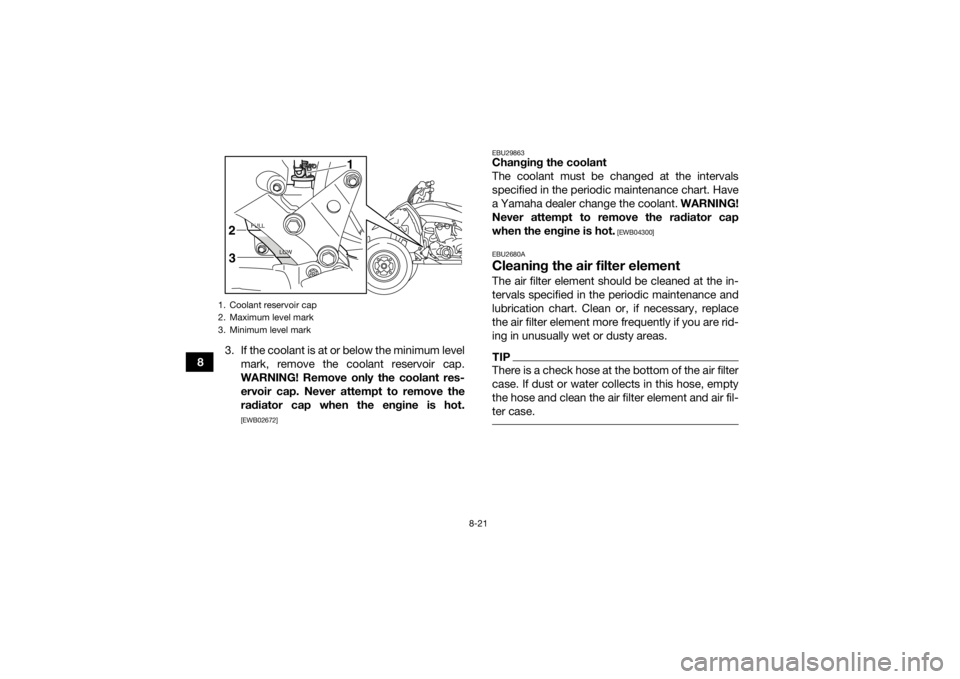
83. If the coolant is at or below the minimum level
mark, remove the coolant reservoir cap.
WARNING! Remove only the coolant res-
ervoir cap. Never attempt to remove the
radiator cap when the engine is hot.
[EWB02672] EBU29863
Changing the coolant
The coolant must be changed at the intervals
specified in the periodic maintenance chart. Have
a Yamaha dealer change the coolant.
WARNING!
Never attempt to remove the radiator cap
when the engine is hot.
[EWB04300]
EBU2680A
Cleaning the air filter elementThe air filter element should be cleaned at the in-
tervals specified in the periodic maintenance and
lubrication chart. Clean or, if necessary, replace
the air filter element more frequently if you are rid-
ing in unusually wet or dusty areas.TIPThere is a check hose at the bottom of the air filter
case. If dust or water collects in this hose, empty
the hose and clean the air filter element and air fil-
ter case.
1. Coolant reservoir cap
2. Maximum level mark
3. Minimum level mark
1
2
3
UBW262E0.book Page 21 Tuesday, April 3, 2018 10:59 AM
Page 108 of 150
8-25
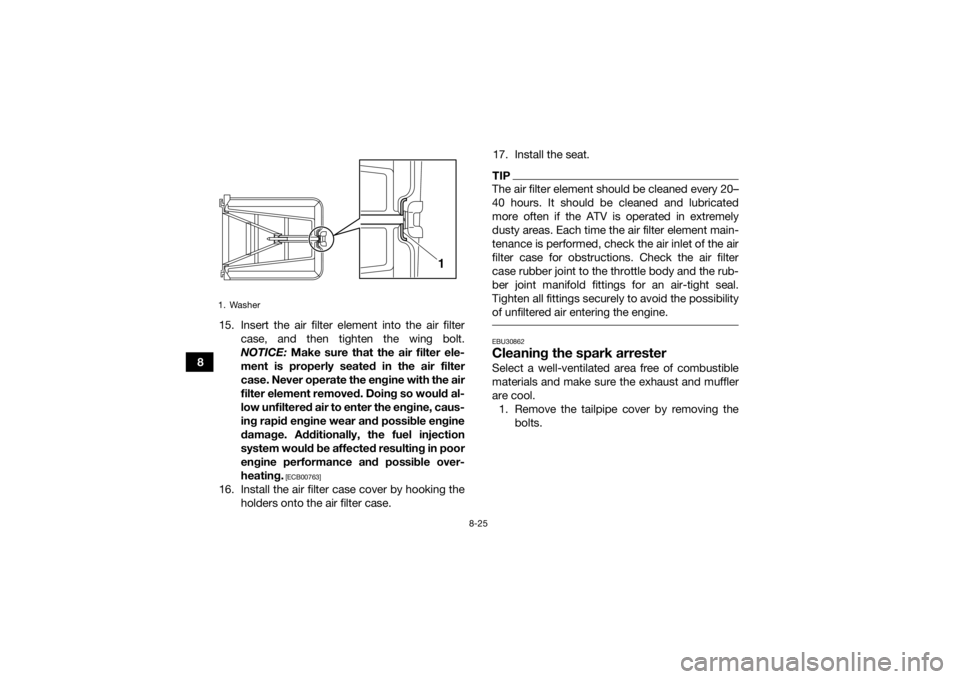
815. Insert the air filter element into the air filter
case, and then tighten the wing bolt.
NOTICE: Make sure that the air filter ele-
ment is properly seated in the air filter
case. Never operate the engine with the air
filter element removed. Doing so would al-
low unfiltered air to enter the engine, caus-
ing rapid engine wear and possible engine
damage. Additionally, the fuel injection
system would be affected resulting in poor
engine performance and possible over-
heating.
[ECB00763]
16. Install the air filter case cover by hooking the holders onto the air filter case. 17. Install the seat.
TIPThe air filter element should be cleaned every 20–
40 hours. It should be cleaned and lubricated
more often if the ATV is operated in extremely
dusty areas. Each time the air filter element main-
tenance is performed, check the air inlet of the air
filter case for obstructions. Check the air filter
case rubber joint to the throttle body and the rub-
ber joint manifold fittings for an air-tight seal.
Tighten all fittings securely to avoid the possibility
of unfiltered air entering the engine. EBU30862Cleaning the spark arresterSelect a well-ventilated area free of combustible
materials and make sure the exhaust and muffler
are cool.
1. Remove the tailpipe cover by removing the bolts.
1. Washer
1
UBW262E0.book Page 25 Tuesday, April 3, 2018 10:59 AM
Page 111 of 150
8-28
8
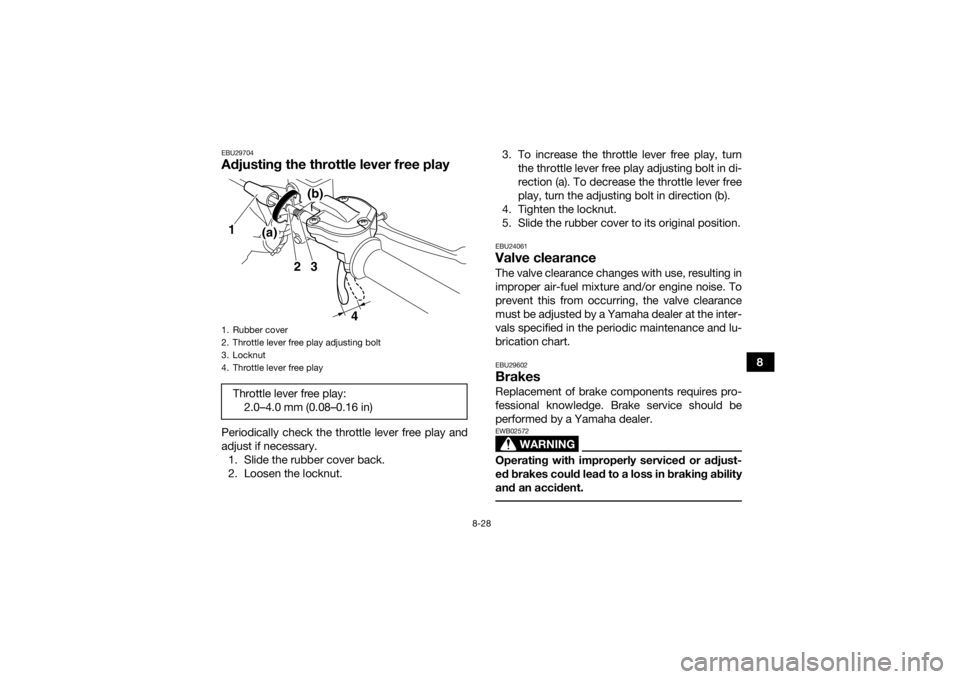
EBU29704Adjusting the throttle lever free playPeriodically check the throttle lever free play and
adjust if necessary.1. Slide the rubber cover back.
2. Loosen the locknut. 3. To increase the throttle lever free play, turn
the throttle lever free play adjusting bolt in di-
rection (a). To decrease the throttle lever free
play, turn the adjusting bolt in direction (b).
4. Tighten the locknut.
5. Slide the rubber cover to its original position.
EBU24061Valve clearanceThe valve clearance changes with use, resulting in
improper air-fuel mixture and/or engine noise. To
prevent this from occurring, the valve clearance
must be adjusted by a Yamaha dealer at the inter-
vals specified in the periodic maintenance and lu-
brication chart.EBU29602BrakesReplacement of brake components requires pro-
fessional knowledge. Brake service should be
performed by a Yamaha dealer.
WARNING
EWB02572Operating with improperly serviced or adjust-
ed brakes could lead to a loss in braking ability
and an accident.
1. Rubber cover
2. Throttle lever free play adjusting bolt
3. Locknut
4. Throttle lever free playThrottle lever free play: 2.0–4.0 mm (0.08–0.16 in)
32
4
(a)(b)
1
UBW262E0.book Page 28 Tuesday, April 3, 2018 10:59 AM
Page 121 of 150
8-38
8
EBU24883Lubricating the drive chainThe drive chain must be cleaned and lubricated at
the intervals specified in the periodic maintenance
and lubrication chart, otherwise it will quickly wear
out, especially when riding in dusty or wet areas.
Service the drive chain as follows.NOTICEECB00562The drive chain must be lubricated after wash-
ing the ATV or riding in the rain or wet areas. 1. Clean the drive chain with kerosene and asmall soft brush. NOTICE: To prevent dam-
aging the O-rings, do not clean the drive
chain with steam cleaners, high-pressure
washers or inappropriate solvents.
[ECB00572]
2. Wipe the drive chain dry.
3. Thoroughly lubricate the drive chain with a special O-ring chain lubricant. NOTICE: Do
not use engine oil or any other lubricants
for the drive chain, as they may contain
substances that could damage the O-
rings.
[ECB00582]
EBU24905
Checking and lubricating the cablesThe operation and the condition of all control ca-
bles should be checked before each ride, and the
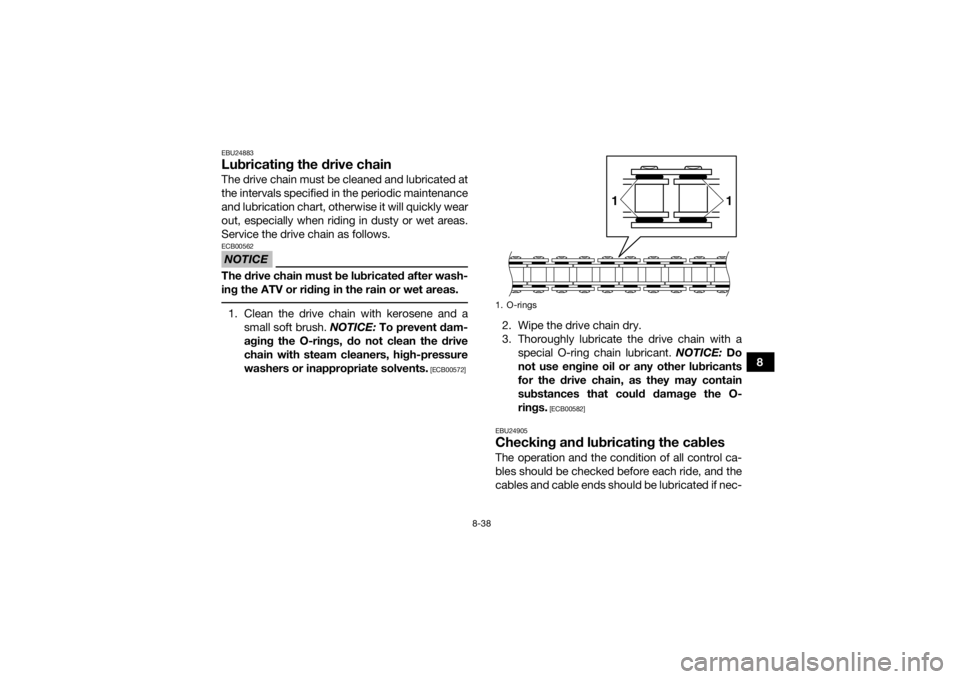
cables and cable ends should be lubricated if nec-1. O-rings
1
1
UBW262E0.book Page 38 Tuesday, April 3, 2018 10:59 AM
Page 135 of 150
8-52
8
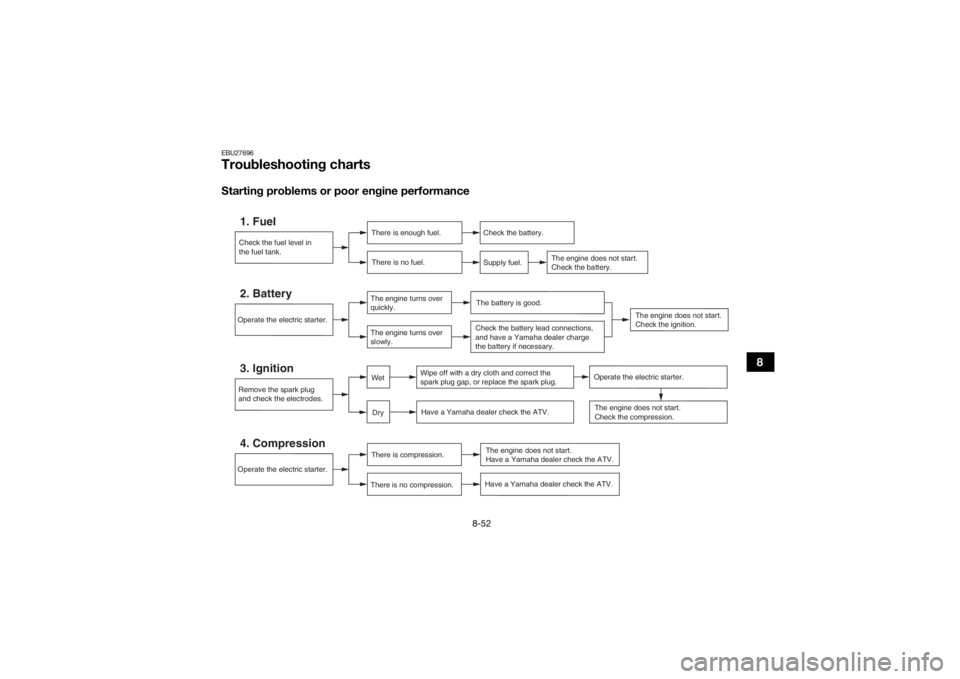
EBU27696Troubleshooting chartsStarting problems or poor engine performance
Check the fuel level in
the fuel tank.1. Fuel
There is enough fuel.There is no fuel.
Check the battery.
Supply fuel.
The engine does not start.
Check the battery.
Operate the electric starter.4. Compression
There is compression.
There is no compression.
The engine does not start.
Have a Yamaha dealer check the ATV.
Remove the spark plug
and check the electrodes.3. Ignition
Wipe off with a dry cloth and correct the
spark plug gap, or replace the spark plug. Have a Yamaha dealer check the ATV.
The engine does not start.
Check the compression.
DryWet
Operate the electric starter.
Have a Yamaha dealer check the ATV.
The engine does not start.
Check the ignition.
Operate the electric starter.2. Battery
The engine turns over
quickly.
The engine turns over
slowly.
The battery is good.Check the battery lead connections,
and have a Yamaha dealer charge
the battery if necessary.
UBW262E0.book Page 52 Tuesday, April 3, 2018 10:59 AM
Page 136 of 150
8-53
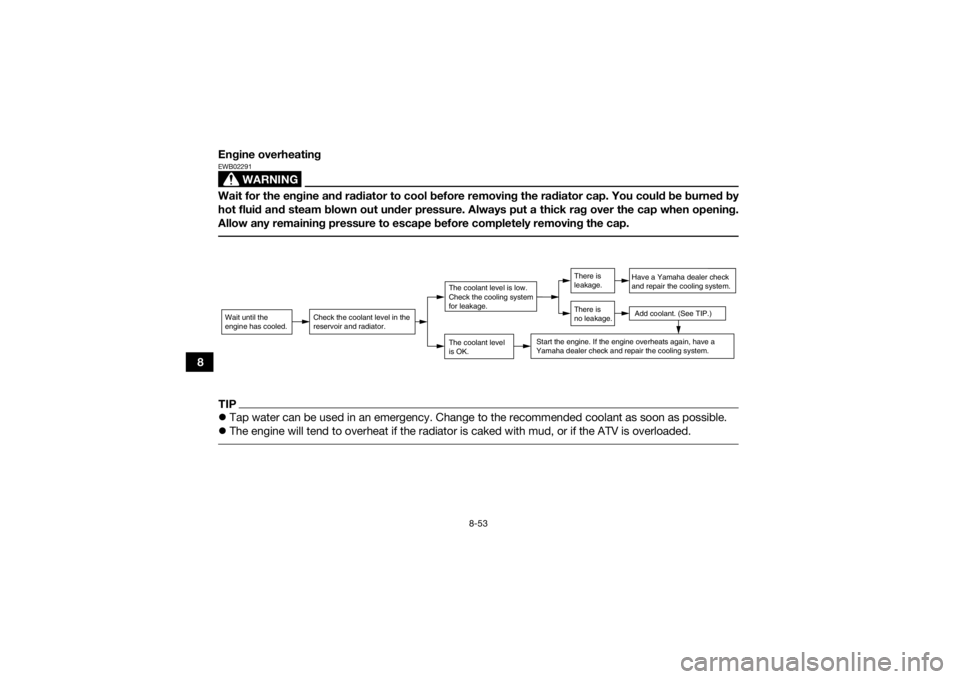
8Engine overheating
WARNING
EWB02291Wait for the engine and radiator to cool before removing the radiator cap. You could be burned by
hot fluid and steam blown out under pressure. Always put a thick rag over the cap when opening.
Allow any remaining pressure to escape before completely removing the cap. TIP
Tap water can be used in an emergency. Change to the recommended coolant as soon as possible.
The engine will tend to overheat if the radiator is caked with mud, or if the ATV is overloaded. Wait until the
engine has cooled.
Check the coolant level in the
reservoir and radiator.
The coolant level
is OK.The coolant level is low.
Check the cooling system
for leakage.
Have a Yamaha dealer check
and repair the cooling system.Add coolant. (See TIP.)
Start the engine. If the engine overheats again, have a
Yamaha dealer check and repair the cooling system.
There is
leakage.
There is
no leakage.
UBW262E0.book Page 53 Tuesday, April 3, 2018 10:59 AM
Page 147 of 150

12-1
12
INDEX
AAccessories and loading ................................................ 6-5
Air filter element, cleaning ........................................... 8-21BBattery ......................................................................... 8-43
Brake and clutch levers, checking and lubricating ...... 8-39
Brake fluid, changing ................................................... 8-31
Brake fluid level, checking ........................................... 8-30
Brake lever ..................................................................... 4-5
Brake lever free play, checking the front ..................... 8-32
Brake light switches ..................................................... 8-34
Brake pads, checking the front and rear ..................... 8-29
Brake pedal .................................................................... 4-6
Brake pedal, checking and lubricating ........................ 8-40
Brake pedal height, checking ...................................... 8-32
Brakes .......................................................................... 8-28
Brakes, front and rear .................................................... 5-4
Brake/tail light .............................................................. 8-49CCables, checking and lubricating ................................ 8-38
Chassis fasteners .......................................................... 5-7
Cleaning ......................................................................... 9-1
Clutch lever .................................................................... 4-5
Clutch lever free play, adjusting .................................. 8-35
Coolant .................................................................5-4, 8-20
Coolant, changing ........................................................ 8-21
Coolant temperature warning light ................................ 4-2
Cowling and panels, removing and installing .............. 8-10
DDrive chain ..................................................................... 5-5
Drive chain, lubricating ................................................ 8-38
Drive chain slack .......................................................... 8-36EEngine break-in .............................................................. 6-4
Engine oil ....................................................................... 5-4
Engine oil and oil filter element .................................... 8-14
Engine, start ................................................................... 6-1
Engine stop switch ........................................................ 4-3
Engine trouble warning light .......................................... 4-2FFuel ......................................................................... 4-9, 5-4
Fuel level warning light .................................................. 4-2
Fuel tank cap ................................................................. 4-8
Fuse, replacing ............................................................ 8-46HHandlebar position, adjusting ...................................... 4-23
Handlebar switches ....................................................... 4-3
Headlight beam, adjusting ........................................... 8-49
Headlight bulb, replacing ............................................. 8-46IIdentification numbers ................................................. 11-1
Indicator light and warning lights ................................... 4-1
Instruments, lights and switches ................................... 5-7LLabel locations ............................................................... 1-1
Light switch ................................................................... 4-3
UBW262E0.book Page 1 Tuesday, April 3, 2018 10:59 AM