clutch YAMAHA YFZ450R 2010 User Guide
[x] Cancel search | Manufacturer: YAMAHA, Model Year: 2010, Model line: YFZ450R, Model: YAMAHA YFZ450R 2010Pages: 154, PDF Size: 3.8 MB
Page 63 of 154

6-3
6
3. Shift into first gear, and then release the
brake. NOTICE: Always close the throttle
before shifting gears, otherwise damage
to the engine and drive train may result.
[ECB01220]
4. Open the throttle gradually and at the same time, release the clutch lever slowly.
WARNING! Opening the throttle abruptly or releasing the clutch lever too quickly
could make the ATV wheelie, which would
increase the chance of an accident, in-
cluding an overturn.
[EWB00732]
5. Once the ATV has attained adequate speed, release the throttle, and at the same time,
quickly pull in the clutch lever.
6. Shift the transmission into second gear. (Make sure not to shift the transmission into
neutral.)
7. Open the throttle part way and gradually re- lease the clutch lever.
8. Follow the same procedure when shifting to the next higher gear.
EBU20652To decelerate
When slowing down or stopping, release the
throttle and apply the brakes smoothly and evenly.
As you slow down, shift to a lower gear. Be sure
that the engine has sufficiently slowed before en-
gaging a lower gear. Improper use of the brakes or
shifting can cause the tires to lose traction, reduc-
ing control and increasing the possibility of an ac-
cident.
WARNING
EWB00711Make sure the engine has sufficiently slowed
before shifting to a lower gear. Engaging a low-
er gear when the engine speed is too high
could make the wheels stop rotating and lose
traction. This could cause loss of control, an
accident and injury. It could also cause engine
or drive train damage. NOTICEECB00181Even with the transmission in the neutral po-
sition, do not coast for long periods of time
with the engine off, and do not tow the ATV
for long distances. The transmission is prop-
U1TD61E0.book Page 3 Tuesday, July 8, 2014 11:30 AM
Page 64 of 154

6-4
6erly lubricated only when the engine is run-
ning. Inadequate lubrication may damage
the transmission.
Always use the clutch when changing gears.
The engine, transmission and drive train are
not designed to withstand the shock of
forced shifting and can be damaged by shift-
ing without using the clutch.
EBU20673Engine break-inTIPFor ATVs equipped with an odometer or an hour
meter, follow the figures given in km (mi) or the
figures given in hours.
For ATVs not equipped with an odometer or
hour meter, follow the figures given in hours. There is never a more important period in the life
of your engine than the first 320 km (200 mi) or 20
hours of riding. For this reason, you should read
the following material carefully.
Since the engine is brand new, do not put an ex-
cessive load on it for the first 320 km (200 mi) or
20 hours. The various parts in the engine wear and
polish themselves to the correct operating clear- ances. During this period, prolonged full-throttle
operation or any condition that might result in en-
gine overheating must be avoided.
0–160 km (0–100 mi) or 0–10 hours
Avoid prolonged operation above 1/2 throttle.
Vary the speed of the ATV regularly. Do not oper-
ate it at one set throttle position.
160–320 km (100–200 mi) or 10–20 hours
Avoid prolonged operation above 3/4 throttle. Rev
the engine through the gears freely, but do not use
full throttle at any time.
320 km (200 mi) or 20 hours and beyond
The ATV can now be operated normally.
NOTICEECB00221If any engine trouble should occur during the
engine break-in period, immediately have a
Yamaha dealer check the ATV. EBU26762ParkingWhen parking the ATV, shift into first gear, stop
the engine, and then apply the parking brake.
U1TD61E0.book Page 4 Tuesday, July 8, 2014 11:30 AM
Page 78 of 154

7-11
7Select a large, flat, unpaved area to become famil-
iar with your ATV. Make sure that this area is free
of obstacles and other riders. You should practice
control of the throttle, brakes, shifting procedures,
and turning techniques in this area before trying
more difficult terrain.
Set the parking brake and follow the instruction on
page 6-1 to start the engine. Once it has warmed
up you are ready to begin riding your ATV. As you
get on the ATV, be sure not to accidentally move
the shift pedal. With the engine idling, pull the
clutch lever to disengage the clutch and shift into
1st gear, and then release the parking brake.
Open the throttle gradually, and at the same time,
release the clutch lever slowly. Once the ATV has
attained adequate speed, release the throttle lever
and at the same time, quickly pull in the clutch le-
ver and shift into 2nd gear. Open the throttle part
way and gradually release the clutch.
WARNING!
If the throttle is applied too abruptly or if the
throttle is not released during shifting, or if the
shift pedal is not released before applying the
throttle, the front wheels may lift off the
ground, resulting in a loss of directional con- trol.
[EWB02632]
NOTICE: Do not shift gears without
releasing the throttle. Damage to the engine or
drive train may occur.
[ECB01072]
Use this same procedure as you move into the
higher gears. Be sure to coordinate the use of the
throttle and shift pedal properly.
Avoid higher speeds until you are thoroughly fa-
miliar with the operation of your ATV.
When slowing down or stopping, release the
throttle and apply the brakes smoothly and evenly.
As you slow down, shift to a lower gear. Be sure
that the engine has sufficiently slowed before en-
gaging a lower gear. Improper use of the brakes or
shifting can cause the tires to lose traction, reduc-
ing control and increasing the possibility of an ac-
cident.
TURNING YOUR ATV
WARNING
EWB01772Always follow proper procedures for turning as
described in this Owner’s Manual. Practice
turning at low speeds before attempting to turn
at faster speeds. Do not turn at speeds too fast
for your skills or the conditions. ATV could go
out of control, causing a collision or overturn.
U1TD61E0.book Page 11 Tuesday, July 8, 2014 11:30 AM
Page 94 of 154
8-5
8
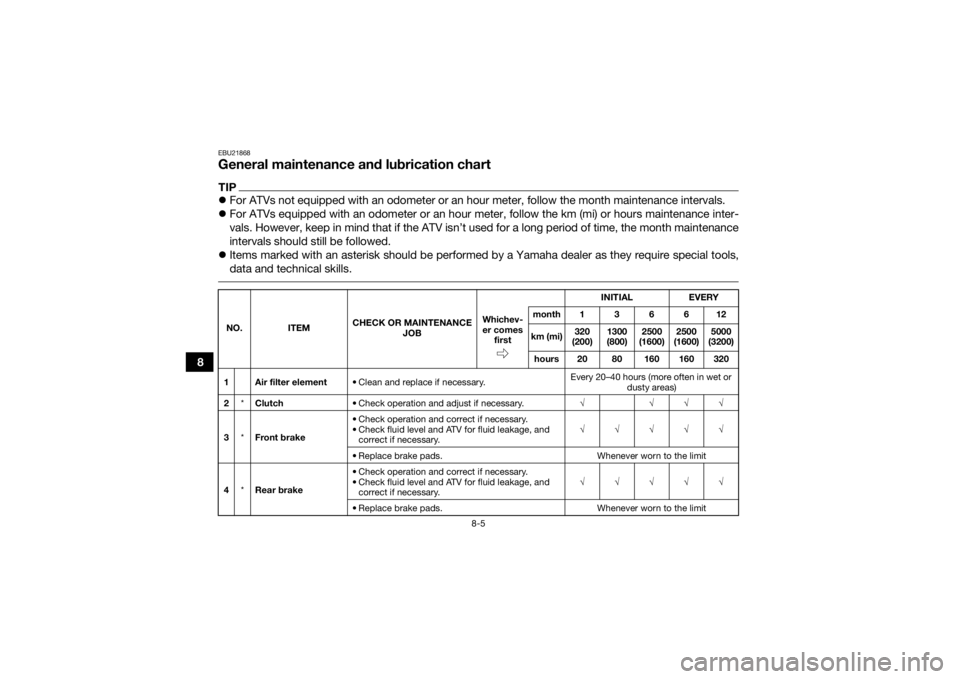
EBU21868General maintenance and lubrication chartTIPFor ATVs not equipped with an odometer or an hour meter, follow the month maintenance intervals.
For ATVs equipped with an odometer or an hour meter, follow the km (mi) or hours maintenance inter-
vals. However, keep in mind that if the ATV isn’t used for a long period of time, the month maintenance
intervals should still be followed.
Items marked with an asterisk should be performed by a Yamaha dealer as they require special tools,
data and technical skills. NO. ITEM CHECK OR MAINTENANCE
JOB INITIAL
EVERY
Whichev-
er comes first month136612
km (mi) 320
(200) 1300
(800) 2500
(1600) 2500
(1600) 5000
(3200)
hours 20 80 160 160 320
1 Air filter element • Clean and replace if necessary. Every 20–40 hours (more often in wet or
dusty areas)
2 *Clutch • Check operation and adjust if necessary. √ √√√
3 *Front brake • Check operation and correct if necessary.
• Check fluid level and ATV for fluid leakage, and
correct if necessary. √√√√√
• Replace brake pads. Whenever worn to the limit
4 *Rear brake • Check operation and correct if necessary.
• Check fluid level and ATV for fluid leakage, and
correct if necessary. √√√√√
• Replace brake pads. Whenever worn to the limit
U1TD61E0.book Page 5 Tuesday, July 8, 2014 11:30 AM
Page 108 of 154

8-19
811. Install the crankcase engine oil drain bolt, the
engine oil tank drain bolt and their new gas-
ket, and then tighten the bolts to their speci-
fied torques.
12. Refill with the specified amount of the recom- mended engine oil through the engine oil tank
filler hole, and then install and tighten the en-
gine oil tank filler cap.
TIPBe sure to wipe off spilled oil on any parts after the
engine and exhaust system have cooled down. NOTICEECB00301In order to prevent clutch slippage (since the
engine oil also lubricates the clutch), do not
mix any chemical additives. Do not use oils
with a diesel specification of “CD” or oils of
a higher quality than specified. In addition,
do not use oils labeled “ENERGY CONSERV-
ING II” or higher.
Make sure that no foreign material enters the
crankcase. 13. Start the engine, and then let it idle for several
minutes while checking it for oil leakage. If oil
is leaking, immediately turn the engine off and
check for the cause.
14. Turn the engine off, and then check the oil level and correct it if necessary.
Tightening torques:
Crankcase engine oil drain bolt:20 Nm (2.0 m·kgf, 14 ft·lbf)
Engine oil tank drain bolt: 20 Nm (2.0 m·kgf, 14 ft·lbf)
Recommended oil: See page 10-1.
Oil quantity: Without oil filter element replacement:1.40 L (1.48 US qt, 1.23 Imp.qt)
With oil filter element replacement: 1.45 L (1.53 US qt, 1.28 Imp.qt)
U1TD61E0.book Page 19 Tuesday, July 8, 2014 11:30 AM
Page 123 of 154

8-34
8
The brake light switch for the brake pedal can be
adjusted as follows, but the front brake light
switch should be adjusted by a Yamaha dealer.
Turn the rear brake light switch adjusting nut while
holding the brake light switch in place. To make
the brake light come on earlier, turn the adjusting
nut in direction (a). To make the brake light come
on later, turn the adjusting nut in direction (b).
EBU30153Adjusting the clutch lever free playThe clutch lever free play must be checked and, if
necessary, adjusted at the intervals specified in
the periodic maintenance and lubrication chart. The clutch lever free play should measure 8.0–
13.0 mm (0.31–0.51 in) as shown. If the free play is
incorrect, adjust it as follows.
1. To increase the clutch lever free play, turn the clutch lever free play adjusting nut at the
clutch lever in direction (a), and to decrease it,
turn the nut in direction (b).
If the specified free play cannot be obtained,
proceed with the following steps.
2. Fully turn the adjusting nut at the clutch lever in direction (a) to loosen the clutch cable.
3. Slide the rubber cover back.
4. Loosen the locknut.1. Rear brake light switch
2. Rear brake light switch adjusting nut
1
2(a) (b)
1. Clutch lever free play
2. Clutch lever free play adjusting nut (clutch lever)
1
(a)
(b)
2
U1TD61E0.book Page 34 Tuesday, July 8, 2014 11:30 AM
Page 124 of 154

8-35
85. To increase the clutch lever free play, turn the
clutch lever free play adjusting nut located to-
wards the center of the cable in direction (a),
and to decrease it, turn the nut in direction (b).
6. Tighten the locknut.
7. Slide the rubber cover to its original position.
TIPIf the specified free play cannot be obtained as de-
scribed above or if the clutch does not operate
correctly, have a Yamaha dealer check the internal
clutch mechanism.
EBU26865Drive chain slackThe drive chain slack should be checked before
each ride and adjusted if necessary.
To check the drive chain slack 1. Place the ATV on a level surface.TIPWhen checking and adjusting the drive chain
slack, there should be no weight on the ATV and
all tires must be touching the ground. 2. Move the ATV back and forth to locate the tightest portion of the drive chain, and then
measure the drive chain slack as shown.
1. Locknut
2. Clutch lever free play adjusting nut (clutch cable)
3. Rubber cover
1
2
3
(b)
(a)
Drive chain slack:25.0–35.0 mm (0.98–1.38 in)
U1TD61E0.book Page 35 Tuesday, July 8, 2014 11:30 AM
Page 128 of 154

8-39
8
EBU24923Checking and lubricating the brake
and clutch leversThe operation of the brake and clutch levers
should be checked before each ride, and the lever
pivots should be lubricated if necessary.
Brake leverClutch lever
EBUM0171Checking the shift pedalThe operation of the shift pedal should be
checked before each ride. If operation is not
smooth, have a Yamaha dealer check the vehicle.EBU28872Checking and lubricating the brake
pedalThe operation of the brake pedal should be
checked before each ride, and the pedal pivot
should be lubricated if necessary.
Recommended lubricants:
Brake lever:Silicone grease
Clutch lever: Lithium-soap-based grease
U1TD61E0.book Page 39 Tuesday, July 8, 2014 11:30 AM
Page 146 of 154
10-2
10
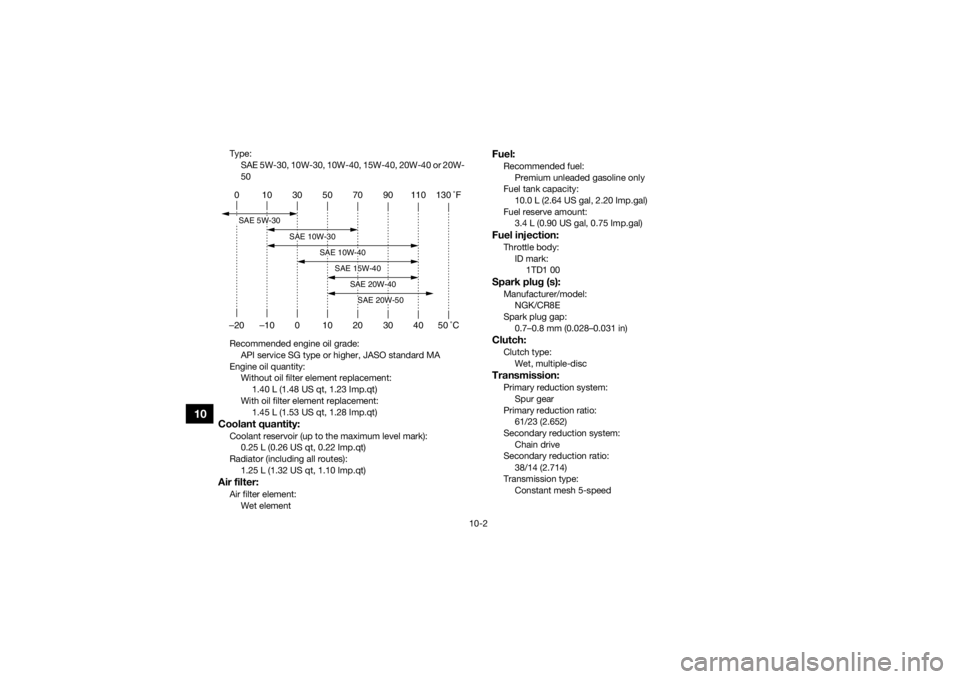
Type:SAE 5W-30, 10W-30, 10W-40, 15W-40, 20W-40 or 20W-
50
Recommended engine oil grade: API service SG type or higher, JASO standard MA
Engine oil quantity: Without oil filter element replacement: 1.40 L (1.48 US qt, 1.23 Imp.qt)
With oil filter element replacement: 1.45 L (1.53 US qt, 1.28 Imp.qt)Coolant quantity:Coolant reservoir (up to the maximum level mark):0.25 L (0.26 US qt, 0.22 Imp.qt)
Radiator (including all routes): 1.25 L (1.32 US qt, 1.10 Imp.qt)Air filter:Air filter element:Wet element
Fuel:Recommended fuel:Premium unleaded gasoline only
Fuel tank capacity:
10.0 L (2.64 US gal, 2.20 Imp.gal)
Fuel reserve amount: 3.4 L (0.90 US gal, 0.75 Imp.gal)Fuel injection:Throttle body:
ID mark: 1TD1 00Spark plug (s):Manufacturer/model:NGK/CR8E
Spark plug gap: 0.7–0.8 mm (0.028–0.031 in)Clutch:Clutch type:Wet, multiple-discTransmission:Primary reduction system:
Spur gear
Primary reduction ratio: 61/23 (2.652)
Secondary reduction system: Chain drive
Secondary reduction ratio:
38/14 (2.714)
Transmission type: Constant mesh 5-speed
0 10 30 50 70 90 110 130 F
–20 –10 0 10 20 30 40 50 CSAE 5W-30
SAE 10W-30
SAE 10W-40
SAE 15W-40
SAE 20W-40SAE 20W-50
U1TD61E0.book Page 2 Tuesday, July 8, 2014 11:30 AM
Page 152 of 154
12-1
12
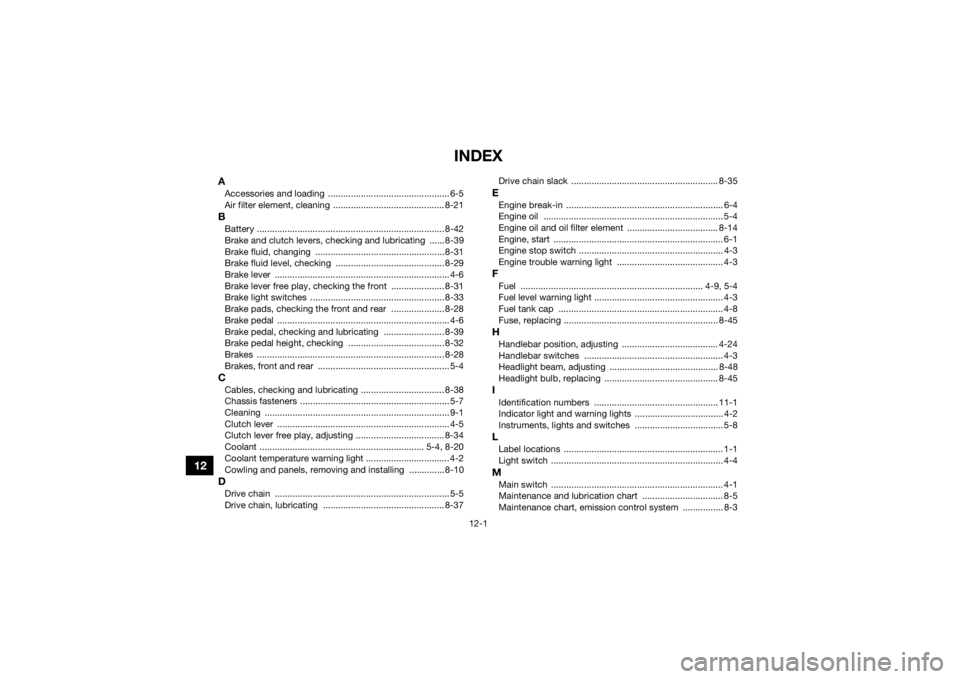
INDEX
AAccessories and loading ................................................ 6-5
Air filter element, cleaning ............................................ 8-21BBattery .......................................................................... 8-42
Brake and clutch levers, checking and lubricating ...... 8-39
Brake fluid, changing ...................................................8-31
Brake fluid level, checking ........................................... 8-29
Brake lever ..................................................................... 4-6
Brake lever free play, checking the front ..................... 8-31
Brake light switches ..................................................... 8-33
Brake pads, checking the front and rear ..................... 8-28
Brake pedal .................................................................... 4-6
Brake pedal, checking and lubricating ........................ 8-39
Brake pedal height, checking ...................................... 8-32
Brakes .......................................................................... 8-28
Brakes, front and rear .................................................... 5-4CCables, checking and lubricating ................................. 8-38
Chassis fasteners ........................................................... 5-7
Cleaning ......................................................................... 9-1
Clutch lever .................................................................... 4-5
Clutch lever free play, adjusting ................................... 8-34
Coolant ................................................................. 5-4, 8-20
Coolant temperature warning light ................................. 4-2
Cowling and panels, removing and installing .............. 8-10DDrive chain ..................................................................... 5-5
Drive chain, lubricating ................................................ 8-37 Drive chain slack .......................................................... 8-35
EEngine break-in .............................................................. 6-4
Engine oil ....................................................................... 5-4
Engine oil and oil filter element .................................... 8-14
Engine, start ................................................................... 6-1
Engine stop switch ......................................................... 4-3
Engine trouble warning light .......................................... 4-3FFuel ........................................................................ 4-9, 5-4
Fuel level warning light ................................................... 4-3
Fuel tank cap ................................................................. 4-8
Fuse, replacing ............................................................. 8-45HHandlebar position, adjusting ...................................... 4-24
Handlebar switches ....................................................... 4-3
Headlight beam, adjusting ........................................... 8-48
Headlight bulb, replacing ............................................. 8-45IIdentification numbers ................................................. 11-1
Indicator light and warning lights ................................... 4-2
Instruments, lights and switches ................................... 5-8LLabel locations ............................................................... 1-1
Light switch .................................................................... 4-4MMain switch .................................................................... 4-1
Maintenance and lubrication chart ................................ 8-5
Maintenance chart, emission control system ................ 8-3
U1TD61E0.book Page 1 Tuesday, July 8, 2014 11:30 AM