changing the oil YAMAHA YFZ450R 2010 Owners Manual
[x] Cancel search | Manufacturer: YAMAHA, Model Year: 2010, Model line: YFZ450R, Model: YAMAHA YFZ450R 2010Pages: 154, PDF Size: 3.8 MB
Page 9 of 154

Accessories and loading ............................. 6-5
RIDING YOUR ATV ........................................ 7-1 GETTING TO KNOW YOUR ATV ................ 7-2
RIDE WITH CARE AND GOOD JUDGMENT .............................................. 7-2
BE CAREFUL WHERE YOU RIDE ............... 7-8
TURNING YOUR ATV................................ 7-11
CLIMBING UPHILL ................................... 7-13
RIDING DOWNHILL .................................. 7-16
CROSSING A SLOPE................................ 7-17
CROSSING THROUGH SHALLOW WATER .................................................... 7-18
RIDING OVER ROUGH TERRAIN ............. 7-20
SLIDING AND SKIDDING.......................... 7-20
WHAT TO DO IF... ..................................... 7-21
WHAT TO DO... ......................................... 7-22
PERIODIC MAINTENANCE AND
ADJUSTMENT................................................ 8-1 Owner’s manual and tool kit ....................... 8-2
Periodic maintenance chart for the emission control system ........................... 8-3
General maintenance and lubrication chart .......................................................... 8-5
Removing and installing the cowling and panels...................................................... 8-10 Checking the spark plug........................... 8-13
Engine oil and oil filter element................. 8-14
Coolant ..................................................... 8-20
Cleaning the air filter element ................... 8-21
Cleaning the spark arrester ...................... 8-25
Adjusting the throttle lever free play ......... 8-27
Valve clearance......................................... 8-28
Brakes....................................................... 8-28
Checking the front and rear brake pads... 8-28
Checking the brake fluid level .................. 8-29
Changing the brake fluid .......................... 8-31
Checking the front brake lever free play... 8-31
Checking the brake pedal height.............. 8-32
Adjusting the parking brake free play ....... 8-32
Brake light switches ................................. 8-33
Adjusting the clutch lever free play .......... 8-34
Drive chain slack....................................... 8-35
Lubricating the drive chain ....................... 8-37
Checking and lubricating the cables ........ 8-38
Checking and lubricating the brake and
clutch levers ........................................... 8-39
Checking the shift pedal ........................... 8-39
Checking and lubricating the brake pedal ....................................................... 8-39
Checking the wheel hub bearings ............ 8-40
Lubricating the swingarm pivots .............. 8-40
U1TD61E0.book Page 2 Tuesday, July 8, 2014 11:30 AM
Page 120 of 154

8-31
8
Be careful that water does not enter the
brake fluid reservoir when refilling. Water will
significantly lower the boiling point of the flu-
id and may result in vapor lock.
NOTICEECB01161Brake fluid may damage painted surfaces or
plastic parts. Always clean up spilled fluid im-
mediately. As the brake pads wear, it is normal for the brake
fluid level to gradually go down. A low brake fluid
level may indicate worn brake pads and/or brake
system leakage; therefore, be sure to check the
brake pads for wear and the brake system for
leakage. If the brake fluid level goes down sud-
denly, have a Yamaha dealer check the cause be-
fore further riding.EBU24293Changing the brake fluidHave a Yamaha dealer change the brake fluid at
the intervals specified in the periodic maintenance
and lubrication chart. In addition, have the oil seals of the master cylinders and calipers as well as the
brake hoses replaced at the intervals listed below
or whenever they are damaged or leaking.
Oil seals: Replace every two years.
Brake hoses: Replace every four years.
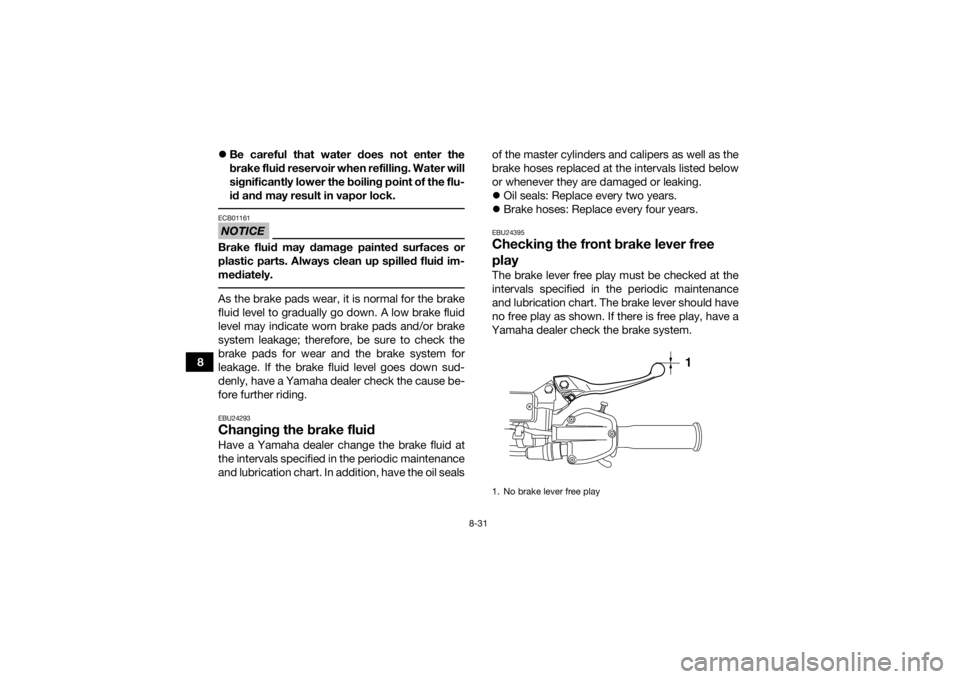
EBU24395Checking the front brake lever free
playThe brake lever free play must be checked at the
intervals specified in the periodic maintenance
and lubrication chart. The brake lever should have
no free play as shown. If there is free play, have a
Yamaha dealer check the brake system.1. No brake lever free play
1
U1TD61E0.book Page 31 Tuesday, July 8, 2014 11:30 AM
Page 152 of 154

12-1
12
INDEX
AAccessories and loading ................................................ 6-5
Air filter element, cleaning ............................................ 8-21BBattery .......................................................................... 8-42
Brake and clutch levers, checking and lubricating ...... 8-39
Brake fluid, changing ...................................................8-31
Brake fluid level, checking ........................................... 8-29
Brake lever ..................................................................... 4-6
Brake lever free play, checking the front ..................... 8-31
Brake light switches ..................................................... 8-33
Brake pads, checking the front and rear ..................... 8-28
Brake pedal .................................................................... 4-6
Brake pedal, checking and lubricating ........................ 8-39
Brake pedal height, checking ...................................... 8-32
Brakes .......................................................................... 8-28
Brakes, front and rear .................................................... 5-4CCables, checking and lubricating ................................. 8-38
Chassis fasteners ........................................................... 5-7
Cleaning ......................................................................... 9-1
Clutch lever .................................................................... 4-5
Clutch lever free play, adjusting ................................... 8-34
Coolant ................................................................. 5-4, 8-20
Coolant temperature warning light ................................. 4-2
Cowling and panels, removing and installing .............. 8-10DDrive chain ..................................................................... 5-5
Drive chain, lubricating ................................................ 8-37 Drive chain slack .......................................................... 8-35
EEngine break-in .............................................................. 6-4
Engine oil ....................................................................... 5-4
Engine oil and oil filter element .................................... 8-14
Engine, start ................................................................... 6-1
Engine stop switch ......................................................... 4-3
Engine trouble warning light .......................................... 4-3FFuel ........................................................................ 4-9, 5-4
Fuel level warning light ................................................... 4-3
Fuel tank cap ................................................................. 4-8
Fuse, replacing ............................................................. 8-45HHandlebar position, adjusting ...................................... 4-24
Handlebar switches ....................................................... 4-3
Headlight beam, adjusting ........................................... 8-48
Headlight bulb, replacing ............................................. 8-45IIdentification numbers ................................................. 11-1
Indicator light and warning lights ................................... 4-2
Instruments, lights and switches ................................... 5-8LLabel locations ............................................................... 1-1
Light switch .................................................................... 4-4MMain switch .................................................................... 4-1
Maintenance and lubrication chart ................................ 8-5
Maintenance chart, emission control system ................ 8-3
U1TD61E0.book Page 1 Tuesday, July 8, 2014 11:30 AM