parking brake YAMAHA YFZ450R 2013 User Guide
[x] Cancel search | Manufacturer: YAMAHA, Model Year: 2013, Model line: YFZ450R, Model: YAMAHA YFZ450R 2013Pages: 156, PDF Size: 3.75 MB
Page 81 of 156
7-16
7
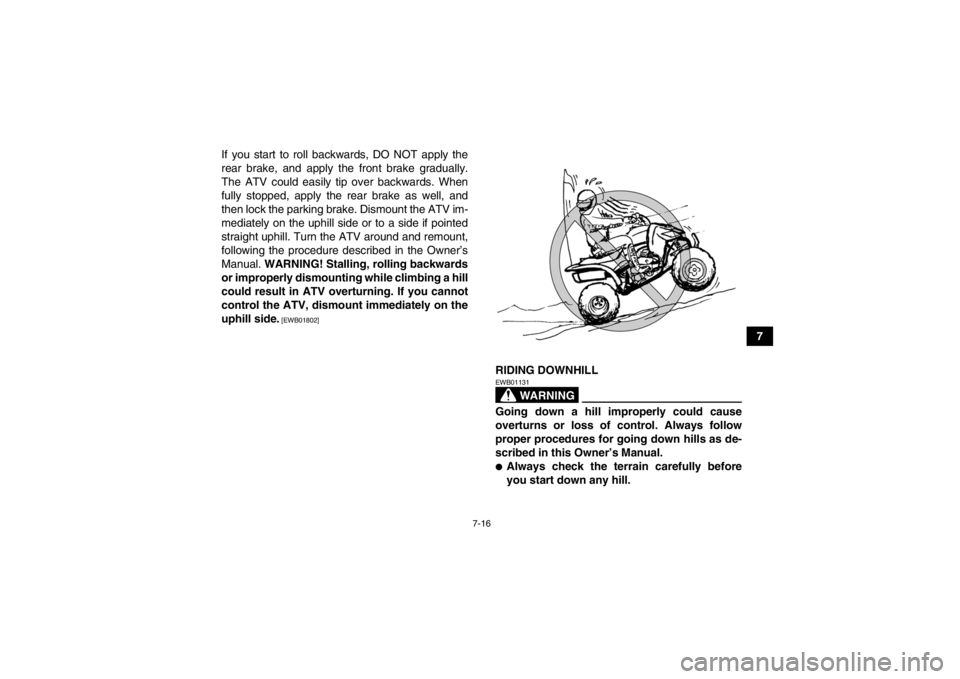
If you start to roll backwards, DO NOT apply the
rear brake, and apply the front brake gradually.
The ATV could easily tip over backwards. When
fully stopped, apply the rear brake as well, and
then lock the parking brake. Dismount the ATV im-
mediately on the uphill side or to a side if pointed
straight uphill. Turn the ATV around and remount,
following the procedure described in the Owner’s
Manual.
WARNING! Stalling, rolling backwards
or improperly dismounting while climbing a hill
could result in ATV overturning. If you cannot
control the ATV, dismount immediately on the
uphill side.
[EWB01802]
RIDING DOWNHILL
WARNING
EWB01131Going down a hill improperly could cause
overturns or loss of control. Always follow
proper procedures for going down hills as de-
scribed in this Owner’s Manual.●Always check the terrain carefully before
you start down any hill.
U18P67E0.book Page 16 Wednesday, May 9, 2012 3:30 PM
Page 94 of 156
8-6
8
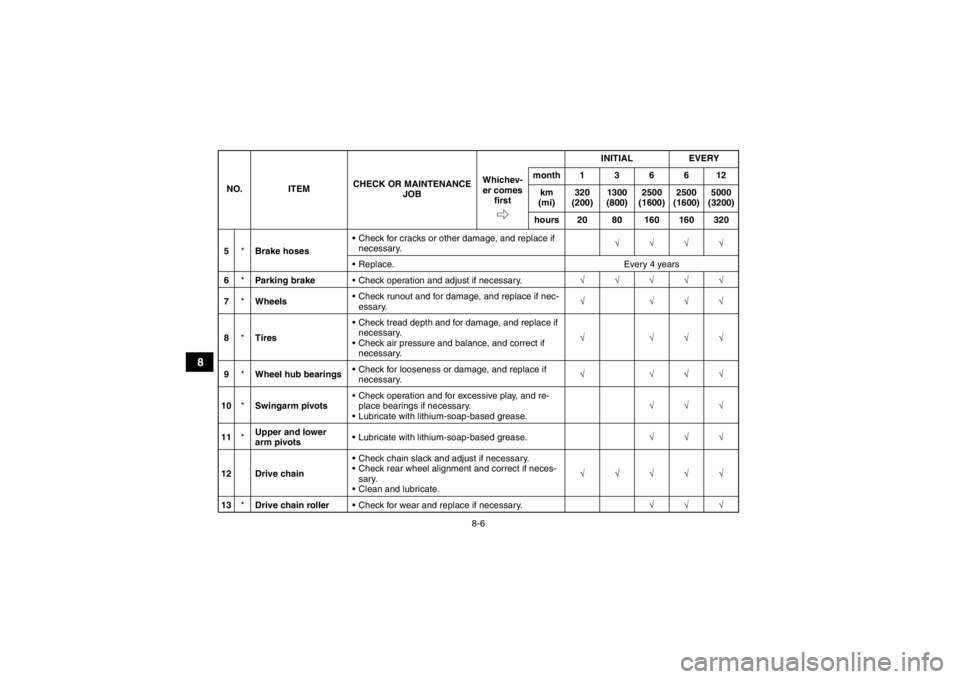
5*Brake hoses Check for cracks or other damage, and replace if
necessary. √√√√
Replace. Every 4 years
6 *Parking brake Check operation and adjust if necessary. √√√√√
7 *Wheels Check runout and for damage, and replace if nec-
essary. √ √√√
8 *Tires Check tread depth and for damage, and replace if
necessary.
Check air pressure and balance, and correct if necessary. √ √√√
9 *Wheel hub bearings Check for looseness or damage, and replace if
necessary. √ √√√
10 *Swingarm pivots Check operation and for excessive play, and re-
place bearings if necessary.
Lubricate with lithium-soap-based grease. √√√
11 *Upper and lower
arm pivots
Lubricate with lithium-soap-based grease.
√√√
12 Drive chain Check chain slack and adjust if necessary.
Check rear wheel alignment and correct if neces-
sary.
Clean and lubricate. √√√√√
13 *Drive chain roller Check for wear and replace if necessary. √√√
NO. ITEM
CHECK OR MAINTENANCE
JOB INITIAL EVERY
Whichev- er comes first month136612
km
(mi) 320
(200) 1300
(800) 2500
(1600) 2500
(1600) 5000
(3200)
hours 20 80 160 160 320U18P67E0.book Page 6 Wednesday, May 9, 2012 3:30 PM
Page 122 of 156
8-34
8
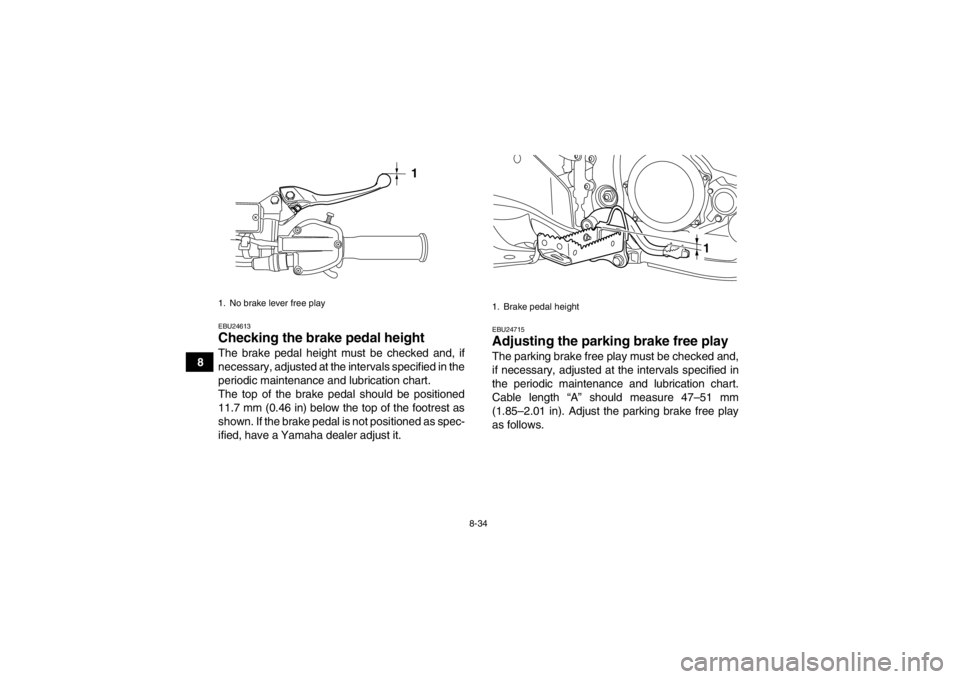
EBU24613Checking the brake pedal height The brake pedal height must be checked and, if
necessary, adjusted at the intervals specified in the
periodic maintenance and lubrication chart.
The top of the brake pedal should be positioned
11.7 mm (0.46 in) below the top of the footrest as
shown. If the brake pedal is not positioned as spec-
ified, have a Yamaha dealer adjust it.
EBU24715Adjusting the parking brake free play The parking brake free play must be checked and,
if necessary, adjusted at the intervals specified in
the periodic maintenance and lubrication chart.
Cable length “A” should measure 47–51 mm
(1.85–2.01 in). Adjust the parking brake free play
as follows.
1. No brake lever free play
1
1. Brake pedal height
1
U18P67E0.book Page 34 Wednesday, May 9, 2012 3:30 PM
Page 123 of 156
8-35
8
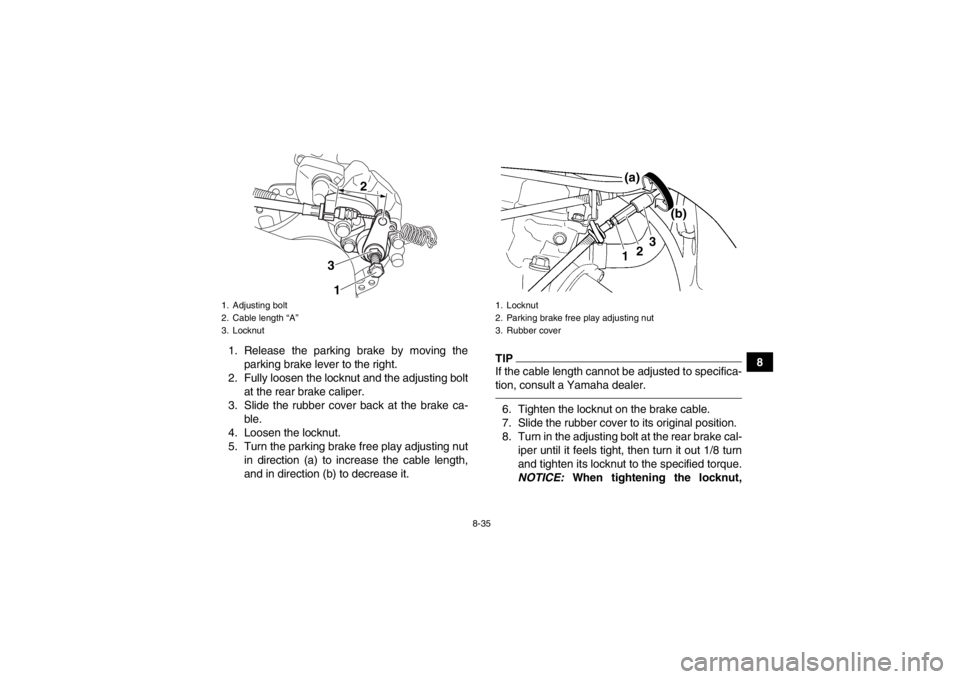
1. Release the parking brake by moving the
parking brake lever to the right.
2. Fully loosen the locknut and the adjusting bolt at the rear brake caliper.
3. Slide the rubber cover back at the brake ca- ble.
4. Loosen the locknut.
5. Turn the parking brake free play adjusting nut in direction (a) to increase the cable length,
and in direction (b) to decrease it.
TIPIf the cable length cannot be adjusted to specifica-
tion, consult a Yamaha dealer.6. Tighten the locknut on the brake cable.
7. Slide the rubber cover to its original position.
8. Turn in the adjusting bolt at the rear brake cal-iper until it feels tight, then turn it out 1/8 turn
and tighten its locknut to the specified torque.
NOTICE: When tightening the locknut,
1. Adjusting bolt
2. Cable length “A”
3. Locknut
1
2
3
1. Locknut
2. Parking brake free play adjusting nut
3. Rubber cover
(a)
(b)
1
2
3
U18P67E0.book Page 35 Wednesday, May 9, 2012 3:30 PM
Page 124 of 156
8-36
8hold the adjusting bolt with a wrench so
that it does not turn together with the lock-
nut.
[ECB00521]
WARNING
EWB02090Operating with improperly serviced or adjust-
ed brakes could cause the brakes to malfunc-
tion, resulting in reduced braking
performance. This could increase the chance
of a collision or accident. After adjusting the
parking brake free play, block the rear of the
ATV off the ground and spin the rear wheels.
Check to make sure there is no brake drag. If
brake drag is noticed, perform the adjustment
again.EBU24743Brake light switches The brake light, which is activated by the brake
pedal and brake lever, should come on just before
braking takes effect. The brake light switch for the brake pedal can be
adjusted as follows, but the front brake light switch
should be adjusted by a Yamaha dealer.
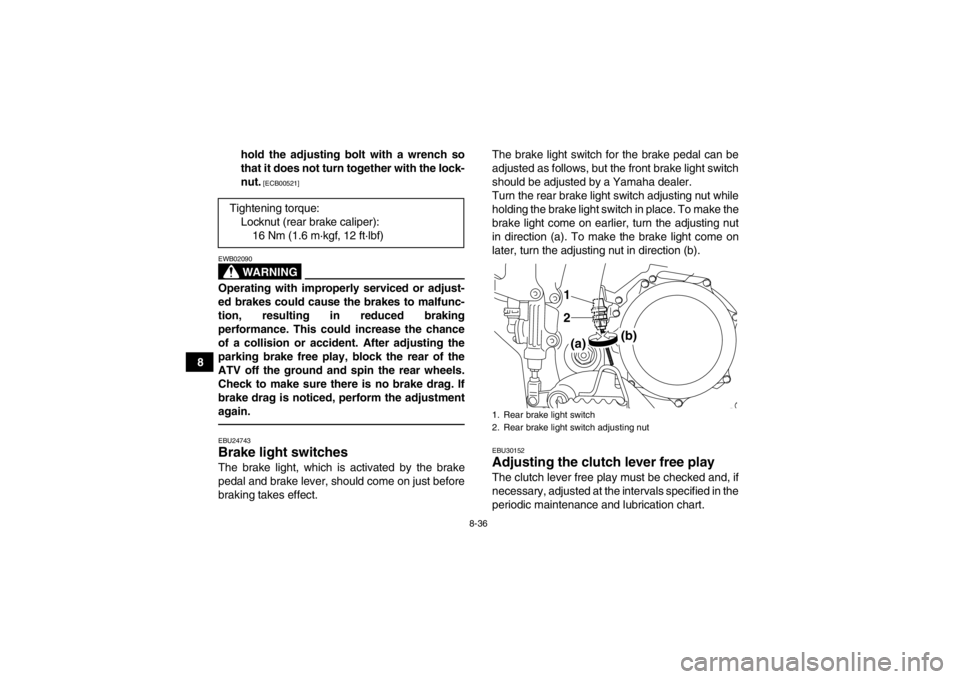
Turn the rear brake light switch adjusting nut while
holding the brake light switch in place. To make the
brake light come on earlier, turn the adjusting nut
in direction (a). To make the brake light come on
later, turn the adjusting nut in direction (b).
EBU30152Adjusting the clutch lever free play The clutch lever free play must be checked and, if
necessary, adjusted at the intervals specified in the
periodic maintenance and lubrication chart.
Tightening torque:
Locknut (rear brake caliper):16 Nm (1.6 m·kgf, 12 ft·lbf)1. Rear brake light switch
2. Rear brake light switch adjusting nut
1
2(a) (b)
U18P67E0.book Page 36 Wednesday, May 9, 2012 3:30 PM
Page 154 of 156
Maintenance and lubrication chart ................................. 8-5
Maintenance chart, emission control system ................. 8-3
Model label ................................................................... 11-1NNeutral indicator light ..................................................... 4-2OOwner’s manual and tool kit ........................................... 8-2PParking ........................................................................... 6-4
Parking brake free play, adjusting ................................ 8-34
Parking brake lever ........................................................ 4-7
Parking on a slope ......................................................... 6-5
Part locations ................................................................. 3-1RRiding your ATV ............................................................. 7-1SSafety information .......................................................... 2-1
Seat .............................................................................. 4-10
Shifting ........................................................................... 6-2
Shift pedal ...................................................................... 4-8
Shift pedal, checking .................................................... 8-42
Shock absorber assemblies, adjusting the front .......... 4-11
Shock absorber assembly, adjusting the rear .............. 4-16
Spark arrester, cleaning ............................................... 8-27
Spark plug, checking .................................................... 8-15
Specifications ............................................................... 10-1
Speed limiter .................................................................. 4-5
Start switch ..................................................................... 4-4
Steering shaft, lubricating ............................................. 8-44
Storage ........................................................................... 9-2
Suspension, lubricating the upper and lower arm pivots .......................................................................... 8-43 Swingarm pivots, lubricating ........................................ 8-43
TTail/brake light .............................................................. 8-50
Throttle lever ........................................................... 4-4, 5-5
Throttle lever free play, adjusting ................................. 8-29
Tires ............................................................................... 5-5
Troubleshooting ........................................................... 8-52
Troubleshooting charts ................................................. 8-53VValve clearance ............................................................ 8-30
Vehicle identification number ....................................... 11-1WWheel hub bearings, checking ..................................... 8-42
Wheel, installing ........................................................... 8-51
Wheel, removing .......................................................... 8-50
U18P67E0.book Page 2 Wednesday, May 9, 2012 3:30 PM