clutch YAMAHA YFZ450R 2016 Owners Manual
[x] Cancel search | Manufacturer: YAMAHA, Model Year: 2016, Model line: YFZ450R, Model: YAMAHA YFZ450R 2016Pages: 154, PDF Size: 3.8 MB
Page 8 of 154

EBU17421
TABLE OF CONTENTS
LOCATION OF THE WARNING AND
SPECIFICATION LABELS .............................. 1-1
SAFETY INFORMATION ................................ 2-1
DESCRIPTION................................................ 3-1Left view ...................................................... 3-1
Right view.................................................... 3-2
Controls and instruments............................ 3-2
INSTRUMENT AND CONTROL
FUNCTIONS ................................................... 4-1 Main switch ................................................. 4-1
Indicator light and warning lights ................ 4-2
Handlebar switches .................................... 4-3
Throttle lever ............................................... 4-4
Speed limiter ............................................... 4-5
Clutch lever ................................................. 4-5
Brake lever .................................................. 4-6
Brake pedal ................................................. 4-6
Parking brake lever ..................................... 4-7
Shift pedal ................................................... 4-8
Fuel tank cap............................................... 4-8
Fuel ............................................................. 4-9 Seat .......................................................... 4-10
Adjusting the front shock absorber
assemblies .............................................. 4-11
Adjusting the rear shock absorber assembly ................................................ 4-16
Handlebar position ................................... 4-24
PRE-OPERATION CHECKS .......................... 5-1 Fuel ............................................................. 5-4
Engine oil .................................................... 5-4
Coolant ....................................................... 5-4
Front and rear brakes ................................. 5-4
Throttle lever ............................................... 5-5
Drive chain .................................................. 5-5
Tires ............................................................ 5-5
Chassis fasteners ....................................... 5-7
Instruments, lights and switches ................ 5-8
OPERATION .................................................. 6-1 Starting the engine ..................................... 6-1
Shifting........................................................ 6-2
Engine break-in........................................... 6-4
Parking........................................................ 6-4
Parking on a slope ...................................... 6-5U1TD62E0.book Page 1 Monday, May 18, 2015 9:20 AM
Page 9 of 154

Accessories and loading ............................. 6-5
RIDING YOUR ATV ........................................ 7-1 GETTING TO KNOW YOUR ATV ................ 7-2
RIDE WITH CARE AND GOOD JUDGMENT .............................................. 7-2
BE CAREFUL WHERE YOU RIDE ............... 7-8
TURNING YOUR ATV................................ 7-11
CLIMBING UPHILL ................................... 7-13
RIDING DOWNHILL .................................. 7-16
CROSSING A SLOPE................................ 7-17
CROSSING THROUGH SHALLOW WATER .................................................... 7-18
RIDING OVER ROUGH TERRAIN ............. 7-20
SLIDING AND SKIDDING.......................... 7-20
WHAT TO DO IF... ..................................... 7-21
WHAT TO DO... ......................................... 7-22
PERIODIC MAINTENANCE AND
ADJUSTMENT................................................ 8-1 Owner’s manual and tool kit ....................... 8-2
Periodic maintenance chart for the emission control system ........................... 8-3
General maintenance and lubrication chart .......................................................... 8-5
Removing and installing the cowling and panels...................................................... 8-10 Checking the spark plug........................... 8-13
Engine oil and oil filter element................. 8-14
Coolant ..................................................... 8-20
Cleaning the air filter element ................... 8-21
Cleaning the spark arrester ...................... 8-25
Adjusting the throttle lever free play ......... 8-27
Valve clearance......................................... 8-28
Brakes....................................................... 8-28
Checking the front and rear brake pads... 8-28
Checking the brake fluid level .................. 8-29
Changing the brake fluid .......................... 8-31
Checking the front brake lever free play... 8-31
Checking the brake pedal height.............. 8-32
Adjusting the parking brake free play ....... 8-32
Brake light switches ................................. 8-33
Adjusting the clutch lever free play .......... 8-34
Drive chain slack....................................... 8-35
Lubricating the drive chain ....................... 8-37
Checking and lubricating the cables ........ 8-38
Checking and lubricating the brake and
clutch levers ........................................... 8-39
Checking the shift pedal ........................... 8-39
Checking and lubricating the brake pedal ....................................................... 8-39
Checking the wheel hub bearings ............ 8-40
Lubricating the swingarm pivots .............. 8-40
U1TD62E0.book Page 2 Monday, May 18, 2015 9:20 AM
Page 28 of 154
3-2
3
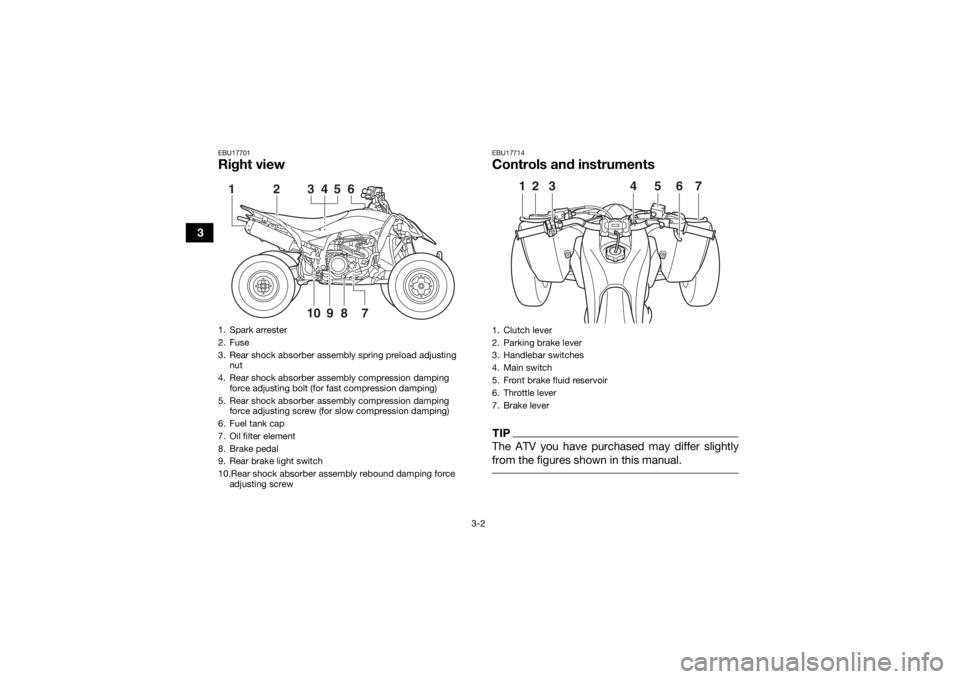
EBU17701Right view
EBU17714Controls and instrumentsTIPThe ATV you have purchased may differ slightly
from the figures shown in this manual.
1. Spark arrester
2. Fuse
3. Rear shock absorber assembly spring preload adjusting nut
4. Rear shock absorber assembly compression damping force adjusting bolt (for fast compression damping)
5. Rear shock absorber assembly compression damping force adjusting screw (for slow compression damping)
6. Fuel tank cap
7. Oil filter element
8. Brake pedal
9. Rear brake light switch
10.Rear shock absorber assembly rebound damping force adjusting screw
789
1
2
3
4
5
10
6
1. Clutch lever
2. Parking brake lever
3. Handlebar switches
4. Main switch
5. Front brake fluid reservoir
6. Throttle lever
7. Brake lever
2
1
3
6
5
4
7
U1TD62E0.book Page 2 Monday, May 18, 2015 9:20 AM
Page 33 of 154
4-5
4
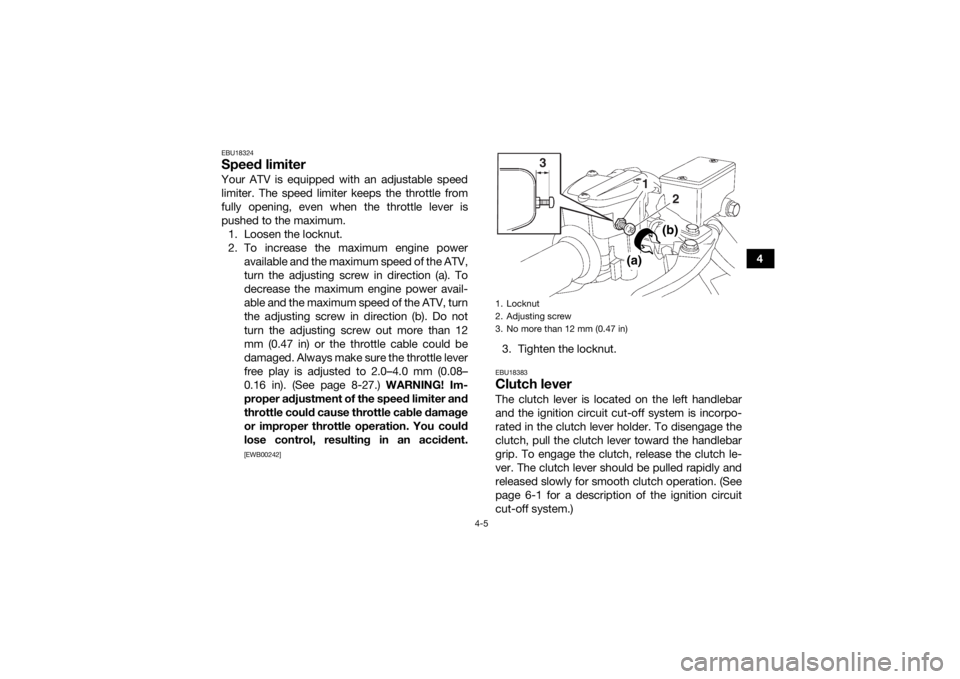
EBU18324Speed limiterYour ATV is equipped with an adjustable speed
limiter. The speed limiter keeps the throttle from
fully opening, even when the throttle lever is
pushed to the maximum.1. Loosen the locknut.
2. To increase the maximum engine power available and the maximum speed of the ATV,
turn the adjusting screw in direction (a). To
decrease the maximum engine power avail-
able and the maximum speed of the ATV, turn
the adjusting screw in direction (b). Do not
turn the adjusting screw out more than 12
mm (0.47 in) or the throttle cable could be
damaged. Always make sure the throttle lever
free play is adjusted to 2.0–4.0 mm (0.08–
0.16 in). (See page 8-27.) WARNING! Im-
proper adjustment of the speed limiter and
throttle could cause throttle cable damage
or improper throttle operation. You could
lose control, resulting in an accident.
[EWB00242]
3. Tighten the locknut.EBU18383Clutch leverThe clutch lever is located on the left handlebar
and the ignition circuit cut-off system is incorpo-
rated in the clutch lever holder. To disengage the
clutch, pull the clutch lever toward the handlebar
grip. To engage the clutch, release the clutch le-
ver. The clutch lever should be pulled rapidly and
released slowly for smooth clutch operation. (See
page 6-1 for a description of the ignition circuit
cut-off system.)1. Locknut
2. Adjusting screw
3. No more than 12 mm (0.47 in)
3
12
(a)
(b)
U1TD62E0.book Page 5 Monday, May 18, 2015 9:20 AM
Page 34 of 154
4-6
4
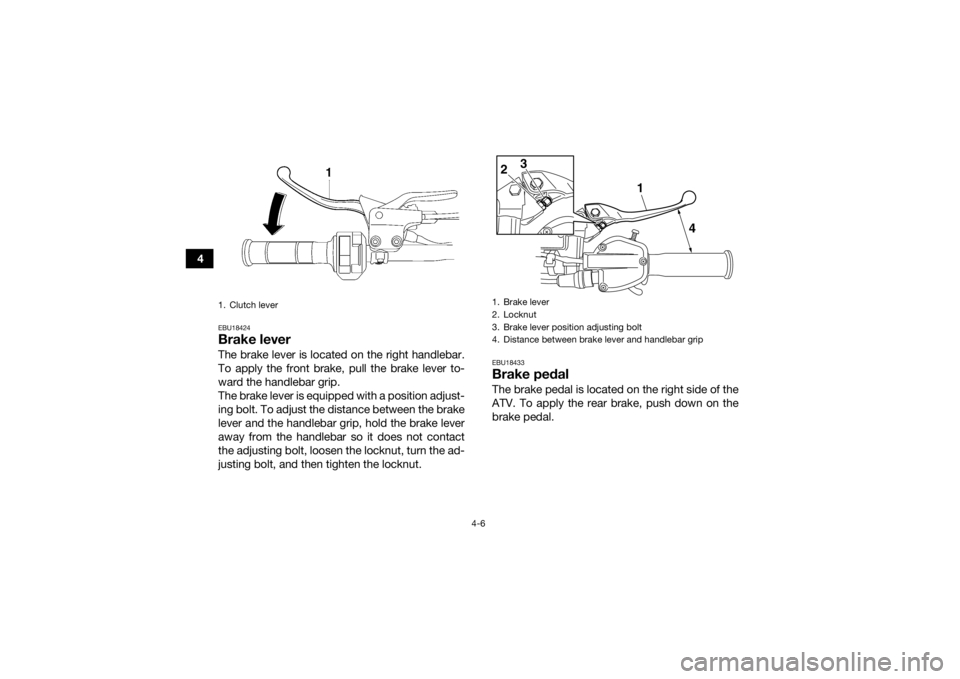
EBU18424Brake leverThe brake lever is located on the right handlebar.
To apply the front brake, pull the brake lever to-
ward the handlebar grip.
The brake lever is equipped with a position adjust-
ing bolt. To adjust the distance between the brake
lever and the handlebar grip, hold the brake lever
away from the handlebar so it does not contact
the adjusting bolt, loosen the locknut, turn the ad-
justing bolt, and then tighten the locknut.
EBU18433Brake pedalThe brake pedal is located on the right side of the
ATV. To apply the rear brake, push down on the
brake pedal.
1. Clutch lever
1. Brake lever
2. Locknut
3. Brake lever position adjusting bolt
4. Distance between brake lever and handlebar grip
14
23
U1TD62E0.book Page 6 Monday, May 18, 2015 9:20 AM
Page 36 of 154
4-8
4
WARNING
EWB00221Always set the parking brake before starting
the engine. The ATV could start moving un-
expectedly if the parking brake is not ap-
plied. This could cause loss of control or a
collision.
Always be sure you have released the park-
ing brake before you begin to ride. The brake
could overheat if you ride the ATV without re-
leasing the parking brake. You could lose
braking performance which could cause an
accident. You could also wear out the brakes
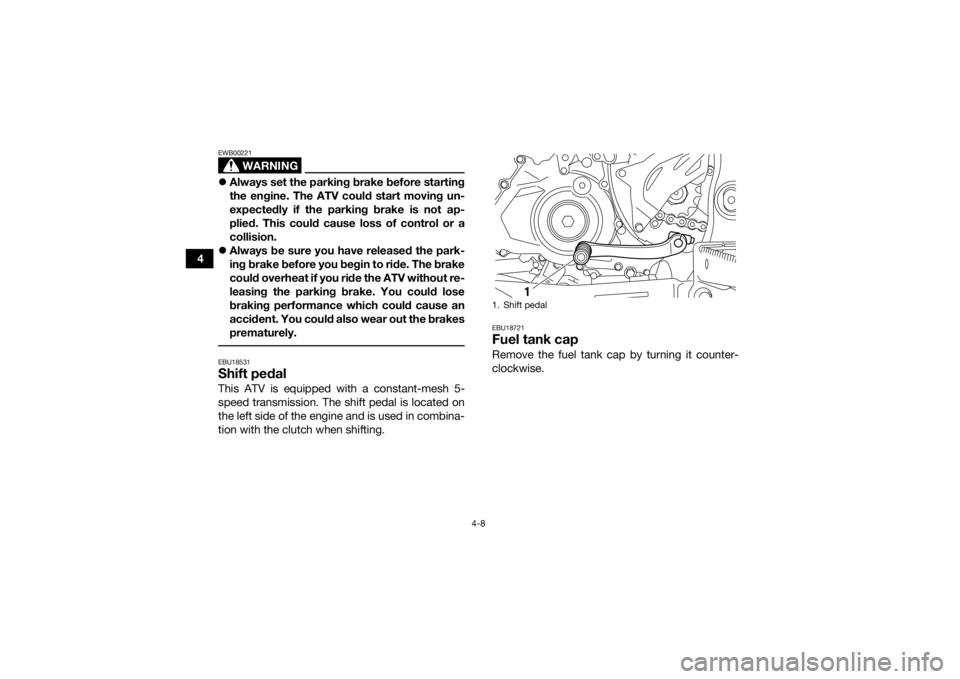
prematurely. EBU18531Shift pedalThis ATV is equipped with a constant-mesh 5-
speed transmission. The shift pedal is located on
the left side of the engine and is used in combina-
tion with the clutch when shifting.
EBU18721Fuel tank capRemove the fuel tank cap by turning it counter-
clockwise.1. Shift pedal
1
U1TD62E0.book Page 8 Monday, May 18, 2015 9:20 AM
Page 54 of 154

5-2
5
Front brake• Check operation. If soft or spongy, have Yamaha dealer bleed hy-
draulic system.
• Check brake pads for wear, and replace if necessary.
• Check brake fluid level in reservoir, and add specified brake fluid to specified level if necessary.
• Check hydraulic system for leakage. Correct if necessary. 5-4, 8-28, 8-29, 8-31
Rear brake • Check operation. If soft or spongy, have Yamaha dealer bleed hy-
draulic system.
• Check brake pads for wear, and replace if necessary.
• Check brake fluid level in reservoir, and add specified brake fluid to specified level if necessary.
• Check hydraulic system for leakage. Correct if necessary. 5-4, 8-28, 8-29, 8-32
Clutch • Check operation, and correct if necessary.
• Lubricate cable if necessary.
• Check lever free play, and adjust if necessary. 8-34
Throttle lever • Make sure that operation is smooth. Lubricate cable and lever
housing if necessary.
• Check lever free play, and adjust if necessary. 5-5, 8-27
Control cables • Make sure that operation is smooth. Lubricate if necessary. 8-38
Drive chain • Check chain slack, and adjust if necessary.
• Check chain condition. Lubricate if necessary. 5-5, 8-35, 8-37
Wheels and tires • Check wheel condition, and replace if damaged.
• Check tire condition and tread depth. Replace if necessary.
• Check air pressure. Correct if necessary. 5-5
Shift pedal • Make sure that operation is smooth.
• Correct if necessary.
8-39
Brake pedal • Make sure that operation is smooth. Lubricate pedal pivoting point
if necessary. 8-39
ITEM ROUTINE PAGEU1TD62E0.book Page 2 Monday, May 18, 2015 9:20 AM
Page 55 of 154

5-3
5
Brake and clutch levers• Make sure that operation is smooth. Lubricate lever pivoting points
if necessary. 8-39
Chassis fasteners • Make sure that all nuts, bolts and screws are properly tightened. 5-7
Instruments, lights and
switches • Check operation, and correct if necessary. 5-8
ITEM ROUTINE PAGE
U1TD62E0.book Page 3 Monday, May 18, 2015 9:20 AM
Page 61 of 154
6-1
6
EBU19882
OPERATION
EBU19902Read the Owner’s Manual carefully before riding
the ATV. If there is a control or function you do not
understand, ask your Yamaha dealer.
WARNING
EWB00632Read the Owner’s Manual carefully to become
familiar with all controls in order to help pre-
vent any loss of control, which could cause an
accident or injury. EBU29953Starting the engineNOTICEECB00151See the “Engine break-in” section on page 6-4
prior to operating the engine for the first time. 1. Set the parking brake.
2. Turn the key to “ ” (on) and the engine stopswitch to “ ”.
The following warning lights should come on
for a few seconds, then go off.
Coolant temperature warning light
Fuel level warning light
Engine trouble warning light
NOTICEECB00825If a warning light does not go off, see page 4-2
for the corresponding warning light circuit
check. To avoid possible damage, do not oper-
ate the ATV if a warning light stays on. 3. Shift the transmission into neutral. The neutral
indicator light should come on, if it does not
come on, have a Yamaha dealer check the
electrical circuit.TIPThis model is equipped with an ignition circuit cut-
off system. The engine can be started under the
following conditions.
The transmission is in neutral.
The clutch is disengaged with the transmission
in gear. However, it is recommended to shift
into neutral before starting the engine.
U1TD62E0.book Page 1 Monday, May 18, 2015 9:20 AM
Page 62 of 154
6-2
64. Completely close the throttle lever and start
the engine by pushing the start switch.
TIPIf the engine fails to start, release the start switch,
then push it again. Pause a few seconds before
the next attempt. Each cranking should be as
short as possible to preserve battery energy. Do
not crank the engine more than 10 seconds on
each attempt. NOTICEECB00164For maximum engine life, never accelerate
hard when the engine is cold! EBU20525ShiftingThis ATV has a 5-speed forward transmission. The
transmission allows you to control the amount of
power you have available at a given speed or for
starting, accelerating, climbing hills, etc.
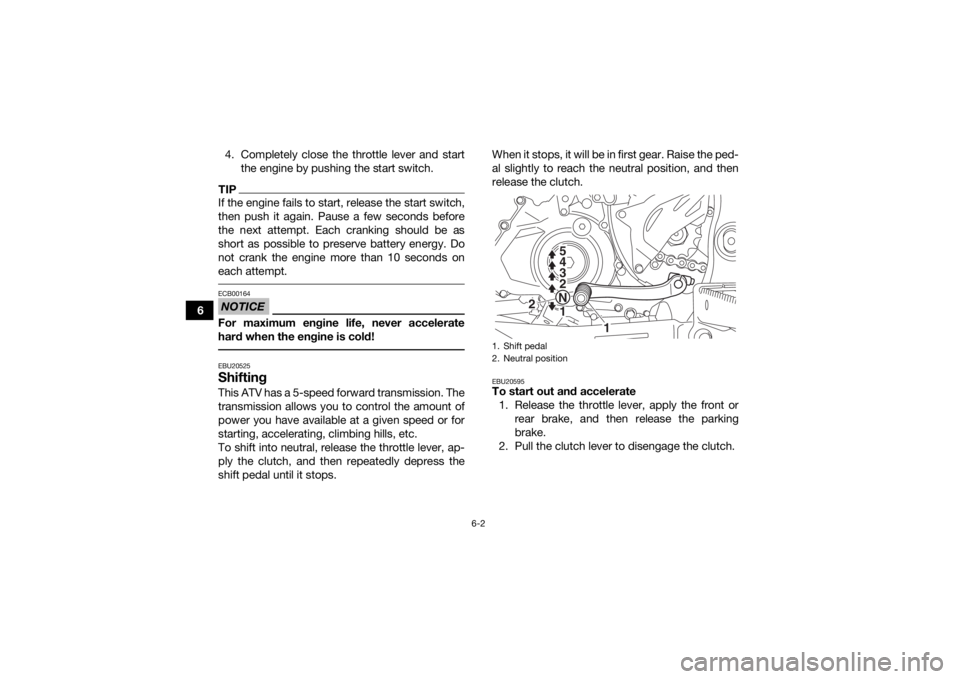
To shift into neutral, release the throttle lever, ap-
ply the clutch, and then repeatedly depress the
shift pedal until it stops. When it stops, it will be in first gear. Raise the ped-
al slightly to reach the neutral position, and then
release the clutch.
EBU20595To start out and accelerate
1. Release the throttle lever, apply the front or rear brake, and then release the parking
brake.
2. Pull the clutch lever to disengage the clutch.1. Shift pedal
2. Neutral position
1
1
N
2 3
4
5
2
U1TD62E0.book Page 2 Monday, May 18, 2015 9:20 AM