carburetor YAMAHA YFZ50 2020 Owners Manual
[x] Cancel search | Manufacturer: YAMAHA, Model Year: 2020, Model line: YFZ50, Model: YAMAHA YFZ50 2020Pages: 126, PDF Size: 5.44 MB
Page 10 of 126

RIDING YOUR ATV ........................................ 7-1GETTING TO KNOW YOUR ATV ................ 7-2
RIDE WITH CARE AND GOOD JUDGMENT .............................................. 7-2
BE CAREFUL WHERE YOU RIDE ............... 7-9
TURNING YOUR ATV................................ 7-12
CLIMBING UPHILL ................................... 7-13
RIDING DOWNHILL .................................. 7-16
CROSSING A SLOPE................................ 7-17
CROSSING THROUGH SHALLOW WATER .................................................... 7-18
RIDING OVER ROUGH TERRAIN ............. 7-20
SLIDING AND SKIDDING .......................... 7-20
WHAT TO DO IF... ..................................... 7-21
WHAT TO DO... ......................................... 7-22
PERIODIC MAINTENANCE AND
ADJUSTMENT................................................ 8-1 Owner’s Manual and tool kit ....................... 8-2
Periodic maintenance chart: Emission control system .......................................... 8-3
Periodic maintenance chart: General maintenance and lubrication..................... 8-5
Removing and installing the panel .............. 8-9
Checking the spark plug ............................. 8-9
Engine oil................................................... 8-11
Why Yamalube .......................................... 8-14 Transmission oil ........................................ 8-15
Cleaning the air filter element ................... 8-16
Cleaning the spark arrester ...................... 8-19
Adjusting the carburetor ........................... 8-20
Adjusting the engine idling speed ............ 8-20
Adjusting the throttle lever free play ......... 8-22
Valve clearance......................................... 8-22
Brakes....................................................... 8-22
Checking the front and rear brake
shoes ...................................................... 8-23
Adjusting the front brake lever free play... 8-24
Adjusting the rear brake lever free play .... 8-26
Drive chain slack....................................... 8-26
Cleaning and lubricating the drive chain ....................................................... 8-29
Checking and lubricating the cables ........ 8-29
Checking and lubricating the front and rear brake levers ..................................... 8-30
Checking the wheel hub bearings ............ 8-30
Lubricating the front arm pivots ............... 8-31
Lubricating the front knuckle pivots ......... 8-31
Lubricating the steering shaft ................... 8-32
Battery ...................................................... 8-32
Replacing the fuse .................................... 8-35
Removing a wheel .................................... 8-36
Installing a wheel ...................................... 8-36
Troubleshooting........................................ 8-37UBW463E0.book Page 2 Monday, January 28, 2019 10:22 AM
Page 25 of 126

2-8
2
WARNING
EWB00073Avoid Carbon Monoxide Poisoning
All engine exhaust contains carbon monoxide,
a deadly gas. Breathing carbon monoxide can
cause headaches, dizziness, drowsiness, nau-
sea, confusion, and eventually death.
Carbon Monoxide is a colorless, odorless,
tasteless gas which may be present even if you
do not see or smell any engine exhaust. Deadly
levels of carbon monoxide can collect rapidly
and you can quickly be overcome and unable
to save yourself. Also, deadly levels of carbon
monoxide can linger for hours or days in en-
closed or poorly ventilated areas. If you experi-
ence any symptoms of carbon monoxide
poisoning, leave the area immediately, get
fresh air, and SEEK MEDICAL TREATMENT.
Do not run engine indoors. Even if you try to
ventilate engine exhaust with fans or open
windows and doors, carbon monoxide can
rapidly reach dangerous levels.
Do not run engine in poorly ventilated or par-
tially enclosed areas such as barns, garages,
or carports.
Do not run engine outdoors where engine
exhaust can be drawn into a building through
openings such as windows and doors.
WARNING
EWB02592When transporting the ATV in another vehicle,
be sure it is kept upright and that the fuel cock
is in the “OFF” position. Otherwise, fuel may
leak out of the carburetor or fuel tank.
UBW463E0.book Page 8 Monday, January 28, 2019 10:22 AM
Page 37 of 126
4-10
4
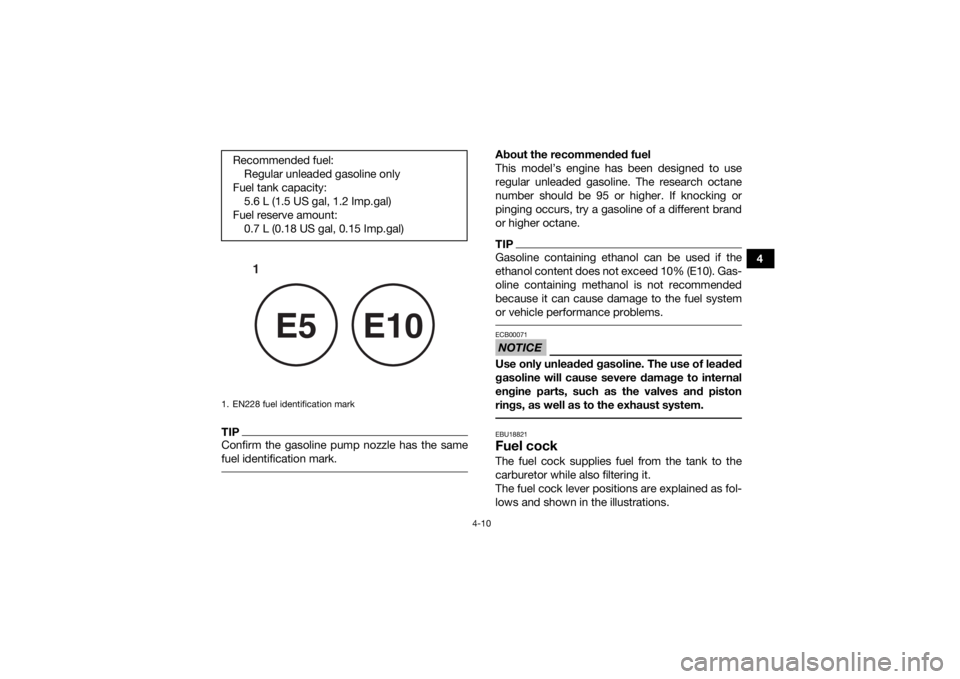
TIPConfirm the gasoline pump nozzle has the same
fuel identification mark.
About the recommended fuel
This model’s engine has been designed to use
regular unleaded gasoline. The research octane
number should be 95 or higher. If knocking or
pinging occurs, try a gasoline of a different brand
or higher octane.TIPGasoline containing ethanol can be used if the
ethanol content does not exceed 10% (E10). Gas-
oline containing methanol is not recommended
because it can cause damage to the fuel system
or vehicle performance problems. NOTICEECB00071Use only unleaded gasoline. The use of leaded
gasoline will cause severe damage to internal
engine parts, such as the valves and piston
rings, as well as to the exhaust system. EBU18821Fuel cockThe fuel cock supplies fuel from the tank to the
carburetor while also filtering it.
The fuel cock lever positions are explained as fol-
lows and shown in the illustrations.
Recommended fuel:
Regular unleaded gasoline only
Fuel tank capacity: 5.6 L (1.5 US gal, 1.2 Imp.gal)
Fuel reserve amount: 0.7 L (0.18 US gal, 0.15 Imp.gal)
1. EN228 fuel identification mark
1
E5
E10
UBW463E0.book Page 10 Monday, January 28, 2019 10:22 AM
Page 38 of 126
4-11
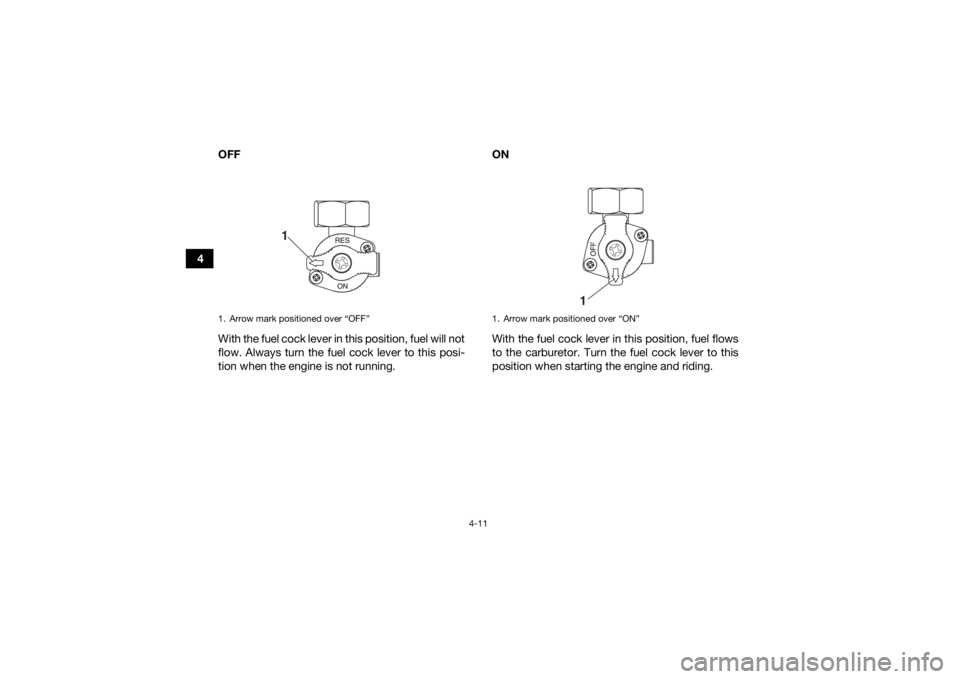
4OFF
With the fuel cock lever in this position, fuel will not
flow. Always turn the fuel cock lever to this posi-
tion when the engine is not running. ON
With the fuel cock lever in this position, fuel flows
to the carburetor. Turn the fuel cock lever to this
position when starting the engine and riding.
1. Arrow mark positioned over “OFF”
1
1. Arrow mark positioned over “ON”
1
UBW463E0.book Page 11 Monday, January 28, 2019 10:22 AM
Page 78 of 126
8-3
8
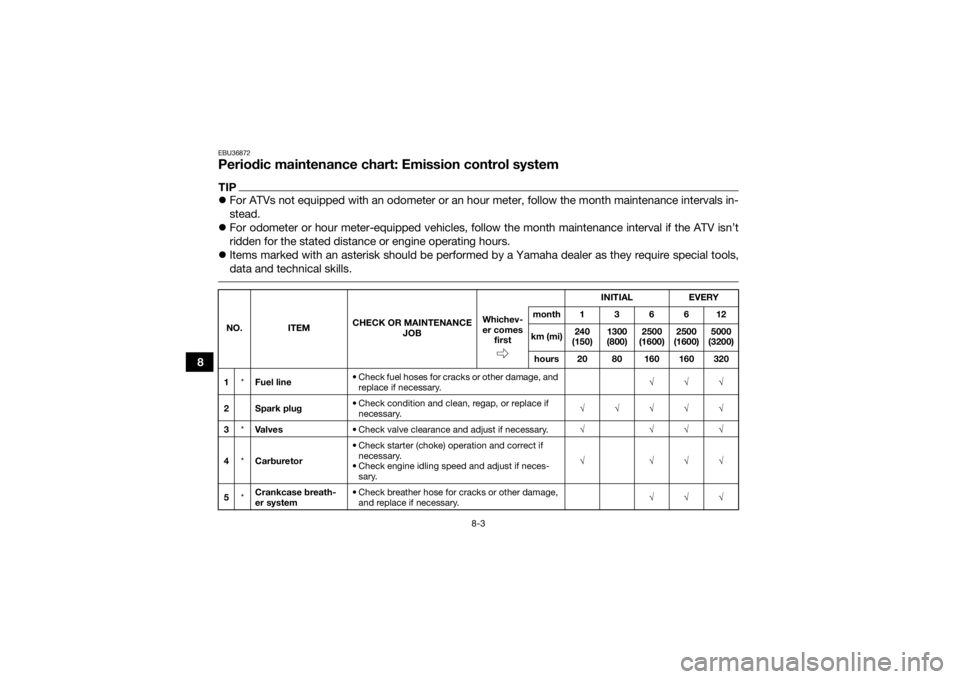
EBU36872Periodic maintenance chart: Emission control systemTIPFor ATVs not equipped with an odometer or an hour meter, follow the month maintenance intervals in-
stead.
For odometer or hour meter-equipped vehicles, follow the month maintenance interval if the ATV isn’t
ridden for the stated distance or engine operating hours.
Items marked with an asterisk should be performed by a Yamaha dealer as they require special tools,
data and technical skills. NO. ITEM CHECK OR MAINTENANCE
JOB INITIAL
EVERY
Whichev-
er comes first month136612
km (mi) 240
(150) 1300
(800) 2500
(1600) 2500
(1600) 5000
(3200)
hours 20 80 160 160 320
1 *Fuel line • Check fuel hoses for cracks or other damage, and
replace if necessary. √√√
2 Spark plug • Check condition and clean, regap, or replace if
necessary. √√√√√
3 *Va l ve s • Check valve clearance and adjust if necessary. √ √√√
4 *Carburetor • Check starter (choke) operation and correct if
necessary.
• Check engine idling speed and adjust if neces- sary. √ √√√
5 *Crankcase breath-
er system • Check breather hose for cracks or other damage,
and replace if necessary. √√√
UBW463E0.book Page 3 Monday, January 28, 2019 10:22 AM
Page 94 of 126
8-19
8ment removed. This will allow unfiltered air
to enter the engine, causing rapid engine
wear and possible engine damage. Addi-
tionally, operation without the air filter ele-
ment will affect carburetor jetting with
subsequent poor performance and possi-
ble engine overheating.
[ECB00462]
10. Install the seat.TIPThe air filter element should be cleaned every 20–
40 hours. It should be cleaned and lubricated
more often if the ATV is operated in extremely dusty areas. When servicing the air filter element,
be sure to check the air inlet of the air filter case
for obstructions.
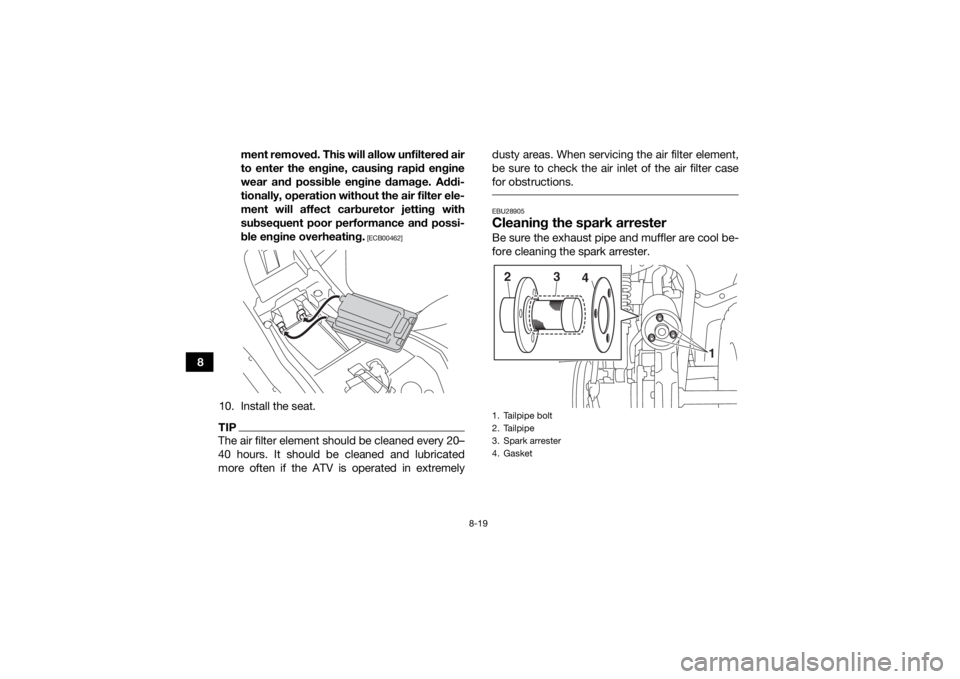
EBU28905Cleaning the spark arresterBe sure the exhaust pipe and muffler are cool be-
fore cleaning the spark arrester.1. Tailpipe bolt
2. Tailpipe
3. Spark arrester
4. Gasket
1
2
3
4
UBW463E0.book Page 19 Monday, January 28, 2019 10:22 AM
Page 95 of 126
8-20
8
WARNING
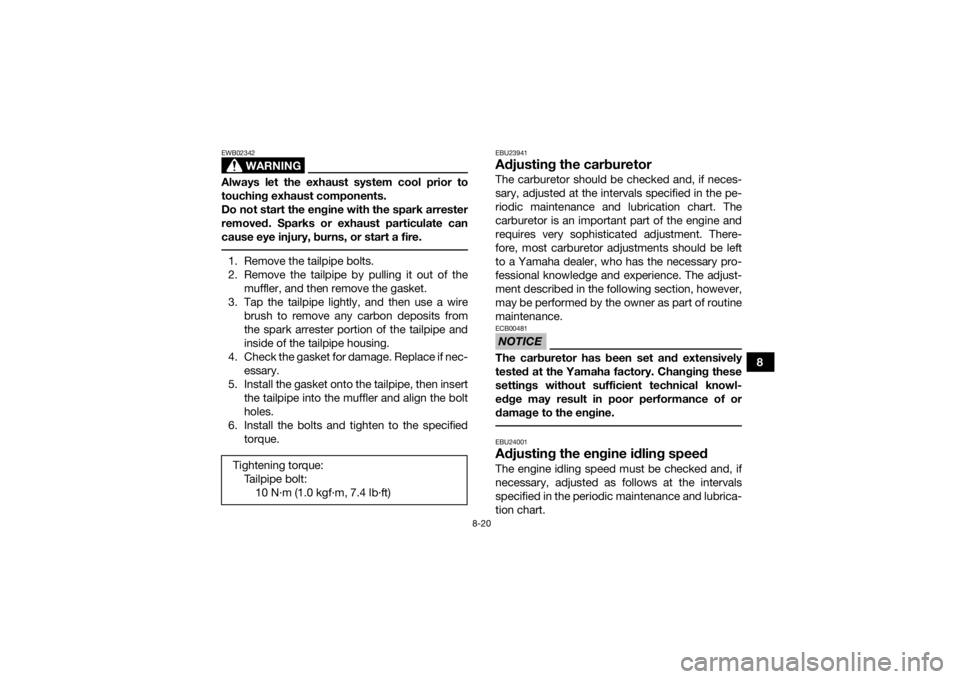
EWB02342Always let the exhaust system cool prior to
touching exhaust components.
Do not start the engine with the spark arrester
removed. Sparks or exhaust particulate can
cause eye injury, burns, or start a fire. 1. Remove the tailpipe bolts.
2. Remove the tailpipe by pulling it out of themuffler, and then remove the gasket.
3. Tap the tailpipe lightly, and then use a wire brush to remove any carbon deposits from
the spark arrester portion of the tailpipe and
inside of the tailpipe housing.
4. Check the gasket for damage. Replace if nec- essary.
5. Install the gasket onto the tailpipe, then insert the tailpipe into the muffler and align the bolt
holes.
6. Install the bolts and tighten to the specified torque.
EBU23941Adjusting the carburetorThe carburetor should be checked and, if neces-
sary, adjusted at the intervals specified in the pe-
riodic maintenance and lubrication chart. The
carburetor is an important part of the engine and
requires very sophisticated adjustment. There-
fore, most carburetor adjustments should be left
to a Yamaha dealer, who has the necessary pro-
fessional knowledge and experience. The adjust-
ment described in the following section, however,
may be performed by the owner as part of routine
maintenance.NOTICEECB00481The carburetor has been set and extensively
tested at the Yamaha factory. Changing these
settings without sufficient technical knowl-
edge may result in poor performance of or
damage to the engine. EBU24001Adjusting the engine idling speedThe engine idling speed must be checked and, if
necessary, adjusted as follows at the intervals
specified in the periodic maintenance and lubrica-
tion chart.
Tightening torque:
Tailpipe bolt:10 N·m (1.0 kgf·m, 7.4 lb·ft)
UBW463E0.book Page 20 Monday, January 28, 2019 10:22 AM
Page 96 of 126
8-21
8
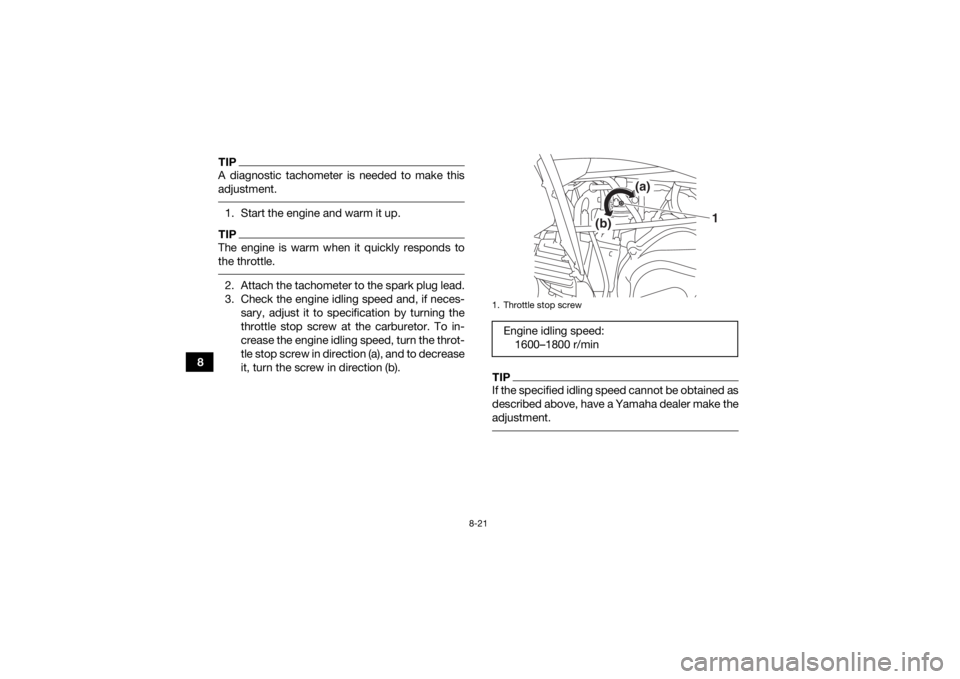
TIPA diagnostic tachometer is needed to make this
adjustment. 1. Start the engine and warm it up.TIPThe engine is warm when it quickly responds to
the throttle. 2. Attach the tachometer to the spark plug lead.
3. Check the engine idling speed and, if neces-sary, adjust it to specification by turning the
throttle stop screw at the carburetor. To in-
crease the engine idling speed, turn the throt-
tle stop screw in direction (a), and to decrease
it, turn the screw in direction (b).
TIPIf the specified idling speed cannot be obtained as
described above, have a Yamaha dealer make the
adjustment. 1. Throttle stop screwEngine idling speed:1600–1800 r/min
(a)
(b)
1
UBW463E0.book Page 21 Monday, January 28, 2019 10:22 AM
Page 115 of 126

9-2
9
abrasives which may mar the paint or protec-
tive finish. When finished cleaning, start the
engine and let it idle for several minutes.
EBU30362StorageShort-term
Always store your ATV in a cool, dry place and, if
necessary, protect it against dust with a porous
cover.
NOTICE: Storing the ATV in a poorly ven-
tilated room or covering it with a tarp while it is
still wet, will allow water and humidity to seep
in and cause rust. To prevent corrosion, avoid
damp cellars, stables (because of the presence
of ammonia) and areas where strong chemi-
cals are stored.
[ECB00722]
Long-term
Before storing your ATV for several months: 1. Make any necessary repairs and perform all outstanding maintenance.
2. Follow all the instructions in the Cleaning sec- tion of this chapter. 3. Fill up the fuel tank and add fuel stabilizer (Fu-
el Med Rx if available), and then run the en-
gine for 5 minutes to distribute the treated
fuel.
4. Turn the fuel cock lever off, and then drain the carburetor float chamber by loosening the
drain bolt. Pour the drained fuel into the fuel
tank.
5. Perform the following steps to protect the en- gine from internal corrosion.a. Remove the spark plug cap and spark plug.
b. Pour a teaspoonful of engine oil into the spark plug bore.
c. Install the spark plug cap onto the spark plug, and then place the spark plug on the
cylinder head so that the electrodes are
grounded. (This will limit sparking during
the next step.)
d. Turn the engine over several times with the starter. (This will coat the cylinder wall
with oil.)
Specified amount:
7.5 ml per liter of fuel (1 oz per gallon)UBW463E0.book Page 2 Monday, January 28, 2019 10:22 AM
Page 118 of 126
10-2
10
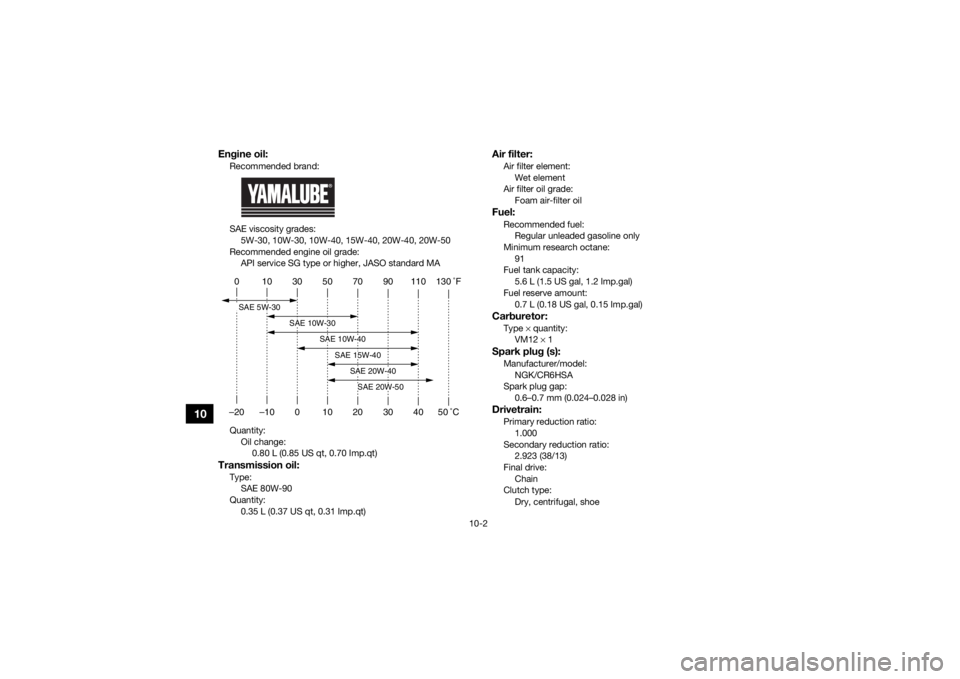
Engine oil:Recommended brand:
SAE viscosity grades:5W-30, 10W-30, 10W-40, 15W-40, 20W-40, 20W-50
Recommended engine oil grade: API service SG type or higher, JASO standard MA
Quantity: Oil change: 0.80 L (0.85 US qt, 0.70 Imp.qt)Transmission oil:Type:SAE 80W-90
Quantity: 0.35 L (0.37 US qt, 0.31 Imp.qt)
Air filter:Air filter element:Wet element
Air filter oil grade:
Foam air-filter oilFuel:Recommended fuel:Regular unleaded gasoline only
Minimum research octane:
91
Fuel tank capacity: 5.6 L (1.5 US gal, 1.2 Imp.gal)
Fuel reserve amount: 0.7 L (0.18 US gal, 0.15 Imp.gal)Carburetor:Type × quantity:
VM12 × 1Spark plug (s):Manufacturer/model:
NGK/CR6HSA
Spark plug gap: 0.6–0.7 mm (0.024–0.028 in)Drivetrain:Primary reduction ratio:
1.000
Secondary reduction ratio: 2.923 (38/13)
Final drive: Chain
Clutch type:
Dry, centrifugal, shoe
0 10 30 50 70 90 110 130 ˚F
–20 –10 0 10 20 30 40 50 ˚CSAE 5W-30
SAE 10W-30
SAE 10W-40
SAE 15W-40
SAE 20W-40SAE 20W-50
UBW463E0.book Page 2 Monday, January 28, 2019 10:22 AM