jump start YAMAHA YXZ1000R 2017 Owners Manual
[x] Cancel search | Manufacturer: YAMAHA, Model Year: 2017, Model line: YXZ1000R, Model: YAMAHA YXZ1000R 2017Pages: 218, PDF Size: 5.08 MB
Page 8 of 218

Checking the spark plugs .................. 8-35
Air filter maintenance.......................... 8-37
Cleaning the air filter case check hoses ................................................ 8-41
Cleaning the spark arrester ................ 8-42
Valve clearance .................................. 8-44
Brakes ................................................ 8-44
Checking the front and rear brake
pads.................................................. 8-44
Checking the parking brake pads ...... 8-45
Checking the brake and YCC-S clutch fluid levels .............................. 8-45
Brake and YCC-S clutch fluid replacement...................................... 8-47
YCC-S clutch ..................................... 8-47
Checking the brake pedal .................. 8-48
Checking the accelerator pedal ......... 8-48
Parking brake lever free play adjustment........................................ 8-49
Brake light switch ............................... 8-50
Cable inspection and lubrication........ 8-50
Pedal lubrication................................. 8-51
Checking the stabilizer bushes .......... 8-51 Upper and lower arm pivot
lubrication (left and right) ..................8-52
Rear knuckle upper and lower pivot lubrication (left and right) ..................8-53
Drive shaft universal joint
lubrication .........................................8-53
Steering shaft lubrication....................8-53
Wheel removal ....................................8-54
Checking and tightening the bead lock (YXZ10YESH) ............................8-54
Tire replacement .................................8-55
Wheel installation................................8-56
Battery ................................................8-56
Jump-starting .....................................8-59
Fuse replacement ...............................8-61
Headlights...........................................8-63
Headlight beam adjustment ...............8-63
Tail/brake light ....................................8-64
Troubleshooting ..................................8-64
Troubleshooting charts .......................8-66
CLEANING AND STORAGE ....................9-1 Cleaning................................................9-1
UB577AE0.book Page 3 Wednesday, June 8, 2016 9:35 AM
Page 195 of 218

8-59
8
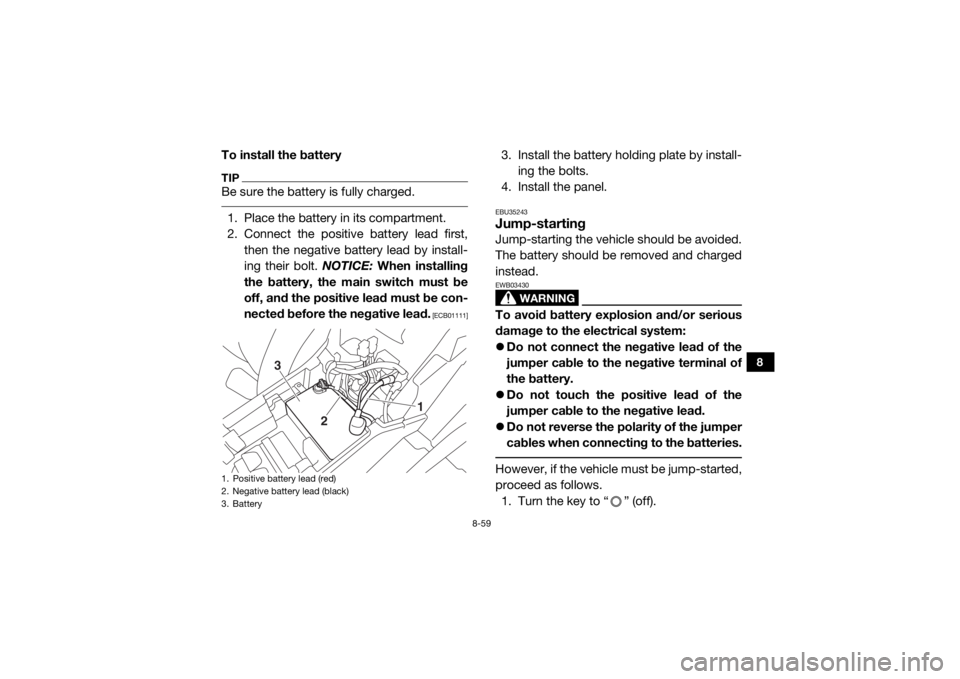
To install the batteryTIPBe sure the battery is fully charged. 1. Place the battery in its compartment.
2. Connect the positive battery lead first,then the negative battery lead by install-
ing their bolt. NOTICE: When installing
the battery, the main switch must be
off, and the positive lead must be con-
nected before the negative lead.
[ECB01111]
3. Install the battery ho lding plate by install-
ing the bolts.
4. Install the panel.EBU35243Jump-startingJump-starting the vehicle should be avoided.
The battery should be removed and charged
instead.
WARNING
EWB03430To avoid battery explosion and/or serious
damage to the electrical system:
Do not connect the negative lead of the
jumper cable to the negative terminal of
the battery.
Do not touch the positive lead of the
jumper cable to the negative lead.
Do not reverse the polarity of the jumper
cables when connecting to the batteries. However, if the vehicle must be jump-started,
proceed as follows.
1. Turn the key to “ ” (off).
1. Positive battery lead (red)
2. Negative battery lead (black)
3. Battery
1
2
3
UB577AE0.book Page 59 Wednesday, June 8, 2016 9:35 AM
Page 196 of 218

8-60
8
2. Remove panel A. (See page 8-10.)
3. Remove the passenger seat cushion.(See page 4-25.)
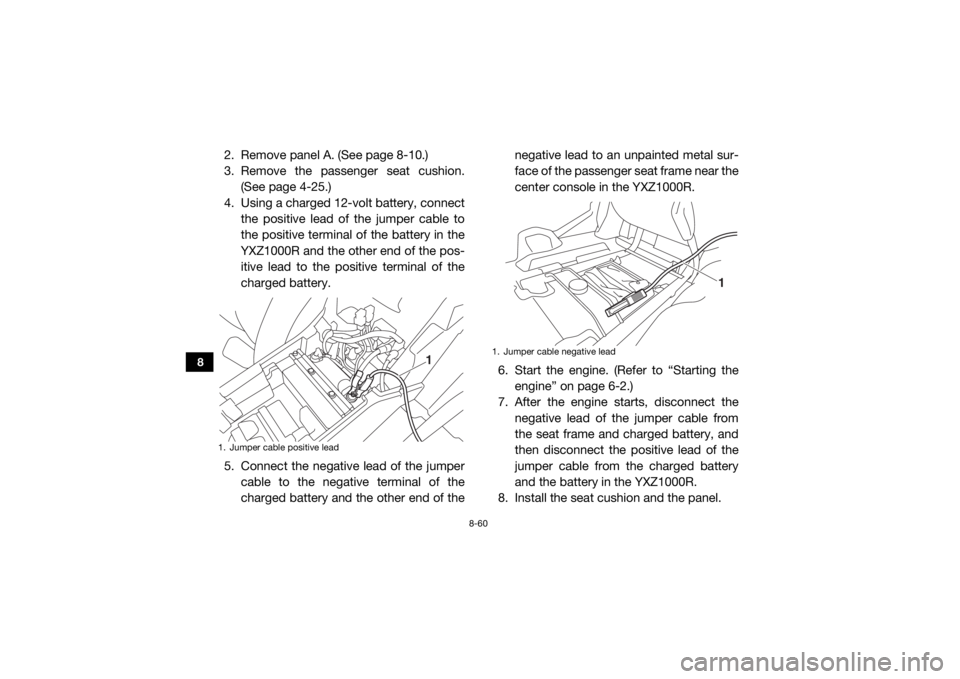
4. Using a charged 12-volt battery, connect the positive lead of the jumper cable to
the positive terminal of the battery in the
YXZ1000R and the other end of the pos-
itive lead to the positive terminal of the
charged battery.
5. Connect the negative lead of the jumper cable to the negative terminal of the
charged battery and the other end of the negative lead to an unpainted metal sur-
face of the passenger seat frame near the
center console in the YXZ1000R.
6. Start the engine. (Refer to “Starting the engine” on page 6-2.)
7. After the engine starts, disconnect the
negative lead of the jumper cable from
the seat frame and charged battery, and
then disconnect the positive lead of the
jumper cable from the charged battery
and the battery in the YXZ1000R.
8. Install the seat cushion and the panel.1. Jumper cable positive lead
1
1. Jumper cable negative lead
1
UB577AE0.book Page 60 Wednesday, June 8, 2016 9:35 AM
Page 216 of 218

12-2
12
Headlights .................................................................... 8-63
Helmet indicator light .....................................................4-9
High beam indicator light ............................................... 4-3
Hood ............................................................................ 8-10IIdentification number records ...................................... 11-1
Indicator lights and warning lights ................................. 4-2
Instruments, lights and switches, Pre-operation check ........................................................................... 5-8JJump-starting ............................................................... 8-59LLabel locations ............................................................... 1-1
Launch system indicator light ........................................ 4-6
Launch system operation ............................................... 6-7
Light switch .................................................................. 4-19
Loading ........................................................................6-11MMain switch .................................................................... 4-1
Maintenance and lubrication chart ................................8-6
Maintenance chart, emission control system ................ 8-4
Model label ................................................................... 11-1
Multi-function meter unit ................................................ 4-9NNeutral indicator light .....................................................4-2OOn-Command drive knob ............................................ 4-20
Owner’s manual and tool kit .......................................... 8-2PPanels .......................................................................... 8-10
Parking ......................................................................... 6-11 Parking brake indicator light .......................................... 4-3
Parking brake lever ...................................................... 4-21
Parking brake lever free play, adjusting ....................... 8-49
Parking brake pads, checking ..................................... 8-45
Passenger handhold, Pre-operation check ................... 5-7
Pedal, lubrication ......................................................... 8-51
RRear knuckle upper and lower pivot, lubrication ......... 8-53
Reverse indicator light ................................................... 4-2SSafety information .......................................................... 2-1
Seat belt indicator light .................................................. 4-9
Seat belts ..................................................................... 4-28
Seat belts, Pre-operation check .................................... 5-7
Seats ............................................................................ 4-25
Shifting and reverse driving ........................................... 6-3
Shifting, drive select lever and shift paddle ................. 4-23
Shift timing indicator light .............................................. 4-4
Shock absorber assemblies, adjusting the front ......... 4-33
Shock absorber assemblies, adjusting the rear ........... 4-43
Spark arrester, cleaning ............................................... 8-42
Spark plugs, checking ................................................. 8-35
Specifications .............................................................. 10-1
Stabilizer bushes, checking ......................................... 8-51
Starting the engine ......................................................... 6-2
Steering, Pre-operation check ....................................... 5-7
Steering shaft, lubrication ............................................ 8-53
Steering wheel position ................................................ 4-27
Storage .......................................................................... 9-2
Storage compartments ................................................ 4-29TTail/brake light ............................................................. 8-64
UB577AE0.book Page 2 Wednesday, June 8, 2016 9:35 AM