lock YAMAHA YXZ1000R 2020 Owner's Guide
[x] Cancel search | Manufacturer: YAMAHA, Model Year: 2020, Model line: YXZ1000R, Model: YAMAHA YXZ1000R 2020Pages: 198, PDF Size: 8.22 MB
Page 127 of 198

9-14
9
2. Install the passenger seat by installing thebolts, and then tighten them to the spec-
ified torque.TIPMake sure that the seat frame is properly
secured.
Place the passenger seat belt in the original
position.
3. Install the passenger seat cushion.
4. Install the top cover by installing the bolts
and quick fastener screw.
5. Install panel A and the hood.
Panels C and D
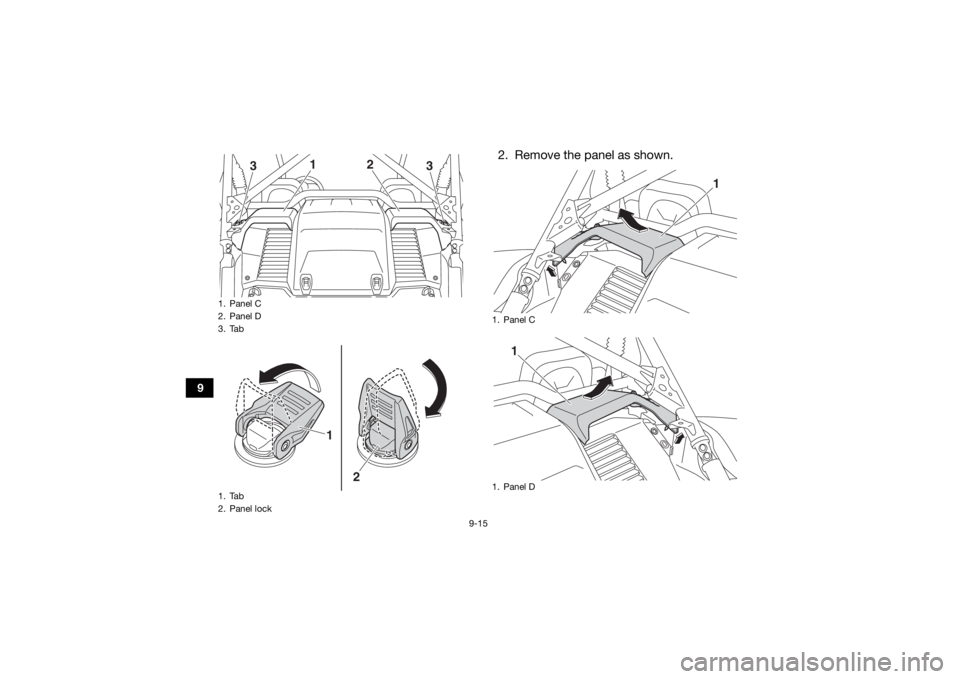
To remove a panel1. Pull the tab on the panel lock up, and then turn the panel lock 1/4 turn clock-
wise.
1. Panel BTightening torque:Passenger seat bolt:32 N·m (3.2 kgf·m, 24 lb·ft)
1
UB5J7BE0.book Page 14 Tuesday, June 18, 2019 10:07 AM
Page 128 of 198

9-15
9
2. Remove the panel as shown.
1. Panel C
2. Panel D
3. Tab
1. Tab
2. Panel lock
1
3
2
3
1
2
1. Panel C
1. Panel D
1
1
UB5J7BE0.book Page 15 Tuesday, June 18, 2019 10:07 AM
Page 129 of 198

9-16
9
To install a panel1. Place the panel in the original position.2. Turn the panel lock 1/4 turn counter-
clockwise, and then push the tab on the
p a n e l l o c k d o w n s o t h a t i t i s p o i n t i n g r e a r -
ward.
EBU3543AEngine oil and oil filterCheck the engine oil level before each opera-
tion. In addition, change the oil and the oil fil-
ter cartridge at the intervals specified in the
periodic maintenance chart.
1. Panel C
1. Panel D
1
1
Recommended engine oil: YA M A L U B E5W-30, 10W-30, 10W-40, 15W-40, 20W-
40, 20W-50
Oil quantity: Oil change only:2.50 L (2.64 US qt, 2.20 Imp.qt)
Oil change and filter replacement: 2.70 L (2.85 US qt, 2.38 Imp.qt)
UB5J7BE0.book Page 16 Tuesday, June 18, 2019 10:07 AM
Page 153 of 198

9-40
9
TIPService the air filters more frequently when
operating in wet or dusty environments. Whenever air filter maintenance is performed:
check the air inlet for obstructions and the
air filter case for dirt and foreign matter.
check the air filter case check hoses for dirt
or water and clean as necessary.
check the air filter case joints and the rub-
ber joints to and from the throttle body for
proper fit and sealing.
tighten all fittings securely to avoid the pos-
sibility of unfiltered air entering the engine.NOTICEECB02270Never operate the engine with the air filter
element removed. Doing so would allow
unfiltered air to enter, causing rapid en-
gine wear and possible engine damage. Additionally, the fuel injection system
would be affected, re
sulting in poor engine
performance and possible overheating.
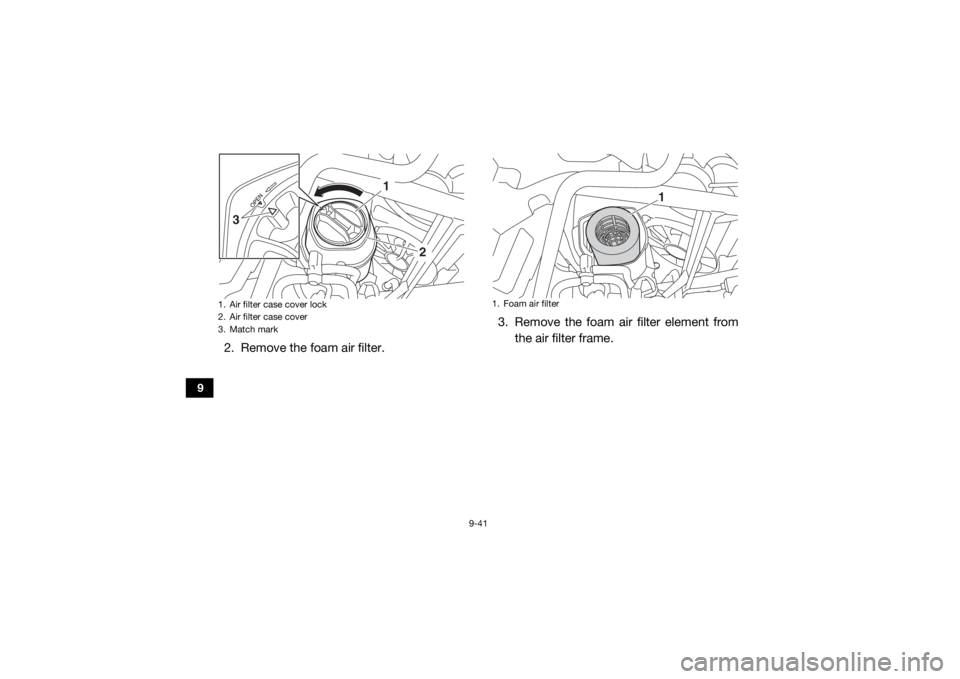
Clean the primary air filter as follows. 1. Remove the air filter case cover by turn- ing the air filter case cover lock counter-
clockwise.TIPMake sure that the match mark on the cover
lock is aligned with the open match mark on
the air filter case cover.
UB5J7BE0.book Page 40 Tuesday, June 18, 2019 10:07 AM
Page 154 of 198

9-41
9
2. Remove the foam air filter.3. Remove the foam air filter element from
the air filter frame.1. Air filter case cover lock
2. Air filter case cover
3. Match mark
1
2
3
1. Foam air filter
1
UB5J7BE0.book Page 41 Tuesday, June 18, 2019 10:07 AM
Page 156 of 198

9-43
9
9. Thoroughly apply Yamalube foam air filteroil (or other quality liquid foam air filter—
do not use a spray-type product) to the
foam material. The foam air filter element
should be wet but not dripping.
10. Pull the foam air filter element over its frame.
11. Install the air filter.
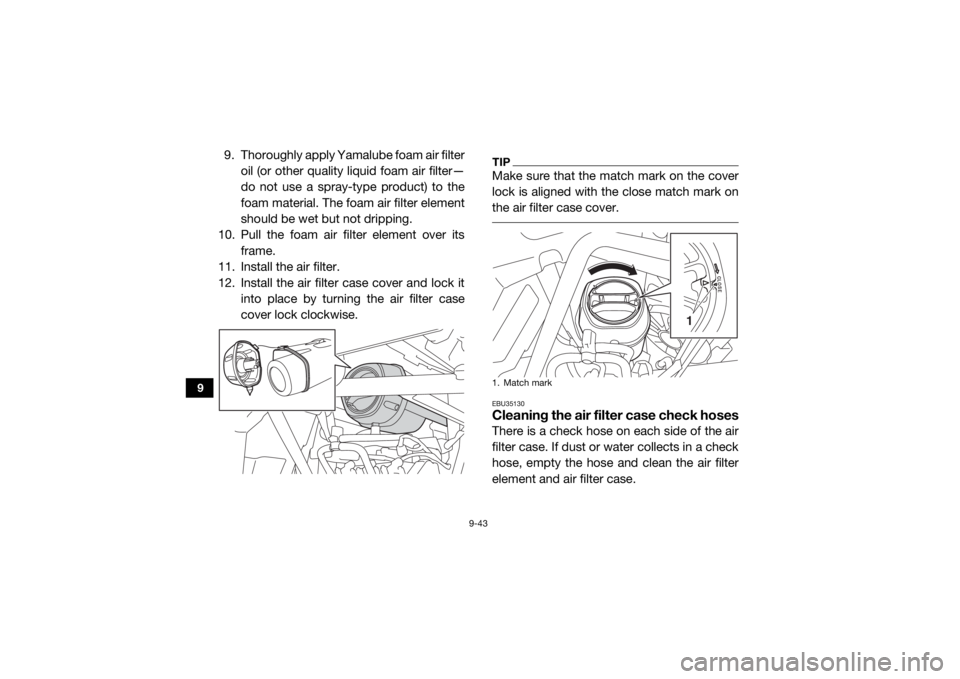
12. Install the air filter case cover and lock it
into place by turning the air filter case
cover lock clockwise.
TIPMake sure that the match mark on the cover
lock is aligned with the close match mark on
the air filter case cover. EBU35130Cleaning the air filter case check hosesThere is a check hose on each side of the air
filter case. If dust or water collects in a check
hose, empty the hose and clean the air filter
element and air filter case.1. Match mark
1
UB5J7BE0.book Page 43 Tuesday, June 18, 2019 10:07 AM
Page 162 of 198

9-49
9
Be careful that water or dust does not
enter the brake or clutch fluid reservoir
when refilling. Water will significantly
lower the boiling point of the fluid and
may result in vapor lock. NOTICEECB01161Brake fluid may damage painted surfaces
or plastic parts. Always clean up spilled
fluid immediately. As the brake pads wear, it is normal for the
brake fluid level to gradually go down. A low
brake fluid level may indicate worn brake
pads or brake system leakage; therefore, be
sure to check the brake pads for wear and the
brake system for leakage. A low clutch fluid
level may indicate clutch system leakage;
therefore, be sure to check the clutch system
for leakage. If the brake or clutch fluid level
goes down suddenly, have a Yamaha dealer
check and repair the vehicle before any fur-
ther operation.
EBU35170Brake and clutch fluid replacementComplete fluid replacement should be done
only by trained Yamaha service personnel.
Have a Yamaha dealer replace the following
components during periodic maintenance or
when they are damaged or leaking.
Replace the oil seals every two years.
Replace the brake and clutch hoses every
four years.EBU35182Checking the clutch pedalThe clutch pedal should operate smoothly
and spring back to position when released.
When depressed, it should offer resistance
before reaching the floorboard. If the pedal
offers little resistance when depressed, or if
the transmission grinds gears when shifting,
have a Yamaha dealer check the vehicle.
UB5J7BE0.book Page 49 Tuesday, June 18, 2019 10:07 AM
Page 165 of 198

9-52
9
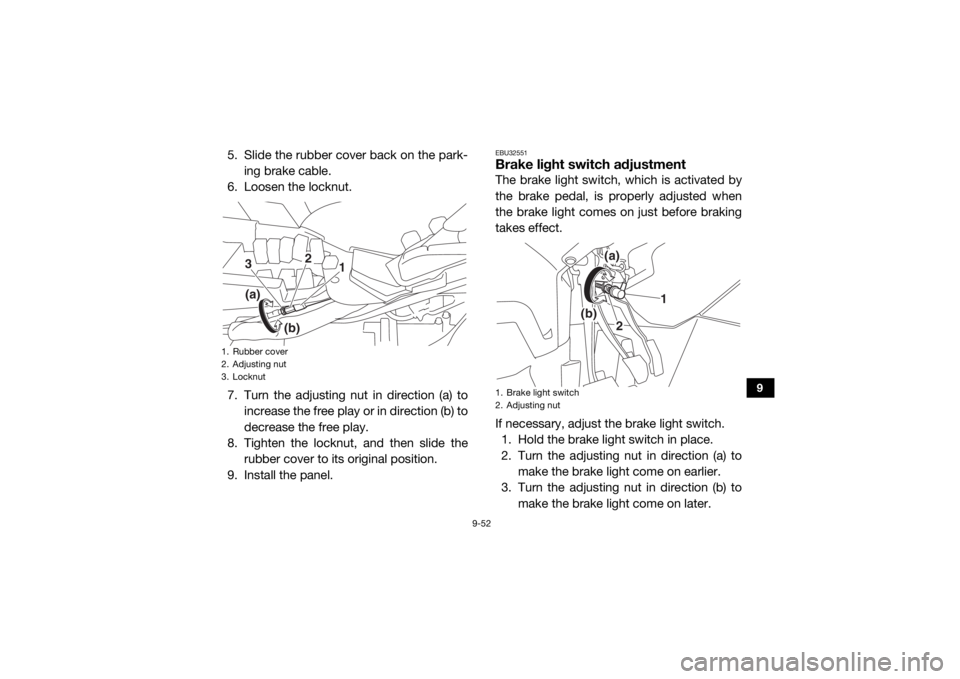
5. Slide the rubber cover back on the park-ing brake cable.
6. Loosen the locknut.
7. Turn the adjusting nut in direction (a) to increase the free play or in direction (b) to
decrease the free play.
8. Tighten the locknut, and then slide the
rubber cover to its original position.
9. Install the panel.
EBU32551Brake light switch adjustmentThe brake light switch, which is activated by
the brake pedal, is properly adjusted when
the brake light comes on just before braking
takes effect.
If necessary, adjust the brake light switch. 1. Hold the brake light switch in place.
2. Turn the adjusting nut in direction (a) to
make the brake light come on earlier.
3. Turn the adjusting nut in direction (b) to
make the brake light come on later.
1. Rubber cover
2. Adjusting nut
3. Locknut
1
(b)
(a)
3
2
1. Brake light switch
2. Adjusting nut
1
2
(b) (a)
UB5J7BE0.book Page 52 Tuesday, June 18, 2019 10:07 AM
Page 177 of 198

9-64
9
If a fuse is blown, replace it as follows.1. Turn the key to “ ” (off) and turn off the electrical circuit in question.
NOTICEECB00641To prevent accidental short-circuiting,
turn off the main switch when checking or
replacing a fuse. 2. Remove panel A. (See page 9-10.)
3. Remove the blown fuse, and then install a
new fuse of the specified amperage.
WARNING! Always use a fuse of the specified amperage. Never use any
material in place of the proper fuse.
Using an improper fuse can cause
damage to the electrical system and
may lead to a fire.
[EWB03440]
1. Headlight fuse “HEAD”
2. Signaling system fuse “SIGNAL”
3. Four-wheel-drive motor fuse “DIFF”
4. Ignition fuse “IGNITION”
5. Backup fuse “BACK UP” (for clock)
6. Radiator fan motor fuse “FAN”
7. Spare fuse
8. Accessory fuse “ACC”
9. Sub radiator fan motor fuse “FAN_2”
10.Auxiliary DC jack fuse “TERMINAL”
1 234
5
6
7
8
9
10
UB5J7BE0.book Page 64 Tuesday, June 18, 2019 10:07 AM
Page 183 of 198

10-1
10
EBU32720
CLEANING AND STORAGE
EBU35920CleaningFrequent, thorough cleaning of your vehicle
will not only enhance its appearance but will
improve its general performance and extend
the useful life of many components.1. Before cleaning the vehicle: a. Block off the end of the exhaust pipeto prevent water entry. A plastic bag
and strong rubber band may be used.
b. Make sure the spark plugs and all filler caps are properly installed.
2. If the engine case is excessively greasy, apply degreaser with a paint brush. Do
not apply degreaser to the wheel axles.
3. Rinse the dirt and degreaser off with a garden hose. Use only enough pressure
to do the job. WARNING! Test the
brakes after washing. Apply the
brakes several times at slow speeds to
let friction dry the brakes. Wet brakes may have reduced stopping ability, in-
creasing the chance of an accident.
[EWB03471]
NOTICE: Excessive water pres-
sure may cause water seepage and
deterioration of wheel bearings,
brakes, transmission seals and electri-
cal devices. Many expensive repair
bills have resulted from improper high-
pressure detergent applications such
as those available in coin-operated car
washers.
[ECB00712]
4. Once the majority of the dirt has been hosed off, wash all surfaces with warm
water and mild, detergent-type soap. An
old toothbrush or bottle brush is handy
for hard-to-get-at places.
5. Rinse the vehicle off immediately with
clean water and dry all surfaces with a
clean chamois towel or soft, absorbent
cloth.
6. Clean the seats with a vinyl upholstery cleaner to keep the covers pliable and
glossy.
UB5J7BE0.book Page 1 Tuesday, June 18, 2019 10:07 AM