battery YAMAHA YXZ1000R 2020 Owners Manual
[x] Cancel search | Manufacturer: YAMAHA, Model Year: 2020, Model line: YXZ1000R, Model: YAMAHA YXZ1000R 2020Pages: 198, PDF Size: 8.22 MB
Page 8 of 198

Axle boots .......................................... 9-37
Checking the spark plugs .................. 9-37
Air filter maintenance.......................... 9-39
Cleaning the air filter case check hoses ................................................ 9-43
Cleaning the spark arrester ................ 9-44
Valve clearance .................................. 9-46
Brakes ................................................ 9-46
Checking the front and rear brake pads.................................................. 9-46
Checking the parking brake pads ...... 9-47
Checking the brake and clutch fluid
levels................................................. 9-47
Brake and clutch fluid replacement ... 9-49
Checking the clutch pedal ................. 9-49
Checking the brake pedal .................. 9-50
Checking the accelerator pedal ......... 9-51
Parking brake lever free play
adjustment........................................ 9-51
Brake light switch adjustment ............ 9-52
Cable inspection and lubrication........ 9-53
Pedal lubrication................................. 9-53
Checking the stabilizer bushes .......... 9-54 Upper and lower arm pivot
lubrication (left and right) ..................9-54
Rear knuckle upper and lower pivot lubrication (left and right) ..................9-55
Drive shaft universal joint
lubrication .........................................9-55
Steering shaft lubrication....................9-56
Wheel removal ....................................9-56
Tire replacement .................................9-57
Wheel installation................................9-58
Battery ................................................9-58
Jump-starting .....................................9-62
Fuse replacement ...............................9-63
Headlights...........................................9-65
Headlight beam adjustment ...............9-66
Brake/tail light .....................................9-66
Troubleshooting ..................................9-66
Troubleshooting charts .......................9-68
CLEANING AND STORAGE ..................10-1 Cleaning..............................................10-1
Storage ...............................................10-2
UB5J7BE0.book Page 3 Tuesday, June 18, 2019 10:07 AM
Page 31 of 198

4-2
4
EBU31190Right view
3
4,5
6
1
7
2
1. Rear shock absorber
2. Engine oil tank
3. Passenger seat belt
4. Battery
5. Fuses
6. Headlight
7. Fuel tank capUB5J7BE0.book Page 2 Tuesday, June 18, 2019 10:07 AM
Page 42 of 198

5-10
5
Clock, hour meter, voltage display and
coolant temperature display
The clock displays time in 12-hour format.
The hour meter shows the total time the en-
gine has been running.
The voltage display shows the battery volt-
age.
The coolant temperature display shows the
temperature of the coolant.Push the “MODE” button to switch between
the clock “CLOCK”, the hour meter “HOUR”,
the voltage display “VOLTAGE”, and the
coolant temperature display in the following
order:
CLOCK
→ HOUR → VOLTAGE → coolant
temperature → CLOCK
To set the clock
1. Set the display to the clock.
2. Push both the “SELECT” button and “RESET” button until the hour digits start
flashing.
3. Push the “RESET” button to set the
hours.
4. Push the “SELECT” button, and the mi- nute digits will start flashing.
5. Push the “RESET” button to set the minu- tes.
6. Push the “SELECT” button, and then re-
lease it to start the clock.
1. Clock/Hour meter/Voltage display/Coolant temperature display
2. “SELECT” button
3. “RESET” button
4. “MODE” button
23
4
1
UB5J7BE0.book Page 10 Tuesday, June 18, 2019 10:07 AM
Page 43 of 198

5-11
5
Voltage displayThis display shows “ ” and the battery volt-
age.
When the battery voltage is low, “LO” will be
displayed. When the battery voltage is high,
“HI” will be displayed.
NOTICEECB02050If the voltage display indicates “LO” or
“HI”, there may be trouble with the battery
charging circuit or the battery may be
faulty. If this occurs, have a Yamaha dealer
check or repair the vehicle. Coolant temperature displayWhen the coolant temperature is in the nor-
mal operating range, the temperature will be
displayed. When the coolant temperature is
1. Voltage display
1
1. Coolant temperature display
1
UB5J7BE0.book Page 11 Tuesday, June 18, 2019 10:07 AM
Page 48 of 198

5-16
5
If a problem is detected in any of those cir-
cuits, the engine trouble warning light will
come on or flash, and the display will indicate
an error code.
If the display indicates an error code, note the
code number and have a Yamaha dealer
check the vehicle.NOTICEECB00812If the multi-function display indicates an
error code, the vehicle should be checked
as soon as possible in order to avoid en-
gine damage.
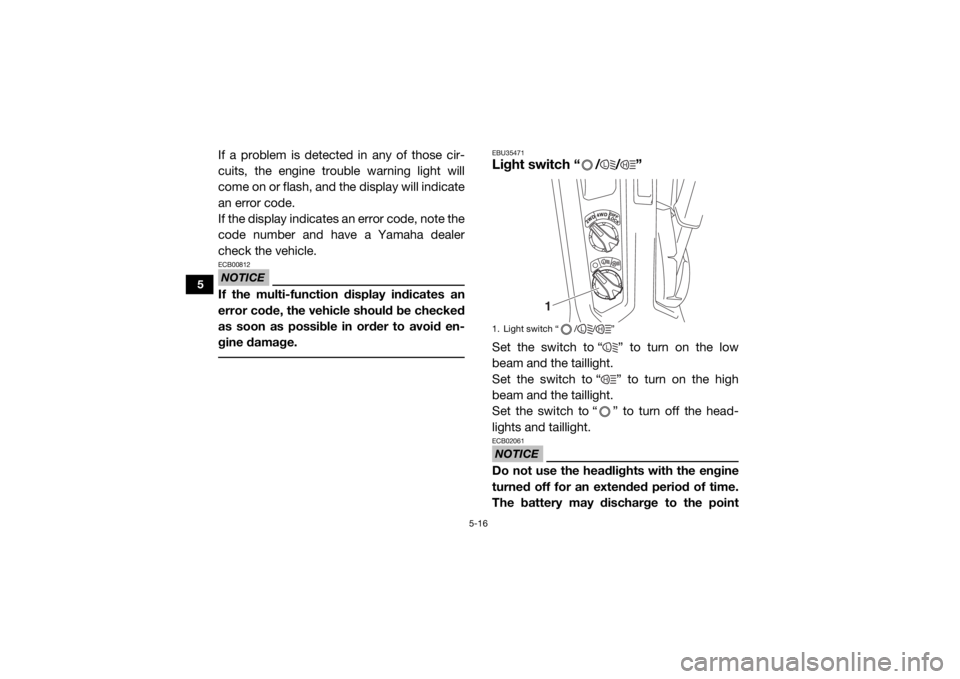
EBU35471Light switch “ / / ”Set the switch to “ ” to turn on the low
beam and the taillight.
Set the switch to “ ” to turn on the high
beam and the taillight.
Set the switch to “ ” to turn off the head-
lights and taillight.NOTICEECB02061Do not use the headlights with the engine
turned off for an extended period of time.
The battery may discharge to the point1. Light switch “ / / ”
L
H
1
L
HLH
UB5J7BE0.book Page 16 Tuesday, June 18, 2019 10:07 AM
Page 49 of 198

5-17
5
that the electric starter will not have
enough power to crank the engine. If this
should happen, remove the battery and re-
charge it. EBU31402On–Command drive knob
“2WD/4WD/DIFF LOCK”Stop the vehicle and move the On–Command
drive knob to change the drive mode to two–
wheel drive, four–wheel drive, or four–wheeldrive with differential lock. Select the appro-
priate drive according to
the terrain and driv-
ing conditions.
“2WD” (two–wheel drive): Power is sup-
plied to the rear wheels only.
“4WD” (four–wheel drive): Power is sup-
plied to the front and rear wheels.
“DIFF LOCK” (four–wheel drive with the dif-
ferential gear locked): Power is supplied to
the front and rear wheels with the differen-
tial gear locked. Unlike standard four–wheel
drive, all wheels turn at the same speed re-
gardless of traction.1. On-Command drive knob “2WD/4WD/DIFF LOCK”
1
UB5J7BE0.book Page 17 Tuesday, June 18, 2019 10:07 AM
Page 83 of 198

7-2
7
10–20 hours:
Avoid prolonged operation above 6300 r/min.
After break-in:
The vehicle may now be operated normally.EBU35342Starting the engine1. Turn the key to “ ” (on).NOTICEECB02291The coolant temperature warning light and
engine trouble warning light should come
on, then go off.
The EPS warning light should come on,
then go off when the engine is started.
To avoid possible damage, do not operate
the vehicle if a warning light does not work
as described above. 2. Press the brake pedal.
3. Shift the transmission into neutral.
When the transmission is in the neutral
position, the transmission gear display
shows “N” and the neutral indicator
light should come on.
The engine can be started in any gear if
the clutch pedal is applied. However, it
is recommended to shift into neutral
before starting the engine.
4. With your foot off the accelerator pedal, start the engine by turning the key to “ ”
(start).
If the engine fails to start, release the key, and
then try starting it again. Wait a few seconds
before the next attempt. Each attempt should
be as short as possible, to preserve battery
energy. NOTICE: Do not crank the engine
more than 5 seconds on each attempt, or
starter damage could occur. Wait at least
5 seconds between each operation of the
electric starter to let it cool.
[ECB02140]
Do not turn the key to the “ ” (start) position
with the engine running; otherwise, damage
to the electric starter may result.
UB5J7BE0.book Page 2 Tuesday, June 18, 2019 10:07 AM
Page 171 of 198

9-58
9
EBU33090Wheel installation1. Install the wheel and the nuts.
2. Lower the vehicle so that the wheel is onthe ground.
3. Tighten the wheel nuts in a crisscross pattern to the specified torque.
WARNING
EWB03400Do not reverse the rims on your Yamaha
YXZ1000R to widen the track width. In-
stalling wheels improperly increases the
risk of wheel failure and accidents.
EBU35232BatteryThis model is equipped with a 12–volt VRLA
(valve–regulated lead–acid) battery. There is
no need to check the electrolyte or to add dis-
tilled water. However, the battery lead con-
nections need to be checked and tightened,
and the battery terminals cleaned if corroded.
If the battery seems to have discharged, re-
charge it as soon as possible.
WARNING
EWB03410Avoid battery contact with skin, eyes, or
clothing. Shield eyes when working near
batteries. Keep out of reach of children.
You could be poisoned or severely burned
by the sulfuric acid in battery electrolyte. In
case of accidental contact with battery
electrolyte:
EXTERNAL: Flush with water.
Tightening torques:Front wheel nut:95 N·m (9.5 kgf·m, 70 lb·ft)
Rear wheel nut: 95 N·m (9.5 kgf·m, 70 lb·ft)
UB5J7BE0.book Page 58 Tuesday, June 18, 2019 10:07 AM
Page 172 of 198

9-59
9
INTERNAL: Drink large quantities of water
or milk. Follow with milk of magnesia,
beaten egg, or vegetable oil. Get prompt
medical attention.
EYES: Flush with water for 15 minutes and
get prompt medical attention.
WARNING
EWB03420Batteries may produce explosive gases.
Ventilate when charging or using in a
closed space. Keep batteries away from
sparks, flames, cigarettes, or other sourc-
es of ignition. To remove the battery
1. Turn the key to “ ” (off).
2. Remove panel A. (See page 9-10.)
3. Remove the battery holding plate by re- moving the bolts. 4. Disconnect the negative battery lead first,
then the positive battery lead by remov-
ing their bolt. NOTICE: When removing
the battery, the main switch must be
off, and the negative lead must be dis-
connected before the positive lead.
[ECB01002]
1. Battery holding plate
2. Bolt
1 2
2
UB5J7BE0.book Page 59 Tuesday, June 18, 2019 10:07 AM
Page 173 of 198

9-60
9
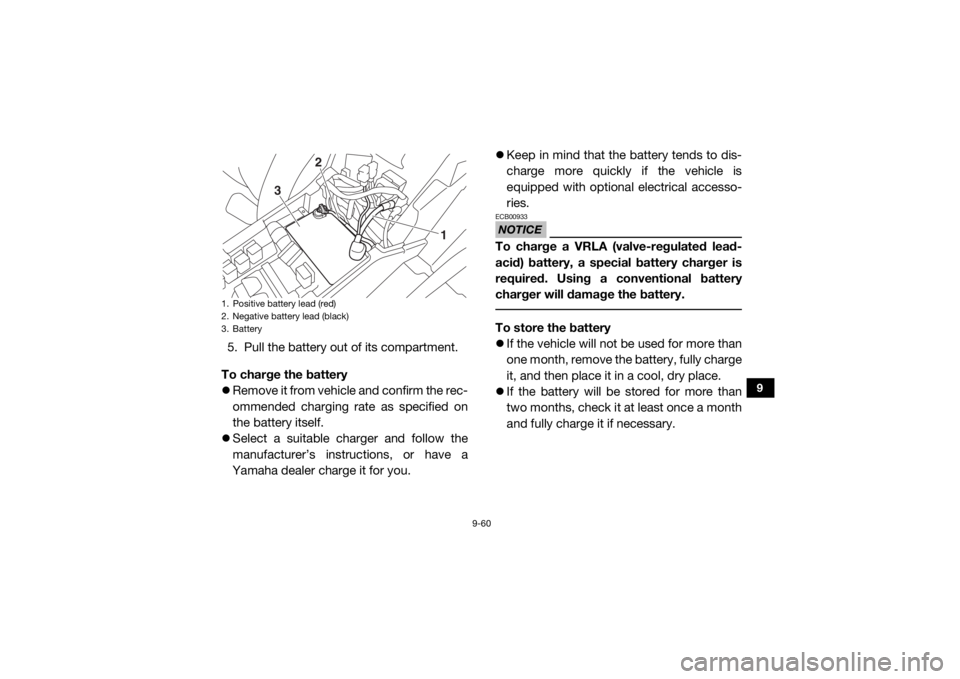
5. Pull the battery out of its compartment.
To charge the battery
Remove it from vehicle and confirm the rec-
ommended charging rate as specified on
the battery itself.
Select a suitable ch arger and follow the
manufacturer’s instructions, or have a
Yamaha dealer charge it for you.
Keep in mind that the battery tends to dis-
charge more quickly if the vehicle is
equipped with optional electrical accesso-
ries.
NOTICEECB00933To charge a VRLA (valve-regulated lead-
acid) battery, a special battery charger is
required. Using a conventional battery
charger will damage the battery. To store the battery
If the vehicle will not be used for more than
one month, remove the battery, fully charge
it, and then place it in a cool, dry place.
If the battery will be stored for more than
two months, check it at least once a month
and fully charge it if necessary.
1. Positive battery lead (red)
2. Negative battery lead (black)
3. Battery
1
2
3
UB5J7BE0.book Page 60 Tuesday, June 18, 2019 10:07 AM