steering YAMAHA YXZ1000R SS 2017 User Guide
[x] Cancel search | Manufacturer: YAMAHA, Model Year: 2017, Model line: YXZ1000R SS, Model: YAMAHA YXZ1000R SS 2017Pages: 208, PDF Size: 4.79 MB
Page 31 of 208

2-4
2
While using your Yamaha YXZ1000R
Keep your body completely inside the vehicle at all times. Keep both hands on the steering
wheel except when operating the shift lever. Be sure the passenger is seated, belted, and hold-
ing onto the passenger handhold. Close doors before driving. Any part of your body (arms,
legs, and head) outside the vehicle can be struck by objects your vehicle is passing or crushed
by the vehicle itself in a rollover accident.
Watch for branches, brush, or other hazards that could enter the vehicle.
Abrupt maneuvers or aggressive driving, even on flat, open areas, can cause loss of control,
including rollovers. The YXZ1000R has higher ground clearance and other features to handle
rugged terrain, and, as a result, can overturn in situations where some other vehicles may not.
Avoid rollovers:
• Use care when turning:
• Turning the steering wheel too far or too fast can result in a rollover.
• Avoid sideways sliding, skidding, or back-wheel sliding, and never do donuts.
• Slow down before entering a turn and avoid hard braking in a turn.
• When making tight turns from a stop or at sl ow speeds, avoid sudden or hard acceleration.U2HC7ME0.book Page 4 Tuesday, April 19, 2016 10:33 AM
Page 32 of 208
2-5
2
• Drive straight up and down inclines, not across them. If crossing a hill is unavoidable, drive
slowly and turn downhill immediately if you feel the vehicle may tip.
• Avoid paved surfaces. Turn gradually and go slowly if you must drive on pavement. This vehicle is designed for off-road use only.
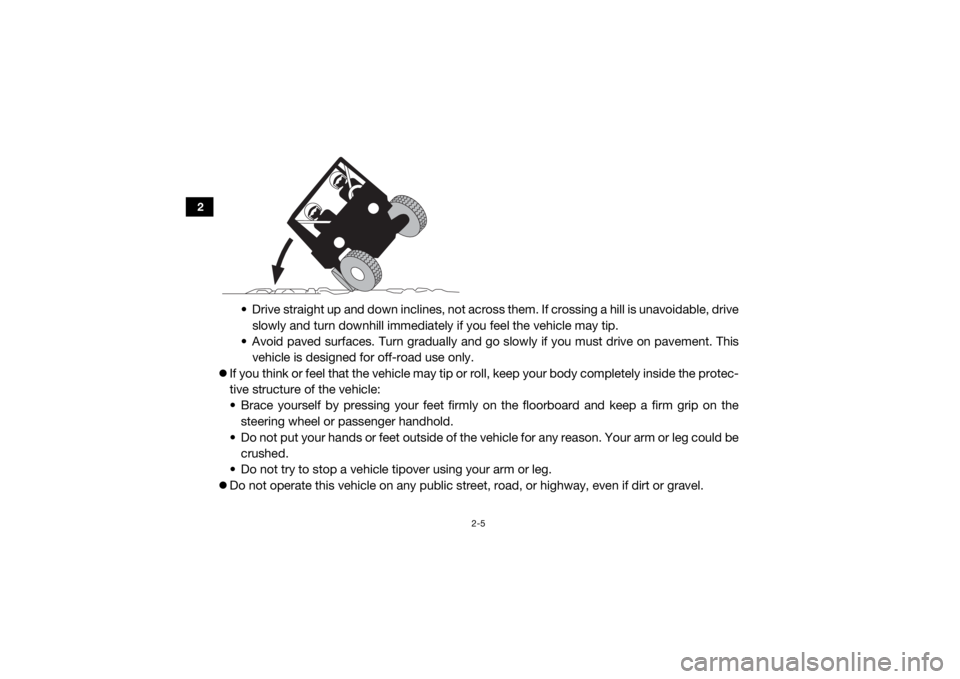
If you think or feel that the vehicle may tip or ro ll, keep your body completely inside the protec-
tive structure of the vehicle:
• Brace yourself by pressing your feet firmly on the floorboard and keep a firm grip on the
steering wheel or passenger handhold.
• Do not put your hands or feet outside of the vehicle for any reason. Your arm or leg could be
crushed.
• Do not try to stop a vehicle tipover using your arm or leg.
Do not operate this vehicle on any public street, road, or highway, even if dirt or gravel.
U2HC7ME0.book Page 5 Tuesday, April 19, 2016 10:33 AM
Page 38 of 208
3-3
3
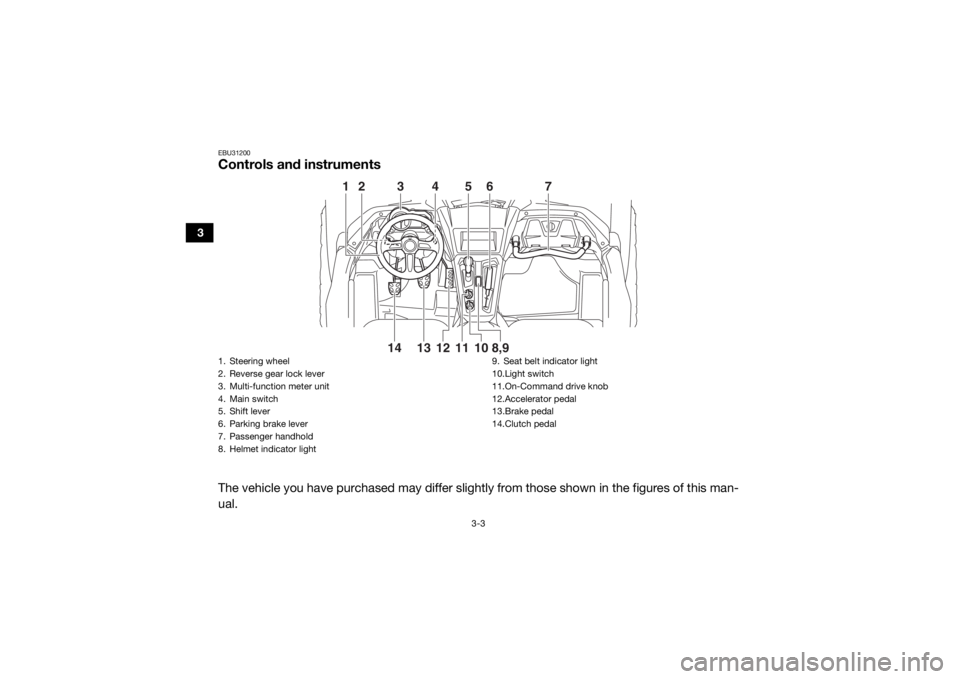
EBU31200Controls and instrumentsThe vehicle you have purchased may differ slightly from those shown in the figures of this man-
ual.
345
6
7
1
212
10
8,9
13 11
14
1. Steering wheel
2. Reverse gear lock lever
3. Multi-function meter unit
4. Main switch
5. Shift lever
6. Parking brake lever
7. Passenger handhold
8. Helmet indicator light 9. Seat belt indicator light
10.Light switch
11.On-Command drive knob
12.Accelerator pedal
13.Brake pedal
14.Clutch pedalU2HC7ME0.book Page 3 Tuesday, April 19, 2016 10:33 AM
Page 40 of 208
4-2
4
EBU31265Indicator lights and warning lights
EBU35450Neutral indicator light “N”
This indicator light comes on when the trans-
mission is in the neutral position.EBU35460Reverse indicator light “R”
This indicator light comes on when the trans-
mission is in the reverse position.
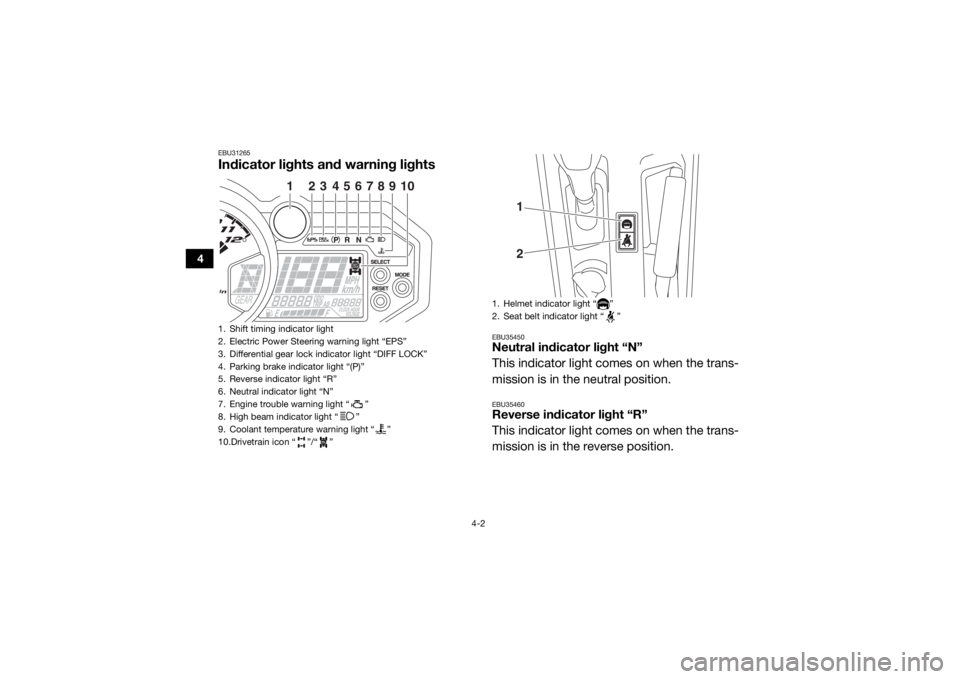
1. Shift timing indicator light
2. Electric Power Steering warning light “EPS”
3. Differential gear lock indicator light “DIFF LOCK”
4. Parking brake indicator light “(P)”
5. Reverse indicator light “R”
6. Neutral indicator light “N”
7. Engine trouble warning light “ ”
8. High beam indicator light “ ”
9. Coolant temperature warning light “ ”
10.Drivetrain icon “ ”/“ ”
1
2
3
45
6
78
10
9
1. Helmet indicator light “ ”
2. Seat belt indicator light “ ”
12
U2HC7ME0.book Page 2 Tuesday, April 19, 2016 10:33 AM
Page 41 of 208

4-3
4
EBU34910Parking brake indicator light “(P)”
This indicator light comes on when the park-
ing brake is applied.EBU36450High beam indicator light “ ”
This indicator light comes on when the high
beam of the headlight is switched on.EBU35850Differential gear lock indicator light “DIFF
LOCK”
This indicator light comes on when the front
differential gear is locked.EBU34921Drivetrain icon “ / ”
The drivetrain icon indicates what type of
drive mode is currently selected. When 2WD
is selected, the icon will turn off. When 4WD
is selected, “ ” is displayed. And when 4WD
with differential lock is selected “ ” is dis-
played.
TIP See pages 4-17 and 6-7 for more informa-
tion on selecting the drive mode.
Due to the synchronizing mechanism in the
differential gear case, the drivetrain icon
may not come on until the vehicle starts
moving.
When the On-Command drive knob is set
to “DIFF LOCK” or “4WD”, the drivetrain
icon and the differential gear lock indicator
light will flash until the differential gear is
completely locked or unlocked. If the icon
and the indicator light continue to flash, the
differential is not completely locked or un-
locked. In this case, start moving slowly
and/or turn the steering wheel back and
forth to help the differential to lock or un-
lock.
U2HC7ME0.book Page 3 Tuesday, April 19, 2016 10:33 AM
Page 43 of 208

4-5
4
NOTICEECB02040The engine may overheat if the vehicle is
overloaded. If this happens, reduce the
load to specification.
After restarting, make sure that the
warning light is out. Continuous use
while this warning light is on may cause
damage to the engine. EBU31341Engine trouble warning light “ ”
This warning light comes on or flashes if a
problem is detected in the electrical circuit
monitoring the engine. When this occurs, the
display will indicate an error code (see page
4-16). Have a Yamaha dealer check the self-
diagnosis system.
The electrical circuit of the warning light can
be checked by turning the key to “ ” (on). If
the warning light does not come on initially when the key is turned to “ ” (on), or if the
warning light remains on, have a Yamaha
dealer check the vehicle.
EBU33041Electric Power Steering warning light
“EPS”
This warning light comes on when the key is
turned to “ ” (on), and then goes off once
the engine is started. If the warning light re-
mains on or comes on after the engine is
started, the EPS system may not be working
correctly. When this occurs, have a Yamaha
dealer check the EPS system.
The electrical circuit of the warning light can
be checked by turning the key to “ ” (on). If
the warning light does not come on, have a
Yamaha dealer check the electrical circuit.
U2HC7ME0.book Page 5 Tuesday, April 19, 2016 10:33 AM
Page 44 of 208

4-6
4
TIPIf the steering load is too heavy (e.g., exces-
sive steering use at slow speed or when op-
erating in deep mud, sand, or snow), the
power assist is reduced to protect the EPS
motor from overheating. EBU31360Helmet indicator light “ ”
The indicator light comes on and stays on
while the key is turned to “ ” (on) to remind
the occupants to always wear a helmet. If the
indicator light does not come on when the key
is turned to “ ” (on), have a Yamaha dealer
check the electrical circuit.EBU31370Seat belt indicator light “ ”
The indicator light comes on when the key is
turned to “ ” (on) to remind the occupants
to fasten their seat belt. The indicator light
stays on until the driver seat belt is properly
latched. If the indicator light does not come
on when the key is turned to “ ” (on), or ifthe indicator light remains on after the driver
seat belt is properly latched, have a Yamaha
dealer check the electrical circuit.U2HC7ME0.book Page 6 Tuesday, April 19, 2016 10:33 AM
Page 62 of 208
4-24
4
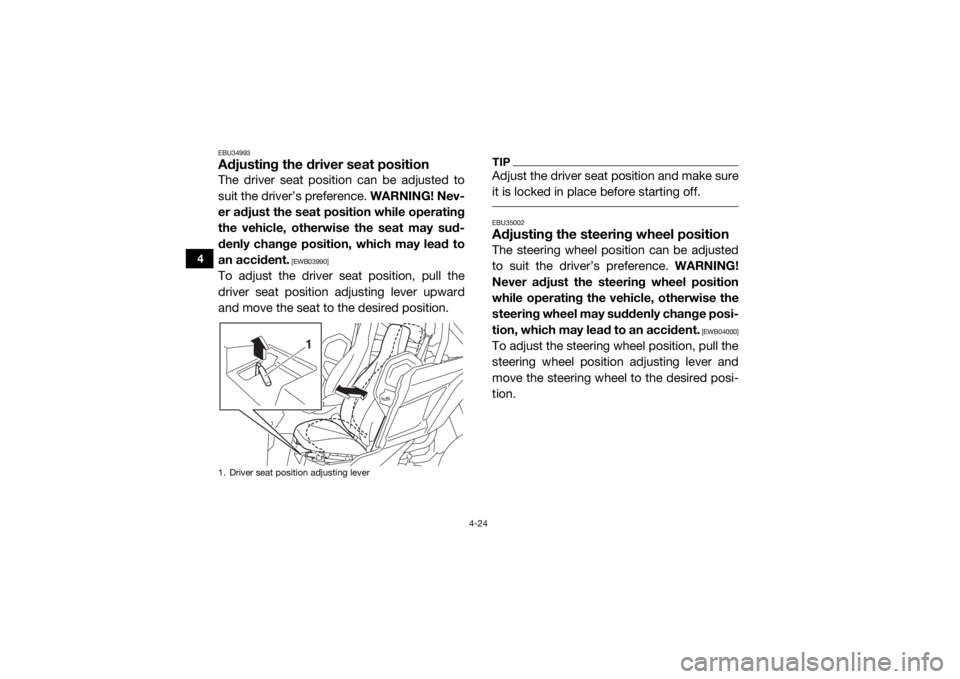
EBU34993Adjusting the driver seat positionThe driver seat position can be adjusted to
suit the driver’s preference. WARNING! Nev-
er adjust the seat position while operating
the vehicle, otherwise the seat may sud-
denly change position, which may lead to
an accident.
[EWB03990]
To adjust the driver seat position, pull the
driver seat position adjusting lever upward
and move the seat to the desired position.
TIPAdjust the driver seat position and make sure
it is locked in place before starting off. EBU35002Adjusting the steering wheel positionThe steering wheel position can be adjusted
to suit the driver’s preference. WARNING!
Never adjust the steering wheel position
while operating the vehicle, otherwise the
steering wheel may suddenly change posi-
tion, which may lead to an accident.
[EWB04000]
To adjust the steering wheel position, pull the
steering wheel position adjusting lever and
move the steering wheel to the desired posi-
tion.
1. Driver seat position adjusting lever
1
U2HC7ME0.book Page 24 Tuesday, April 19, 2016 10:33 AM
Page 63 of 208
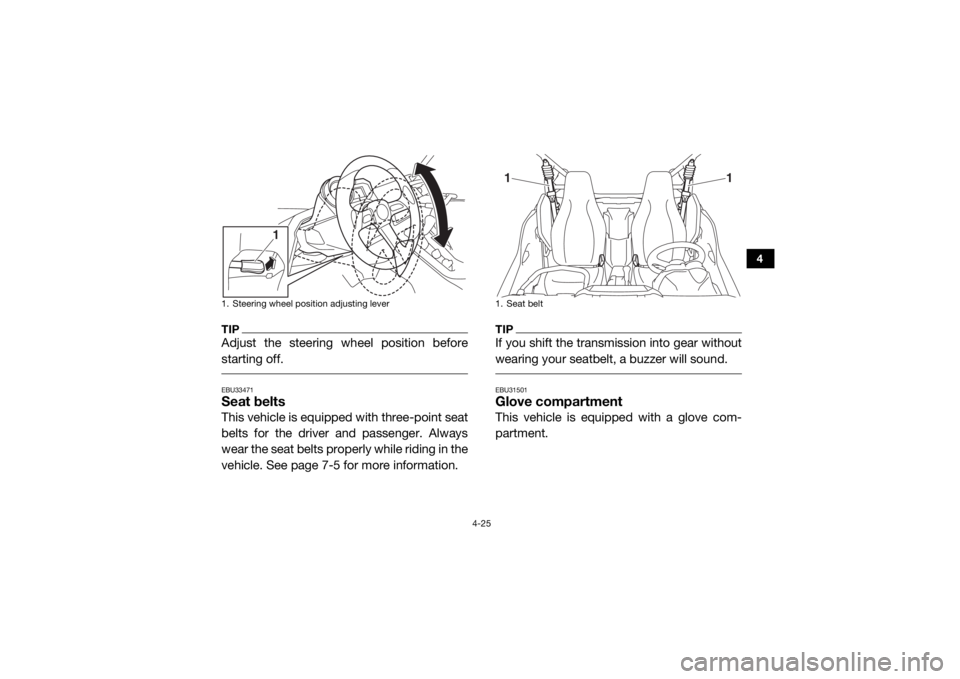
4-25
4
TIPAdjust the steering wheel position before
starting off. EBU33471Seat beltsThis vehicle is equipped with three-point seat
belts for the driver and passenger. Always
wear the seat belts properly while riding in the
vehicle. See page 7-5 for more information.
TIPIf you shift the transmission into gear without
wearing your seatbelt, a buzzer will sound. EBU31501Glove compartmentThis vehicle is equipped with a glove com-
partment.
1. Steering wheel position adjusting lever
1
1. Seat belt
1
1
U2HC7ME0.book Page 25 Tuesday, April 19, 2016 10:33 AM
Page 87 of 208

5-2
5
Engine oil• Check oil level.
• Fill with oil to proper level if necessary.
5-5, 8-15
Drivetrain • Check front differential, transmission case, and rear final
gear for leakage. 5-6, 5-6, 5-7, 8-26,
8-29, 8-31
Coolant • Check coolant level in reservoir.
• Fill with coolant if necessary. 5-6, 8-33
Accelerator pedal • Check free play and for proper operation. 5-7
Seat belts • Check for proper operation and belt wear. 5-7
Passenger handhold • Check for stability and proper fastening. 5-7, 7-8
Steering • Check for proper operation. 5-7
Shift lever • Check for proper operation. 5-8
Fittings and fasteners • Check all fittings and fasteners. 5-8
Instruments, lights and
switches • Check operation, and correct if necessary.
5-8, 8-63, 8-64
Wheels and tires • Check tire pressure and for wear and damage. 5-8, 8-54, 8-56
Axle boots • Check for damage. 8-35
ITEM
ROUTINE PAGE
U2HC7ME0.book Page 2 Tuesday, April 19, 2016 10:33 AM