light YAMAHA YXZ1000R SS 2017 Owner's Manual
[x] Cancel search | Manufacturer: YAMAHA, Model Year: 2017, Model line: YXZ1000R SS, Model: YAMAHA YXZ1000R SS 2017Pages: 208, PDF Size: 4.79 MB
Page 87 of 208

5-2
5
Engine oil• Check oil level.
• Fill with oil to proper level if necessary.
5-5, 8-15
Drivetrain • Check front differential, transmission case, and rear final
gear for leakage. 5-6, 5-6, 5-7, 8-26,
8-29, 8-31
Coolant • Check coolant level in reservoir.
• Fill with coolant if necessary. 5-6, 8-33
Accelerator pedal • Check free play and for proper operation. 5-7
Seat belts • Check for proper operation and belt wear. 5-7
Passenger handhold • Check for stability and proper fastening. 5-7, 7-8
Steering • Check for proper operation. 5-7
Shift lever • Check for proper operation. 5-8
Fittings and fasteners • Check all fittings and fasteners. 5-8
Instruments, lights and
switches • Check operation, and correct if necessary.
5-8, 8-63, 8-64
Wheels and tires • Check tire pressure and for wear and damage. 5-8, 8-54, 8-56
Axle boots • Check for damage. 8-35
ITEM
ROUTINE PAGE
U2HC7ME0.book Page 2 Tuesday, April 19, 2016 10:33 AM
Page 89 of 208
5-4
5
Clutch fluid
Depress and release the clutch pedal five
times. Check to see if any fluid is leaking out
of the hoses, reservoir, or master cylinder.
Check the clutch fluid level and correct if nec-
essary. (See page 8-45.)TIPIf any leakage is found, or if the clutch pedal
offers little resistance, have a Yamaha dealer
service the vehicle. EBU33200FuelMake sure there is sufficient fuel in the tank.
WARNING
EWB02522Gasoline and gasoline vapors are ex-
tremely flammable. To avoid fires and ex-
plosions and to reduce the risk of injury
when refueling, follow these instructions.
1. Before refueling, turn off the engine and
be sure that no one is sitting in the vehi-
cle.
Never refuel while smoking, or while in
the vicinity of sparks, open flames, or
other sources of ignition such as the pilot
lights of water heaters and clothes dry-
ers.
2. Do not overfill the fuel tank. Because fuel expands when it heats up, heat from the
engine or the sun can cause fuel to spill
out of the fuel tank.
3. Wipe up any spilled fuel immediately.
4. Be sure the fuel tank cap is closed se- curely.
WARNING
EWB02532Gasoline is poisonous and can cause inju-
ry or death. Handle gasoline with care.
Never siphon gasoline by mouth. If you
should swallow some gasoline or inhale a
lot of gasoline vapor, or get some gasoline
in your eyes, see your doctor immediately.
U2HC7ME0.book Page 4 Tuesday, April 19, 2016 10:33 AM
Page 93 of 208

5-8
5
EBU35690Shift leverThe shift lever should move smoothly both
forward and backwards and return to its orig-
inal position after a gear change is made.
Check the shift lever and transmission for
roughness before starting off.TIPThe engine may need to be started for the
transmission to engage gears. EBU35700Fittings and fastenersAlways check the tightness of chassis and
wheel fittings and fasteners before starting
off. Take the vehicle to a Yamaha dealer or re-
fer to the Service Manual for correct tighten-
ing torque.EBU31840Instruments, lights and switchesCheck that all instruments, lights and switch-
es are working properly. Correct if necessary.
EBU31851Control cablesWhen driving in cold weather, always make
sure all control cables work smoothly before
starting off. WARNING! Control cables can
freeze in cold weather and you could be
unable to control the vehicle.
[EWB03280]
EBU35331
TiresCheck tire pressure regularly to make sure it
is at the recommended specifications. Also
check for wear and damage.
Tire pressure
Use the tire pressure gauge to check and ad-
just tire pressures when the tires are cold. Tire
pressures must be equal on both sides.
WARNING! Operation of this vehicle with improper tire pressure may cause severe
injury or death from loss of control or roll-
over. Tire pressure below the minimum
U2HC7ME0.book Page 8 Tuesday, April 19, 2016 10:33 AM
Page 97 of 208

6-2
6
10–20 hours:
Avoid prolonged operation above 6300 r/min.
After break-in:
The vehicle may now be operated normally.EBU35342Starting the engine1. Turn the key to “ ” (on).NOTICEECB02291The coolant temperature warning light and
engine trouble warning light should come
on, then go off.
The EPS warning light should come on,
then go off when the engine is started.
To avoid possible damage, do not operate
the vehicle if a warning light does not work
as described above. 2. Press the brake pedal.
3. Shift the transmission into neutral.
When the transmission is in the neutral
position, the transmission gear display
shows “N” and the neutral indicator
light should come on.
The engine can be started in any gear if
the clutch pedal is applied. However, it
is recommended to shift into neutral
before starting the engine.
4. With your foot off the accelerator pedal, start the engine by turning the key to “ ”
(start).
If the engine fails to start, release the key, and
then try starting it again. Wait a few seconds
before the next attempt. Each attempt should
be as short as possible, to preserve battery
energy. NOTICE: Do not crank the engine
more than 5 seconds on each attempt, or
starter damage could occur. Wait at least
5 seconds between each operation of the
electric starter to let it cool.
[ECB02140]
Do not turn the key to the “ ” (start) position
with the engine running; otherwise, damage
to the electric starter may result.
U2HC7ME0.book Page 2 Tuesday, April 19, 2016 10:33 AM
Page 98 of 208
6-3
6
TIPFor maximum engine life, never accelerate
hard when the engine is cold! EBU35413Shift lever operation and reverse driv-
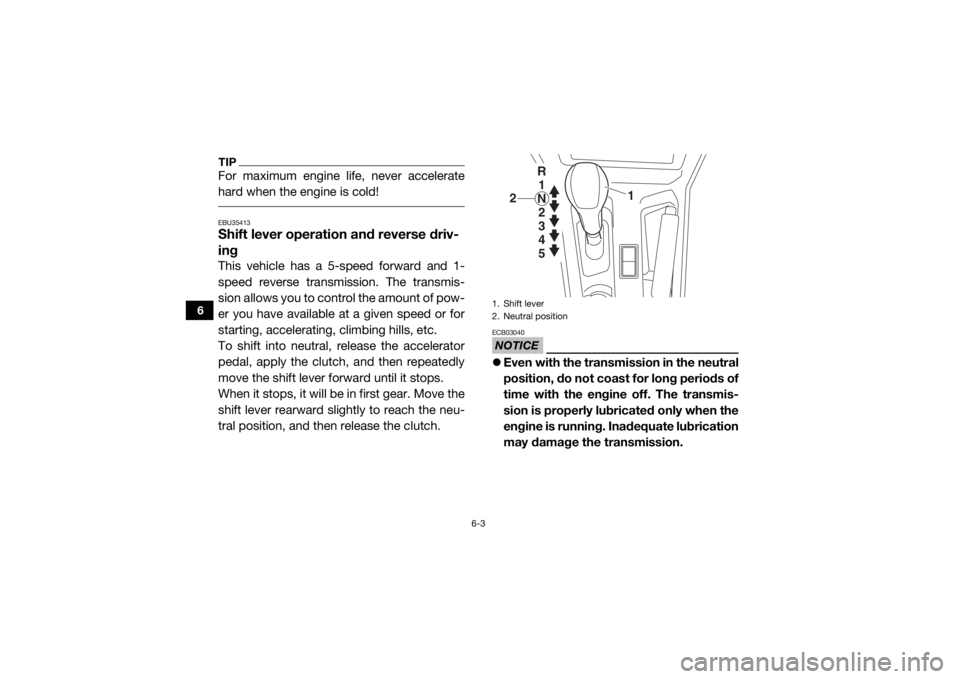
ingThis vehicle has a 5-speed forward and 1-
speed reverse transmission. The transmis-
sion allows you to control the amount of pow-
er you have available at a given speed or for
starting, accelerating, climbing hills, etc.
To shift into neutral, release the accelerator
pedal, apply the clutch, and then repeatedly
move the shift lever forward until it stops.
When it stops, it will be in first gear. Move the
shift lever rearward slightly to reach the neu-
tral position, and then release the clutch.
NOTICEECB03040 Even with the transmission in the neutral
position, do not coast for long periods of
time with the engine off. The transmis-
sion is properly lubri cated only when the
engine is running. Inadequate lubrication
may damage the transmission.1. Shift lever
2. Neutral position
1
2
R 1
N 2
3
4
5
U2HC7ME0.book Page 3 Tuesday, April 19, 2016 10:33 AM
Page 101 of 208
6-6
6
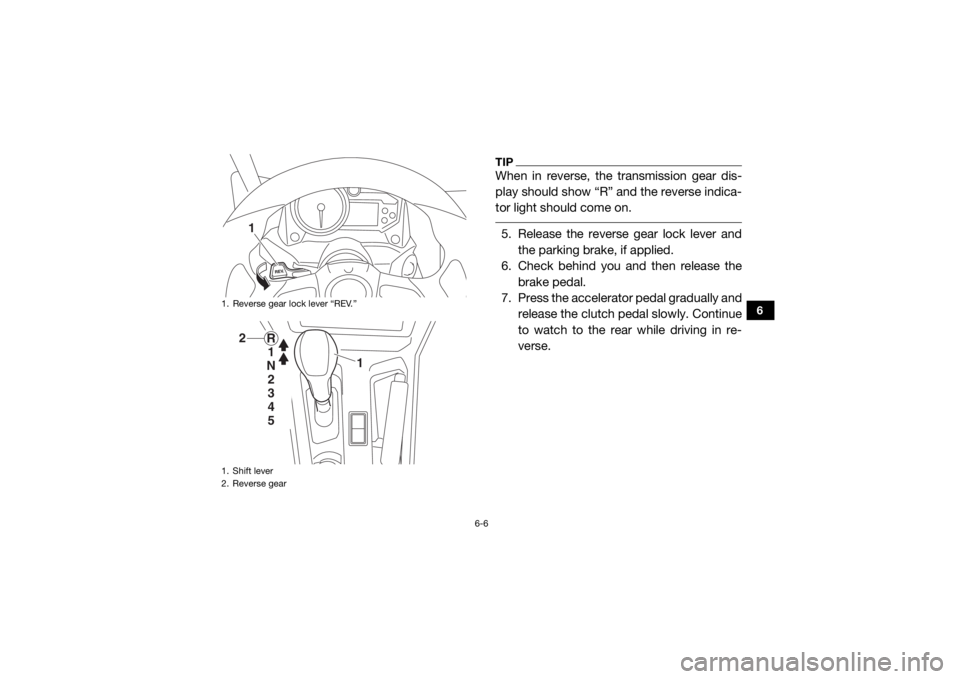
TIPWhen in reverse, the transmission gear dis-
play should show “R” and the reverse indica-
tor light should come on. 5. Release the reverse gear lock lever and the parking brake, if applied.
6. Check behind you and then release the brake pedal.
7. Press the accelerator pedal gradually and
release the clutch pedal slowly. Continue
to watch to the rear while driving in re-
verse.
1. Reverse gear lock lever “REV.”
1. Shift lever
2. Reverse gear
1
1
2
R 1
N 2
3
4
5
U2HC7ME0.book Page 6 Tuesday, April 19, 2016 10:33 AM
Page 102 of 208
6-7
6
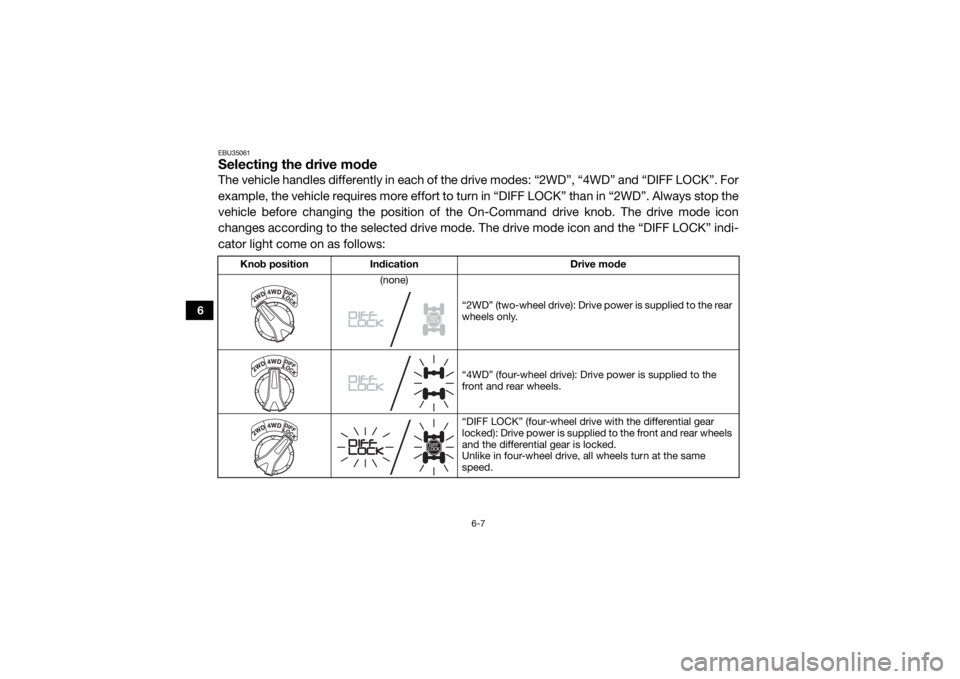
EBU35061Selecting the drive modeThe vehicle handles differently in each of the drive modes: “2WD”, “4WD” and “DIFF LOCK”. For
example, the vehicle requires more effort to turn in “DIFF LOCK” than in “2WD”. Always stop the
vehicle before changing the position of th e On-Command drive knob. The drive mode icon
changes according to the selected drive mode. The drive mode icon and the “DIFF LOCK” indi-
cator light come on as follows:
Knob position Indication Drive mode
(none)
“2WD” (two-wheel drive): Drive power is supplied to the rear
wheels only.
“4WD” (four-wheel drive): Drive power is supplied to the
front and rear wheels.
“DIFF LOCK” (four-wheel drive with the differential gear
locked): Drive power is supplied to the front and rear wheels
and the differential gear is locked.
Unlike in four-wheel drive, all wheels turn at the same
speed.
U2HC7ME0.book Page 7 Tuesday, April 19, 2016 10:33 AM
Page 103 of 208

6-8
6
TIPWhen the knob is set to “DIFF LOCK” or “4WD ”, the drive mode icon and the indicator light
will flash until the differential gear is completely locked or unlocked.
Turning the steering wheel back and forth will help the differential gear lock to engage or dis-
engage.
To protect the drivetrain from damage, vehicle speed is limited until the differential gear lock
has properly transitioned. U2HC7ME0.book Page 8 Tuesday, April 19, 2016 10:33 AM
Page 121 of 208
![YAMAHA YXZ1000R SS 2017 Owners Manual 7-17
7
TIPYou may need to turn the steering wheel left
and right or release the clutch slightly to help
the differential lock into place. 3. Stop the engine (turn the key to “ ”[off]).
4. With the YAMAHA YXZ1000R SS 2017 Owners Manual 7-17
7
TIPYou may need to turn the steering wheel left
and right or release the clutch slightly to help
the differential lock into place. 3. Stop the engine (turn the key to “ ”[off]).
4. With the](/img/51/53899/w960_53899-120.png)
7-17
7
TIPYou may need to turn the steering wheel left
and right or release the clutch slightly to help
the differential lock into place. 3. Stop the engine (turn the key to “ ”[off]).
4. With the brake pedal still being applied, set the parking brake.
5. Finally, get out of the vehicle and block
the front and rear wheels with rocks or
other objects.
Loading
Be aware that vehicle load includes the total
combined weight of the operator, passenger,
any installed accessories, and any luggage or
cargo brought on board or stored in the cargo
bed. Make sure that the gross vehicle weight
(vehicle load plus weight of the vehicle itself)
never exceeds 1025 kg (2260 lb). Vehicle loading can affect handling as well as
the recommended tire pressure. See “Load-
ing” on page 6-9 and “Tire pressure” on page
5-8.
EBU35572Operation on different surfaces and
terrainsGo slowly and proceed with caution when op-
erating on an unfamiliar surface or terrain.
This vehicle may handle differently in certain
types of terrains or on certain surfaces. You
may come upon hidden rocks, bumps, or
holes without enough time to react. To avoid
loss of control or rollover, always be alert to
changing surfaces or terrain when operating
the vehicle.
Your Yamaha YXZ1000R has higher ground
clearance and other features to handle rug-
ged terrain, and as a result, can overturn in
situations where some vehicles may not.
Abrupt maneuvers or aggressive driving can
cause loss of control, including rollovers –
U2HC7ME0.book Page 17 Tuesday, April 19, 2016 10:33 AM
Page 148 of 208
8-22
8
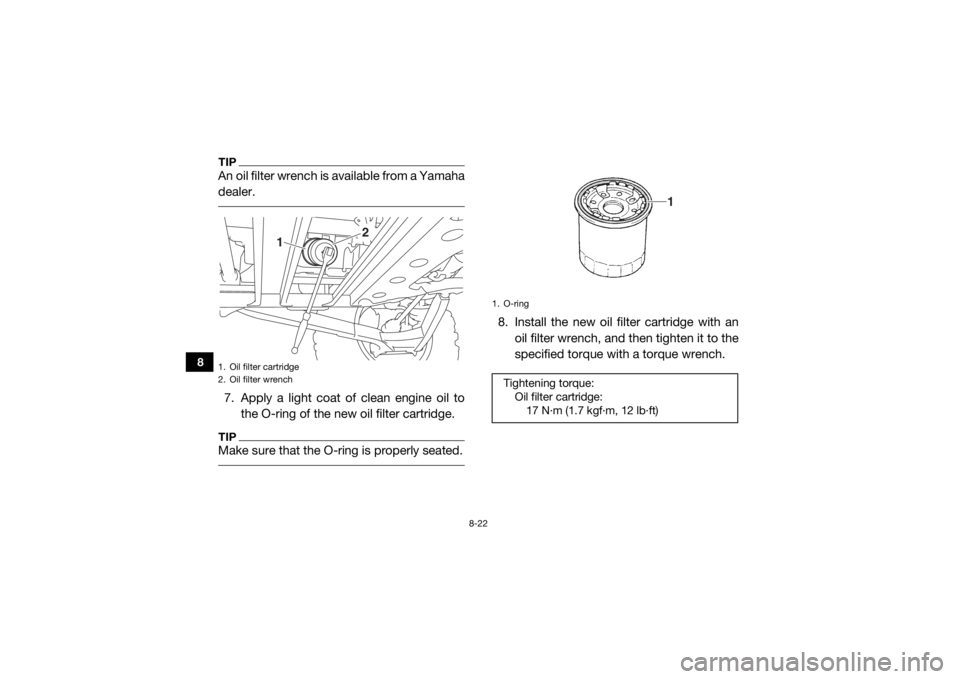
TIPAn oil filter wrench is available from a Yamaha
dealer. 7. Apply a light coat of clean engine oil to
the O-ring of the new oil filter cartridge.TIPMake sure that the O-ring is properly seated.
8. Install the new oil filter cartridge with anoil filter wrench, and then tighten it to the
specified torque with a torque wrench.
1. Oil filter cartridge
2. Oil filter wrench
2
1
1. O-ringTightening torque:Oil filter cartridge:17 N·m (1.7 kgf·m, 12 lb·ft)
1
U2HC7ME0.book Page 22 Tuesday, April 19, 2016 10:33 AM