engine oil YAMAHA YZ125LC 2001 Betriebsanleitungen (in German)
[x] Cancel search | Manufacturer: YAMAHA, Model Year: 2001, Model line: YZ125LC, Model: YAMAHA YZ125LC 2001Pages: 558, PDF-Größe: 13.11 MB
Page 116 of 558
2-13
SPECCABLE ROUTING DIAGRAM
EC240000
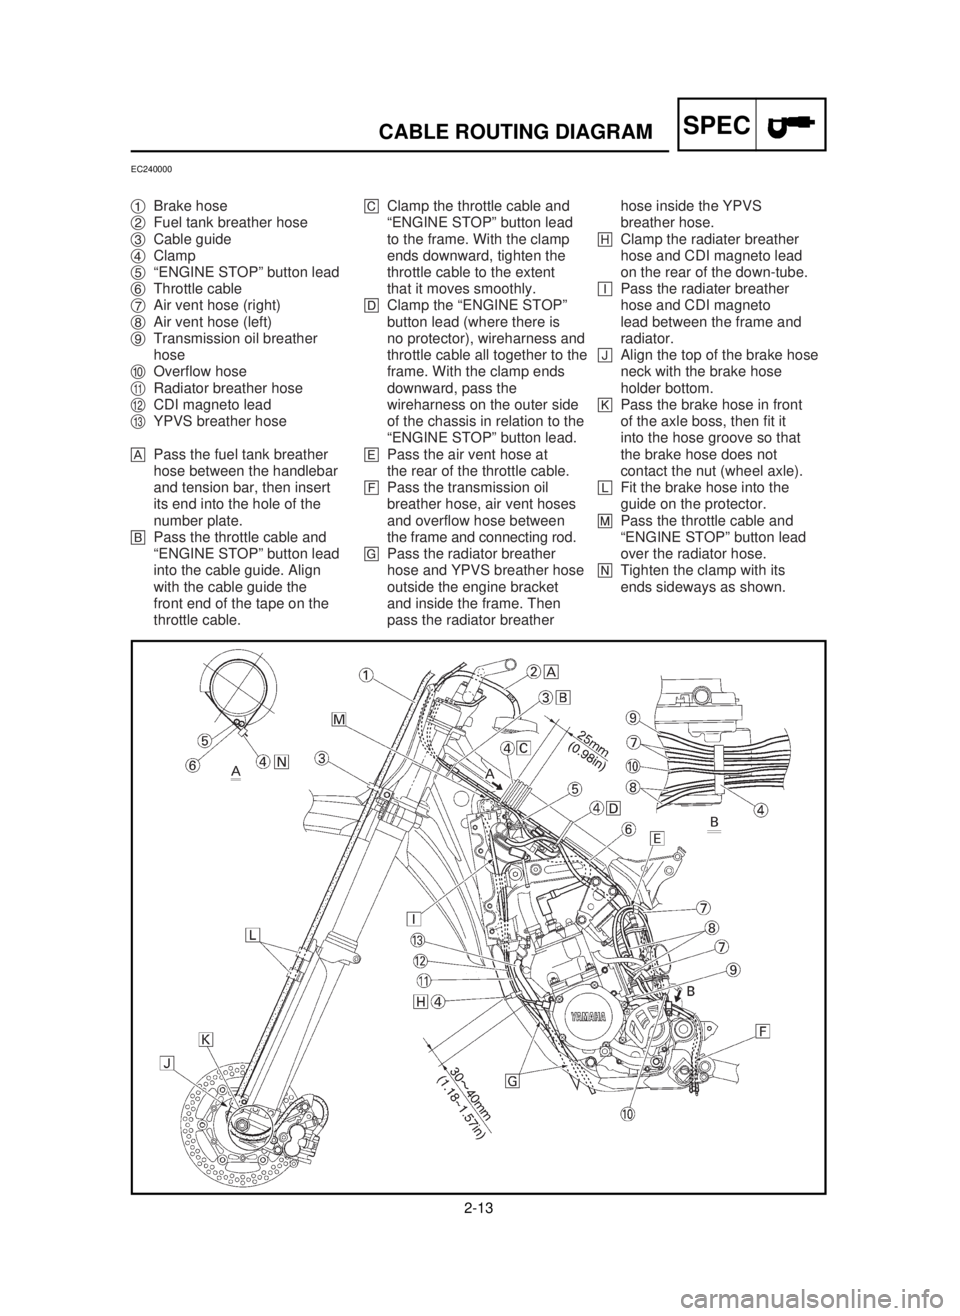
1Brake hose
2Fuel tank breather hose
3Cable guide
4Clamp
5“ENGINE STOP” button lead
6Throttle cable
7Air vent hose (right)
8Air vent hose (left)
9Transmission oil breather
hose
0Overflow hose
qRadiator breather hose
wCDI magneto lead
eYPVS breather hose
APass the fuel tank breather
hose between the handlebar
and tension bar, then insert
its end into the hole of the
number plate.
BPass the throttle cable and
“ENGINE STOP” button lead
into the cable guide. Align
with the cable guide the
front end of the tape on the
throttle cable.CClamp the throttle cable and
“ENGINE STOP” button lead
to the frame. With the clamp
ends downward, tighten the
throttle cable to the extent
that it moves smoothly.
DClamp the “ENGINE STOP”
button lead (where there is
no protector), wireharness and
throttle cable all together to the
frame. With the clamp ends
downward, pass the
wireharness on the outer side
of the chassis in relation to the
“ENGINE STOP” button lead.
EPass the air vent hose at
the rear of the throttle cable.
FPass the transmission oil
breather hose, air vent hoses
and overflow hose between
the frame and connecting rod.
GPass the radiator breather
hose and YPVS breather hose
outside the engine bracket
and inside the frame. Then
pass the radiator breather hose inside the YPVS
breather hose.
HClamp the radiater breather
hose and CDI magneto lead
on the rear of the down-tube.
IPass the radiater breather
hose and CDI magneto
lead between the frame and
radiator.
JAlign the top of the brake hose
neck with the brake hose
holder bottom.
KPass the brake hose in front
of the axle boss, then fit it
into the hose groove so that
the brake hose does not
contact the nut (wheel axle).
LFit the brake hose into the
guide on the protector.
MPass the throttle cable and
“ENGINE STOP” button lead
over the radiator hose.
NTighten the clamp with its
ends sideways as shown.
5MV-9-30-2B 6/19/00 1:14 PM Page 26
Page 118 of 558

2-14
SPECCABLE ROUTING DIAGRAM
1Brake hose holder
2Master cylinder
3Brake hose
4Hose guide
5CDI unit band
6CDI unit
7High tension cord
8Ignition coil
9Cable guide
0Radiator breather hose
qWireharness
w“ENGINE STOP” button lead
eCDI magneto lead
rClutch cable
tClamp
yCDI unit bracket
uEngine bracket
iCDI unit damper
APass the brake hose into
the brake hose holder.BIf the brake hose contacts
the spring (rear shock
absorber), correct its twist.
CInstall the brake hose so that
its pipe portion directs as
shown and lightly touches
the projection on the master
cylinder.
DPass the reservoir hose
between the brake hose and
swingarm bracket.
EPut the CDI unit fully in
the CDI unit band.
FFasten the ground lead
together with the ignition
coil.
GPass the cluch cable into
the cable guide.
HClamp the CDI magneto lead
on the upper part of
the frame gusset at its
protecting tube.IPass the clutch cable over
the radiator hose.
JClamp the wireharness on
the top of the CDI unit with
the clamp end downward.
KCut the clamp end to be flush
with CDI unit side.
LFit the CDI unit band over
the CDI unit bracket till it
stops.
MInstall the brake hose to
the caliper with the paint on
the pipe facing the caliper
and with the pipe contacting
the caliper projection.
NPass the radiator breather
hose between the frame and
radiator hose so that it is not
kinked or wedged.
OPosition the CDI unit between
the engine brackets as
shown.
5MV-9-30-2B 6/19/00 1:14 PM Page 28
Page 134 of 558

3-4
PRE-OPERATION INSPECTION AND MAINTENANCE
INSP
ADJ
EC320000
PRE-OPERATION INSPECTION AND MAINTENANCE
Before riding for break-in operation, practice or a race, make sure the machine is in good operating
condition.
Before using this machine, check the following points.
EC321000
GENERAL INSPECTION AND MAINTENANCE
Item Routine Page
Coolant Check that coolant is filled up to the radiator filler cap.
Check the cooling system for leakage.P3-5~9
Fuel Check that a fresh mixture of oil and gasoline is filled in
the fuel tank. Check the fuel line for leakage.P1-12
Transmission oil Check that the oil level is correct. Check the crankcase
for leakage.P3-12~14
Gear shifter and clutch Check that gears can be shifted correctly in order and
that the clutch operates smoothly.P3-9
Throttle grip/Housing Check that the throttle grip operation and free play
are correctly adjusted. Lubricate the throttle grip and P3-10~11
housing, if necessary.
Brakes Check the play of front brake and effect of front and
rear brake.P3-17~23
Chain Check chain slack and alignment. Check that the chain
is lubricated properly.P3-24~26
Wheels Check for excessive wear and tire pressure. Check for
loose spokes and have no excessive play.P3-34~35
Steering Check that the handlebar can be turned smoothly and
have no excessive play.P3-35~36
Front forks and Check that they operate smoothly and there is no oil
rear shock absorber leakage.P3-26~33
Cables (wires) Check that the clutch and throttle cables move smooth-
ly. Check that they are not caught when the handlebars —
are turned or when the front forks travel up and down.
Muffler Check that the muffler is tightly mounted and has no
cracks.P3-15~16
Sprocket Check that the driven sprocket tightening bolt is
not loose.P3-24
Lubrication Check for smooth operation. Lubricate if necessary. P3-37
Bolts and nuts Check the chassis and engine for loose bolts and nuts. P1-16
Lead connectors Check that the CDI magneto, CDI unit, and ignition coil
are connected tightly.P1-6
Settings Is the machine set suitably for the condition of the
racing course and weather or by taking into account the
P7-1~24
results of test runs before racing? Are inspection and
maintenance completely done?
5MV-9-30-3A 6/19/00 1:52 PM Page 14
Page 142 of 558

3-7
INSP
ADJ
RADIATOR CAP INSPECTION
cC
9Do not mix more than one type of ethyl-
ene glycol antifreeze containing corro-
sion inhibitors for aluminum engine.
9Do not use water containing impurities
or oil.
7. Install:
9Radiator cap
Start the engine and warm it up for a sev-
eral minutes.
8. Check:
9Coolant level
Coolant level low ÕAdd coolant.
EC355000
RADIATOR CAP INSPECTION
1. Inspect:
9Seal (radiator cap) 1
9Valve and valve seat 2
Crack/Damage ÕReplace.
Exist fur deposits 3ÕClean or replace.
Handling notes of coolant:
The coolant is harmful so it should be handled
with special care.
w
9When coolant splashes to your eye.
Thoroughly wash your eye with water
and see your doctor.
9When coolant splashes to your clothes.
Quickly wash it away with water and then
with soap.
9When coolant is swallowed.
Quickly make him vomit and take him to
a doctor.
5MV-9-30-3A 6/19/00 1:52 PM Page 22
Page 152 of 558
3-12
INSP
ADJ
TRANSMISSION OIL LEVEL CHECK
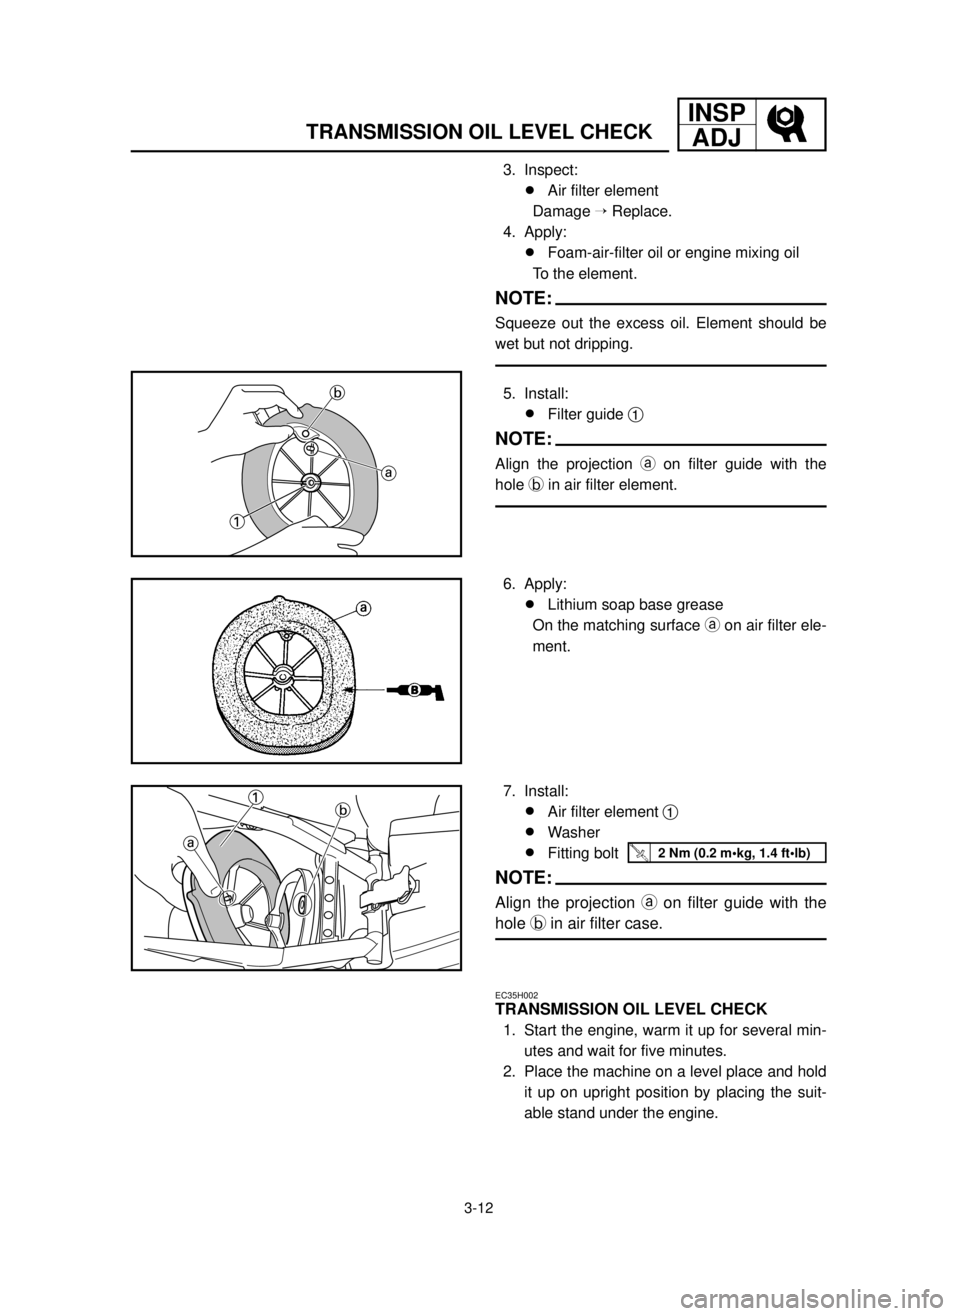
3. Inspect:
9Air filter element
Damage ÕReplace.
4. Apply:
9Foam-air-filter oil or engine mixing oil
To the element.
NOTE:
Squeeze out the excess oil. Element should be
wet but not dripping.
5. Install:
9Filter guide 1
NOTE:
Align the projection aon filter guide with the
hole bin air filter element.
6. Apply:
9Lithium soap base grease
On the matching surface aon air filter ele-
ment.
7. Install:
9Air filter element 1
9Washer
9Fitting bolt
NOTE:
Align the projection aon filter guide with the
hole bin air filter case.
EC35H002
TRANSMISSION OIL LEVEL CHECK
1. Start the engine, warm it up for several min-
utes and wait for five minutes.
2. Place the machine on a level place and hold
it up on upright position by placing the suit-
able stand under the engine.
2 Nm (0.2 m•kg, 1.4 ft•lb)
5MV-9-30-3A 6/19/00 1:52 PM Page 32
Page 154 of 558

3-13
INSP
ADJ
TRANSMISSION OIL REPLACEMENT
3. Check:
9Transmission oil level
EC35K002
TRANSMISSION OIL REPLACEMENT
1. Start the engine and warm it up for several
minutes and wait for five minute.
2. Place the machine on a level place and hold
it on upright position by placing the suitable
stand under the engine.
3. Place a suitable container under the engine.
Transmission oil level checking steps:
9Remove the oil check bolt 1.
9Inspect the oil level.
NOTE:
Be sure the machine is positioned straight
up when inspecting the oil level.
w
Never attempt to remove the oil check bolt
just after high speed operation. The heat-
ed oil could spout out, causing danger.
Wait until the oil cools down.
Oil flows out ÕOil level is correct.
Oil does not flow out ÕOil level is low.
Add transmission
oil until oil flows
out.
9Inspect the gasket (oil check bolt),
replace if damaged.
9Tighten the oil check bolt.
Recommended oil:
Yamalube 4 (10W-30) or SAE
10W-30 type SE motor oil
Oil check bolt:
10 Nm (1.0 m•kg, 7.2 ft•lb)
5MV-9-30-3A 6/19/00 1:52 PM Page 34
Page 178 of 558

3-25
DRIVE CHAIN SLACK ADJUSTMENT
INSP
ADJ
EC36A060
DRIVE CHAIN SLACK ADJUSTMENT
1. Elevate the rear wheel by placing the suit-
able stand under the engine.
2. Check:
9Drive chain slack a
Above the seal guard installation bolt.
Out of specification ÕAdjust
NOTE:
Before checking and/or adjusting, rotate the rear
wheel through several revolutions and check the
slack several times to find the tightest point. Check
and/or adjust chain slack with rear wheel in this
“tight chain” position.
Drive chain slack:
40~50 mm (1.6~2.0 in)
Drive chain lubricant:
SAE 10W-30 motor oil or suitable
chain lubricants
5. Install:
9Drive chain 1
9Joint 2
9Master link clip 3
cC
Be sure to install the master link clip to the
direction as shown.
aTurning direction
6. Lubricate:
9Drive chain
5MV-9-30-3B 6/19/00 1:49 PM Page 14
Page 180 of 558
3-26
FRONT FORK INSPECTION
INSP
ADJ
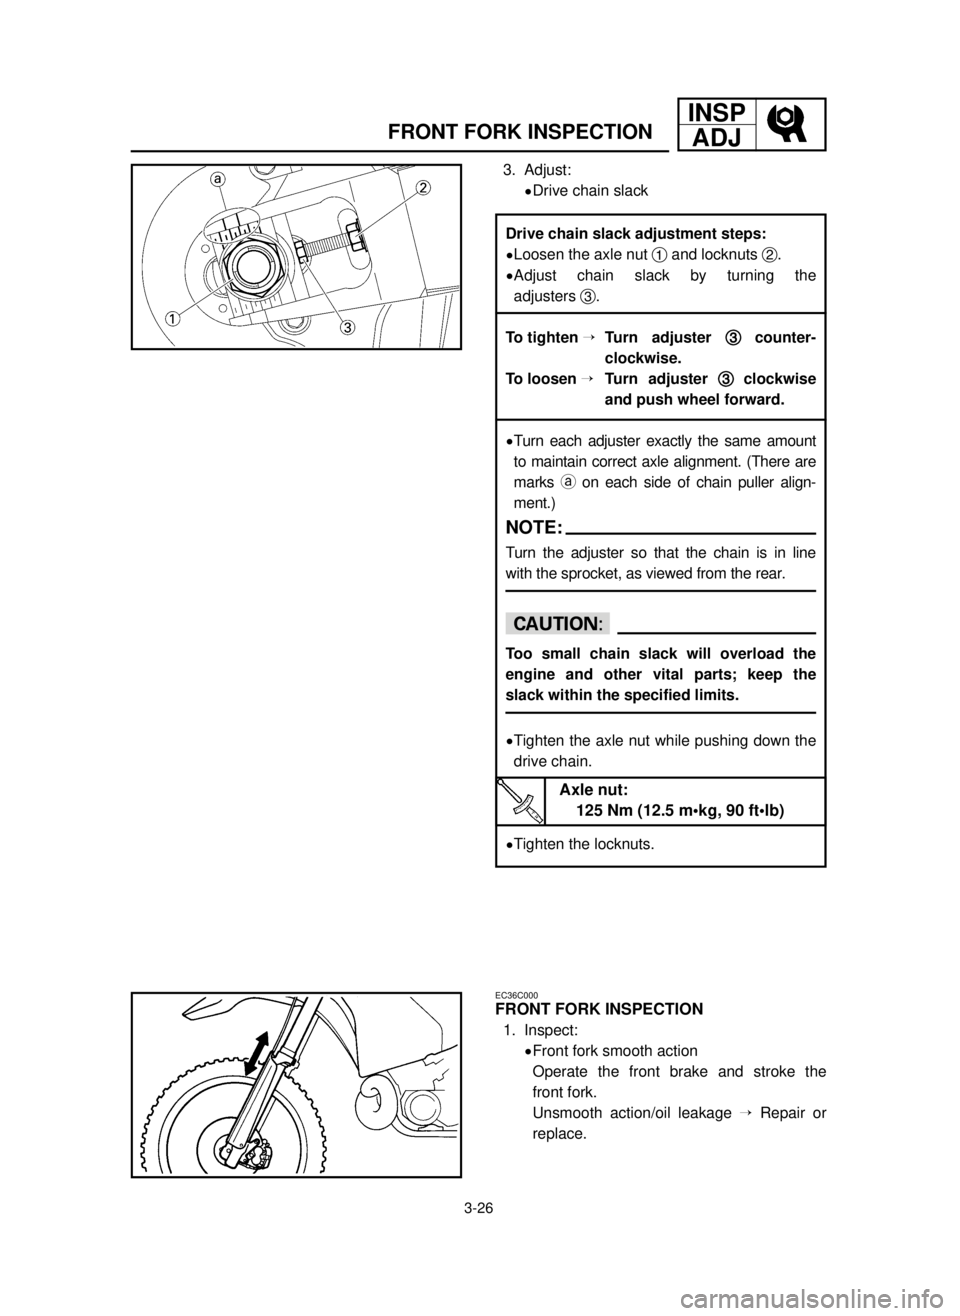
3. Adjust:
9Drive chain slack
EC36C000
FRONT FORK INSPECTION
1. Inspect:
9Front fork smooth action
Operate the front brake and stroke the
front fork.
Unsmooth action/oil leakage ÕRepair or
replace.
Drive chain slack adjustment steps:
9Loosen the axle nut 1and locknuts 2.
9Adjust chain slack by turning the
adjusters 3.
To tighten ÕTurn adjuster 3 3
counter-
clockwise.
To loosen ÕTurn adjuster 3 3
clockwise
and push wheel forward.
9Turn each adjuster exactly the same amount
to maintain correct axle alignment. (There are
marks aon each side of chain puller align-
ment.)
NOTE:
Turn the adjuster so that the chain is in line
with the sprocket, as viewed from the rear.
cC
Too small chain slack will overload the
engine and other vital parts; keep the
slack within the specified limits.
9Tighten the axle nut while pushing down the
drive chain.
9Tighten the locknuts.
Axle nut:
125 Nm (12.5 m•kg, 90 ft•lb)
5MV-9-30-3B 6/19/00 1:49 PM Page 16
Page 262 of 558

4-27
ENGCYLINDER HEAD, CYLINDER AND PISTON
EC475233
Piston ring and piston
1. Install:
9Piston ring 1
NOTE:
9Take care not to scratch the piston or damage
the piston ring.
9Align the piston ring gap with the pin 2.
9After installing the piston ring, check the
smooth movement of it.
2. Install:
9Gasket (cylinder) 1
9Small end bearing 2
9Dowel pin 3
NOTE:
9Apply the engine oil onto the bearing (crank-
shaft and connecting rod) and connecting rod
big end washers.
9Install the gasket with the seal print side toward
the crankcase.
3. Install:
9Piston 1
9Piston pin 2
9Piston pin clip 3
NOTE:
9The arrow aon the piston dome must point to
exhaust side.
9Before installing the piston pin clip, cover the
crankcase with a clean rag to prevent the pis-
ton pin clip from falling into the crankcase cavi-
ty.
cC
Do not allow the clip open ends to meet the
piston pin slot b b
.
5MV-9-30-4B 6/19/00 1:44 PM Page 20
Page 264 of 558
4-28
ENGCYLINDER HEAD, CYLINDER AND PISTON
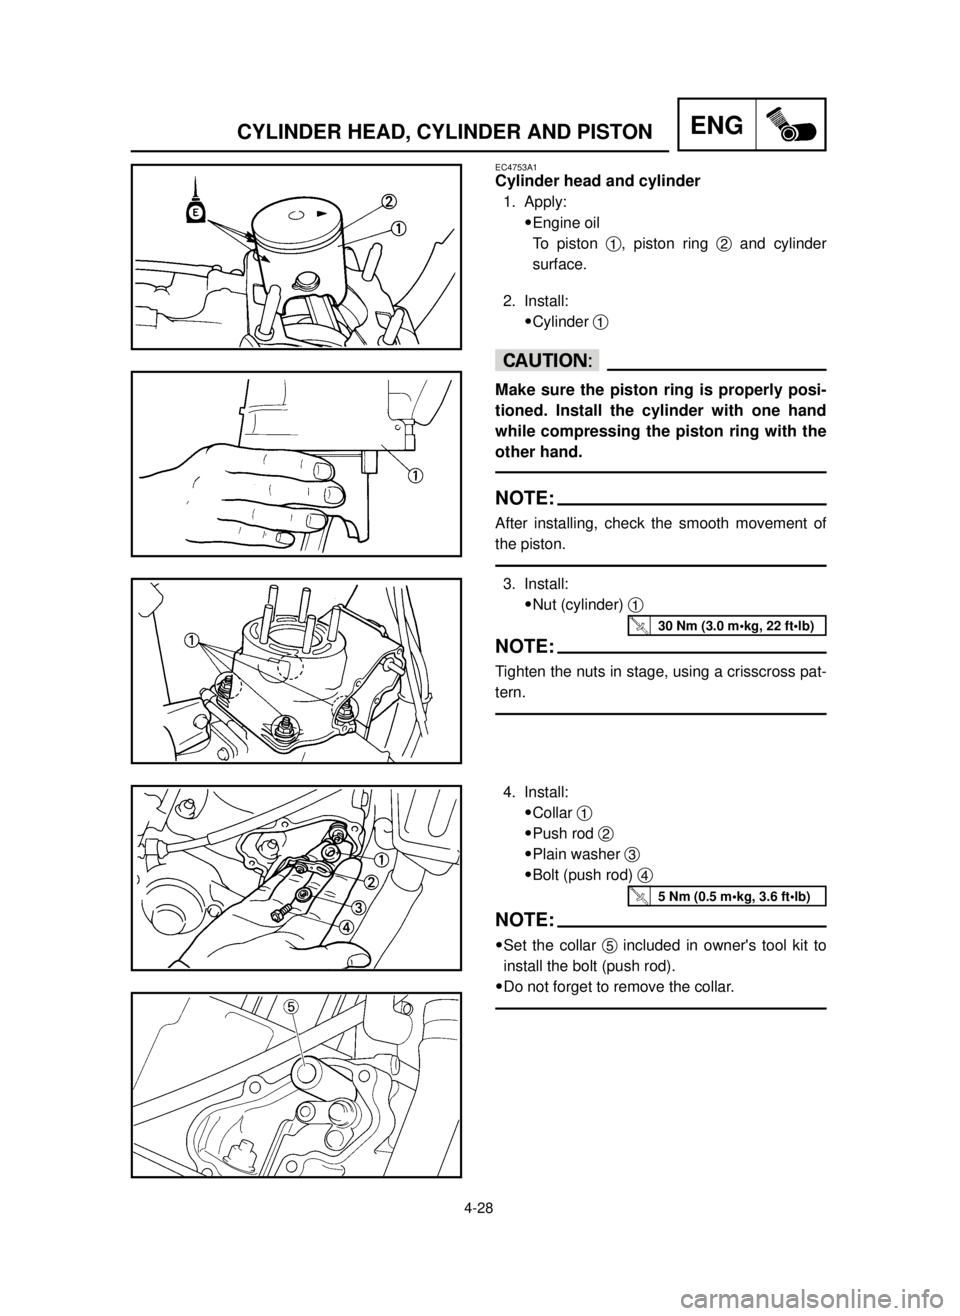
3. Install:
9Nut (cylinder) 1
NOTE:
Tighten the nuts in stage, using a crisscross pat-
tern.
4. Install:
9Collar 1
9Push rod 2
9Plain washer 3
9Bolt (push rod) 4
NOTE:
9Set the collar 5included in owner's tool kit to
install the bolt (push rod).
9Do not forget to remove the collar.
EC4753A1
Cylinder head and cylinder
1. Apply:
9Engine oil
To piston 1, piston ring 2and cylinder
surface.
2. Install:
9Cylinder 1
cC
Make sure the piston ring is properly posi-
tioned. Install the cylinder with one hand
while compressing the piston ring with the
other hand.
NOTE:
After installing, check the smooth movement of
the piston.
30 Nm (3.0 m•kg, 22 ft•lb)
5 Nm (0.5 m•kg, 3.6 ft•lb)
5MV-9-30-4B 6/19/00 1:44 PM Page 22