oil type YAMAHA YZ125LC 2001 User Guide
[x] Cancel search | Manufacturer: YAMAHA, Model Year: 2001, Model line: YZ125LC, Model: YAMAHA YZ125LC 2001Pages: 558, PDF Size: 13.11 MB
Page 156 of 558

3-14
INSP
ADJ
PILOT AIR SCREW ADJUSTMENT
4. Remove:
9Oil drain bolt 1
9Oil filler cap 2
Drain the transmission oil.
5. Install:
9Aluminum washer
9Oil drain bolt 1
6. Fill:
9Transmission oil
7. Check:
9Oil leakage
8. Check:
9Transmission oil level
9. Install:
9Oil filler cap 2
EC35L002
PILOT AIR SCREW ADJUSTMENT
1. Adjust:
9Pilot air screw 1
Recommended oil:
Yamalube 4 (10W-30) or SAE
10W-30 type SE motor oil
Oil capacity
(periodic oil change):
0.65 L (0.57 Imp qt, 0.69 US qt)
Adjustment steps:
9Screw in the pilot air screw until it is
lightly seated.
9Back out by the specified number of
turns.
Pilot air screw:
1-1/4 turns out
*1-1/2 turns out
20 Nm (2.0 m•kg, 14 ft•lb)
*For EUROPE
5MV-9-30-3A 6/19/00 1:52 PM Page 36
Page 404 of 558

5-25
CHASFRONT BRAKE AND REAR BRAKE
2. Install:
9Brake hose holder 1
9Screw (brake hose holder) 2
cC
After installing the brake hose holders,
make sure the brake hose does not contact
the spring (rear shock absorber). If it does,
correct its twist.
EC5A5600
Brake fluid
1. Fill:
9Brake fluid
Until the fluid level reaches “LOWER” level
line a.
w
9Use only the designated quality brake fluid:
otherwise, the rubber seals may deterio-
rate, causing leakage and poor brake per-
formance.
9Refill with the same type of brake fluid;
mixing fluids may result in a harmful chemi-
cal reaction and lead to poor performance.
9Be careful that water does not enter the
master cylinder when refilling. Water will
significantly lower the boiling point of the
fluid and may result in vapor lock.
cC
Brake fluid may erode painted surfaces or
plastic parts. Always clean up spilled fluid
immediately.
AFront
BRear
4 Nm (0.4 m•kg, 2.9 ft•lb)
Recommended brake fluid:
DOT #4
5MV-9-30-5A 6/19/00 1:36 PM Page 50
Page 412 of 558

5-29
CHASFRONT FORK
EC556000
HANDLING NOTE
NOTE:
The front fork requires careful attention. So it is
recommended that the front fork be maintained
at the dealers.
cC
To prevent an accidental explosion of air,
the following instructions should be ob-
served:
9The front fork with a built-in piston rod
has a very sophisticated internal con-
struction and is particularly sensitive to
foreign material.
Use enough care not to allow any foreign
material to come in when the oil is re-
placed or when the front fork is disassem-
bled and reassembled.
9Before removing the cap bolts or front
forks, be sure to extract the air from the air
chamber completely.
EC553000
REMOVAL POINTSEC553151
Cap bolt
1. Remove:
9Cap bolt 1
From the outer tube.
NOTE:
Before removing the front fork from the machine,
loosen the cap bolt.
2. Remove:
9Cap bolt 1
NOTE:
9While compressing the fork spring, set the thin
type spanners 2between the spacer 3and
spring guide 4.
9Hold the locknut 5and remove the cap bolt.
5MV-9-30-5B 6/19/00 1:29 PM Page 6
Page 474 of 558

5-60
CHASREAR SHOCK ABSORBER
EC586000
HANDLING NOTE
w
This shock absorber is provided with a
separate type tank filled with high-pressure
nitrogen gas. To prevent the danger of ex-
plosion, read and understand the following
information before handling the shock ab-
sorber.
The manufacturer can not be held respon-
sible for property damage or personal in-
jury that may result from improper han-
dling.
1. Never tamper or attempt to disassemble
the cylinder or the tank.
2. Never throw the shock absorber into an
open flame or other high heat. The shock
absorber may explode as a result of ni-
trogen gas expansion and/or damage to
the hose.
3. Be careful not to damage any part of the
gas tank. A damaged gas tank will impair
the damping performance or cause a
malfunction.
4. Take care not to scratch the contact sur-
face of the piston rod with the cylinder;
or oil could leak out.
5. Never attempt to remove the plug at the
bottom of the nitrogen gas tank. It is very
dangerous to remove the plug.
6. When scrapping the shock absorber, fol-
low the instructions on disposal.
EC587000
NOTES ON DISPOSAL (YAMAHA DEAL-
ERS ONLY)
Before disposing the shock absorber, be sure to
extract the nitrogen gas from valve 1. Wear eye
protection to prevent eye damage from escaping
gas and/or metal chips.
w
To dispose of a damaged or worn-out
shock absorber, take the unit to your
Yamaha dealer for this disposal procedure.
5MV-9-30-5D 6/19/00 1:26 PM Page 18
Page 498 of 558
7-2
TUNSETTING
That is:
9Higher temperature expands the air with its
resultant reduced density.
9Higher humidity reduces the amount of oxygen
in the air by so much of the water vapor in the
same air.
9Lower atmospheric pressure (at a high altitude)
reduces the density of the air.
EC713001
Test run
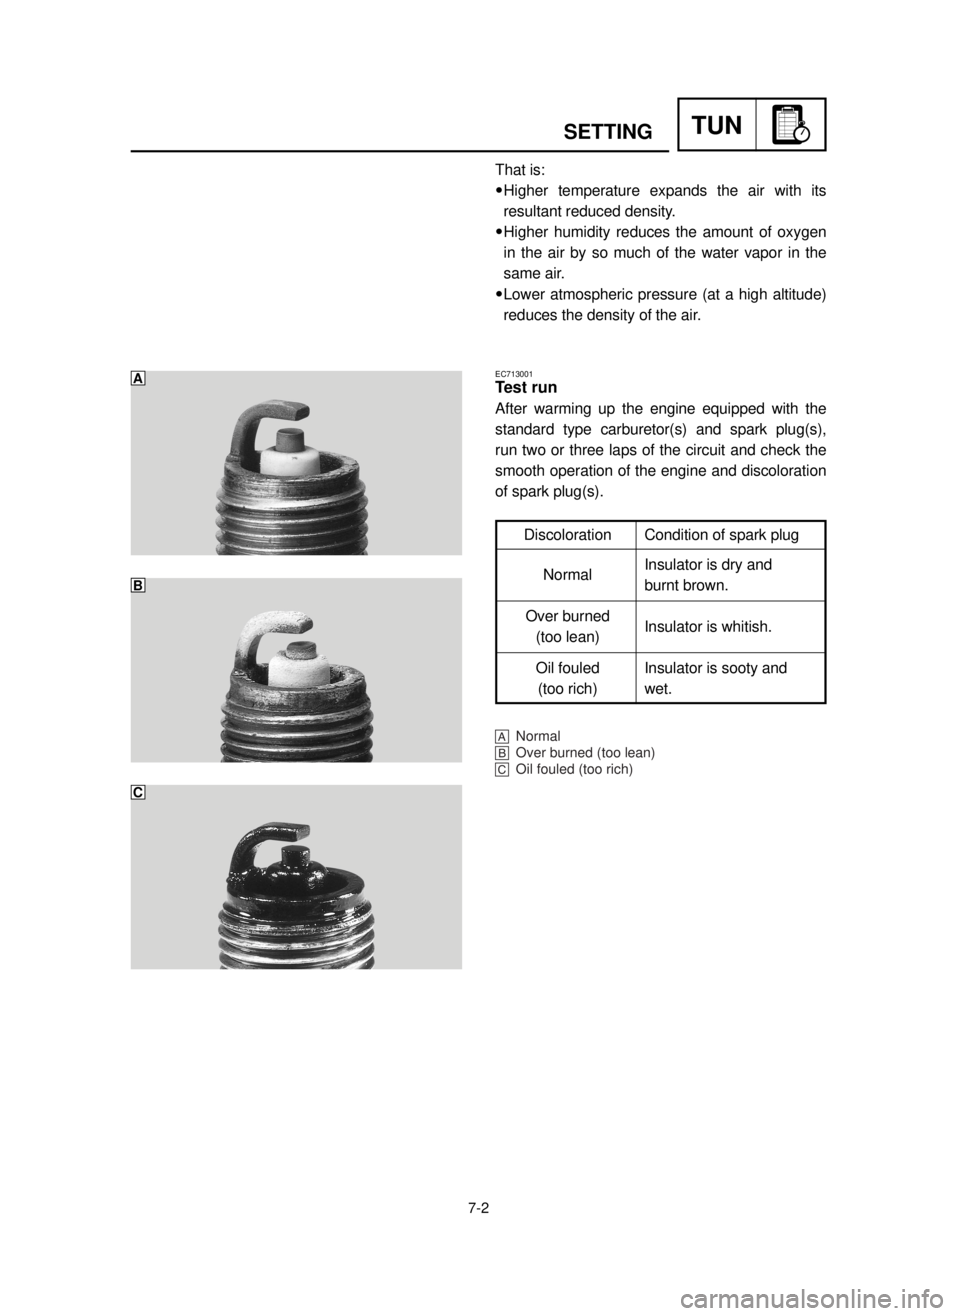
After warming up the engine equipped with the
standard type carburetor(s) and spark plug(s),
run two or three laps of the circuit and check the
smooth operation of the engine and discoloration
of spark plug(s).
ŒNormal
ºOver burned (too lean)
Oil fouled (too rich)
Discoloration Condition of spark plug
NormalInsulator is dry and
burnt brown.
Over burned
Insulator is whitish.
(too lean)
Oil fouled Insulator is sooty and
(too rich) wet.
A
B
C
5MV-9-30-7A 6/19/00 1:24 PM Page 4