torque YAMAHA YZ250F 2005 Notices Demploi (in French)
[x] Cancel search | Manufacturer: YAMAHA, Model Year: 2005, Model line: YZ250F, Model: YAMAHA YZ250F 2005Pages: 668, PDF Size: 15.74 MB
Page 20 of 668
EC0A0000
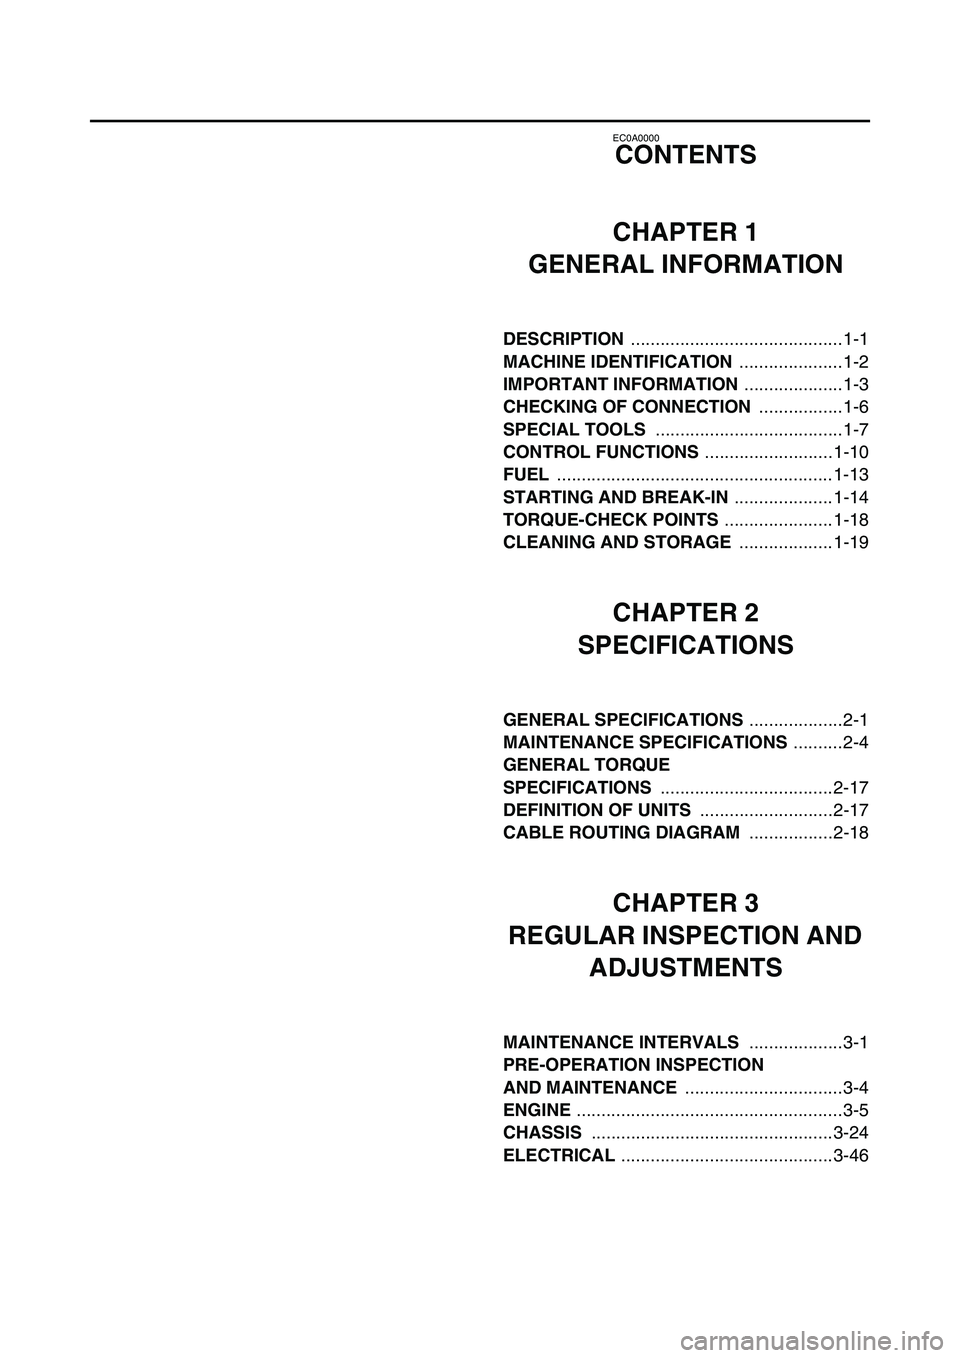
CONTENTS
CHAPTER 1
GENERAL INFORMATION
DESCRIPTION
...........................................1-1
MACHINE IDENTIFICATION
.....................1-2
IMPORTANT INFORMATION
....................1-3
CHECKING OF CONNECTION
.................1-6
SPECIAL TOOLS
......................................1-7
CONTROL FUNCTIONS
..........................1-10
FUEL
........................................................1-13
STARTING AND BREAK-IN
....................1-14
TORQUE-CHECK POINTS
......................1-18
CLEANING AND STORAGE
...................1-19
CHAPTER 2
SPECIFICATIONS
GENERAL SPECIFICATIONS
...................2-1
MAINTENANCE SPECIFICATIONS
..........2-4
GENERAL TORQUE
SPECIFICATIONS
...................................2-17
DEFINITION OF UNITS
...........................2-17
CABLE ROUTING DIAGRAM
.................2-18
CHAPTER 3
REGULAR INSPECTION AND
ADJUSTMENTS
MAINTENANCE INTERVALS
...................3-1
PRE-OPERATION INSPECTION
AND MAINTENANCE
................................3-4
ENGINE
......................................................3-5
CHASSIS
.................................................3-24
ELECTRICAL
...........................................3-46
Page 64 of 668

1 - 17
GEN
INFO
STARTING AND BREAK-IN
BREAK-IN PROCEDURES
1. Before starting the engine, fill the fuel tank
with the fuel.
2. Perform the pre-operation checks on the
machine.
3. Start and warm up the engine. Check the
idle speed, and check the operation of the
controls and the engine stop switch. Then,
restart the engine and check its operation
within no more than 5 minutes after it is
restarted.
4. Operate the machine in the lower gears at
moderate throttle openings for five to eight
minutes.
5. Check how the engine runs when the
machine is ridden with the throttle 1/4 to 1/2
open (low to medium speed) for about one
hour.
6. Restart the engine and check the operation
of the machine throughout its entire operat-
ing range. Restart the machine and oper-
ate it for about 10 to 15 more minutes. The
machine will now be ready to race.
CAUTION:
After the break-in or before each race,
you must check the entire machine for
loose fittings and fasteners as per
“TORQUE-CHECK POINTS”.
Tighten all such fasteners as required.
When any of the following parts have
been replaced, they must be broken in.
CYLINDER AND CRANKSHAFT:
About one hour of break-in operation is
necessary.
PISTON, RING, VALVES, CAMSHAFTS
AND GEARS:
These parts require about 30 minutes of
break-in operation at half-throttle or less.
Observe the condition of the engine care-
fully during operation.
Page 66 of 668
GEN
INFO
1 - 18
TORQUE-CHECK POINTS
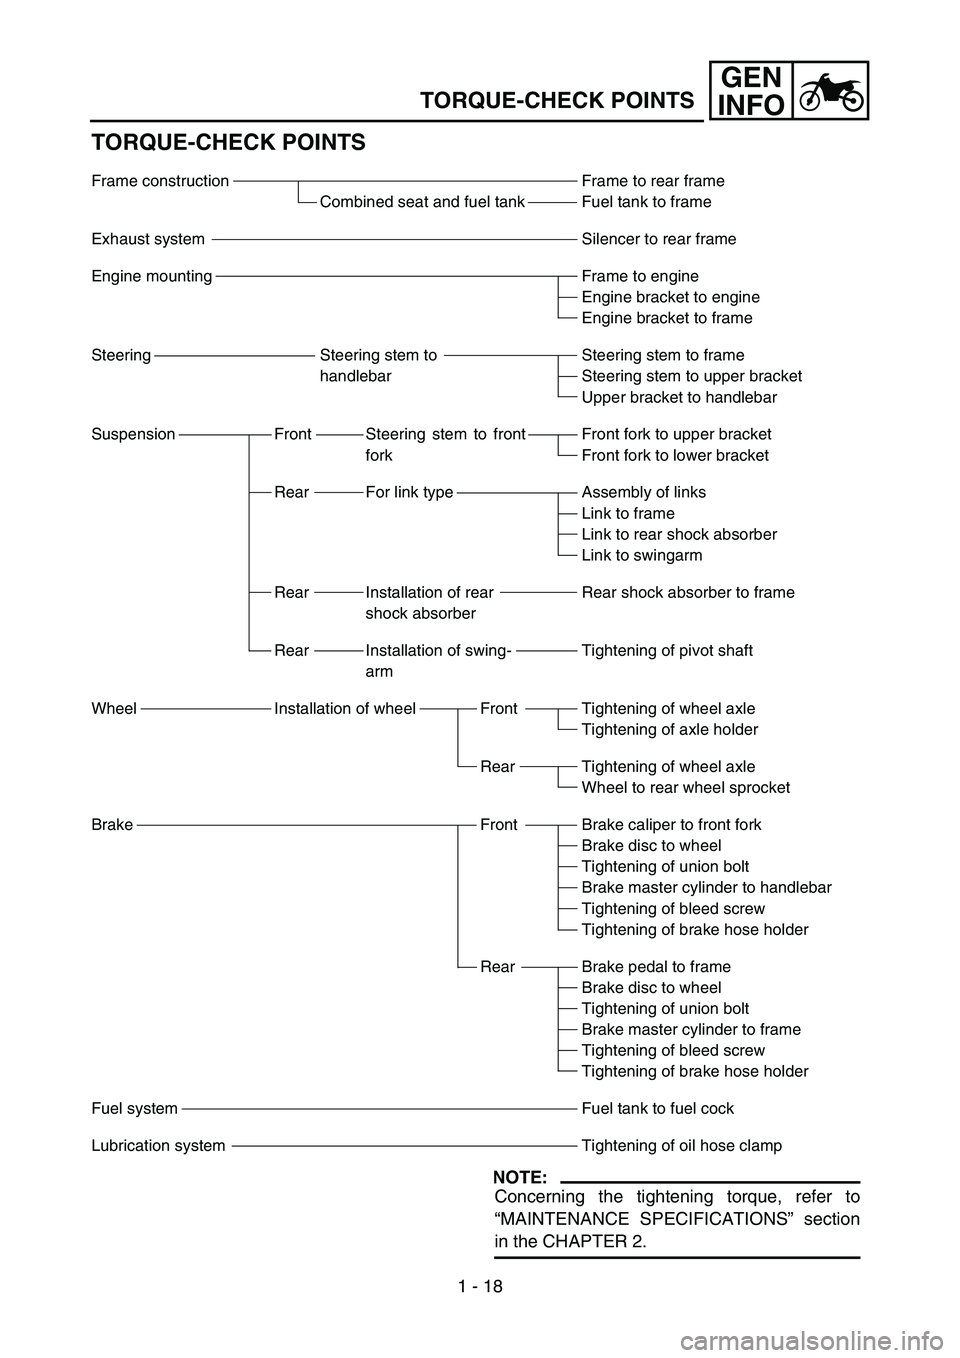
TORQUE-CHECK POINTS
Frame construction
Combined seat and fuel tank
Exhaust system
Engine mounting
Steering Steering stem to
handlebar
Suspension Front Steering stem to front
fork
Rear For link type
Rear Installation of rear
shock absorber
Rear Installation of swing-
arm
Wheel Installation of wheel Front
Rear
Brake Front
Rear
Fuel system
Lubrication systemFrame to rear frame
Fuel tank to frame
Silencer to rear frame
Frame to engine
Engine bracket to engine
Engine bracket to frame
Steering stem to frame
Steering stem to upper bracket
Upper bracket to handlebar
Front fork to upper bracket
Front fork to lower bracket
Assembly of links
Link to frame
Link to rear shock absorber
Link to swingarm
Rear shock absorber to frame
Tightening of pivot shaft
Tightening of wheel axle
Tightening of axle holder
Tightening of wheel axle
Wheel to rear wheel sprocket
Brake caliper to front fork
Brake disc to wheel
Tightening of union bolt
Brake master cylinder to handlebar
Tightening of bleed screw
Tightening of brake hose holder
Brake pedal to frame
Brake disc to wheel
Tightening of union bolt
Brake master cylinder to frame
Tightening of bleed screw
Tightening of brake hose holder
Fuel tank to fuel cock
Tightening of oil hose clamp
NOTE:
Concerning the tightening torque, refer to
“MAINTENANCE SPECIFICATIONS” section
in the CHAPTER 2.
Page 83 of 668
SPEC
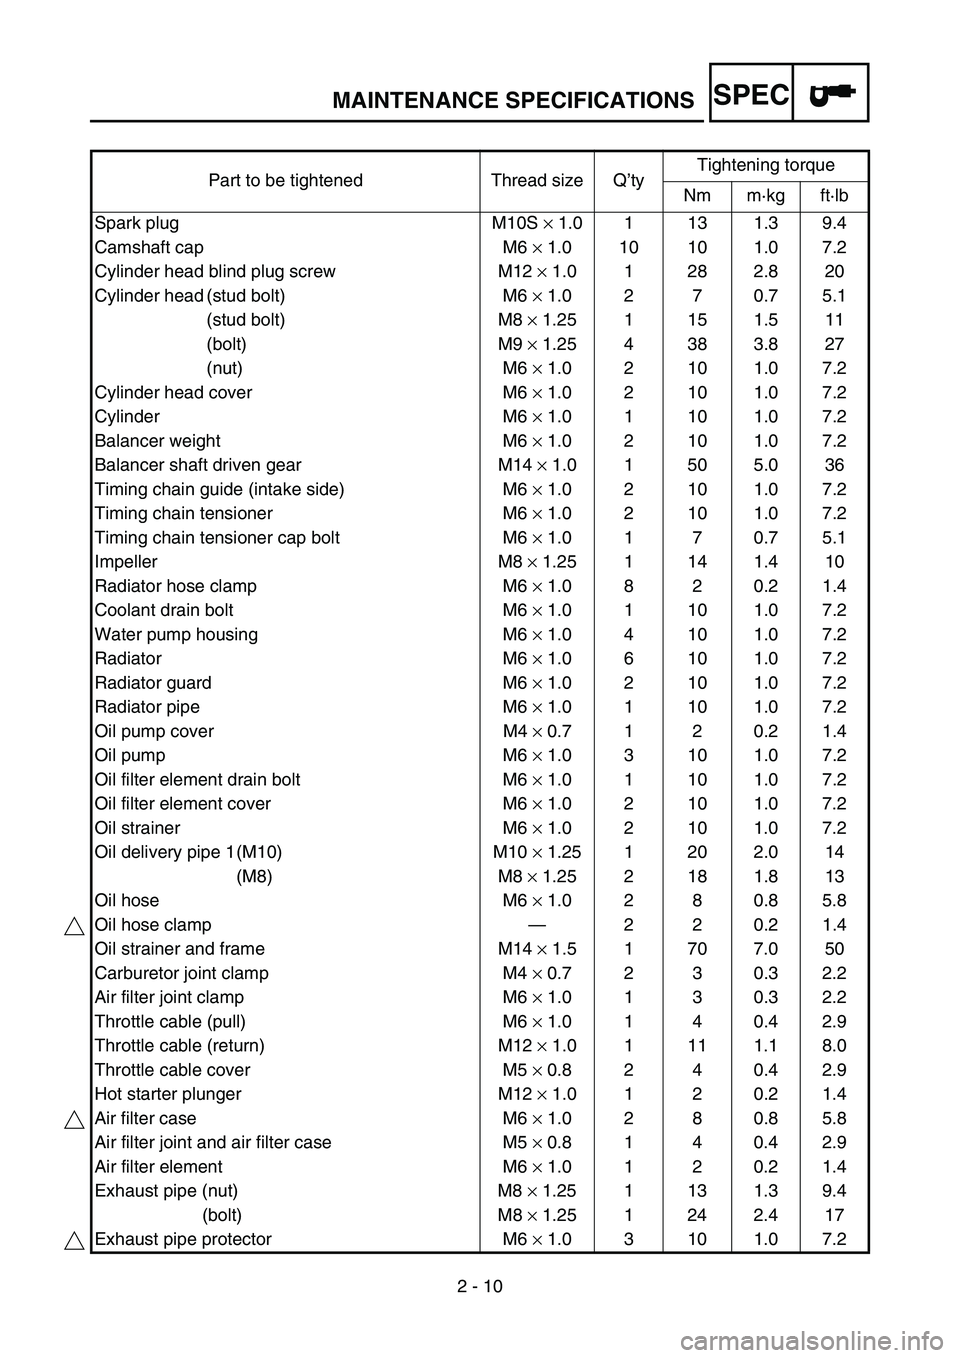
2 - 10 Part to be tightened Thread size Q’tyTightening torque
Nm m·kg ft·lb
Spark plug M10S × 1.0 1 13 1.3 9.4
Camshaft cap M6 × 1.0 10 10 1.0 7.2
Cylinder head blind plug screw M12 × 1.0 1 28 2.8 20
Cylinder head (stud bolt) M6 × 1.0 2 7 0.7 5.1
(stud bolt) M8 × 1.25 1 15 1.5 11
(bolt) M9 × 1.25 4 38 3.8 27
(nut) M6 × 1.0 2 10 1.0 7.2
Cylinder head cover M6 × 1.0 2 10 1.0 7.2
Cylinder M6 × 1.0 1 10 1.0 7.2
Balancer weight M6 × 1.0 2 10 1.0 7.2
Balancer shaft driven gear M14 × 1.0 1 50 5.0 36
Timing chain guide (intake side) M6 × 1.0 2 10 1.0 7.2
Timing chain tensioner M6 × 1.0 2 10 1.0 7.2
Timing chain tensioner cap bolt M6 × 1.0 1 7 0.7 5.1
Impeller M8 × 1.25 1 14 1.4 10
Radiator hose clamp M6 × 1.0 8 2 0.2 1.4
Coolant drain bolt M6 × 1.0 1 10 1.0 7.2
Water pump housing M6 × 1.0 4 10 1.0 7.2
Radiator M6 × 1.0 6 10 1.0 7.2
Radiator guard M6 × 1.0 2 10 1.0 7.2
Radiator pipe M6 × 1.0 1 10 1.0 7.2
Oil pump cover M4 × 0.7 1 2 0.2 1.4
Oil pump M6 × 1.0 3 10 1.0 7.2
Oil filter element drain bolt M6 × 1.0 1 10 1.0 7.2
Oil filter element cover M6 × 1.0 2 10 1.0 7.2
Oil strainer M6 × 1.0 2 10 1.0 7.2
Oil delivery pipe 1 (M10) M10 × 1.25 1 20 2.0 14
(M8) M8 × 1.25 2 18 1.8 13
Oil hose M6 × 1.0 2 8 0.8 5.8
Oil hose clamp—220.21.4
Oil strainer and frame M14 × 1.5 1 70 7.0 50
Carburetor joint clamp M4 × 0.7 2 3 0.3 2.2
Air filter joint clamp M6 × 1.0 1 3 0.3 2.2
Throttle cable (pull) M6 × 1.0 1 4 0.4 2.9
Throttle cable (return) M12 × 1.0 1 11 1.1 8.0
Throttle cable cover M5 × 0.8 2 4 0.4 2.9
Hot starter plunger M12 × 1.0 1 2 0.2 1.4
Air filter case M6 × 1.0 2 8 0.8 5.8
Air filter joint and air filter case M5 × 0.8 1 4 0.4 2.9
Air filter element M6 × 1.0 1 2 0.2 1.4
Exhaust pipe (nut) M8 × 1.25 1 13 1.3 9.4
(bolt) M8 × 1.25 1 24 2.4 17
Exhaust pipe protector M6 × 1.0 3 10 1.0 7.2
MAINTENANCE SPECIFICATIONS
Page 84 of 668
SPEC
2 - 11
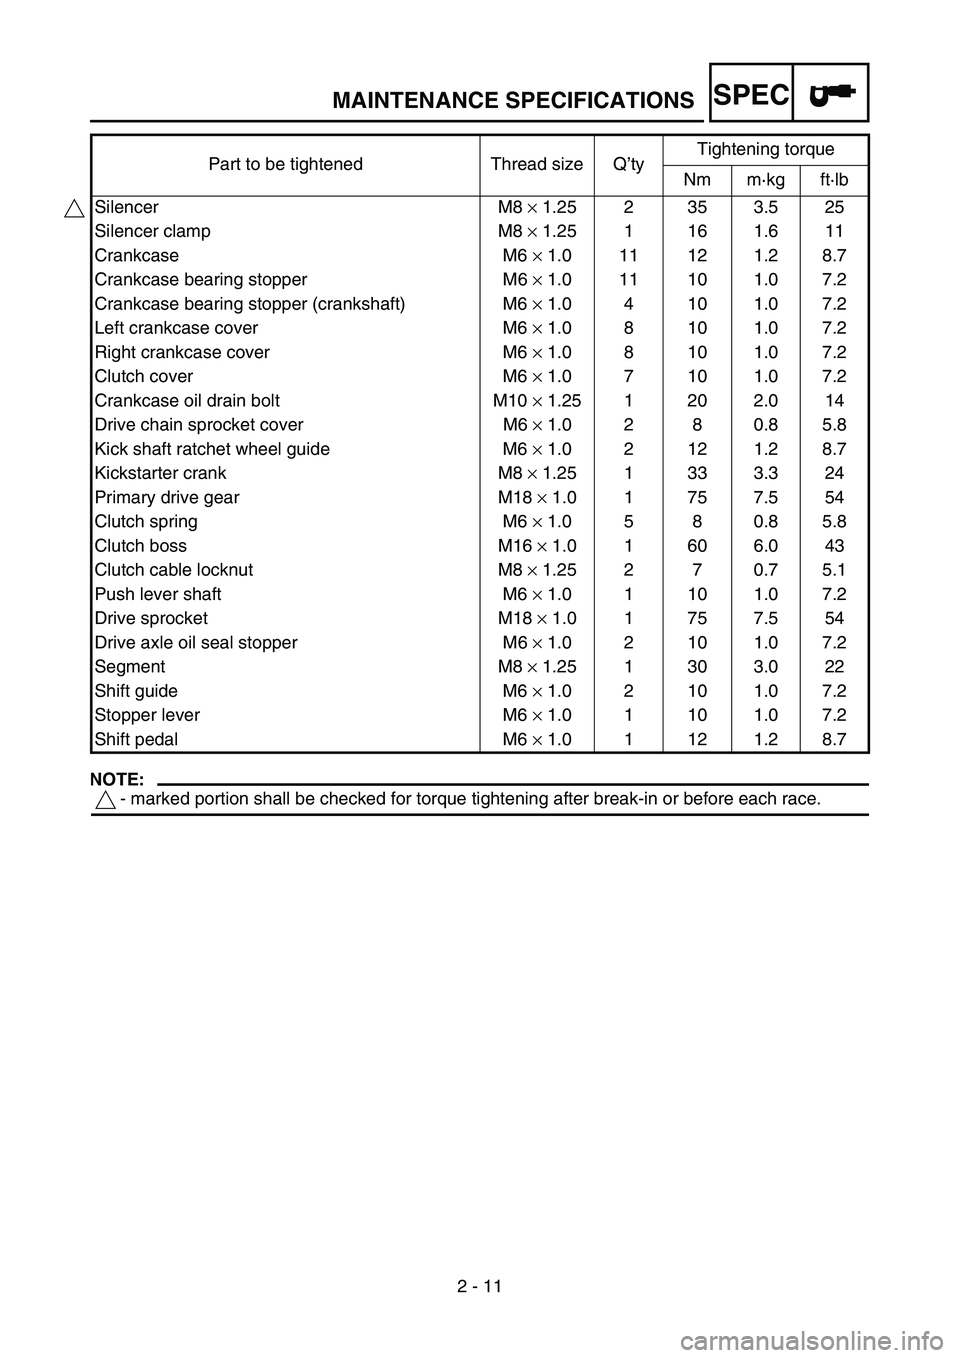
NOTE:
- marked portion shall be checked for torque tightening after break-in or before each race. Silencer M8 × 1.25 2 35 3.5 25
Silencer clamp M8 × 1.25 1 16 1.6 11
Crankcase M6 × 1.0 11 12 1.2 8.7
Crankcase bearing stopper M6 × 1.0 11 10 1.0 7.2
Crankcase bearing stopper (crankshaft) M6 × 1.0 4 10 1.0 7.2
Left crankcase cover M6 × 1.0 8 10 1.0 7.2
Right crankcase cover M6 × 1.0 8 10 1.0 7.2
Clutch cover M6 × 1.0 7 10 1.0 7.2
Crankcase oil drain bolt M10 × 1.25 1 20 2.0 14
Drive chain sprocket cover M6 × 1.0 2 8 0.8 5.8
Kick shaft ratchet wheel guide M6 × 1.0 2 12 1.2 8.7
Kickstarter crank M8 × 1.25 1 33 3.3 24
Primary drive gear M18 × 1.0 1 75 7.5 54
Clutch spring M6 × 1.0 5 8 0.8 5.8
Clutch boss M16 × 1.0 1 60 6.0 43
Clutch cable locknut M8 × 1.25 2 7 0.7 5.1
Push lever shaft M6 × 1.0 1 10 1.0 7.2
Drive sprocket M18 × 1.0 1 75 7.5 54
Drive axle oil seal stopper M6 × 1.0 2 10 1.0 7.2
Segment M8 × 1.25 1 30 3.0 22
Shift guide M6 × 1.0 2 10 1.0 7.2
Stopper lever M6 × 1.0 1 10 1.0 7.2
Shift pedal M6 × 1.0 1 12 1.2 8.7 Part to be tightened Thread size Q’tyTightening torque
Nm m·kg ft·lb
MAINTENANCE SPECIFICATIONS
Page 87 of 668
SPEC
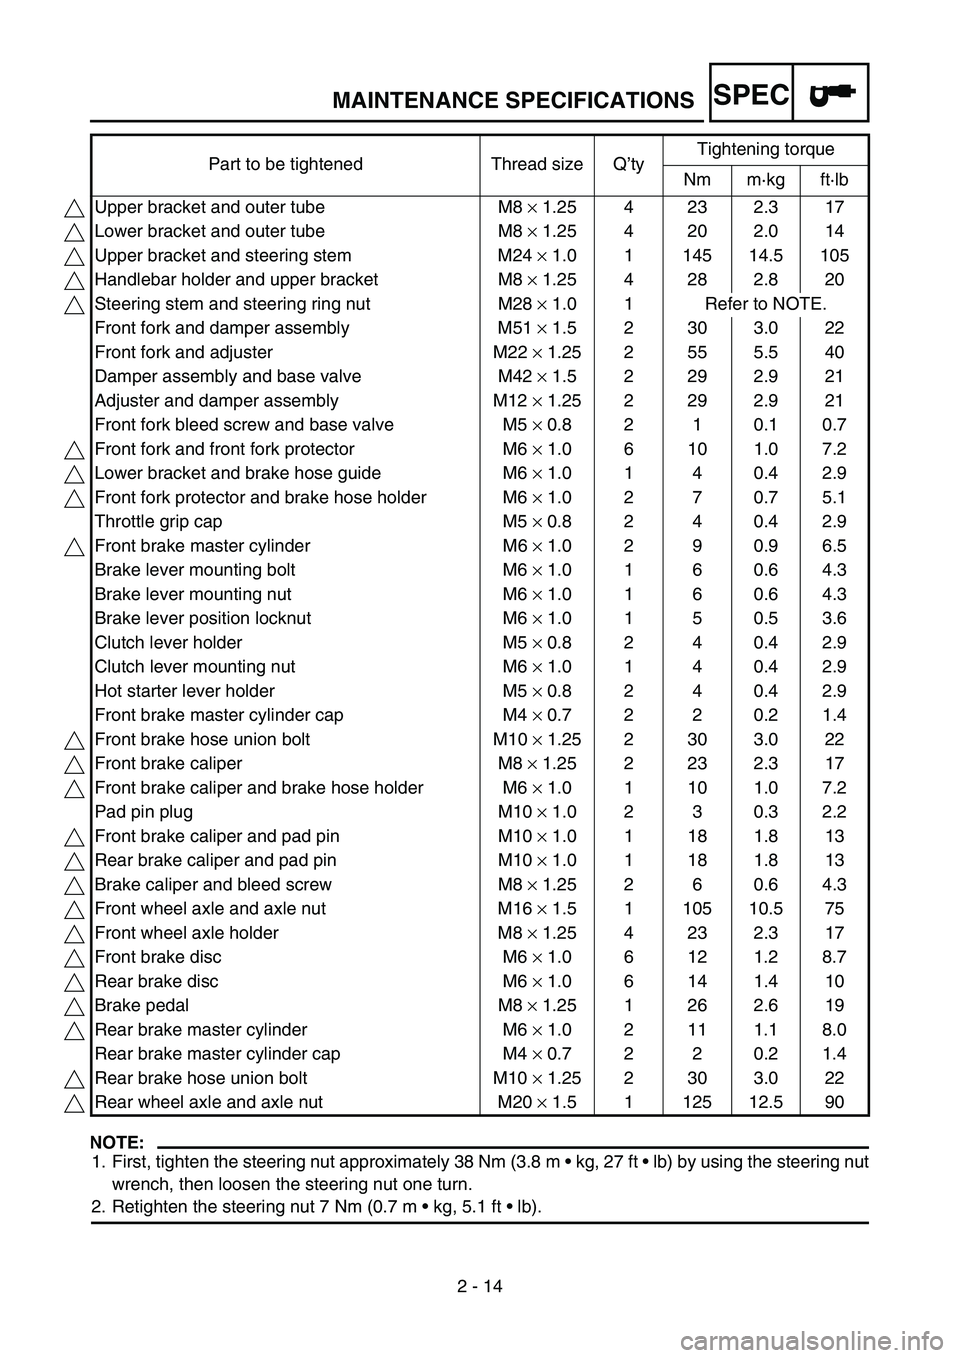
2 - 14
NOTE:
1. First, tighten the steering nut approximately 38 Nm (3.8 m kg, 27 ft lb) by using the steering nut
wrench, then loosen the steering nut one turn.
2. Retighten the steering nut 7 Nm (0.7 m kg, 5.1 ft lb). Part to be tightened Thread size Q’tyTightening torque
Nm m·kg ft·lb
Upper bracket and outer tube M8 × 1.25 4 23 2.3 17
Lower bracket and outer tube M8 × 1.25 4 20 2.0 14
Upper bracket and steering stem M24 × 1.0 1 145 14.5 105
Handlebar holder and upper bracket M8 × 1.25 4 28 2.8 20
Steering stem and steering ring nut M28 × 1.0 1 Refer to NOTE.
Front fork and damper assembly M51 × 1.5 2 30 3.0 22
Front fork and adjuster M22 × 1.25 2 55 5.5 40
Damper assembly and base valve M42 × 1.5 2 29 2.9 21
Adjuster and damper assembly M12 × 1.25 2 29 2.9 21
Front fork bleed screw and base valve M5 × 0.8 2 1 0.1 0.7
Front fork and front fork protector M6 × 1.0 6 10 1.0 7.2
Lower bracket and brake hose guide M6 × 1.0 1 4 0.4 2.9
Front fork protector and brake hose holder M6 × 1.0 2 7 0.7 5.1
Throttle grip cap M5 × 0.8 2 4 0.4 2.9
Front brake master cylinder M6 × 1.0 2 9 0.9 6.5
Brake lever mounting bolt M6 × 1.0 1 6 0.6 4.3
Brake lever mounting nut M6 × 1.0 1 6 0.6 4.3
Brake lever position locknut M6 × 1.0 1 5 0.5 3.6
Clutch lever holder M5 × 0.8 2 4 0.4 2.9
Clutch lever mounting nut M6 × 1.0 1 4 0.4 2.9
Hot starter lever holder M5 × 0.8 2 4 0.4 2.9
Front brake master cylinder cap M4 × 0.7 2 2 0.2 1.4
Front brake hose union bolt M10 × 1.25 2 30 3.0 22
Front brake caliper M8 × 1.25 2 23 2.3 17
Front brake caliper and brake hose holder M6 × 1.0 1 10 1.0 7.2
Pad pin plug M10 × 1.0 2 3 0.3 2.2
Front brake caliper and pad pin M10 × 1.0 1 18 1.8 13
Rear brake caliper and pad pin M10 × 1.0 1 18 1.8 13
Brake caliper and bleed screw M8 × 1.25 2 6 0.6 4.3
Front wheel axle and axle nut M16 × 1.5 1 105 10.5 75
Front wheel axle holder M8 × 1.25 4 23 2.3 17
Front brake disc M6 × 1.0 6 12 1.2 8.7
Rear brake disc M6 × 1.0 6 14 1.4 10
Brake pedal M8 × 1.25 1 26 2.6 19
Rear brake master cylinder M6 × 1.0 2 11 1.1 8.0
Rear brake master cylinder cap M4 × 0.7 2 2 0.2 1.4
Rear brake hose union bolt M10 × 1.25 2 30 3.0 22
Rear wheel axle and axle nut M20 × 1.5 1 125 12.5 90
MAINTENANCE SPECIFICATIONS
Page 88 of 668
SPEC
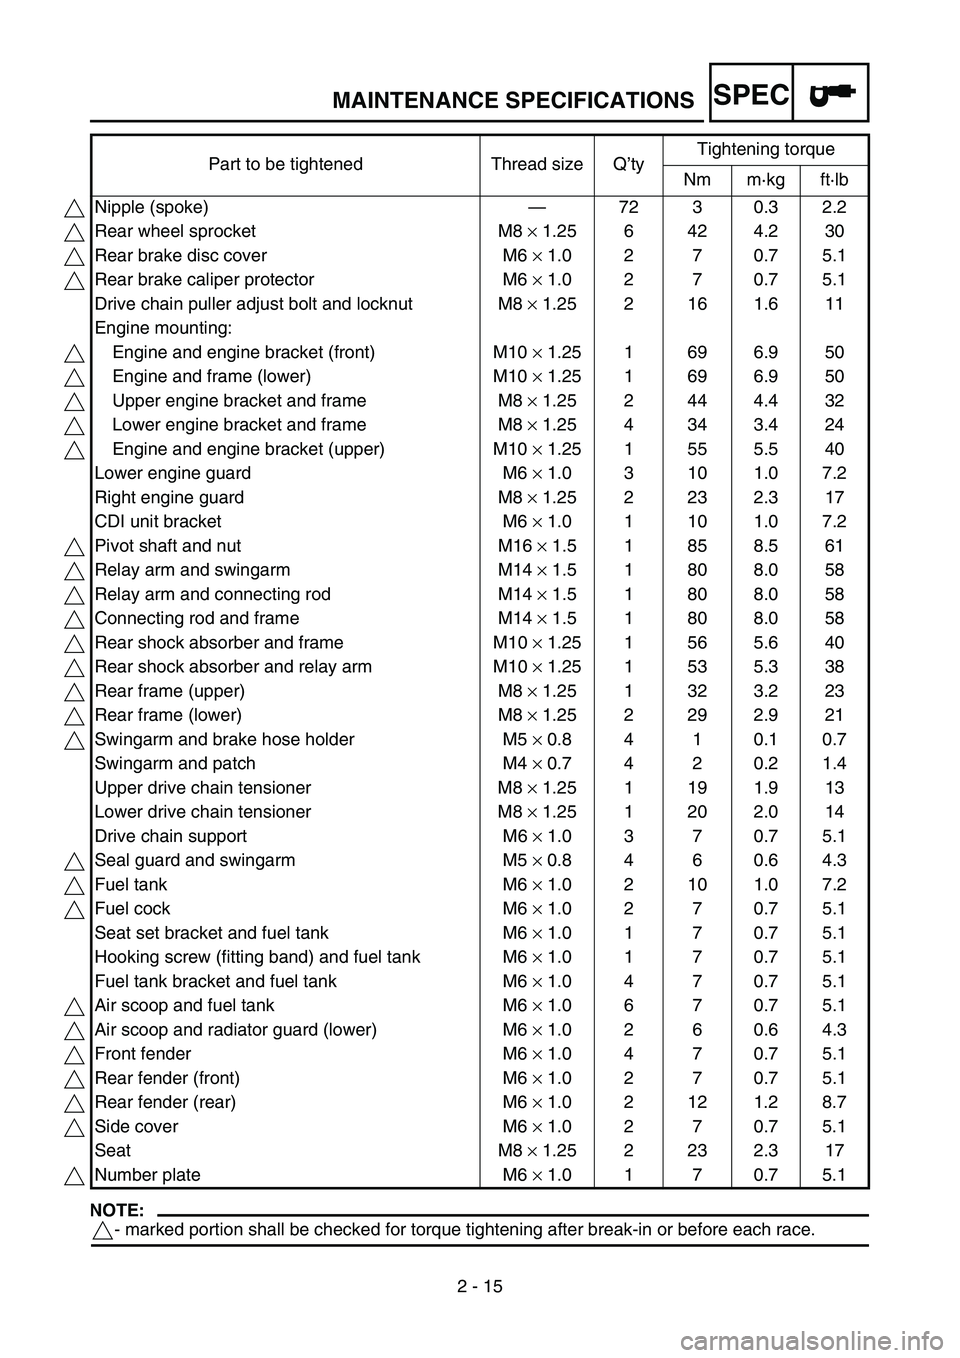
2 - 15
NOTE:
- marked portion shall be checked for torque tightening after break-in or before each race.Part to be tightened Thread size Q’tyTightening torque
Nm m·kg ft·lb
Nipple (spoke)—72 3 0.3 2.2
Rear wheel sprocket M8 × 1.25 6 42 4.2 30
Rear brake disc cover M6 × 1.0 2 7 0.7 5.1
Rear brake caliper protector M6 × 1.0 2 7 0.7 5.1
Drive chain puller adjust bolt and locknut M8 × 1.25 2 16 1.6 11
Engine mounting:
Engine and engine bracket (front) M10 × 1.25 1 69 6.9 50
Engine and frame (lower) M10 × 1.25 1 69 6.9 50
Upper engine bracket and frame M8 × 1.25 2 44 4.4 32
Lower engine bracket and frame M8 × 1.25 4 34 3.4 24
Engine and engine bracket (upper) M10 × 1.25 1 55 5.5 40
Lower engine guard M6 × 1.0 3 10 1.0 7.2
Right engine guard M8 × 1.25 2 23 2.3 17
CDI unit bracket M6 × 1.0 1 10 1.0 7.2
Pivot shaft and nut M16 × 1.5 1 85 8.5 61
Relay arm and swingarm M14 × 1.5 1 80 8.0 58
Relay arm and connecting rod M14 × 1.5 1 80 8.0 58
Connecting rod and frame M14 × 1.5 1 80 8.0 58
Rear shock absorber and frame M10 × 1.25 1 56 5.6 40
Rear shock absorber and relay arm M10 × 1.25 1 53 5.3 38
Rear frame (upper) M8 × 1.25 1 32 3.2 23
Rear frame (lower) M8 × 1.25 2 29 2.9 21
Swingarm and brake hose holder M5 × 0.8 4 1 0.1 0.7
Swingarm and patch M4 × 0.7 4 2 0.2 1.4
Upper drive chain tensioner M8 × 1.25 1 19 1.9 13
Lower drive chain tensioner M8 × 1.25 1 20 2.0 14
Drive chain support M6 × 1.0 3 7 0.7 5.1
Seal guard and swingarm M5 × 0.8 4 6 0.6 4.3
Fuel tank M6 × 1.0 2 10 1.0 7.2
Fuel cock M6 × 1.0 2 7 0.7 5.1
Seat set bracket and fuel tank M6 × 1.0 1 7 0.7 5.1
Hooking screw (fitting band) and fuel tank M6 × 1.0 1 7 0.7 5.1
Fuel tank bracket and fuel tank M6 × 1.0 4 7 0.7 5.1
Air scoop and fuel tank M6 × 1.0 6 7 0.7 5.1
Air scoop and radiator guard (lower) M6 × 1.0 2 6 0.6 4.3
Front fender M6 × 1.0 4 7 0.7 5.1
Rear fender (front) M6 × 1.0 2 7 0.7 5.1
Rear fender (rear) M6 × 1.0 2 12 1.2 8.7
Side cover M6 × 1.0 2 7 0.7 5.1
Seat M8 × 1.25 2 23 2.3 17
Number plate M6 × 1.0 1 7 0.7 5.1
MAINTENANCE SPECIFICATIONS
Page 89 of 668
SPEC
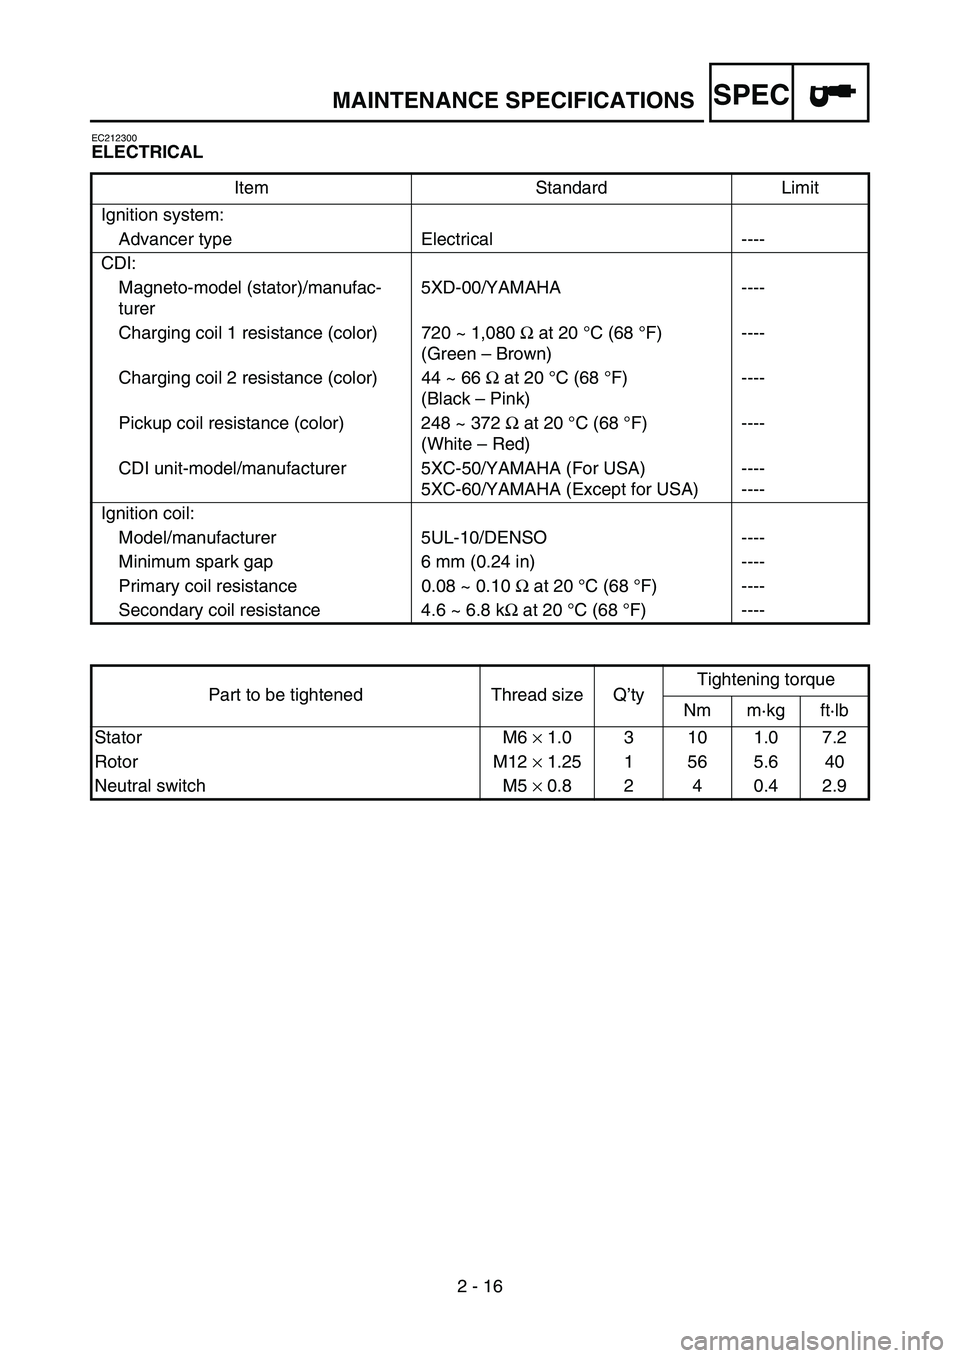
2 - 16
EC212300
ELECTRICAL
Item Standard Limit
Ignition system:
Advancer type Electrical ----
CDI:
Magneto-model (stator)/manufac-
turer5XD-00/YAMAHA ----
Charging coil 1 resistance (color) 720 ~ 1,080 Ω at 20 °C (68 °F)
(Green – Brown)----
Charging coil 2 resistance (color) 44 ~ 66 Ω at 20°C (68 °F)
(Black – Pink)----
Pickup coil resistance (color) 248 ~ 372 Ω at 20°C (68 °F)
(White – Red)----
CDI unit-model/manufacturer 5XC-50/YAMAHA (For USA)
5XC-60/YAMAHA (Except for USA)----
----
Ignition coil:
Model/manufacturer 5UL-10/DENSO ----
Minimum spark gap 6 mm (0.24 in) ----
Primary coil resistance 0.08 ~ 0.10 Ω at 20 °C (68 °F) ----
Secondary coil resistance 4.6 ~ 6.8 kΩ at 20 °C (68 °F) ----
Part to be tightened Thread size Q’tyTightening torque
Nm m·kg ft·lb
Stator M6 × 1.0 3 10 1.0 7.2
Rotor M12 × 1.25 1 56 5.6 40
Neutral switch M5 × 0.8 2 4 0.4 2.9
MAINTENANCE SPECIFICATIONS
Page 90 of 668
SPEC
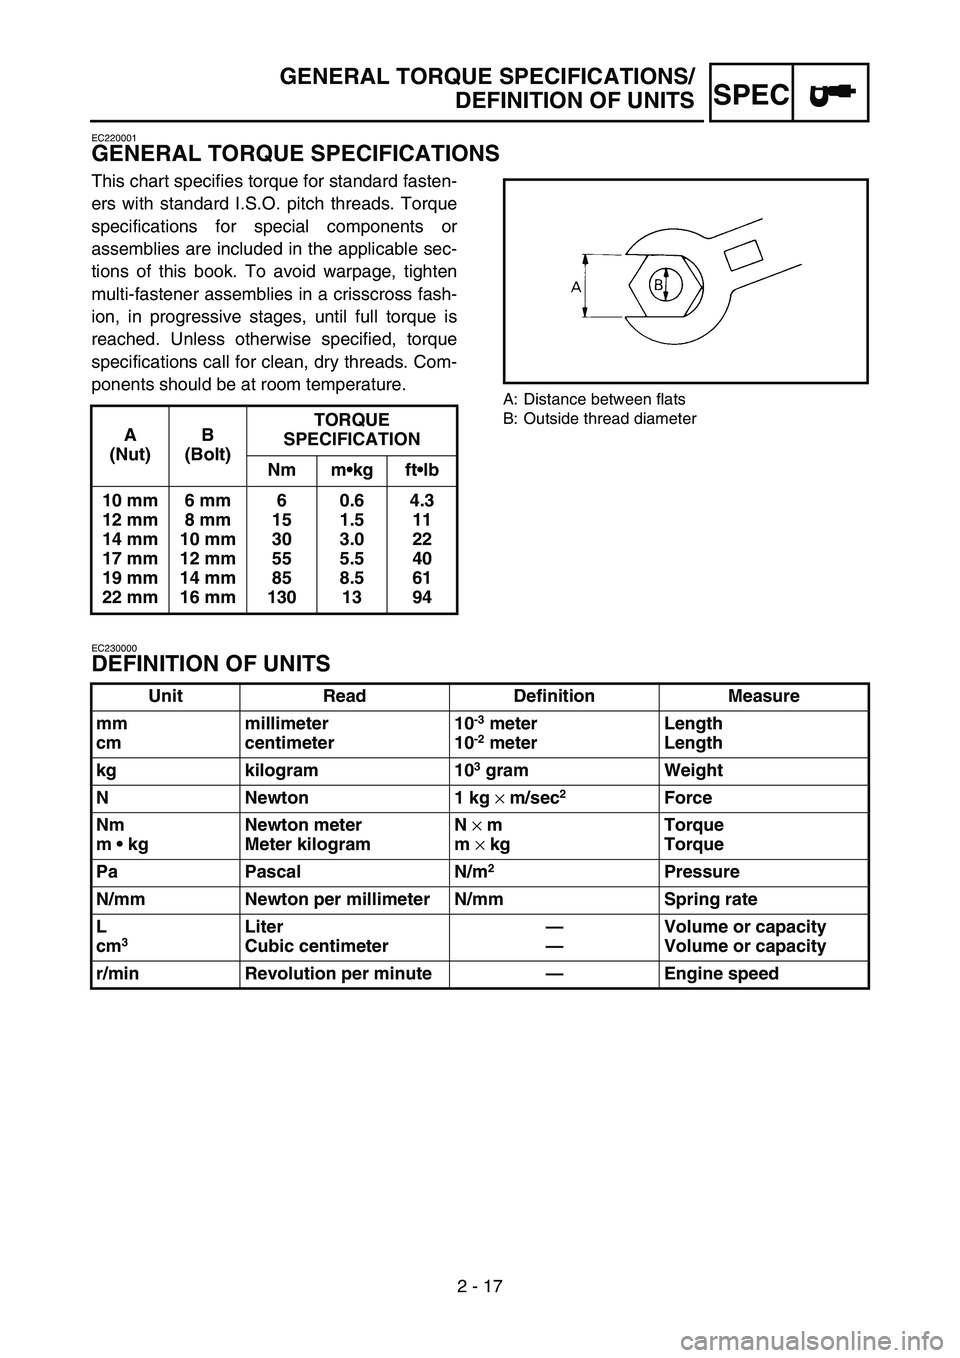
2 - 17
EC220001
GENERAL TORQUE SPECIFICATIONS
This chart specifies torque for standard fasten-
ers with standard I.S.O. pitch threads. Torque
specifications for special components or
assemblies are included in the applicable sec-
tions of this book. To avoid warpage, tighten
multi-fastener assemblies in a crisscross fash-
ion, in progressive stages, until full torque is
reached. Unless otherwise specified, torque
specifications call for clean, dry threads. Com-
ponents should be at room temperature.
A: Distance between flats
B: Outside thread diameter
EC230000
DEFINITION OF UNITS
A
(Nut)B
(Bolt)TORQUE
SPECIFICATION
Nm mkg ftlb
10 mm
12 mm
14 mm
17 mm
19 mm
22 mm6 mm
8 mm
10 mm
12 mm
14 mm
16 mm6
15
30
55
85
1300.6
1.5
3.0
5.5
8.5
134.3
11
22
40
61
94
Unit Read Definition Measure
mm
cmmillimeter
centimeter10
-3 meter
10-2 meterLength
Length
kg kilogram 10
3 gram Weight
N Newton 1 kg
× m/sec
2 Force
Nm
m kgNewton meter
Meter kilogramN
× m
m
× kgTorque
Torque
Pa Pascal N/m
2Pressure
N/mm Newton per millimeter N/mm Spring rate
L
cm
3 Liter
Cubic centimeter—
—Volume or capacity
Volume or capacity
r/min Revolution per minute—Engine speed
GENERAL TORQUE SPECIFICATIONS/
DEFINITION OF UNITS
Page 246 of 668
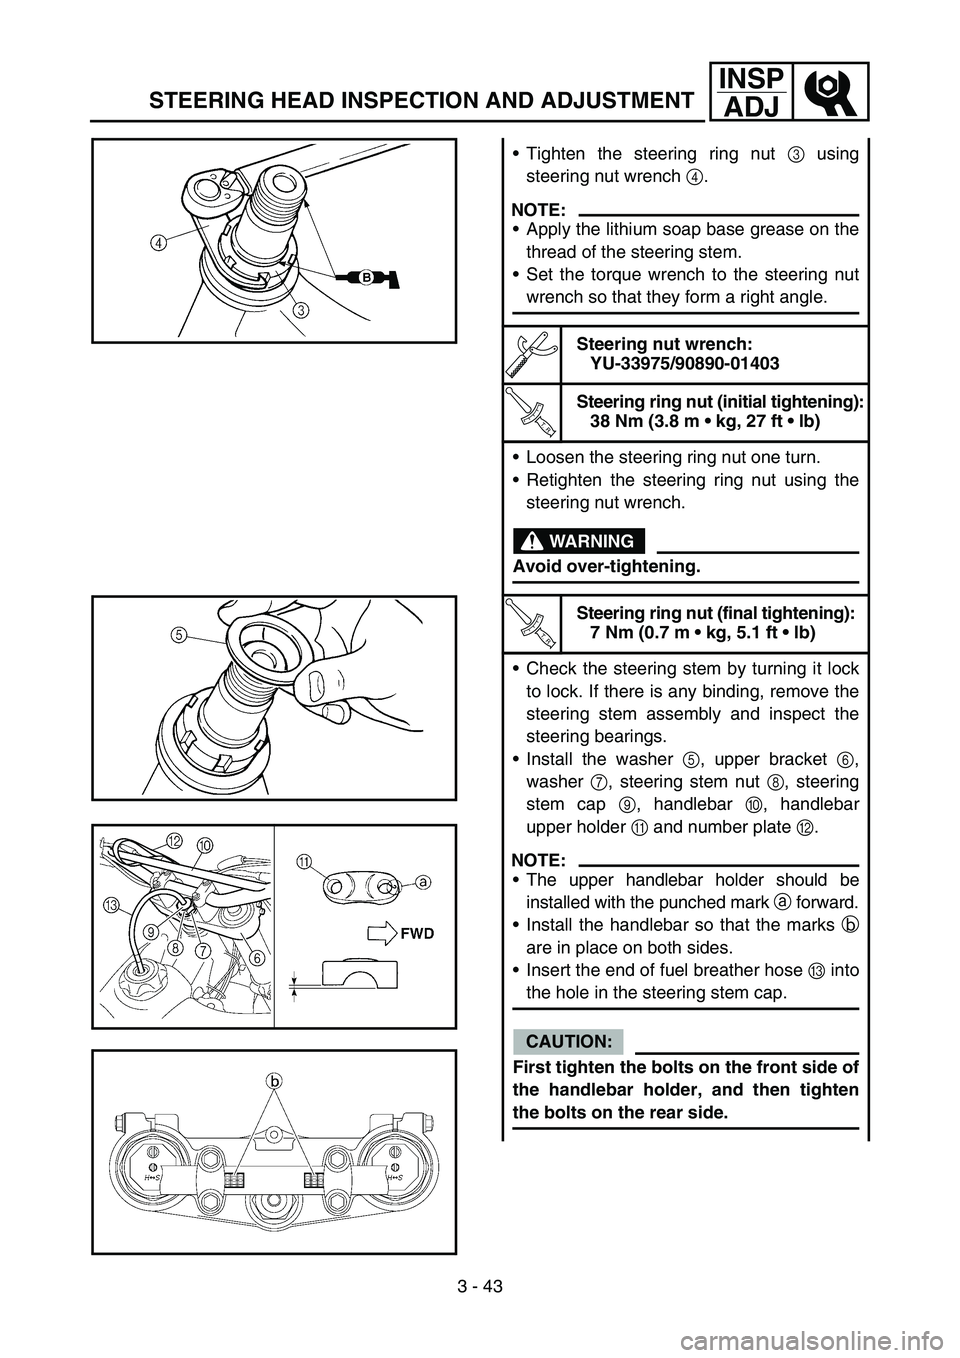
3 - 43
INSP
ADJ
STEERING HEAD INSPECTION AND ADJUSTMENT
Tighten the steering ring nut 3 using
steering nut wrench 4.
NOTE:
Apply the lithium soap base grease on the
thread of the steering stem.
Set the torque wrench to the steering nut
wrench so that they form a right angle.
Steering nut wrench:
YU-33975/90890-01403
T R..
Steering ring nut (initial tightening):
38 Nm (3.8 m kg, 27 ft lb)
Loosen the steering ring nut one turn.
Retighten the steering ring nut using the
steering nut wrench.
WARNING
Avoid over-tightening.
T R..
Steering ring nut (final tightening):
7 Nm (0.7 m kg, 5.1 ft lb)
Check the steering stem by turning it lock
to lock. If there is any binding, remove the
steering stem assembly and inspect the
steering bearings.
Install the washer 5, upper bracket 6,
washer 7, steering stem nut 8, steering
stem cap 9, handlebar 0, handlebar
upper holder A and number plate B.
NOTE:
The upper handlebar holder should be
installed with the punched mark a forward.
Install the handlebar so that the marks b
are in place on both sides.
Insert the end of fuel breather hose C into
the hole in the steering stem cap.
CAUTION:
First tighten the bolts on the front side of
the handlebar holder, and then tighten
the bolts on the rear side.