torque YAMAHA YZ250F 2006 Betriebsanleitungen (in German)
[x] Cancel search | Manufacturer: YAMAHA, Model Year: 2006, Model line: YZ250F, Model: YAMAHA YZ250F 2006Pages: 674, PDF-Größe: 21.07 MB
Page 312 of 674
4 - 29
ENG
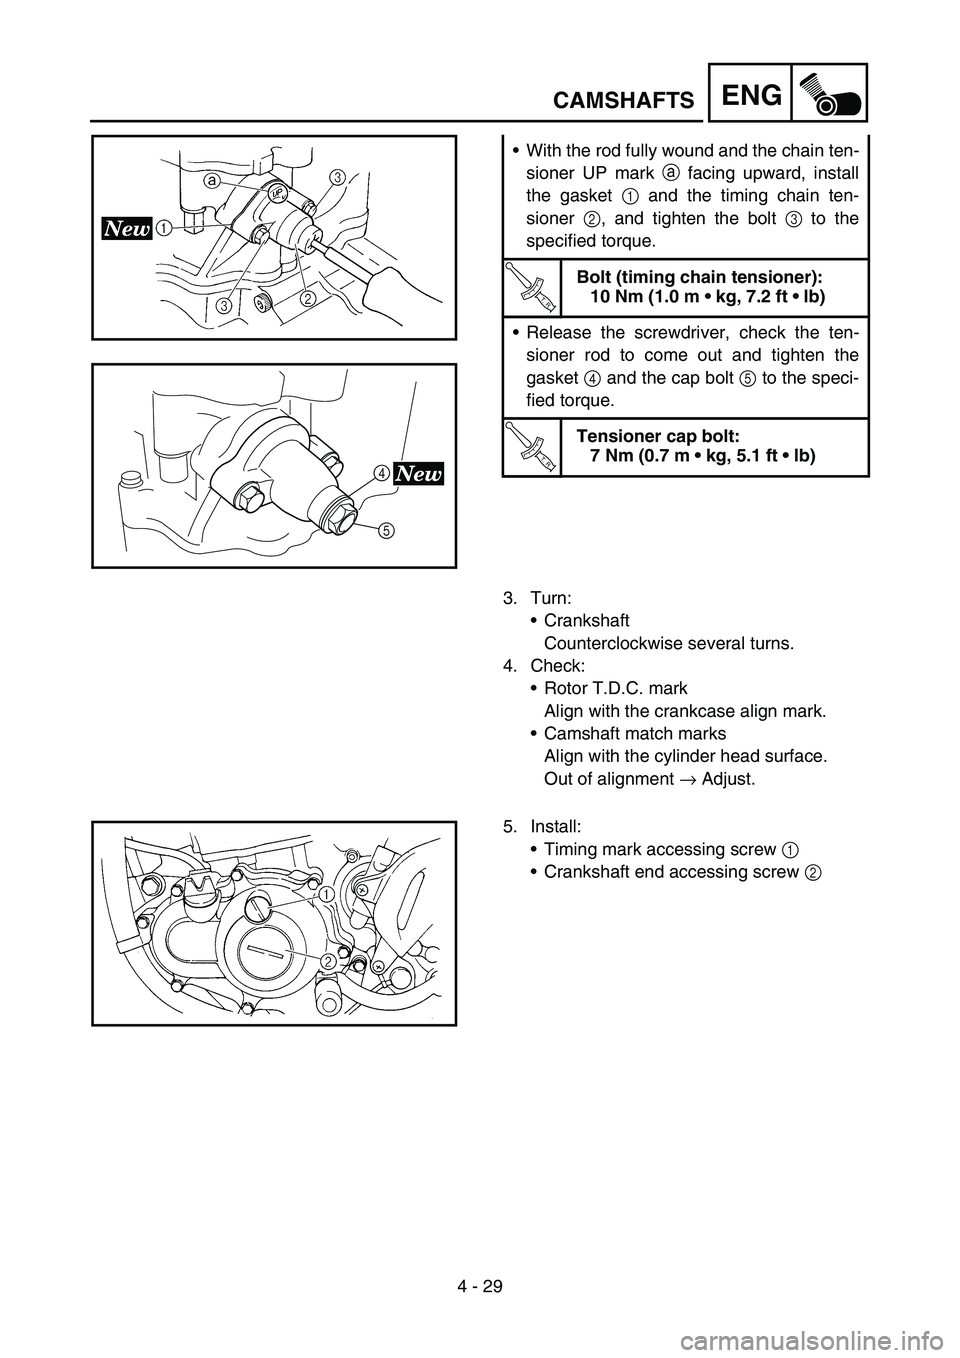
With the rod fully wound and the chain ten-
sioner UP mark a facing upward, install
the gasket 1 and the timing chain ten-
sioner 2, and tighten the bolt 3 to the
specified torque.
T R..
Bolt (timing chain tensioner):
10 Nm (1.0 m kg, 7.2 ft lb)
Release the screwdriver, check the ten-
sioner rod to come out and tighten the
gasket 4 and the cap bolt 5 to the speci-
fied torque.
T R..
Tensioner cap bolt:
7 Nm (0.7 m kg, 5.1 ft lb)
5
4
3. Turn:
Crankshaft
Counterclockwise several turns.
4. Check:
Rotor T.D.C. mark
Align with the crankcase align mark.
Camshaft match marks
Align with the cylinder head surface.
Out of alignment → Adjust.
5. Install:
Timing mark accessing screw 1
Crankshaft end accessing screw 2
CAMSHAFTS
Page 528 of 674
5 - 35
CHAS
9. Check that the damper assembly is fully
stretched. Not fully stretched → Repeat the
steps 2 to 8.
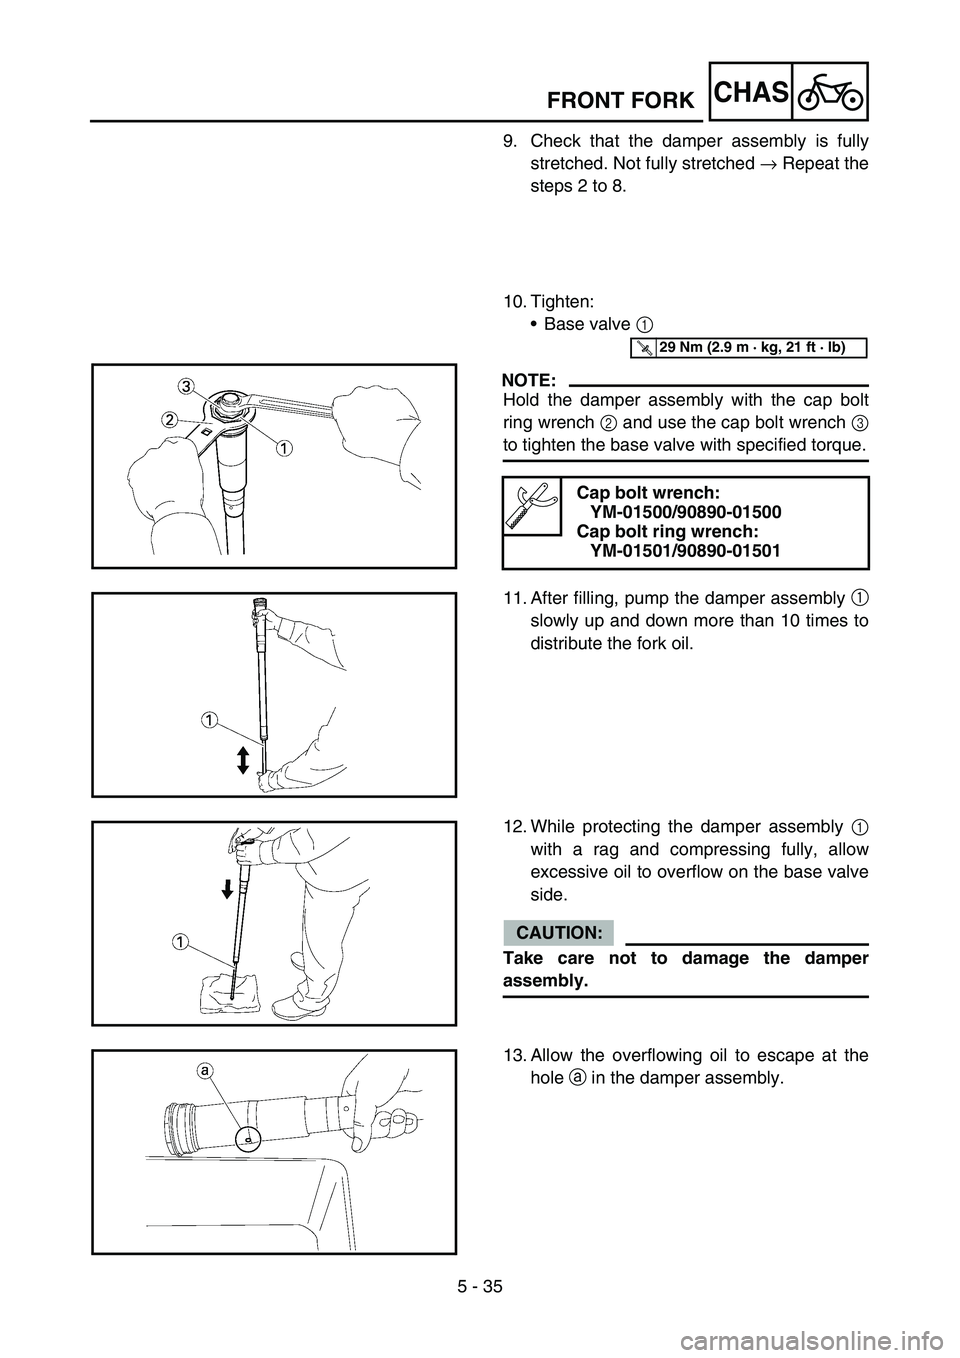
10. Tighten:
Base valve 1
NOTE:
Hold the damper assembly with the cap bolt
ring wrench 2 and use the cap bolt wrench 3
to tighten the base valve with specified torque.
Cap bolt wrench:
YM-01500/90890-01500
Cap bolt ring wrench:
YM-01501/90890-01501
T R..29 Nm (2.9 m · kg, 21 ft · lb)
11. After filling, pump the damper assembly 1
slowly up and down more than 10 times to
distribute the fork oil.
12. While protecting the damper assembly 1
with a rag and compressing fully, allow
excessive oil to overflow on the base valve
side.
CAUTION:
Take care not to damage the damper
assembly.
13. Allow the overflowing oil to escape at the
hole a in the damper assembly.
FRONT FORK
Page 536 of 674
5 - 39
CHASFRONT FORK
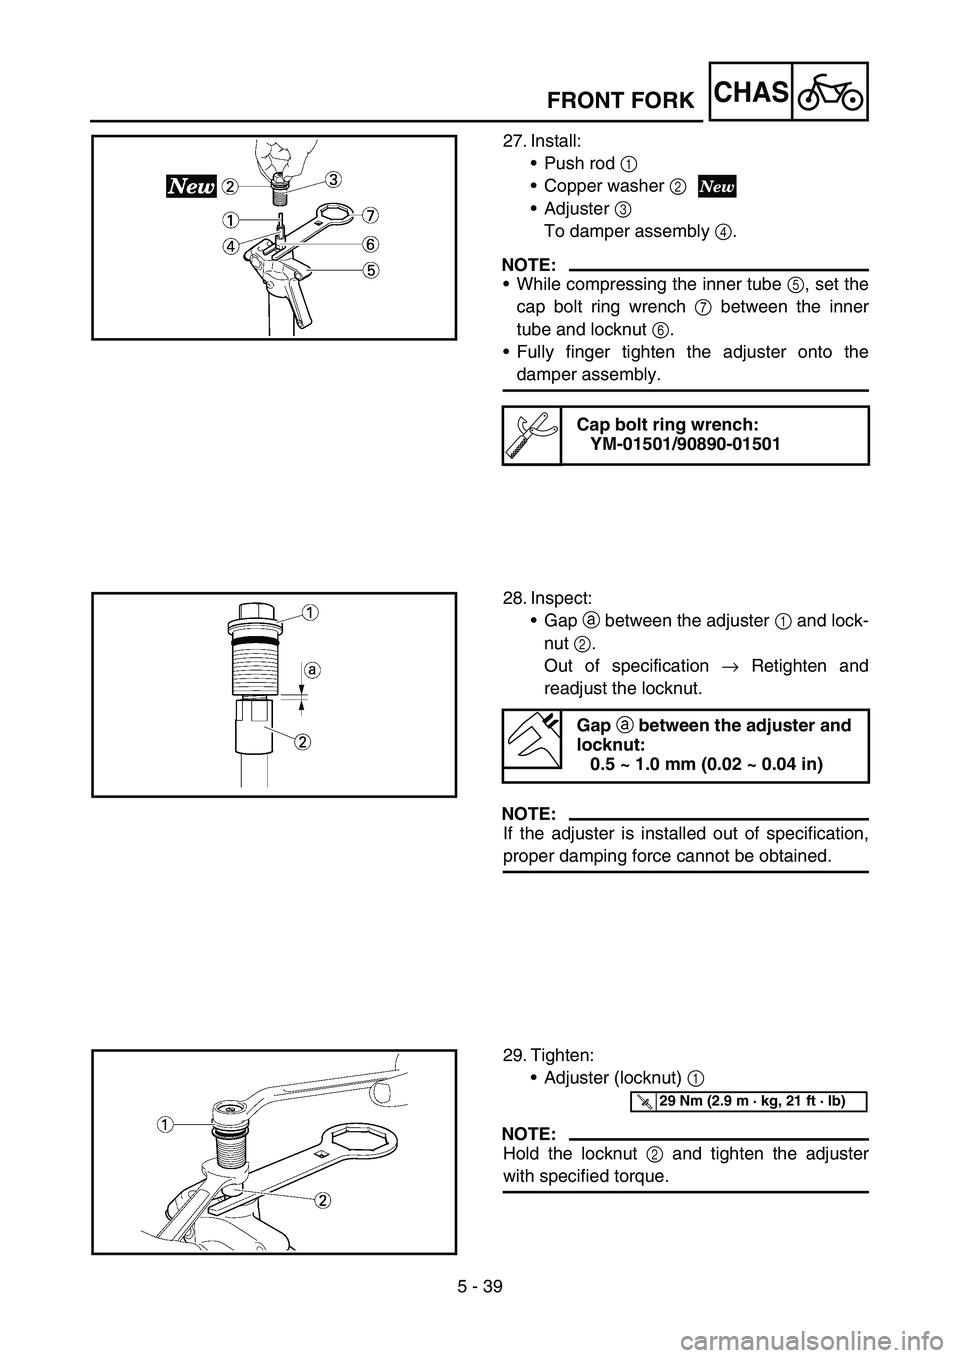
27. Install:
Push rod 1
Copper washer 2
Adjuster 3
To damper assembly 4.
NOTE:
While compressing the inner tube 5, set the
cap bolt ring wrench 7 between the inner
tube and locknut 6.
Fully finger tighten the adjuster onto the
damper assembly.
Cap bolt ring wrench:
YM-01501/90890-01501
28. Inspect:
Gap a between the adjuster 1 and lock-
nut 2.
Out of specification → Retighten and
readjust the locknut.
NOTE:
If the adjuster is installed out of specification,
proper damping force cannot be obtained.
Gap
a between the adjuster and
locknut:
0.5 ~ 1.0 mm (0.02 ~ 0.04 in)
29. Tighten:
Adjuster (locknut) 1
NOTE:
Hold the locknut 2 and tighten the adjuster
with specified torque.
T R..29 Nm (2.9 m · kg, 21 ft · lb)
Page 540 of 674
5 - 41
CHAS
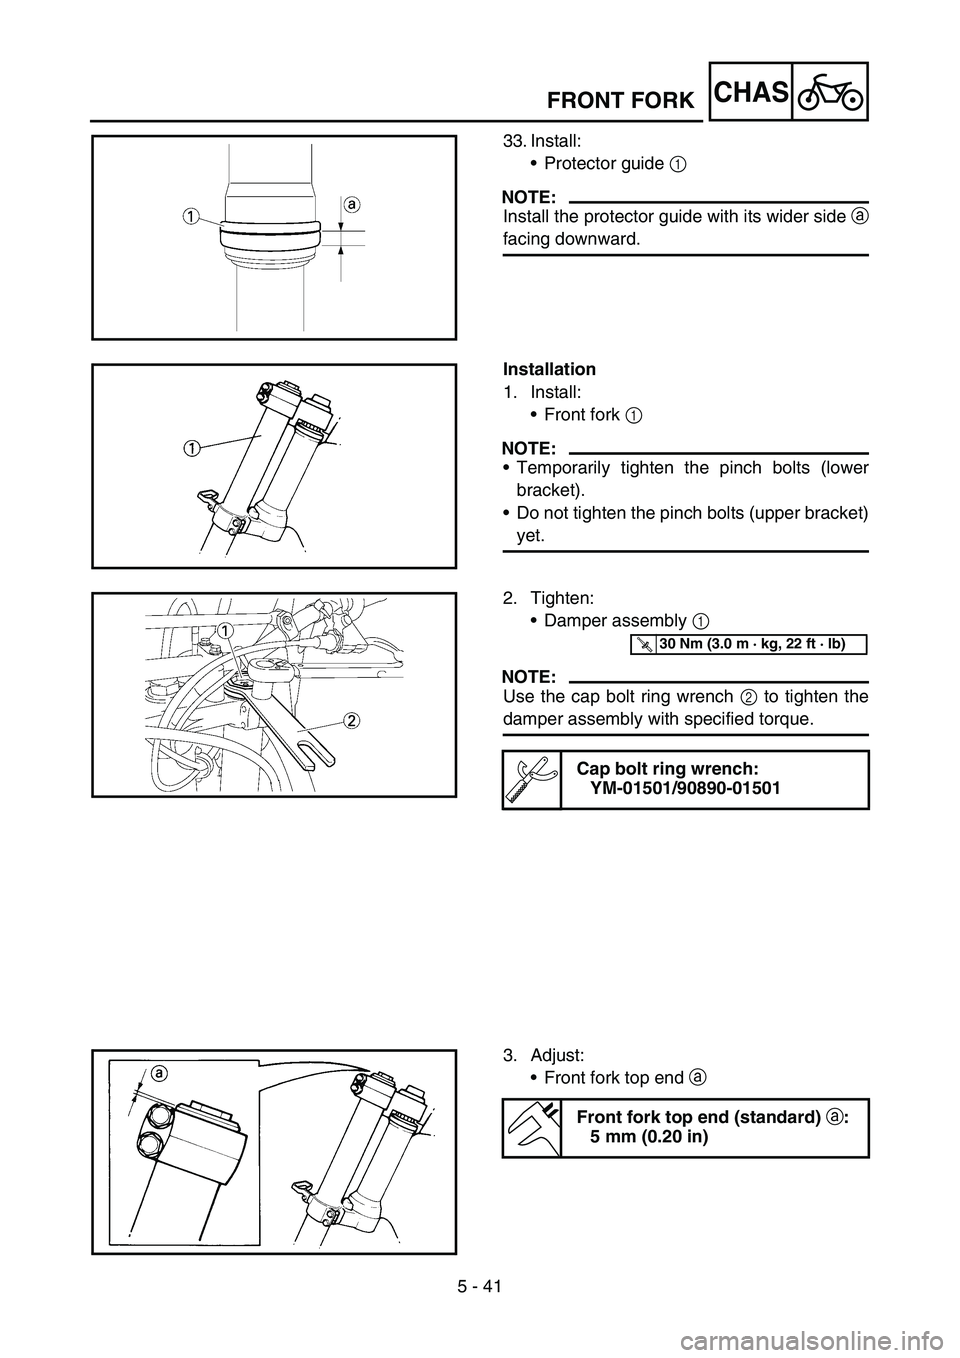
33. Install:
Protector guide 1
NOTE:
Install the protector guide with its wider side a
facing downward.
Installation
1. Install:
Front fork 1
NOTE:
Temporarily tighten the pinch bolts (lower
bracket).
Do not tighten the pinch bolts (upper bracket)
yet.
2. Tighten:
Damper assembly 1
NOTE:
Use the cap bolt ring wrench 2 to tighten the
damper assembly with specified torque.
Cap bolt ring wrench:
YM-01501/90890-01501
T R..30 Nm (3.0 m · kg, 22 ft · lb)
3. Adjust:
Front fork top end a
Front fork top end (standard) a:
5 mm (0.20 in)
FRONT FORK
Page 542 of 674
5 - 42
CHAS
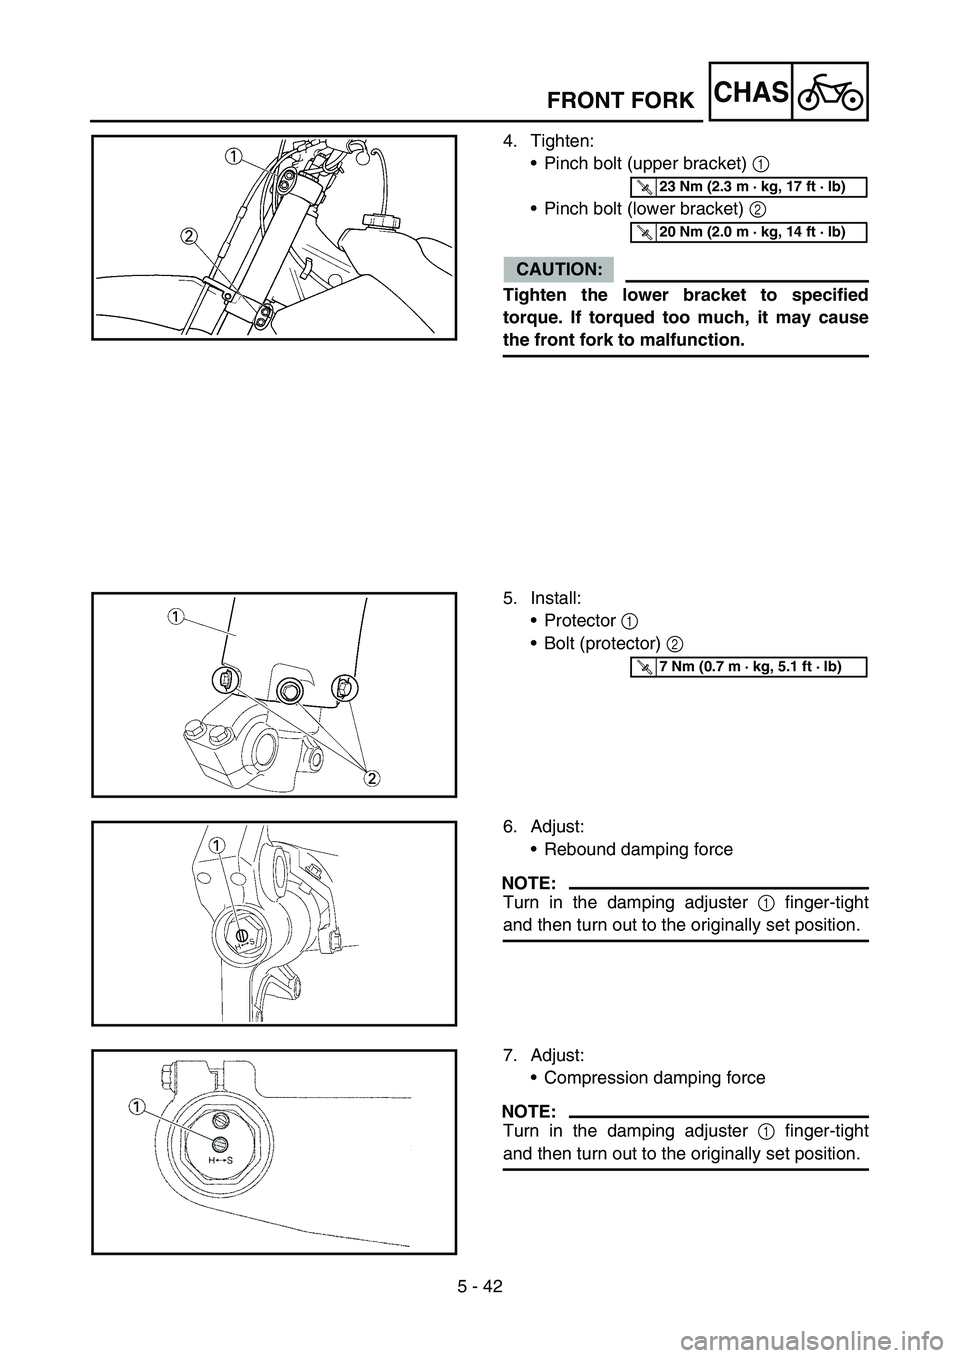
4. Tighten:
Pinch bolt (upper bracket) 1
Pinch bolt (lower bracket) 2
CAUTION:
Tighten the lower bracket to specified
torque. If torqued too much, it may cause
the front fork to malfunction.
T R..23 Nm (2.3 m · kg, 17 ft · lb)
T R..20 Nm (2.0 m · kg, 14 ft · lb)
5. Install:
Protector 1
Bolt (protector) 2
T R..7 Nm (0.7 m · kg, 5.1 ft · lb)
6. Adjust:
Rebound damping force
NOTE:
Turn in the damping adjuster 1 finger-tight
and then turn out to the originally set position.
7. Adjust:
Compression damping force
NOTE:
Turn in the damping adjuster 1 finger-tight
and then turn out to the originally set position.
FRONT FORK
Page 564 of 674
5 - 53
CHAS
9. After tightening the nut, check the steering
for smooth movement. If not, adjust the
steering by loosening the steering ring nut
little by little.
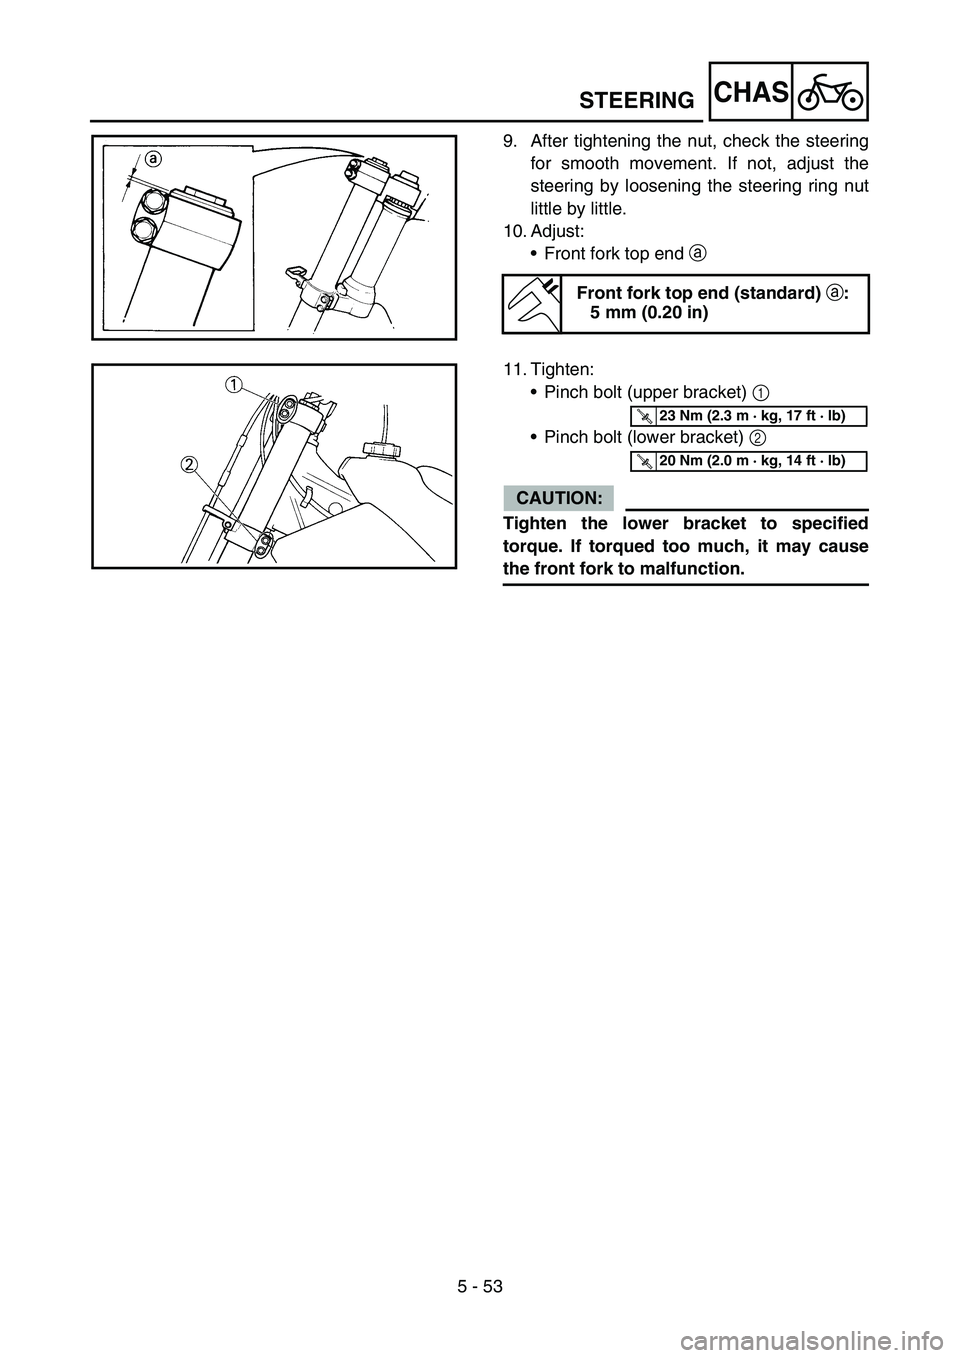
10. Adjust:
•Front fork top end a
Front fork top end (standard) a:
5 mm (0.20 in)
11. Tighten:
•Pinch bolt (upper bracket) 1
•Pinch bolt (lower bracket) 2
CAUTION:
Tighten the lower bracket to specified
torque. If torqued too much, it may cause
the front fork to malfunction.
T R..23 Nm (2.3 m · kg, 17 ft · lb)
T R..20 Nm (2.0 m · kg, 14 ft · lb)
STEERING
Page 664 of 674
7 - 20
TUNSETTING
EC72H002
Suspension setting
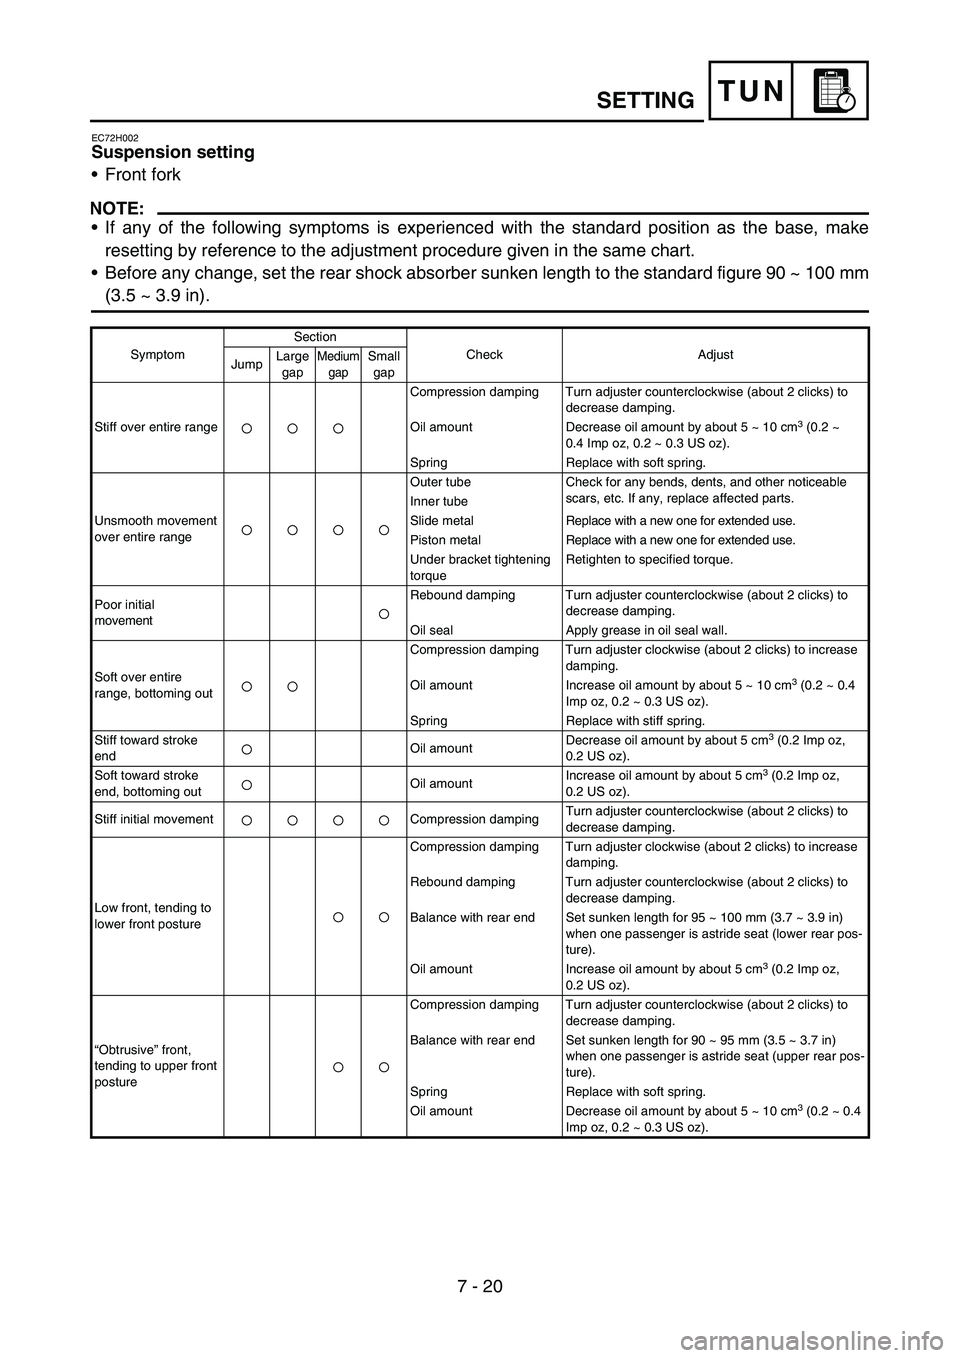
•Front fork
NOTE:
•If any of the following symptoms is experienced with the standard position as the base, make
resetting by reference to the adjustment procedure given in the same chart.
•Before any change, set the rear shock absorber sunken length to the standard figure 90 ~ 100 mm
(3.5 ~ 3.9 in).
SymptomSection
Check Adjust
JumpLarge
gapMedium
gapSmall
gap
Stiff over entire rangeCompression damping Turn adjuster counterclockwise (about 2 clicks) to
decrease damping.
Oil amount Decrease oil amount by about 5 ~ 10 cm
3 (0.2 ~
0.4 Imp oz, 0.2 ~ 0.3 US oz).
Spring Replace with soft spring.
Unsmooth movement
over entire rangeOuter tube Check for any bends, dents, and other noticeable
scars, etc. If any, replace affected parts.
Inner tube
Slide metal Replace with a new one for extended use.
Piston metal Replace with a new one for extended use.
Under bracket tightening
torqueRetighten to specified torque.
Poor initial
movementRebound damping Turn adjuster counterclockwise (about 2 clicks) to
decrease damping.
Oil seal Apply grease in oil seal wall.
Soft over entire
range, bottoming outCompression damping Turn adjuster clockwise (about 2 clicks) to increase
damping.
Oil amount Increase oil amount by about 5 ~ 10 cm
3 (0.2 ~ 0.4
Imp oz, 0.2 ~ 0.3 US oz).
Spring Replace with stiff spring.
Stiff toward stroke
endOil amountDecrease oil amount by about 5 cm
3 (0.2 Imp oz,
0.2 US oz).
Soft toward stroke
end, bottoming outOil amountIncrease oil amount by about 5 cm
3 (0.2 Imp oz,
0.2 US oz).
Stiff initial movement Compression dampingTurn adjuster counterclockwise (about 2 clicks) to
decrease damping.
Low front, tending to
lower front postureCompression damping Turn adjuster clockwise (about 2 clicks) to increase
damping.
Rebound damping Turn adjuster counterclockwise (about 2 clicks) to
decrease damping.
Balance with rear end Set sunken length for 95 ~ 100 mm (3.7 ~ 3.9 in)
when one passenger is astride seat (lower rear pos-
ture).
Oil amount Increase oil amount by about 5 cm
3 (0.2 Imp oz,
0.2 US oz).
“Obtrusive” front,
tending to upper front
postureCompression damping Turn adjuster counterclockwise (about 2 clicks) to
decrease damping.
Balance with rear end Set sunken length for 90 ~ 95 mm (3.5 ~ 3.7 in)
when one passenger is astride seat (upper rear pos-
ture).
Spring Replace with soft spring.
Oil amount Decrease oil amount by about 5 ~ 10 cm
3 (0.2 ~ 0.4
Imp oz, 0.2 ~ 0.3 US oz).