oil YAMAHA YZ250F 2007 Manuale duso (in Italian)
[x] Cancel search | Manufacturer: YAMAHA, Model Year: 2007, Model line: YZ250F, Model: YAMAHA YZ250F 2007Pages: 676, PDF Dimensioni: 21.24 MB
Page 522 of 676

5 - 29
CHASFRONT FORK
Adjuster
1. Drain the outer tube of its front fork oil at its
top.
2. Loosen:
Adjuster 1
3. Remove:
Adjuster 1
NOTE:
While compressing the inner tube 2, set the
cap bolt ring wrench 4 between the inner
tube and locknut 3.
Hold the locknut and remove the adjuster.
CAUTION:
Do not remove the locknut as the damper
rod may go into the damper assembly and
not be taken out.
Cap bolt ring wrench:
YM-01501/90890-01501
EC553201
Inner tube
1. Remove:
Dust seal 1
Stopper ring 2
Using slotted-head screwdriver.
CAUTION:
Take care not to scratch the inner tube.
2. Remove:
Inner tube 1
Oil seal removal steps:
Push in slowly a the inner tube just before
it bottoms out and then pull it back quickly
b.
Repeat this step until the inner tube can
be pulled out from the outer tube.
Page 524 of 676
5 - 30
CHAS
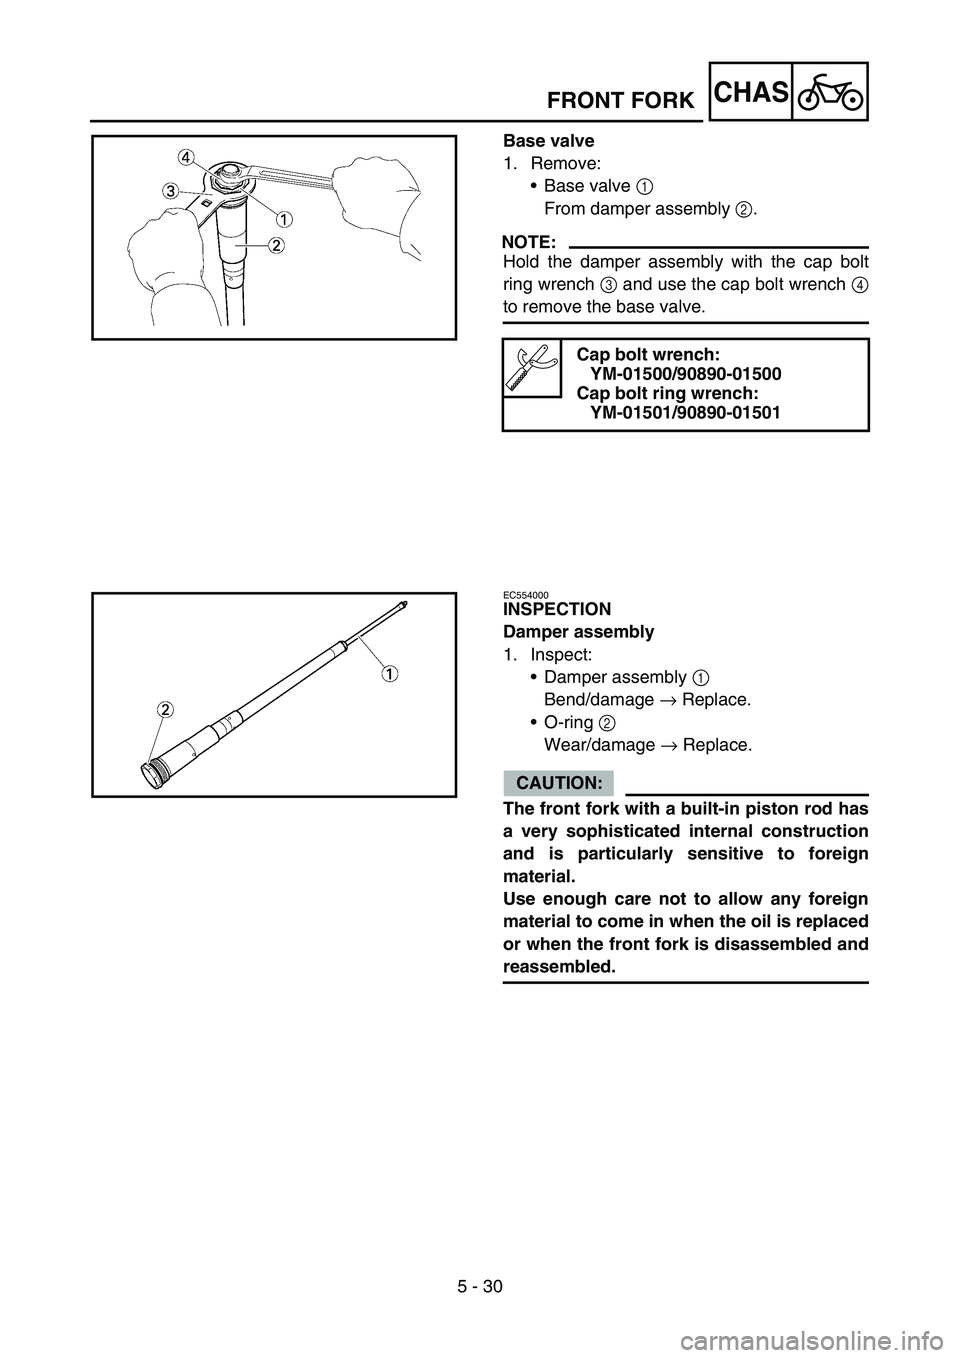
Base valve
1. Remove:
Base valve 1
From damper assembly 2.
NOTE:
Hold the damper assembly with the cap bolt
ring wrench 3 and use the cap bolt wrench 4
to remove the base valve.
Cap bolt wrench:
YM-01500/90890-01500
Cap bolt ring wrench:
YM-01501/90890-01501
EC554000
INSPECTION
Damper assembly
1. Inspect:
Damper assembly 1
Bend/damage → Replace.
O-ring 2
Wear/damage → Replace.
CAUTION:
The front fork with a built-in piston rod has
a very sophisticated internal construction
and is particularly sensitive to foreign
material.
Use enough care not to allow any foreign
material to come in when the oil is replaced
or when the front fork is disassembled and
reassembled.
FRONT FORK
Page 528 of 676

5 - 32
CHAS
EC554502
Inner tube
1. Inspect:
Inner tube surface a
Score marks → Repair or replace.
Use #1,000 grit wet sandpaper.
Damaged oil lock piece → Replace.
Inner tube bends
Out of specification → Replace.
Use the dial gauge 1.
NOTE:
The bending value is shown by one half of the
dial gauge reading.
WARNING
Do not attempt to straighten a bent inner
tube as this may dangerously weaken the
tube.
Inner tube bending limit:
0.2 mm (0.008 in)
EC554600
Outer tube
1. Inspect:
Outer tube 1
Score marks/wear/damage → Replace.
Adjuster
1. Inspect:
Adjuster 1
O-ring 2
Wear/damage → Replace.
FRONT FORK
Page 530 of 676

5 - 33
CHASFRONT FORK
EC555000
ASSEMBLY AND INSTALLATION
Front fork assembly
1. Wash the all parts in a clean solvent.
2. Stretch the damper assembly fully.
3. Fill:
Front fork oil 1
To damper assembly.
CAUTION:
Be sure to use recommended fork oil. If
other oils are used, they may have an
excessively adverse effect on the front
fork performance.
Never allow foreign materials to enter the
front fork.
Recommended oil:
Suspension oil “S1”
Oil capacity:
195 cm
3 (6.86 Imp oz, 6.59 US oz)
4. After filling, pump the damper assembly 1
slowly up and down (about 200 mm (7.9 in)
stroke) several times to bleed the damper
assembly of air.
NOTE:
Be careful not to excessive full stroke. A stroke
of 200 mm (7.9 in) or more will cause air to
enter. In this case, repeat the steps 2 to 4.
Page 532 of 676
5 - 34
CHASFRONT FORK
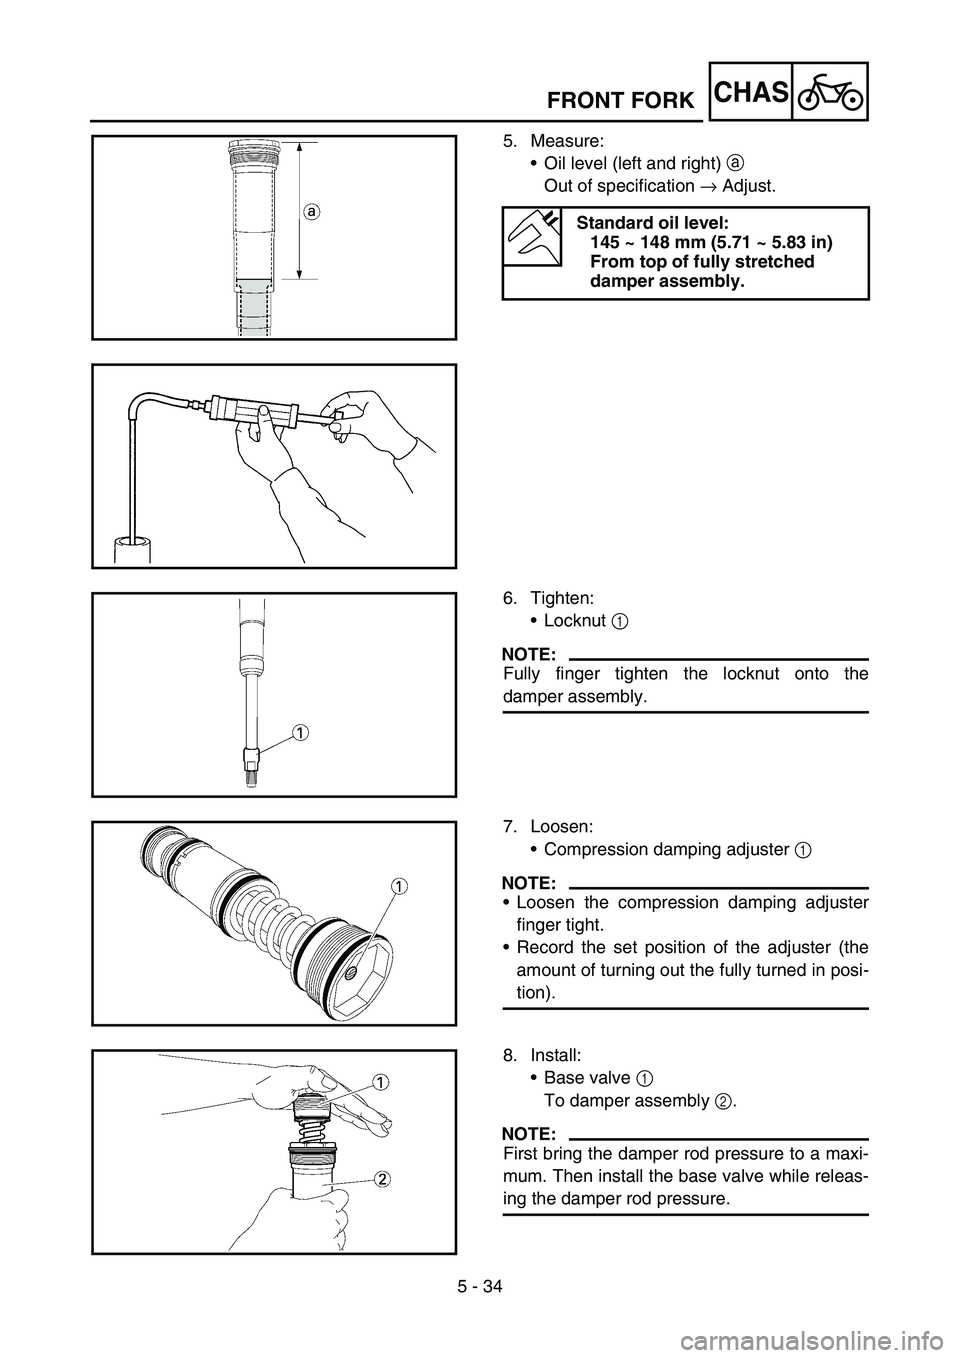
5. Measure:
Oil level (left and right) a
Out of specification → Adjust.
Standard oil level:
145 ~ 148 mm (5.71 ~ 5.83 in)
From top of fully stretched
damper assembly.
6. Tighten:
Locknut 1
NOTE:
Fully finger tighten the locknut onto the
damper assembly.
7. Loosen:
Compression damping adjuster 1
NOTE:
Loosen the compression damping adjuster
finger tight.
Record the set position of the adjuster (the
amount of turning out the fully turned in posi-
tion).
8. Install:
Base valve 1
To damper assembly 2.
NOTE:
First bring the damper rod pressure to a maxi-
mum. Then install the base valve while releas-
ing the damper rod pressure.
Page 534 of 676
5 - 35
CHAS
9. Check that the damper assembly is fully
stretched. Not fully stretched → Repeat the
steps 2 to 8.
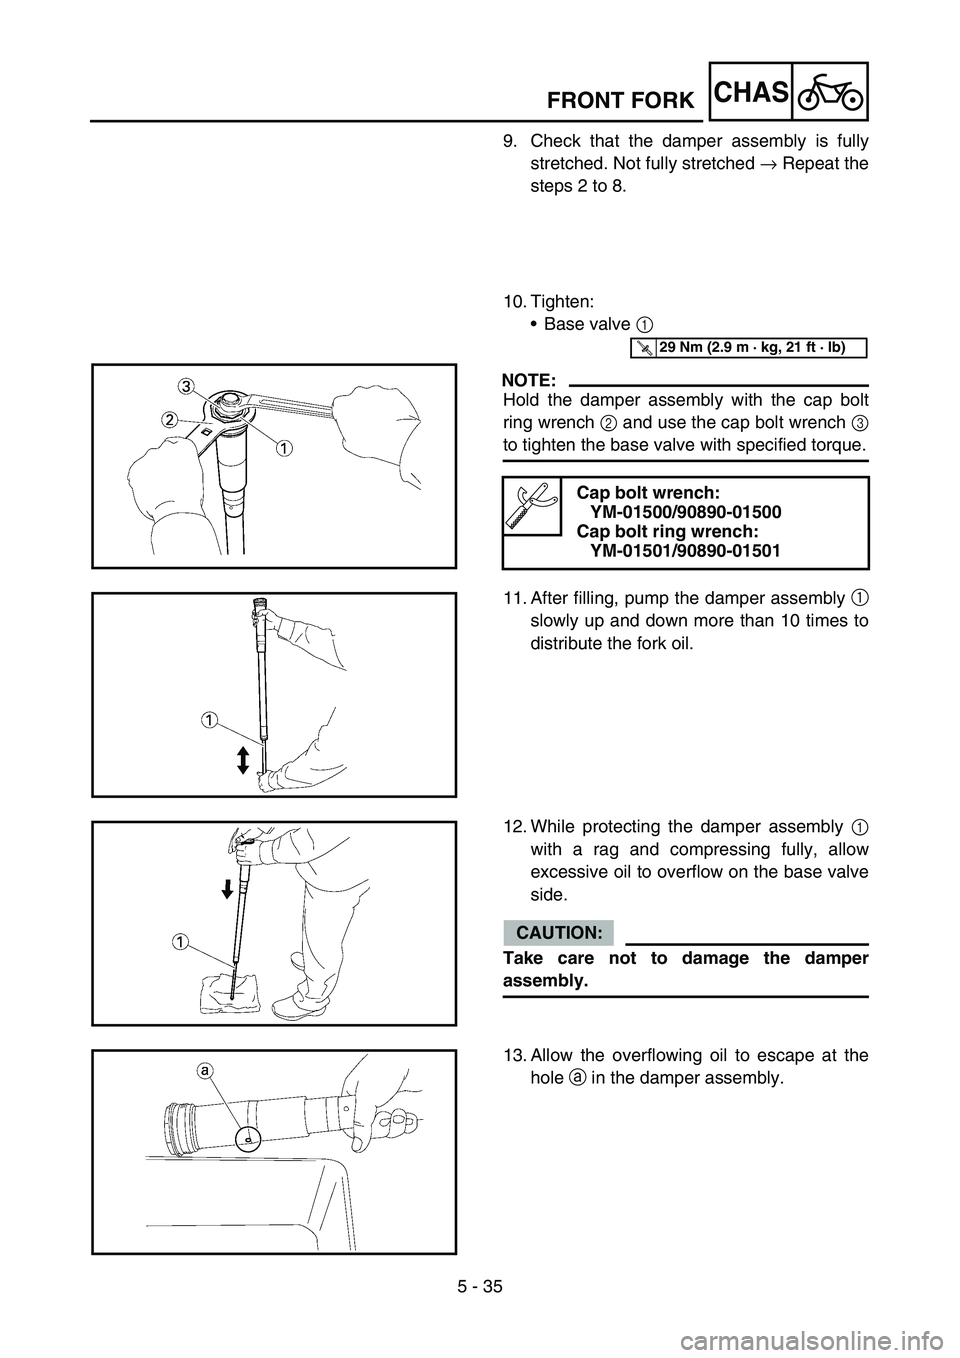
10. Tighten:
Base valve 1
NOTE:
Hold the damper assembly with the cap bolt
ring wrench 2 and use the cap bolt wrench 3
to tighten the base valve with specified torque.
Cap bolt wrench:
YM-01500/90890-01500
Cap bolt ring wrench:
YM-01501/90890-01501
T R..29 Nm (2.9 m · kg, 21 ft · lb)
11. After filling, pump the damper assembly 1
slowly up and down more than 10 times to
distribute the fork oil.
12. While protecting the damper assembly 1
with a rag and compressing fully, allow
excessive oil to overflow on the base valve
side.
CAUTION:
Take care not to damage the damper
assembly.
13. Allow the overflowing oil to escape at the
hole a in the damper assembly.
FRONT FORK
Page 536 of 676

5 - 36
CHASFRONT FORK
14. Check:
Damper assembly smooth movement
Tightness/binding/rough spots → Repeat
the steps 2 to 13.
15. Install:
Dust seal 1
Stopper ring 2
Oil seal 3
Oil seal washer 4
Slide metal 5
To inner tube 6.
NOTE:
Apply the fork oil on the inner tube.
When installing the oil seal, use vinyl seat a
with fork oil applied to protect the oil seal lip.
Install the oil seal with its manufacture’s
marks or number facing the axle holder side.
Install the oil seal washer with its projections
b facing upward.
16. Install:
Piston metal 1
NOTE:
Install the piston metal onto the slot on inner
tube.
17. Install:
Outer tube 1
To inner tube 2.
Page 538 of 676

5 - 37
CHASFRONT FORK
18. Install:
Slide metal 1
Oil seal washer 2
To outer tube slot.
NOTE:
Press the slide metal into the outer tube with
fork seal driver 3.
Fork seal driver:
YM-A0948/90890-01502
19. Install:
Oil seal 1
NOTE:
Press the oil seal into the outer tube with fork
seal driver 2.
Fork seal driver:
YM-A0948/90890-01502
20. Install:
Stopper ring 1
NOTE:
Fit the stopper ring correctly in the groove in
the outer tube.
21. Install:
Dust seal 1
NOTE:
Apply the lithium soap base grease on the
inner tube.
Page 544 of 676

5 - 40
CHAS
30. Install:
Adjuster 1
To inner tube.
T R..55 Nm (5.5 m · kg, 40 ft · lb)
31. Fill:
Front fork oil 1
From outer tube top.
WARNING
Never fail to make the oil amount adjust-
ment between the maximum and minimum
amount and always adjust each front fork
to the same setting. Uneven adjustment
can cause poor handling and loss of stabil-
ity.
CAUTION:
Be sure to use recommended fork oil. If
other oils are used, they may have an
excessively adverse effect on the front
fork performance.
Never allow foreign materials to enter the
front fork.
Recommended oil:
Suspension oil “S1”
Standard oil amount:
340 cm
3 (12.0 Imp oz, 11.5 US oz)
Extent of adjustment:
300 ~ 380 cm
3
(10.6 ~ 13.4 Imp oz,
10.1 ~ 12.8 US oz)
32. Install:
Damper assembly 1
To outer tube.
NOTE:
Temporarily tighten the damper assembly.
FRONT FORK
Page 556 of 676

5 - 46
CHASHANDLEBAR
4. Install:
Left grip 1
Apply the adhesive to the handlebar 2.
NOTE:
Before applying the adhesive, wipe off
grease or oil on the handlebar surface a
with a lacquer thinner.
Install the left grip to the handlebar so that
the line b between the two arrow marks
faces straight upward.
5. Install:
Right grip 1
Collar 2
Apply the adhesive on the tube guide 3.
NOTE:
Before applying the adhesive, wipe off
grease or oil on the tube guide surface a
with a lacquer thinner.
Install the grip to the tube guide so that the
grip match mark b and tube guide slot c
form the angle as shown.
R
L
64˚
3 1b
c
6. Install:
•Collar 1
• Grip cap cover 2
• Throttle grip 3
NOTE:
Apply the lithium soap base grease on the
throttle grip sliding surface.