check oil YAMAHA YZ250F 2012 Owner's Manual
[x] Cancel search | Manufacturer: YAMAHA, Model Year: 2012, Model line: YZ250F, Model: YAMAHA YZ250F 2012Pages: 198, PDF Size: 11.78 MB
Page 69 of 198
3-19
CHASSIS
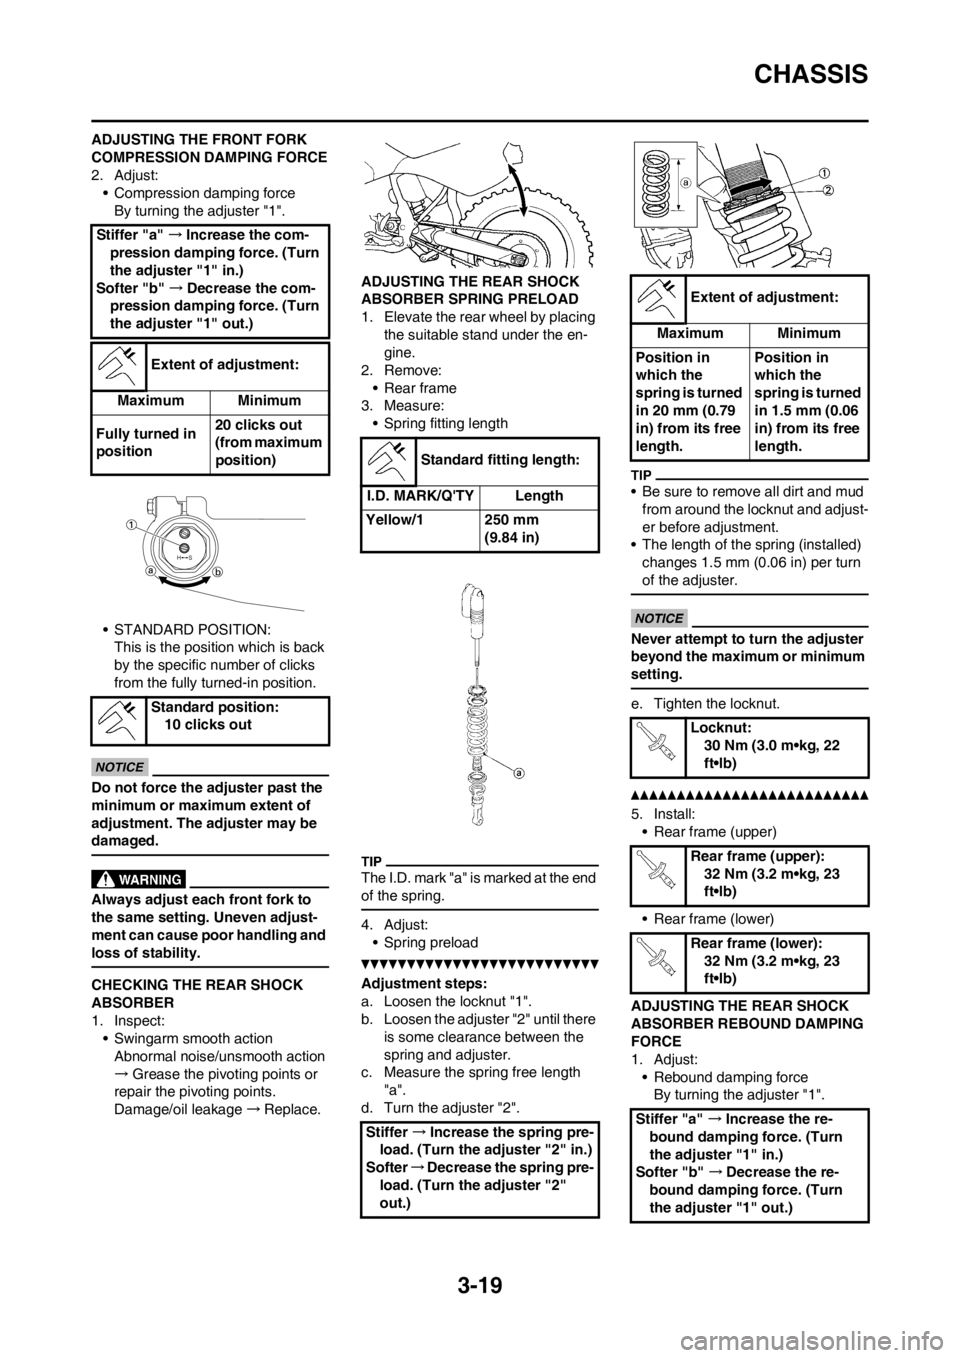
ADJUSTING THE FRONT FORK
COMPRESSION DAMPING FORCE
2. Adjust:
• Compression damping force
By turning the adjuster "1".
• STANDARD POSITION:
This is the position which is back
by the specific number of clicks
from the fully turned-in position.
Do not force the adjuster past the
minimum or maximum extent of
adjustment. The adjuster may be
damaged.
Always adjust each front fork to
the same setting. Uneven adjust-
ment can cause poor handling and
loss of stability.
CHECKING THE REAR SHOCK
ABSORBER
1. Inspect:
• Swingarm smooth action
Abnormal noise/unsmooth action
→Grease the pivoting points or
repair the pivoting points.
Damage/oil leakage→Replace.ADJUSTING THE REAR SHOCK
ABSORBER SPRING PRELOAD
1. Elevate the rear wheel by placing
the suitable stand under the en-
gine.
2. Remove:
• Rear frame
3. Measure:
• Spring fitting length
The I.D. mark "a" is marked at the end
of the spring.
4. Adjust:
• Spring preload
Adjustment steps:
a. Loosen the locknut "1".
b. Loosen the adjuster "2" until there
is some clearance between the
spring and adjuster.
c. Measure the spring free length
"a".
d. Turn the adjuster "2".
• Be sure to remove all dirt and mud
from around the locknut and adjust-
er before adjustment.
• The length of the spring (installed)
changes 1.5 mm (0.06 in) per turn
of the adjuster.
Never attempt to turn the adjuster
beyond the maximum or minimum
setting.
e. Tighten the locknut.
5. Install:
• Rear frame (upper)
• Rear frame (lower)
ADJUSTING THE REAR SHOCK
ABSORBER REBOUND DAMPING
FORCE
1. Adjust:
• Rebound damping force
By turning the adjuster "1". Stiffer "a" →Increase the com-
pression damping force. (Turn
the adjuster "1" in.)
Softer "b" →Decrease the com-
pression damping force. (Turn
the adjuster "1" out.)
Extent of adjustment:
Maximum Minimum
Fully turned in
position20 clicks out
(from maximum
position)
Standard position:
10 clicks out
Standard fitting length:
I.D. MARK/Q'TY Length
Yellow/1 250 mm
(9.84 in)
Stiffer →Increase the spring pre-
load. (Turn the adjuster "2" in.)
Softer→Decrease the spring pre-
load. (Turn the adjuster "2"
out.)
Extent of adjustment:
Maximum Minimum
Position in
which the
spring is turned
in 20 mm (0.79
in) from its free
length.Position in
which the
spring is turned
in 1.5 mm (0.06
in) from its free
length.
Locknut:
30 Nm (3.0 m•kg, 22
ft•lb)
Rear frame (upper):
32 Nm (3.2 m•kg, 23
ft•lb)
Rear frame (lower):
32 Nm (3.2 m•kg, 23
ft•lb)
Stiffer "a" →Increase the re-
bound damping force. (Turn
the adjuster "1" in.)
Softer "b" →Decrease the re-
bound damping force. (Turn
the adjuster "1" out.)
Page 74 of 198
3-24
ELECTRICAL
ELECTRICAL
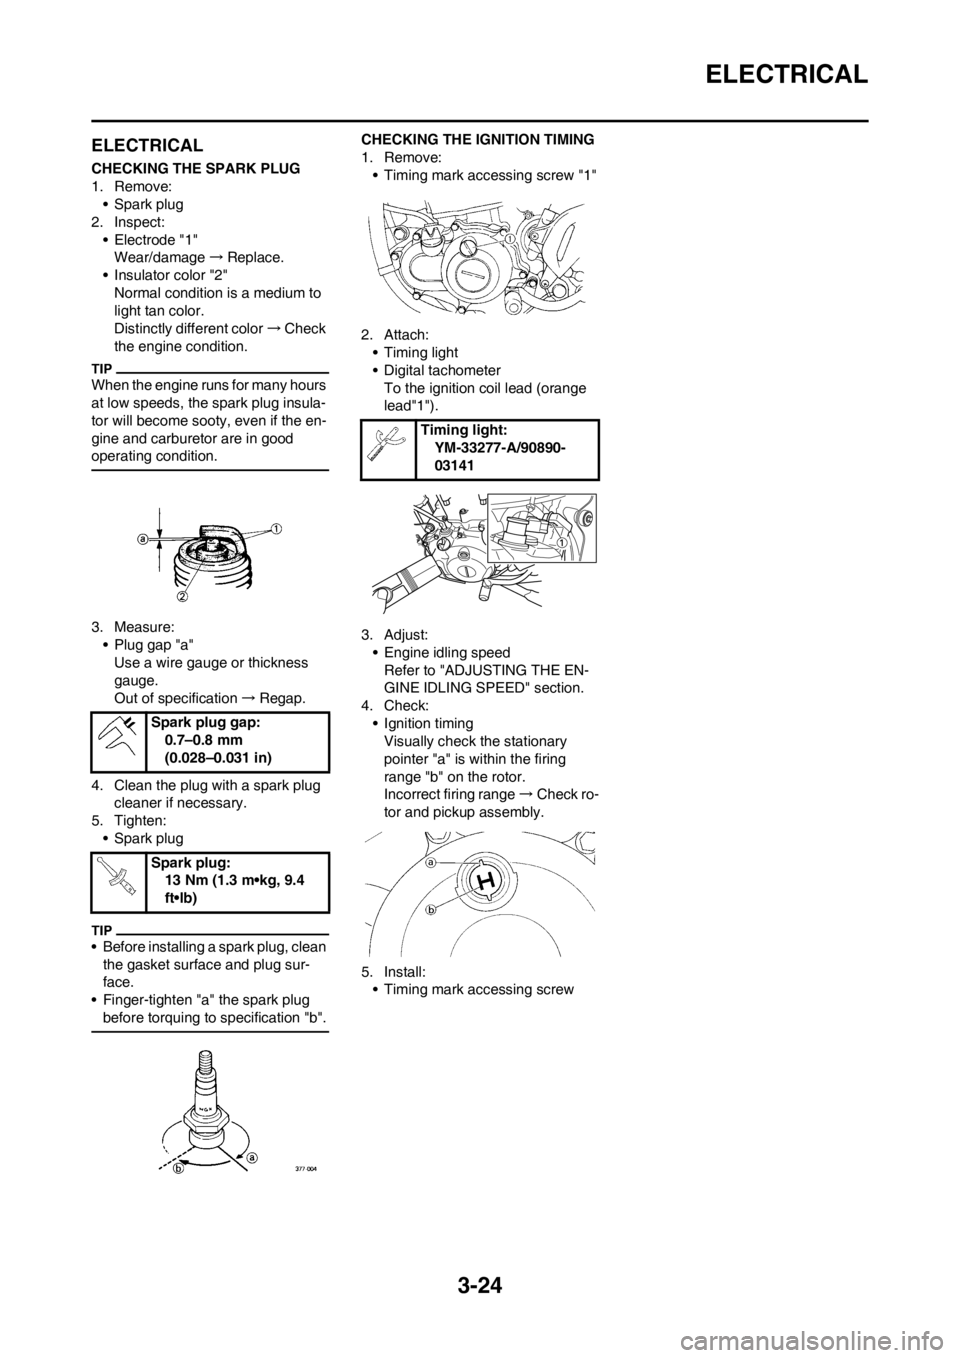
CHECKING THE SPARK PLUG
1. Remove:
• Spark plug
2. Inspect:
• Electrode "1"
Wear/damage→Replace.
• Insulator color "2"
Normal condition is a medium to
light tan color.
Distinctly different color→Check
the engine condition.
When the engine runs for many hours
at low speeds, the spark plug insula-
tor will become sooty, even if the en-
gine and carburetor are in good
operating condition.
3. Measure:
• Plug gap "a"
Use a wire gauge or thickness
gauge.
Out of specification→Regap.
4. Clean the plug with a spark plug
cleaner if necessary.
5. Tighten:
• Spark plug
• Before installing a spark plug, clean
the gasket surface and plug sur-
face.
• Finger-tighten "a" the spark plug
before torquing to specification "b".
CHECKING THE IGNITION TIMING
1. Remove:
• Timing mark accessing screw "1"
2. Attach:
• Timing light
• Digital tachometer
To the ignition coil lead (orange
lead"1").
3. Adjust:
• Engine idling speed
Refer to "ADJUSTING THE EN-
GINE IDLING SPEED" section.
4. Check:
• Ignition timing
Visually check the stationary
pointer "a" is within the firing
range "b" on the rotor.
Incorrect firing range→Check ro-
tor and pickup assembly.
5. Install:
• Timing mark accessing screw Spark plug gap:
0.7–0.8 mm
(0.028–0.031 in)
Spark plug:
13 Nm (1.3 m•kg, 9.4
ft•lb)
Timing light:
YM-33277-A/90890-
03141
Page 93 of 198
4-19
CAMSHAFTS
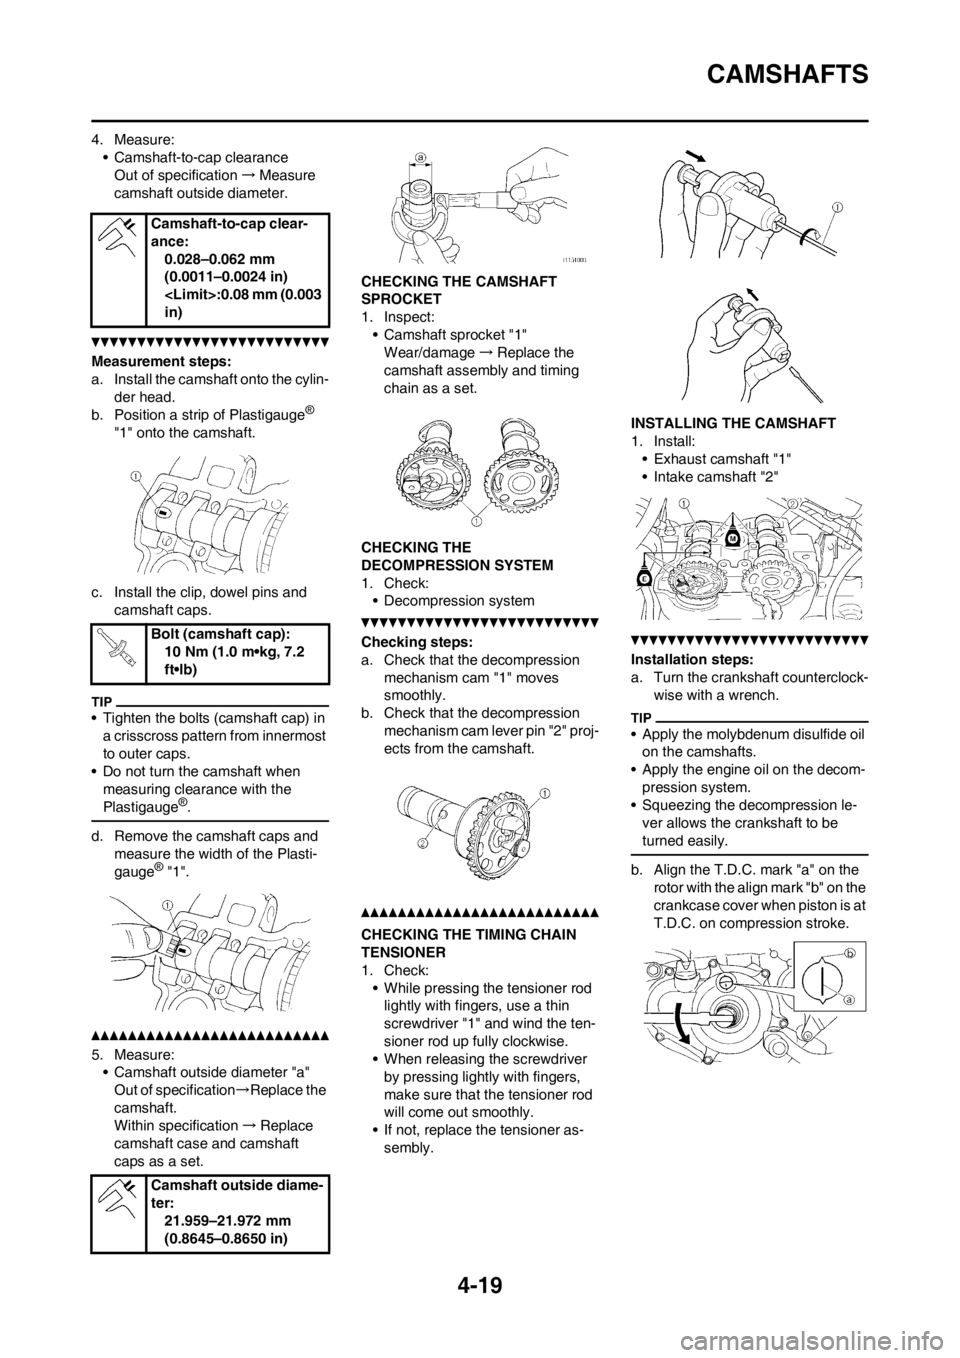
4. Measure:
• Camshaft-to-cap clearance
Out of specification→Measure
camshaft outside diameter.
Measurement steps:
a. Install the camshaft onto the cylin-
der head.
b. Position a strip of Plastigauge
®
"1" onto the camshaft.
c. Install the clip, dowel pins and
camshaft caps.
• Tighten the bolts (camshaft cap) in
a crisscross pattern from innermost
to outer caps.
• Do not turn the camshaft when
measuring clearance with the
Plastigauge
®.
d. Remove the camshaft caps and
measure the width of the Plasti-
gauge
® "1".
5. Measure:
• Camshaft outside diameter "a"
Out of specification→Replace the
camshaft.
Within specification→Replace
camshaft case and camshaft
caps as a set.CHECKING THE CAMSHAFT
SPROCKET
1. Inspect:
• Camshaft sprocket "1"
Wear/damage→Replace the
camshaft assembly and timing
chain as a set.
CHECKING THE
DECOMPRESSION SYSTEM
1. Check:
• Decompression system
Checking steps:
a. Check that the decompression
mechanism cam "1" moves
smoothly.
b. Check that the decompression
mechanism cam lever pin "2" proj-
ects from the camshaft.
CHECKING THE TIMING CHAIN
TENSIONER
1. Check:
• While pressing the tensioner rod
lightly with fingers, use a thin
screwdriver "1" and wind the ten-
sioner rod up fully clockwise.
• When releasing the screwdriver
by pressing lightly with fingers,
make sure that the tensioner rod
will come out smoothly.
• If not, replace the tensioner as-
sembly.INSTALLING THE CAMSHAFT
1. Install:
• Exhaust camshaft "1"
• Intake camshaft "2"
Installation steps:
a. Turn the crankshaft counterclock-
wise with a wrench.
• Apply the molybdenum disulfide oil
on the camshafts.
• Apply the engine oil on the decom-
pression system.
• Squeezing the decompression le-
ver allows the crankshaft to be
turned easily.
b. Align the T.D.C. mark "a" on the
rotor with the align mark "b" on the
crankcase cover when piston is at
T.D.C. on compression stroke. Camshaft-to-cap clear-
ance:
0.028–0.062 mm
(0.0011–0.0024 in)
in)
Bolt (camshaft cap):
10 Nm (1.0 m•kg, 7.2
ft•lb)
Camshaft outside diame-
ter:
21.959–21.972 mm
(0.8645–0.8650 in)
Page 94 of 198
4-20
CAMSHAFTS
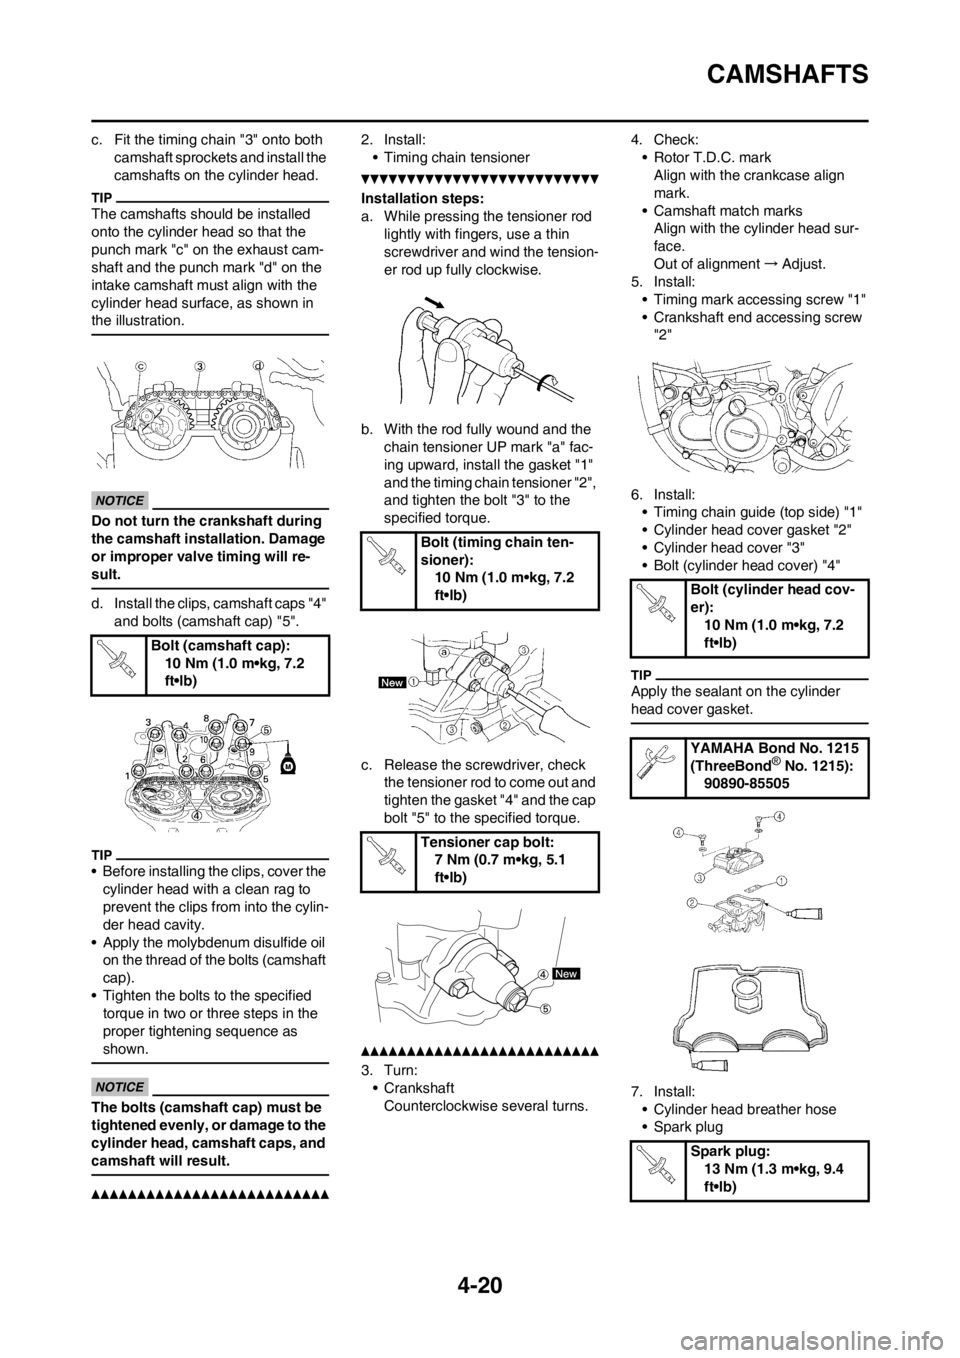
c. Fit the timing chain "3" onto both
camshaft sprockets and install the
camshafts on the cylinder head.
The camshafts should be installed
onto the cylinder head so that the
punch mark "c" on the exhaust cam-
shaft and the punch mark "d" on the
intake camshaft must align with the
cylinder head surface, as shown in
the illustration.
Do not turn the crankshaft during
the camshaft installation. Damage
or improper valve timing will re-
sult.
d. Install the clips, camshaft caps "4"
and bolts (camshaft cap) "5".
• Before installing the clips, cover the
cylinder head with a clean rag to
prevent the clips from into the cylin-
der head cavity.
• Apply the molybdenum disulfide oil
on the thread of the bolts (camshaft
cap).
• Tighten the bolts to the specified
torque in two or three steps in the
proper tightening sequence as
shown.
The bolts (camshaft cap) must be
tightened evenly, or damage to the
cylinder head, camshaft caps, and
camshaft will result.
2. Install:
• Timing chain tensioner
Installation steps:
a. While pressing the tensioner rod
lightly with fingers, use a thin
screwdriver and wind the tension-
er rod up fully clockwise.
b. With the rod fully wound and the
chain tensioner UP mark "a" fac-
ing upward, install the gasket "1"
and the timing chain tensioner "2",
and tighten the bolt "3" to the
specified torque.
c. Release the screwdriver, check
the tensioner rod to come out and
tighten the gasket "4" and the cap
bolt "5" to the specified torque.
3. Turn:
• Crankshaft
Counterclockwise several turns.4. Check:
• Rotor T.D.C. mark
Align with the crankcase align
mark.
• Camshaft match marks
Align with the cylinder head sur-
face.
Out of alignment→Adjust.
5. Install:
• Timing mark accessing screw "1"
• Crankshaft end accessing screw
"2"
6. Install:
• Timing chain guide (top side) "1"
• Cylinder head cover gasket "2"
• Cylinder head cover "3"
• Bolt (cylinder head cover) "4"
Apply the sealant on the cylinder
head cover gasket.
7. Install:
• Cylinder head breather hose
• Spark plug Bolt (camshaft cap):
10 Nm (1.0 m•kg, 7.2
ft•lb)
Bolt (timing chain ten-
sioner):
10 Nm (1.0 m•kg, 7.2
ft•lb)
Tensioner cap bolt:
7 Nm (0.7 m•kg, 5.1
ft•lb)
Bolt (cylinder head cov-
er):
10 Nm (1.0 m•kg, 7.2
ft•lb)
YAMAHA Bond No. 1215
(ThreeBond
® No. 1215):
90890-85505
Spark plug:
13 Nm (1.3 m•kg, 9.4
ft•lb)
Page 96 of 198
4-22
CYLINDER HEAD
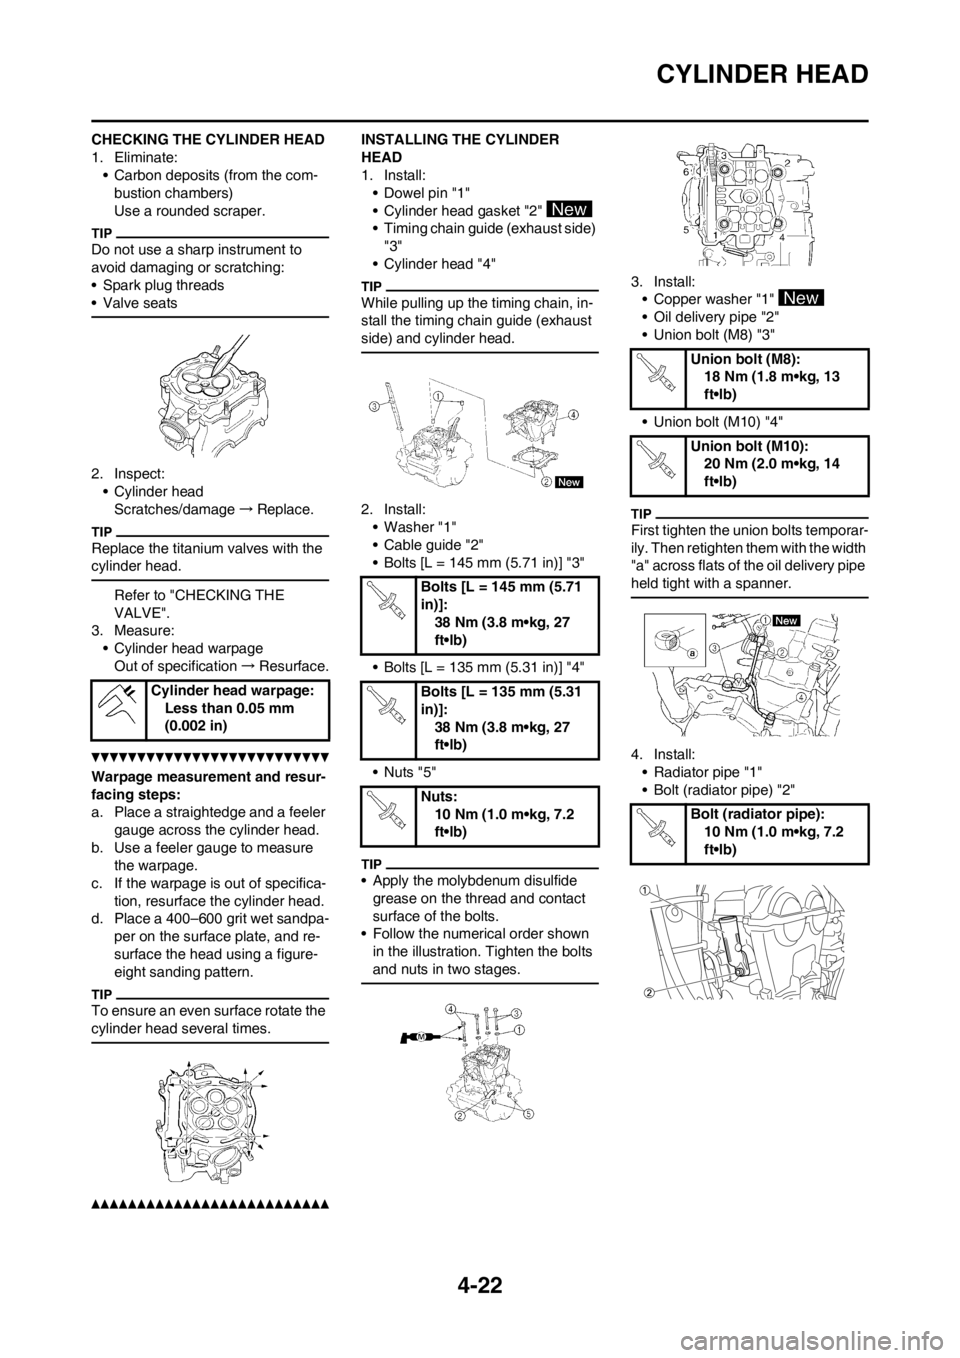
CHECKING THE CYLINDER HEAD
1. Eliminate:
• Carbon deposits (from the com-
bustion chambers)
Use a rounded scraper.
Do not use a sharp instrument to
avoid damaging or scratching:
• Spark plug threads
• Valve seats
2. Inspect:
• Cylinder head
Scratches/damage→Replace.
Replace the titanium valves with the
cylinder head.
Refer to "CHECKING THE
VALVE".
3. Measure:
• Cylinder head warpage
Out of specification→Resurface.
Warpage measurement and resur-
facing steps:
a. Place a straightedge and a feeler
gauge across the cylinder head.
b. Use a feeler gauge to measure
the warpage.
c. If the warpage is out of specifica-
tion, resurface the cylinder head.
d. Place a 400–600 grit wet sandpa-
per on the surface plate, and re-
surface the head using a figure-
eight sanding pattern.
To ensure an even surface rotate the
cylinder head several times.
INSTALLING THE CYLINDER
HEAD
1. Install:
• Dowel pin "1"
• Cylinder head gasket "2"
• Timing chain guide (exhaust side)
"3"
• Cylinder head "4"
While pulling up the timing chain, in-
stall the timing chain guide (exhaust
side) and cylinder head.
2. Install:
• Washer "1"
• Cable guide "2"
• Bolts [L = 145 mm (5.71 in)] "3"
• Bolts [L = 135 mm (5.31 in)] "4"
•Nuts "5"
• Apply the molybdenum disulfide
grease on the thread and contact
surface of the bolts.
• Follow the numerical order shown
in the illustration. Tighten the bolts
and nuts in two stages.
3. Install:
• Copper washer "1"
• Oil delivery pipe "2"
• Union bolt (M8) "3"
• Union bolt (M10) "4"
First tighten the union bolts temporar-
ily. Then retighten them with the width
"a" across flats of the oil delivery pipe
held tight with a spanner.
4. Install:
• Radiator pipe "1"
• Bolt (radiator pipe) "2" Cylinder head warpage:
Less than 0.05 mm
(0.002 in)
Bolts [L = 145 mm (5.71
in)]:
38 Nm (3.8 m•kg, 27
ft•lb)
Bolts [L = 135 mm (5.31
in)]:
38 Nm (3.8 m•kg, 27
ft•lb)
Nuts:
10 Nm (1.0 m•kg, 7.2
ft•lb)
Union bolt (M8):
18 Nm (1.8 m•kg, 13
ft•lb)
Union bolt (M10):
20 Nm (2.0 m•kg, 14
ft•lb)
Bolt (radiator pipe):
10 Nm (1.0 m•kg, 7.2
ft•lb)
Page 100 of 198
4-26
VALVES AND VALVE SPRINGS
h. Press the valve through the valve
guide and onto the valve seat to
make a clear pattern.
i. Measure the valve seat width
again. If the valve seat width is out
of specification, reface and relap
the valve seat.
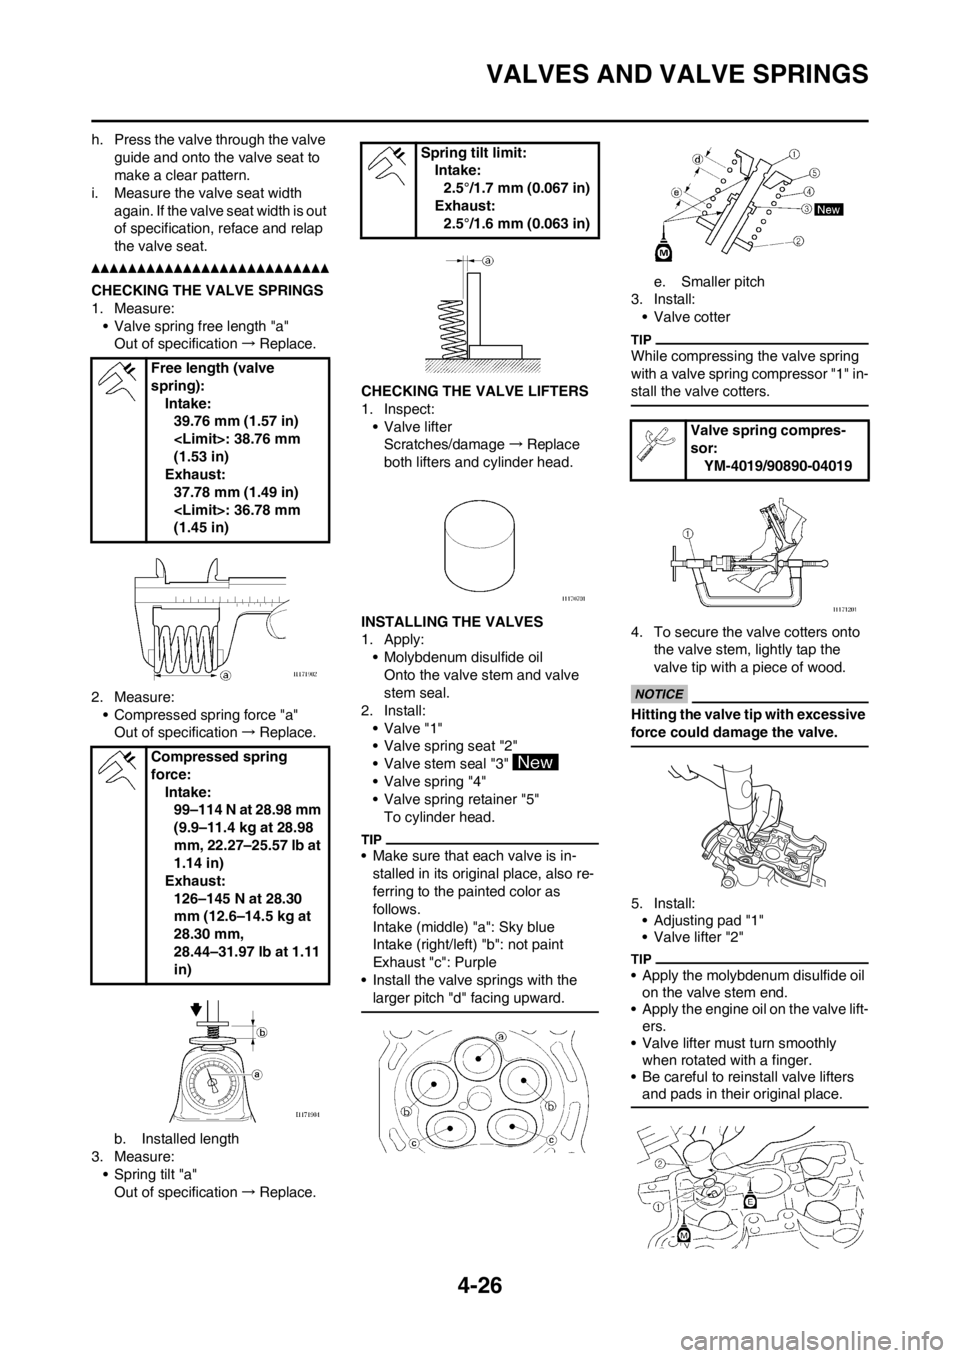
CHECKING THE VALVE SPRINGS
1. Measure:
• Valve spring free length "a"
Out of specification→Replace.
2. Measure:
• Compressed spring force "a"
Out of specification→Replace.
b. Installed length
3. Measure:
• Spring tilt "a"
Out of specification→Replace.CHECKING THE VALVE LIFTERS
1. Inspect:
• Valve lifter
Scratches/damage→Replace
both lifters and cylinder head.
INSTALLING THE VALVES
1. Apply:
• Molybdenum disulfide oil
Onto the valve stem and valve
stem seal.
2. Install:
• Valve "1"
• Valve spring seat "2"
• Valve stem seal "3"
• Valve spring "4"
• Valve spring retainer "5"
To cylinder head.
• Make sure that each valve is in-
stalled in its original place, also re-
ferring to the painted color as
follows.
Intake (middle) "a": Sky blue
Intake (right/left) "b": not paint
Exhaust "c": Purple
• Install the valve springs with the
larger pitch "d" facing upward.
e. Smaller pitch
3. Install:
• Valve cotter
While compressing the valve spring
with a valve spring compressor "1" in-
stall the valve cotters.
4. To secure the valve cotters onto
the valve stem, lightly tap the
valve tip with a piece of wood.
Hitting the valve tip with excessive
force could damage the valve.
5. Install:
• Adjusting pad "1"
• Valve lifter "2"
• Apply the molybdenum disulfide oil
on the valve stem end.
• Apply the engine oil on the valve lift-
ers.
• Valve lifter must turn smoothly
when rotated with a finger.
• Be careful to reinstall valve lifters
and pads in their original place.
Free length (valve
spring):
Intake:
39.76 mm (1.57 in)
(1.53 in)
Exhaust:
37.78 mm (1.49 in)
(1.45 in)
Compressed spring
force:
Intake:
99–114 N at 28.98 mm
(9.9–11.4 kg at 28.98
mm, 22.27–25.57 lb at
1.14 in)
Exhaust:
126–145 N at 28.30
mm (12.6–14.5 kg at
28.30 mm,
28.44–31.97 lb at 1.11
in)
Spring tilt limit:
Intake:
2.5°/1.7 mm (0.067 in)
Exhaust:
2.5°/1.6 mm (0.063 in)
Valve spring compres-
sor:
YM-4019/90890-04019
Page 103 of 198
4-29
CYLINDER AND PISTON
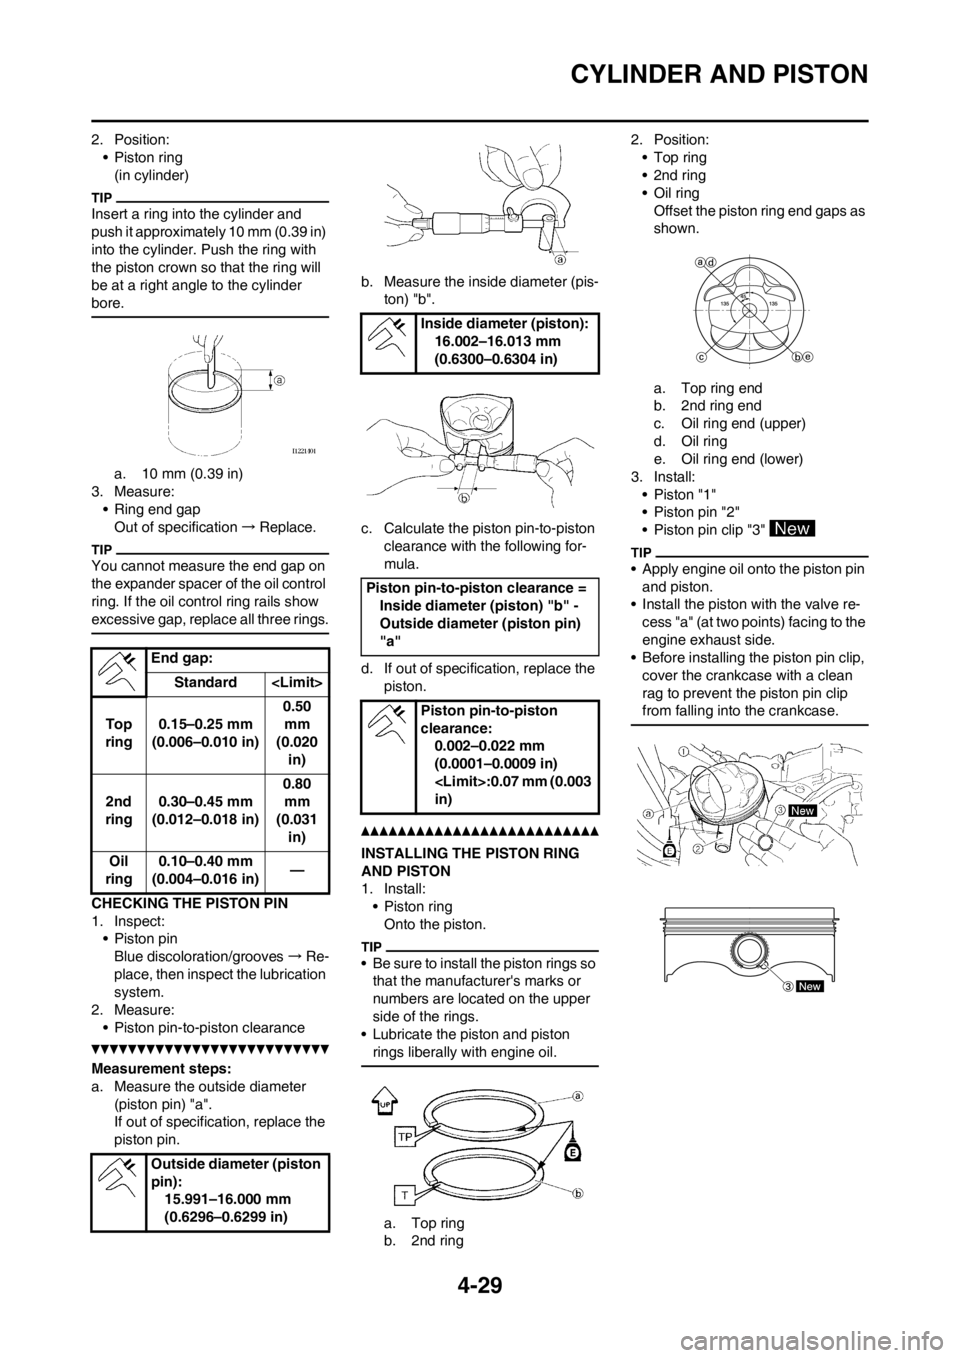
2. Position:
• Piston ring
(in cylinder)
Insert a ring into the cylinder and
push it approximately 10 mm (0.39 in)
into the cylinder. Push the ring with
the piston crown so that the ring will
be at a right angle to the cylinder
bore.
a. 10 mm (0.39 in)
3. Measure:
• Ring end gap
Out of specification→Replace.
You cannot measure the end gap on
the expander spacer of the oil control
ring. If the oil control ring rails show
excessive gap, replace all three rings.
CHECKING THE PISTON PIN
1. Inspect:
• Piston pin
Blue discoloration/grooves→Re-
place, then inspect the lubrication
system.
2. Measure:
• Piston pin-to-piston clearance
Measurement steps:
a. Measure the outside diameter
(piston pin) "a".
If out of specification, replace the
piston pin.b. Measure the inside diameter (pis-
ton) "b".
c. Calculate the piston pin-to-piston
clearance with the following for-
mula.
d. If out of specification, replace the
piston.
INSTALLING THE PISTON RING
AND PISTON
1. Install:
•Piston ring
Onto the piston.
• Be sure to install the piston rings so
that the manufacturer's marks or
numbers are located on the upper
side of the rings.
• Lubricate the piston and piston
rings liberally with engine oil.
a. Top ring
b. 2nd ring2. Position:
•Top ring
•2nd ring
•Oil ring
Offset the piston ring end gaps as
shown.
a. Top ring end
b. 2nd ring end
c. Oil ring end (upper)
d. Oil ring
e. Oil ring end (lower)
3. Install:
• Piston "1"
• Piston pin "2"
• Piston pin clip "3"
• Apply engine oil onto the piston pin
and piston.
• Install the piston with the valve re-
cess "a" (at two points) facing to the
engine exhaust side.
• Before installing the piston pin clip,
cover the crankcase with a clean
rag to prevent the piston pin clip
from falling into the crankcase.
End gap:
Standard
Top
ring0.15–0.25 mm
(0.006–0.010 in)0.50
mm
(0.020
in)
2nd
ring0.30–0.45 mm
(0.012–0.018 in)0.80
mm
(0.031
in)
Oil
ring0.10–0.40 mm
(0.004–0.016 in)—
Outside diameter (piston
pin):
15.991–16.000 mm
(0.6296–0.6299 in)
Inside diameter (piston):
16.002–16.013 mm
(0.6300–0.6304 in)
Piston pin-to-piston clearance =
Inside diameter (piston) "b" -
Outside diameter (piston pin)
"a"
Piston pin-to-piston
clearance:
0.002–0.022 mm
(0.0001–0.0009 in)
in)
Page 107 of 198
4-33
CLUTCH
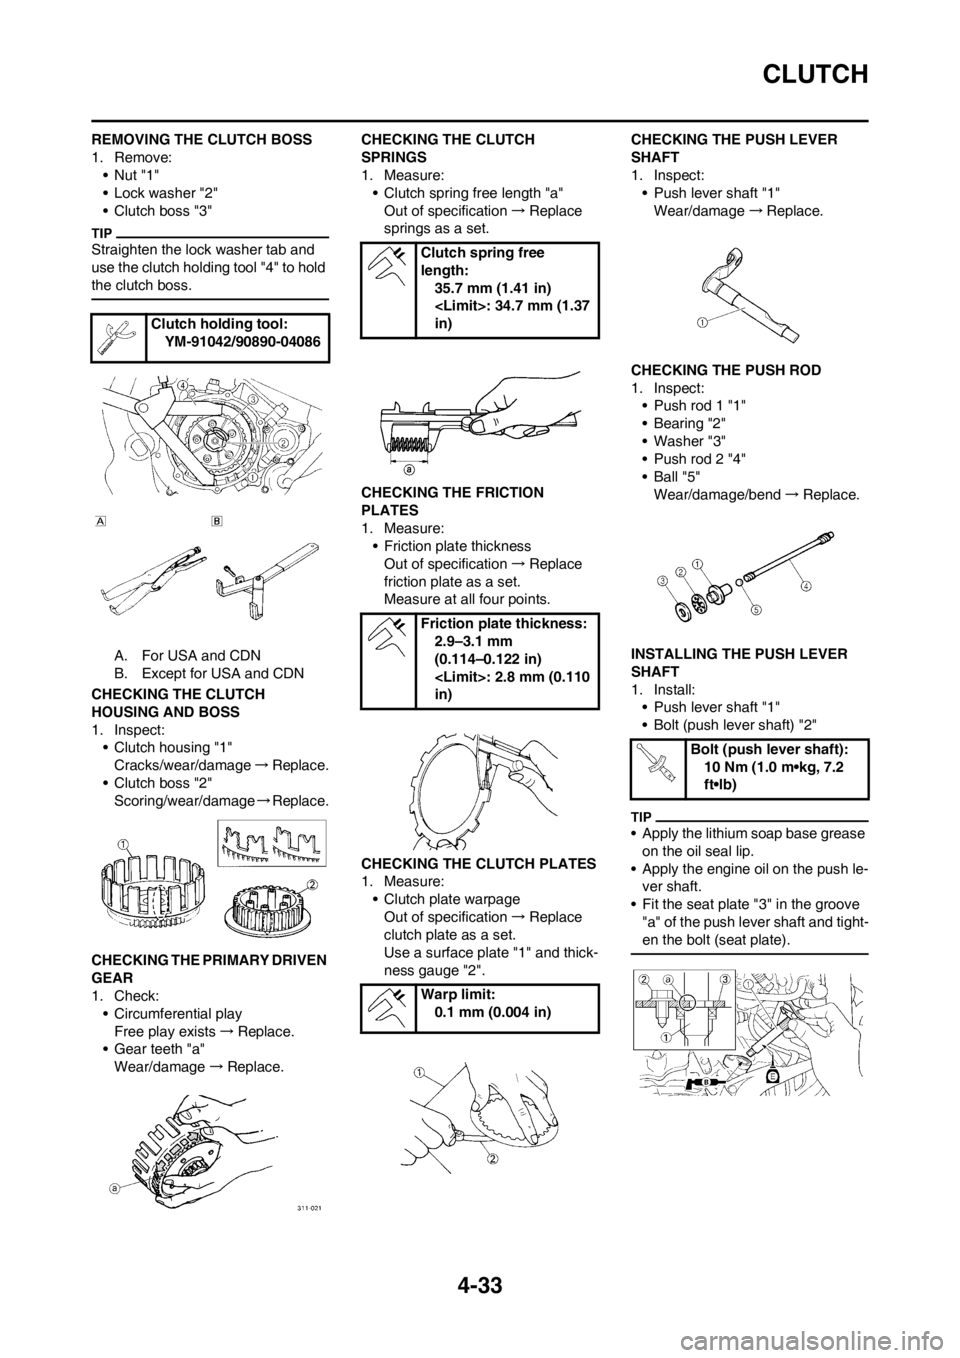
REMOVING THE CLUTCH BOSS
1. Remove:
•Nut "1"
• Lock washer "2"
• Clutch boss "3"
Straighten the lock washer tab and
use the clutch holding tool "4" to hold
the clutch boss.
A. For USA and CDN
B. Except for USA and CDN
CHECKING THE CLUTCH
HOUSING AND BOSS
1. Inspect:
• Clutch housing "1"
Cracks/wear/damage→Replace.
• Clutch boss "2"
Scoring/wear/damage→Replace.
CHECKING THE PRIMARY DRIVEN
GEAR
1. Check:
• Circumferential play
Free play exists→Replace.
• Gear teeth "a"
Wear/damage→Replace.CHECKING THE CLUTCH
SPRINGS
1. Measure:
• Clutch spring free length "a"
Out of specification→Replace
springs as a set.
CHECKING THE FRICTION
PLATES
1. Measure:
• Friction plate thickness
Out of specification→Replace
friction plate as a set.
Measure at all four points.
CHECKING THE CLUTCH PLATES
1. Measure:
• Clutch plate warpage
Out of specification→Replace
clutch plate as a set.
Use a surface plate "1" and thick-
ness gauge "2".CHECKING THE PUSH LEVER
SHAFT
1. Inspect:
• Push lever shaft "1"
Wear/damage→Replace.
CHECKING THE PUSH ROD
1. Inspect:
• Push rod 1 "1"
• Bearing "2"
• Washer "3"
• Push rod 2 "4"
•Ball "5"
Wear/damage/bend→Replace.
INSTALLING THE PUSH LEVER
SHAFT
1. Install:
• Push lever shaft "1"
• Bolt (push lever shaft) "2"
• Apply the lithium soap base grease
on the oil seal lip.
• Apply the engine oil on the push le-
ver shaft.
• Fit the seat plate "3" in the groove
"a" of the push lever shaft and tight-
en the bolt (seat plate).
Clutch holding tool:
YM-91042/90890-04086
Clutch spring free
length:
35.7 mm (1.41 in)
in)
Friction plate thickness:
2.9–3.1 mm
(0.114–0.122 in)
in)
Warp limit:
0.1 mm (0.004 in)
Bolt (push lever shaft):
10 Nm (1.0 m•kg, 7.2
ft•lb)
Page 111 of 198
4-37
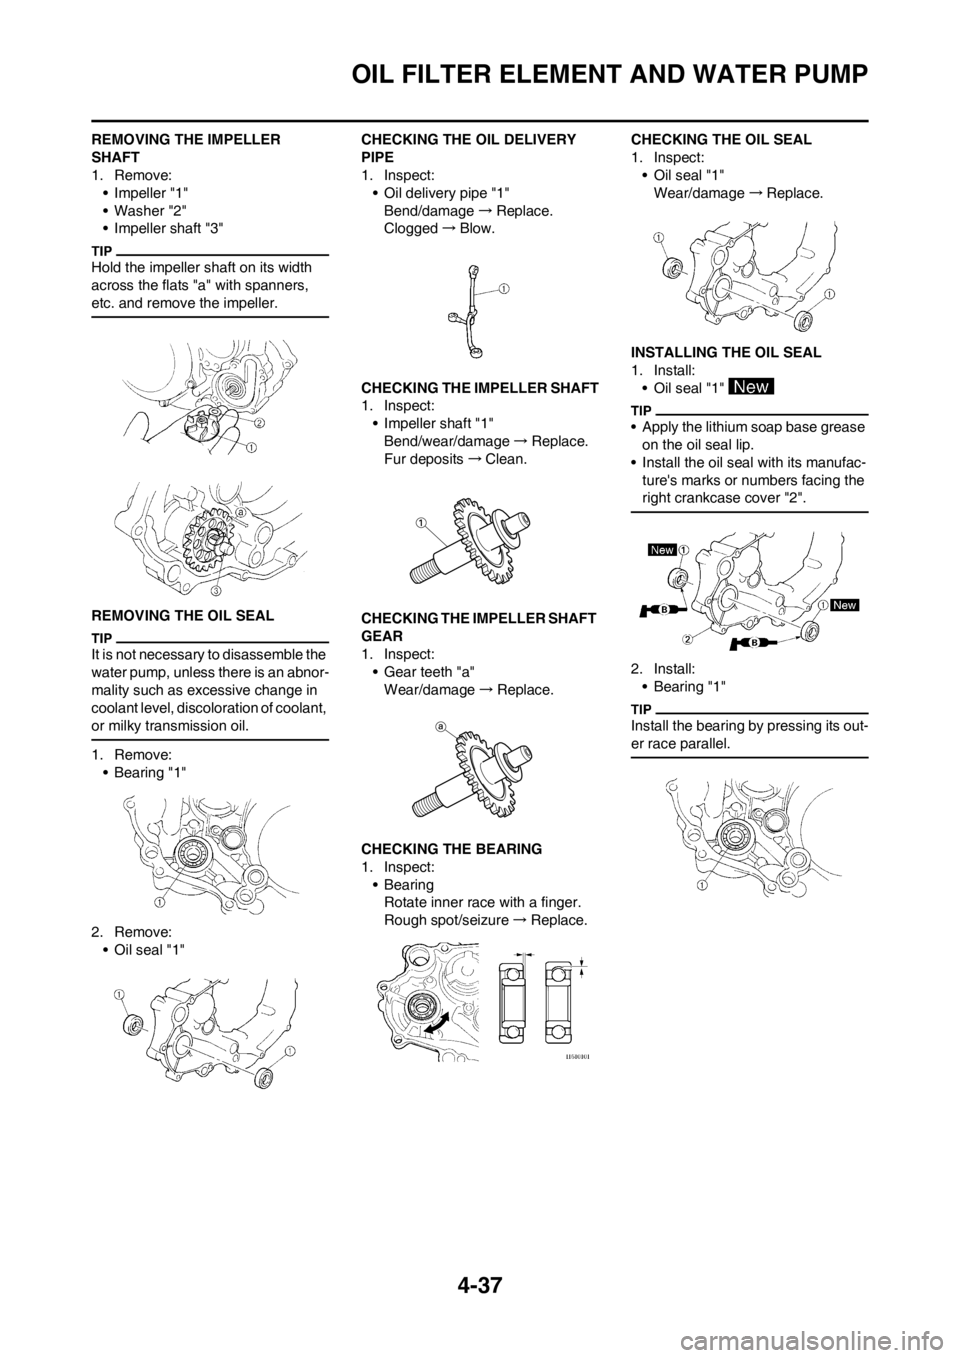
OIL FILTER ELEMENT AND WATER PUMP
REMOVING THE IMPELLER
SHAFT
1. Remove:
• Impeller "1"
• Washer "2"
• Impeller shaft "3"
Hold the impeller shaft on its width
across the flats "a" with spanners,
etc. and remove the impeller.
REMOVING THE OIL SEAL
It is not necessary to disassemble the
water pump, unless there is an abnor-
mality such as excessive change in
coolant level, discoloration of coolant,
or milky transmission oil.
1. Remove:
• Bearing "1"
2. Remove:
• Oil seal "1"CHECKING THE OIL DELIVERY
PIPE
1. Inspect:
• Oil delivery pipe "1"
Bend/damage→Replace.
Clogged→Blow.
CHECKING THE IMPELLER SHAFT
1. Inspect:
• Impeller shaft "1"
Bend/wear/damage→Replace.
Fur deposits→Clean.
CHECKING THE IMPELLER SHAFT
GEAR
1. Inspect:
• Gear teeth "a"
Wear/damage→Replace.
CHECKING THE BEARING
1. Inspect:
•Bearing
Rotate inner race with a finger.
Rough spot/seizure→Replace.CHECKING THE OIL SEAL
1. Inspect:
• Oil seal "1"
Wear/damage→Replace.
INSTALLING THE OIL SEAL
1. Install:
• Oil seal "1"
• Apply the lithium soap base grease
on the oil seal lip.
• Install the oil seal with its manufac-
ture's marks or numbers facing the
right crankcase cover "2".
2. Install:
• Bearing "1"
Install the bearing by pressing its out-
er race parallel.
Page 115 of 198
4-41
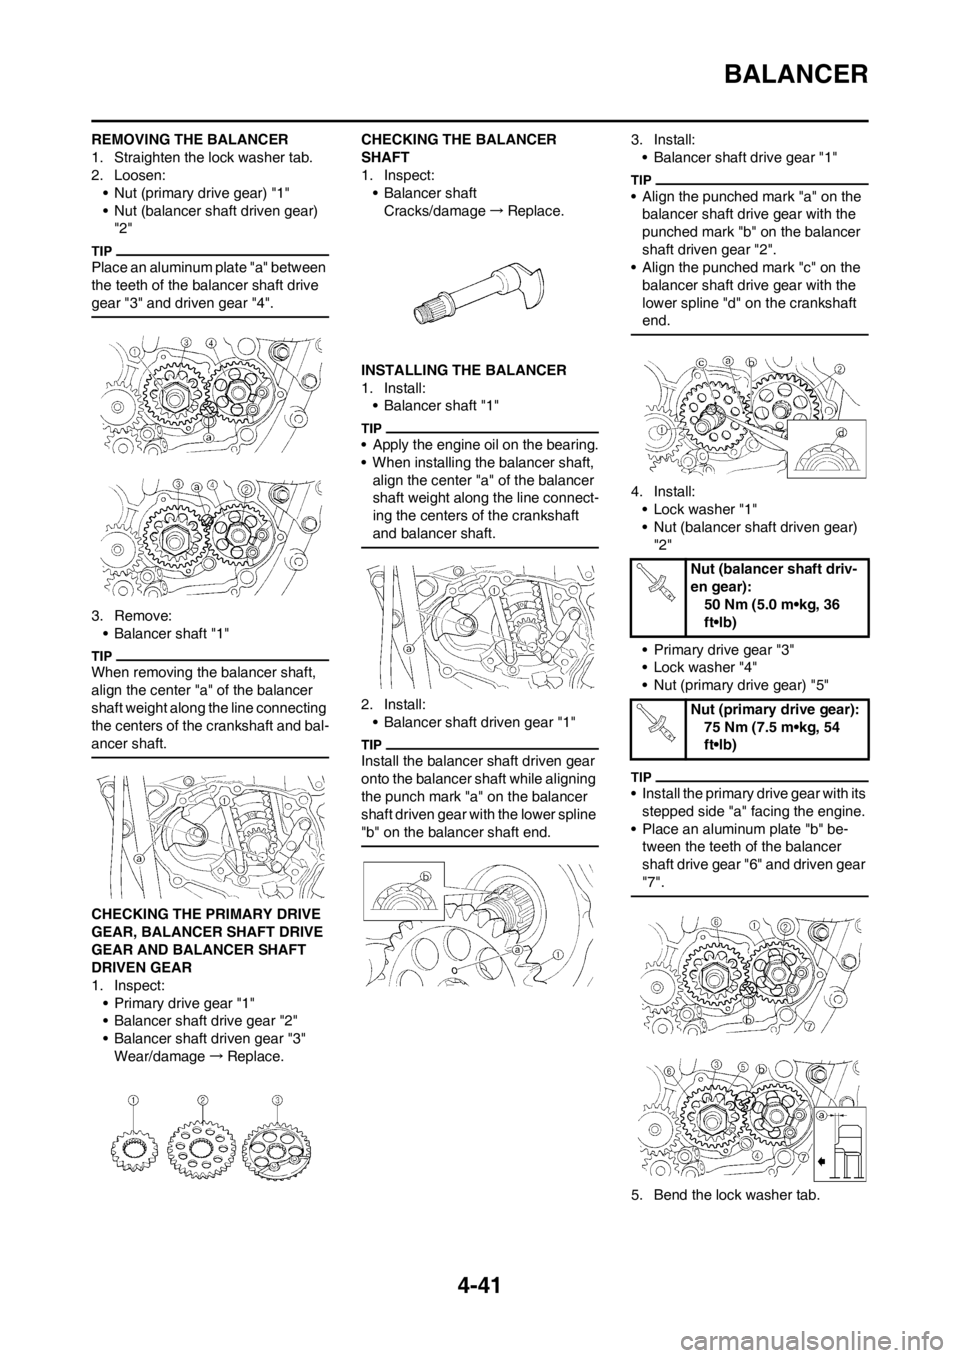
BALANCER
REMOVING THE BALANCER
1. Straighten the lock washer tab.
2. Loosen:
• Nut (primary drive gear) "1"
• Nut (balancer shaft driven gear)
"2"
Place an aluminum plate "a" between
the teeth of the balancer shaft drive
gear "3" and driven gear "4".
3. Remove:
• Balancer shaft "1"
When removing the balancer shaft,
align the center "a" of the balancer
shaft weight along the line connecting
the centers of the crankshaft and bal-
ancer shaft.
CHECKING THE PRIMARY DRIVE
GEAR, BALANCER SHAFT DRIVE
GEAR AND BALANCER SHAFT
DRIVEN GEAR
1. Inspect:
• Primary drive gear "1"
• Balancer shaft drive gear "2"
• Balancer shaft driven gear "3"
Wear/damage→Replace.CHECKING THE BALANCER
SHAFT
1. Inspect:
• Balancer shaft
Cracks/damage→Replace.
INSTALLING THE BALANCER
1. Install:
• Balancer shaft "1"
• Apply the engine oil on the bearing.
• When installing the balancer shaft,
align the center "a" of the balancer
shaft weight along the line connect-
ing the centers of the crankshaft
and balancer shaft.
2. Install:
• Balancer shaft driven gear "1"
Install the balancer shaft driven gear
onto the balancer shaft while aligning
the punch mark "a" on the balancer
shaft driven gear with the lower spline
"b" on the balancer shaft end.
3. Install:
• Balancer shaft drive gear "1"
• Align the punched mark "a" on the
balancer shaft drive gear with the
punched mark "b" on the balancer
shaft driven gear "2".
• Align the punched mark "c" on the
balancer shaft drive gear with the
lower spline "d" on the crankshaft
end.
4. Install:
• Lock washer "1"
• Nut (balancer shaft driven gear)
"2"
• Primary drive gear "3"
• Lock washer "4"
• Nut (primary drive gear) "5"
• Install the primary drive gear with its
stepped side "a" facing the engine.
• Place an aluminum plate "b" be-
tween the teeth of the balancer
shaft drive gear "6" and driven gear
"7".
5. Bend the lock washer tab.
Nut (balancer shaft driv-
en gear):
50 Nm (5.0 m•kg, 36
ft•lb)
Nut (primary drive gear):
75 Nm (7.5 m•kg, 54
ft•lb)