recommended oil YAMAHA YZ250F 2012 Owners Manual
[x] Cancel search | Manufacturer: YAMAHA, Model Year: 2012, Model line: YZ250F, Model: YAMAHA YZ250F 2012Pages: 198, PDF Size: 11.78 MB
Page 23 of 198
1-13
STARTING AND BREAK-IN
STARTING AND BREAK-IN
FUEL
Always use the recommended fuel as
stated below. Also, be sure to use
new gasoline the day of a race.
Use only unleaded gasoline. The
use of leaded gasoline will cause
severe damage to the engine inter-
nal parts such as valves, piston
rings, and exhaust system, etc.
If knocking or pinging occurs, use a
different brand of gasoline or higher
octane grade.
• For refueling, be sure to stop the
engine and use enough care not
to spill any fuel. Also be sure to
avoid refueling close to a fire.
• Refuel after the engine, exhaust
pipe, etc. have cooled off.
HANDLING NOTE
Never start or run the engine in a
closed area. The exhaust fumes
are poisonous; they can cause
loss of consciousness and death
in a very short time. Always oper-
ate the machine in a well-ventilated
area.
• The carburetor on this machine
has a built-in accelerator pump.
Therefore, when starting the en-
gine, do not operate the throttle
or the spark plug will foul.
• Unlike a two-stroke engine, this
engine cannot be kick started
when the throttle is open be-
cause the kickstarter may kick
back. Also, if the throttle is open
the air/fuel mixture may be too
lean for the engine to start.
• Before starting the machine, per-
form the checks in the pre-opera-
tion check list.
AIR FILTER MAINTENANCE
According to "CLEANING THE AIR
FILTER ELEMENT" section in the
CHAPTER 3, apply the foam-air-filter
oil or its equivalent to the element.
(Excess oil in the element may ad-
versely affect engine starting.)
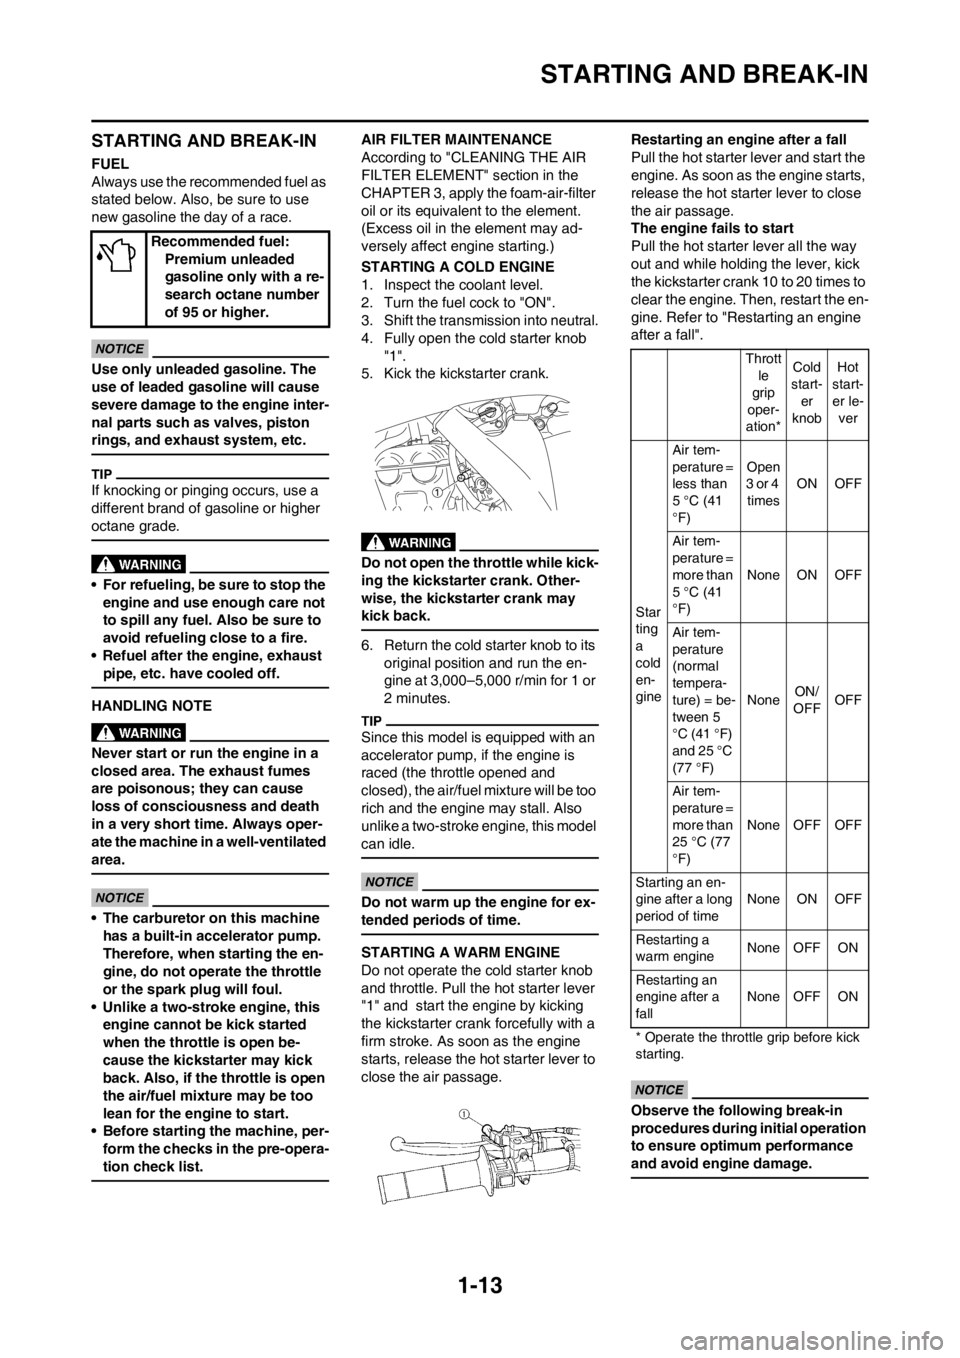
STARTING A COLD ENGINE
1. Inspect the coolant level.
2. Turn the fuel cock to "ON".
3. Shift the transmission into neutral.
4. Fully open the cold starter knob
"1".
5. Kick the kickstarter crank.
Do not open the throttle while kick-
ing the kickstarter crank. Other-
wise, the kickstarter crank may
kick back.
6. Return the cold starter knob to its
original position and run the en-
gine at 3,000–5,000 r/min for 1 or
2 minutes.
Since this model is equipped with an
accelerator pump, if the engine is
raced (the throttle opened and
closed), the air/fuel mixture will be too
rich and the engine may stall. Also
unlike a two-stroke engine, this model
can idle.
Do not warm up the engine for ex-
tended periods of time.
STARTING A WARM ENGINE
Do not operate the cold starter knob
and throttle. Pull the hot starter lever
"1" and start the engine by kicking
the kickstarter crank forcefully with a
firm stroke. As soon as the engine
starts, release the hot starter lever to
close the air passage.Restarting an engine after a fall
Pull the hot starter lever and start the
engine. As soon as the engine starts,
release the hot starter lever to close
the air passage.
The engine fails to start
Pull the hot starter lever all the way
out and while holding the lever, kick
the kickstarter crank 10 to 20 times to
clear the engine. Then, restart the en-
gine. Refer to "Restarting an engine
after a fall".
Observe the following break-in
procedures during initial operation
to ensure optimum performance
and avoid engine damage.
Recommended fuel:
Premium unleaded
gasoline only with a re-
search octane number
of 95 or higher.
Thrott
le
grip
oper-
ation*Cold
start-
er
knobHot
start-
er le-
ver
Star
ting
a
cold
en-
gineAir tem-
perature =
less than
5 °C (41
°F)Open
3 or 4
timesON OFF
Air tem-
perature =
more than
5 °C (41
°F)None ON OFF
Air tem-
perature
(normal
tempera-
ture) = be-
tween 5
°C (41 °F)
and 25 °C
(77 °F)NoneON/
OFFOFF
Air tem-
perature =
more than
25 °C (77
°F)None OFF OFF
Starting an en-
gine after a long
period of timeNone ON OFF
Restarting a
warm engineNone OFF ON
Restarting an
engine after a
fallNone OFF ON
* Operate the throttle grip before kick
starting.
Page 27 of 198
2-1
GENERAL SPECIFICATIONS
SPECIFICATIONS
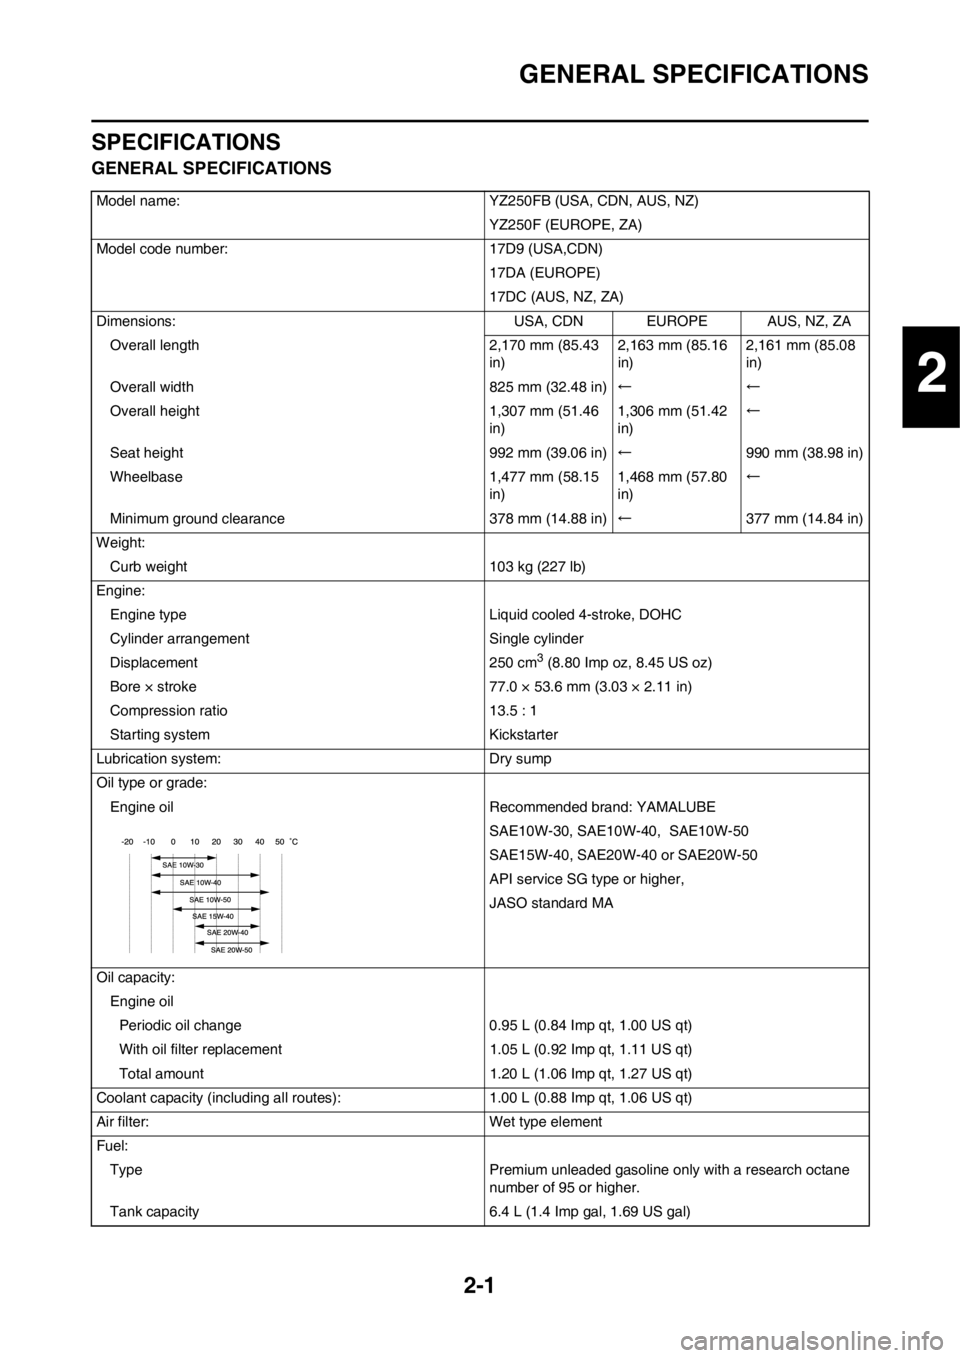
GENERAL SPECIFICATIONS
Model name: YZ250FB (USA, CDN, AUS, NZ)
YZ250F (EUROPE, ZA)
Model code number: 17D9 (USA,CDN)
17DA (EUROPE)
17DC (AUS, NZ, ZA)
Dimensions: USA, CDN EUROPE AUS, NZ, ZA
Overall length 2,170 mm (85.43
in)2,163 mm (85.16
in)2,161 mm (85.08
in)
Overall width 825 mm (32.48 in)←←
Overall height 1,307 mm (51.46
in)1,306 mm (51.42
in)←
Seat height 992 mm (39.06 in)←990 mm (38.98 in)
Wheelbase 1,477 mm (58.15
in)1,468 mm (57.80
in)←
Minimum ground clearance 378 mm (14.88 in)←377 mm (14.84 in)
Weight:
Curb weight 103 kg (227 lb)
Engine:
Engine type Liquid cooled 4-stroke, DOHC
Cylinder arrangement Single cylinder
Displacement 250 cm
3 (8.80 Imp oz, 8.45 US oz)
Bore × stroke 77.0 × 53.6 mm (3.03 × 2.11 in)
Compression ratio 13.5 : 1
Starting system Kickstarter
Lubrication system: Dry sump
Oil type or grade:
Engine oil Recommended brand: YAMALUBE
SAE10W-30, SAE10W-40, SAE10W-50
SAE15W-40, SAE20W-40 or SAE20W-50
API service SG type or higher,
JASO standard MA
Oil capacity:
Engine oil
Periodic oil change 0.95 L (0.84 Imp qt, 1.00 US qt)
With oil filter replacement 1.05 L (0.92 Imp qt, 1.11 US qt)
Total amount 1.20 L (1.06 Imp qt, 1.27 US qt)
Coolant capacity (including all routes): 1.00 L (0.88 Imp qt, 1.06 US qt)
Air filter: Wet type element
Fuel:
Type Premium unleaded gasoline only with a research octane
number of 95 or higher.
Tank capacity 6.4 L (1.4 Imp gal, 1.69 US gal)
2
Page 51 of 198
3-1
MAINTENANCE INTERVALS
REGULAR INSPECTION AND ADJUSTMENTS
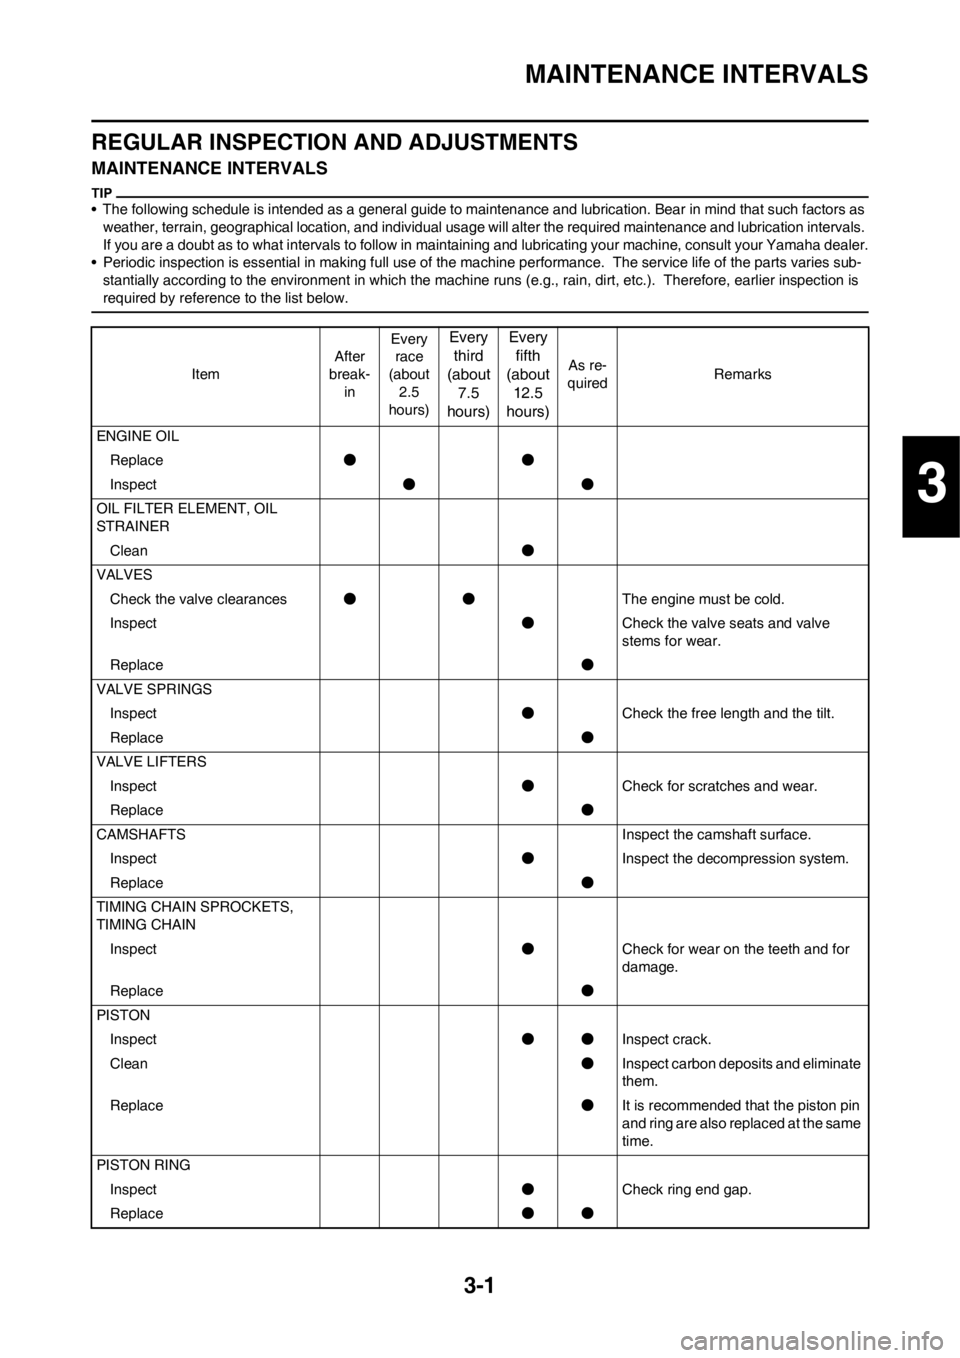
MAINTENANCE INTERVALS
• The following schedule is intended as a general guide to maintenance and lubrication. Bear in mind that such factors as
weather, terrain, geographical location, and individual usage will alter the required maintenance and lubrication intervals.
If you are a doubt as to what intervals to follow in maintaining and lubricating your machine, consult your Yamaha dealer.
• Periodic inspection is essential in making full use of the machine performance. The service life of the parts varies sub-
stantially according to the environment in which the machine runs (e.g., rain, dirt, etc.). Therefore, earlier inspection is
required by reference to the list below.
ItemAfter
break-
inEvery
race
(about
2.5
hours)
Every
third
(about
7.5
hours)Every
fifth
(about
12.5
hours)
As re-
quiredRemarks
ENGINE OIL
Replace●●
Inspect●●
OIL FILTER ELEMENT, OIL
STRAINER
Clean●
VALVES
Check the valve clearances●●The engine must be cold.
Inspect●Check the valve seats and valve
stems for wear.
Replace●
VALVE SPRINGS
Inspect●Check the free length and the tilt.
Replace●
VALVE LIFTERS
Inspect●Check for scratches and wear.
Replace●
CAMSHAFTS Inspect the camshaft surface.
Inspect●Inspect the decompression system.
Replace●
TIMING CHAIN SPROCKETS,
TIMING CHAIN
Inspect●Check for wear on the teeth and for
damage.
Replace●
PISTON
Inspect●●Inspect crack.
Clean●Inspect carbon deposits and eliminate
them.
Replace●It is recommended that the piston pin
and ring are also replaced at the same
time.
PISTON RING
Inspect●Check ring end gap.
Replace●●
3
Page 56 of 198
3-6
ENGINE
ENGINE
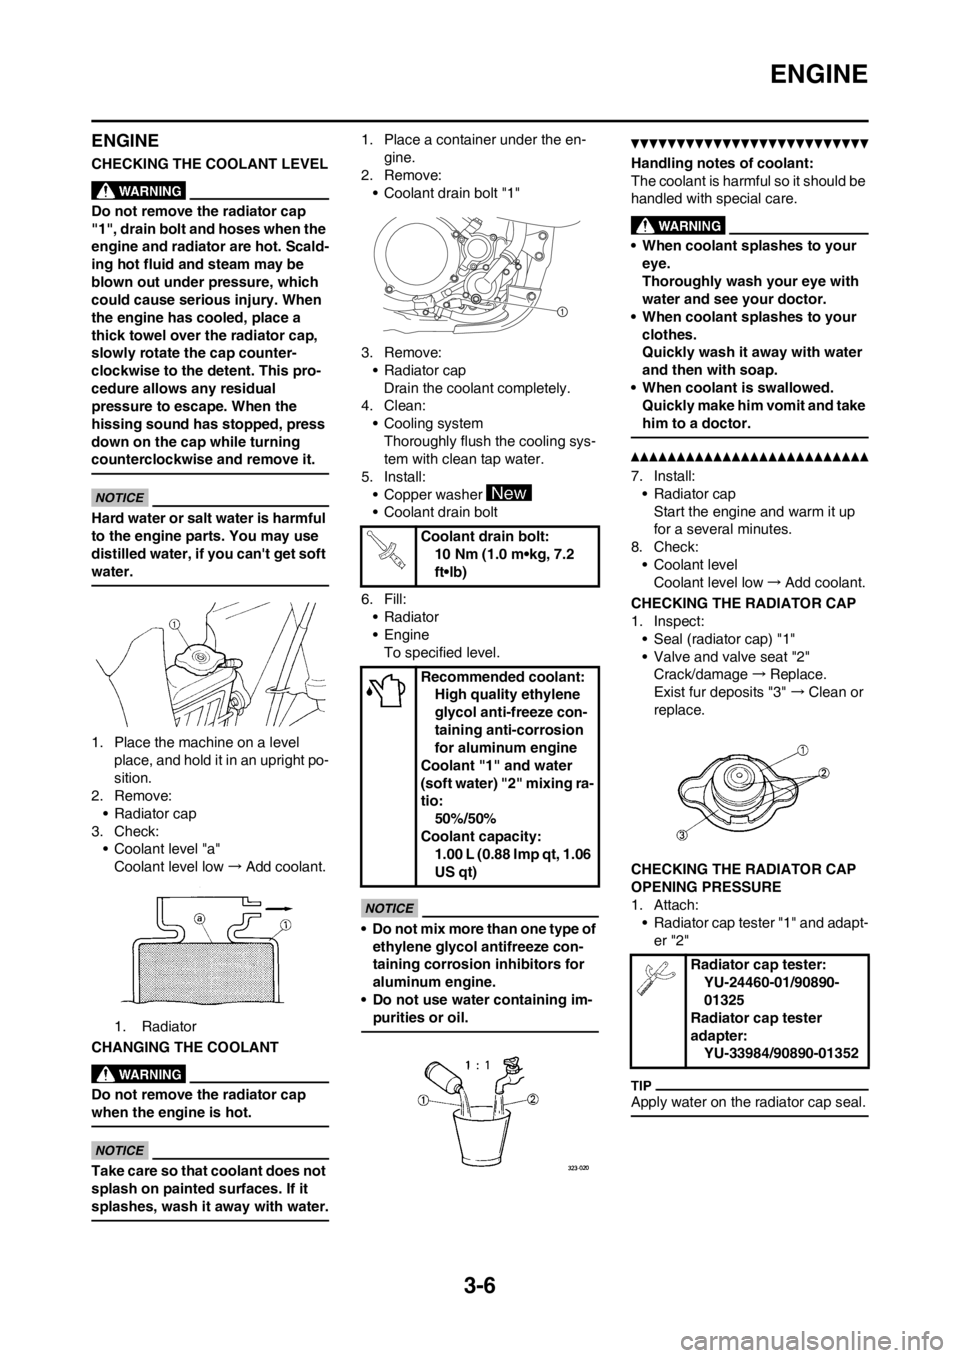
CHECKING THE COOLANT LEVEL
Do not remove the radiator cap
"1", drain bolt and hoses when the
engine and radiator are hot. Scald-
ing hot fluid and steam may be
blown out under pressure, which
could cause serious injury. When
the engine has cooled, place a
thick towel over the radiator cap,
slowly rotate the cap counter-
clockwise to the detent. This pro-
cedure allows any residual
pressure to escape. When the
hissing sound has stopped, press
down on the cap while turning
counterclockwise and remove it.
Hard water or salt water is harmful
to the engine parts. You may use
distilled water, if you can't get soft
water.
1. Place the machine on a level
place, and hold it in an upright po-
sition.
2. Remove:
• Radiator cap
3. Check:
• Coolant level "a"
Coolant level low→Add coolant.
1. Radiator
CHANGING THE COOLANT
Do not remove the radiator cap
when the engine is hot.
Take care so that coolant does not
splash on painted surfaces. If it
splashes, wash it away with water.
1. Place a container under the en-
gine.
2. Remove:
• Coolant drain bolt "1"
3. Remove:
• Radiator cap
Drain the coolant completely.
4. Clean:
• Cooling system
Thoroughly flush the cooling sys-
tem with clean tap water.
5. Install:
• Copper washer
• Coolant drain bolt
6. Fill:
• Radiator
•Engine
To specified level.
• Do not mix more than one type of
ethylene glycol antifreeze con-
taining corrosion inhibitors for
aluminum engine.
• Do not use water containing im-
purities or oil.
Handling notes of coolant:
The coolant is harmful so it should be
handled with special care.
• When coolant splashes to your
eye.
Thoroughly wash your eye with
water and see your doctor.
• When coolant splashes to your
clothes.
Quickly wash it away with water
and then with soap.
• When coolant is swallowed.
Quickly make him vomit and take
him to a doctor.
7. Install:
• Radiator cap
Start the engine and warm it up
for a several minutes.
8. Check:
• Coolant level
Coolant level low→Add coolant.
CHECKING THE RADIATOR CAP
1. Inspect:
• Seal (radiator cap) "1"
• Valve and valve seat "2"
Crack/damage→Replace.
Exist fur deposits "3" →Clean or
replace.
CHECKING THE RADIATOR CAP
OPENING PRESSURE
1. Attach:
• Radiator cap tester "1" and adapt-
er "2"
Apply water on the radiator cap seal.
Coolant drain bolt:
10 Nm (1.0 m•kg, 7.2
ft•lb)
Recommended coolant:
High quality ethylene
glycol anti-freeze con-
taining anti-corrosion
for aluminum engine
Coolant "1" and water
(soft water) "2" mixing ra-
tio:
50%/50%
Coolant capacity:
1.00 L (0.88 Imp qt, 1.06
US qt)
Radiator cap tester:
YU-24460-01/90890-
01325
Radiator cap tester
adapter:
YU-33984/90890-01352
Page 59 of 198
3-9
ENGINE
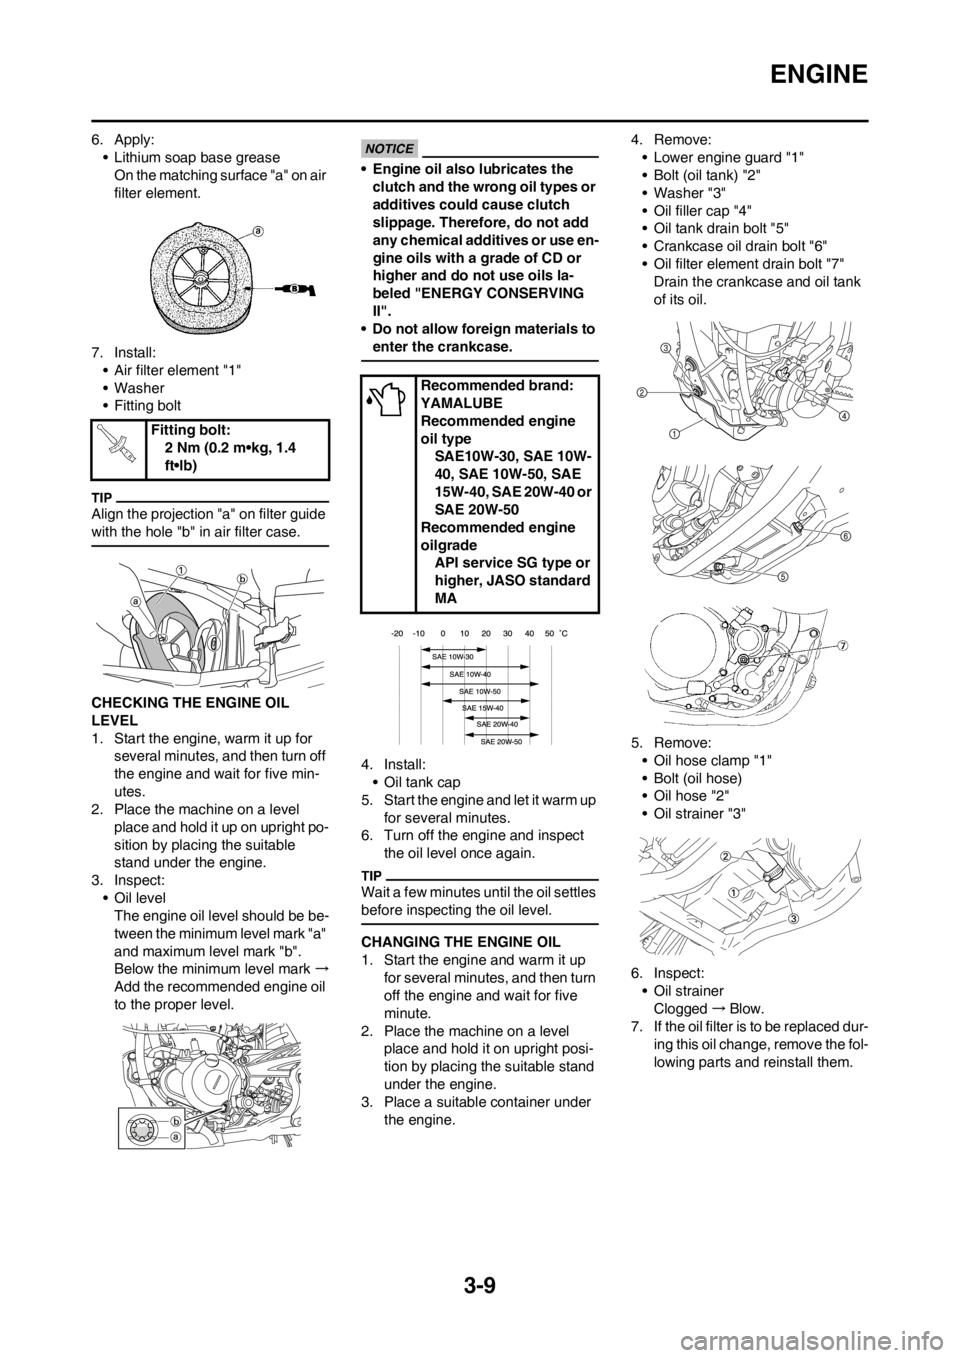
6. Apply:
• Lithium soap base grease
On the matching surface "a" on air
filter element.
7. Install:
• Air filter element "1"
• Washer
• Fitting bolt
Align the projection "a" on filter guide
with the hole "b" in air filter case.
CHECKING THE ENGINE OIL
LEVEL
1. Start the engine, warm it up for
several minutes, and then turn off
the engine and wait for five min-
utes.
2. Place the machine on a level
place and hold it up on upright po-
sition by placing the suitable
stand under the engine.
3. Inspect:
• Oil level
The engine oil level should be be-
tween the minimum level mark "a"
and maximum level mark "b".
Below the minimum level mark →
Add the recommended engine oil
to the proper level.
• Engine oil also lubricates the
clutch and the wrong oil types or
additives could cause clutch
slippage. Therefore, do not add
any chemical additives or use en-
gine oils with a grade of CD or
higher and do not use oils la-
beled "ENERGY CONSERVING
II".
• Do not allow foreign materials to
enter the crankcase.
4. Install:
• Oil tank cap
5. Start the engine and let it warm up
for several minutes.
6. Turn off the engine and inspect
the oil level once again.
Wait a few minutes until the oil settles
before inspecting the oil level.
CHANGING THE ENGINE OIL
1. Start the engine and warm it up
for several minutes, and then turn
off the engine and wait for five
minute.
2. Place the machine on a level
place and hold it on upright posi-
tion by placing the suitable stand
under the engine.
3. Place a suitable container under
the engine.4. Remove:
• Lower engine guard "1"
• Bolt (oil tank) "2"
• Washer "3"
• Oil filler cap "4"
• Oil tank drain bolt "5"
• Crankcase oil drain bolt "6"
• Oil filter element drain bolt "7"
Drain the crankcase and oil tank
of its oil.
5. Remove:
• Oil hose clamp "1"
• Bolt (oil hose)
• Oil hose "2"
• Oil strainer "3"
6. Inspect:
• Oil strainer
Clogged→Blow.
7. If the oil filter is to be replaced dur-
ing this oil change, remove the fol-
lowing parts and reinstall them. Fitting bolt:
2 Nm (0.2 m•kg, 1.4
ft•lb)
Recommended brand:
YAMALUBE
Recommended engine
oil type
SAE10W-30, SAE 10W-
40, SAE 10W-50, SAE
15W-40, SAE 20W-40 or
SAE 20W-50
Recommended engine
oilgrade
API service SG type or
higher, JASO standard
MA
Page 153 of 198
5-14
FRONT BRAKE AND REAR BRAKE
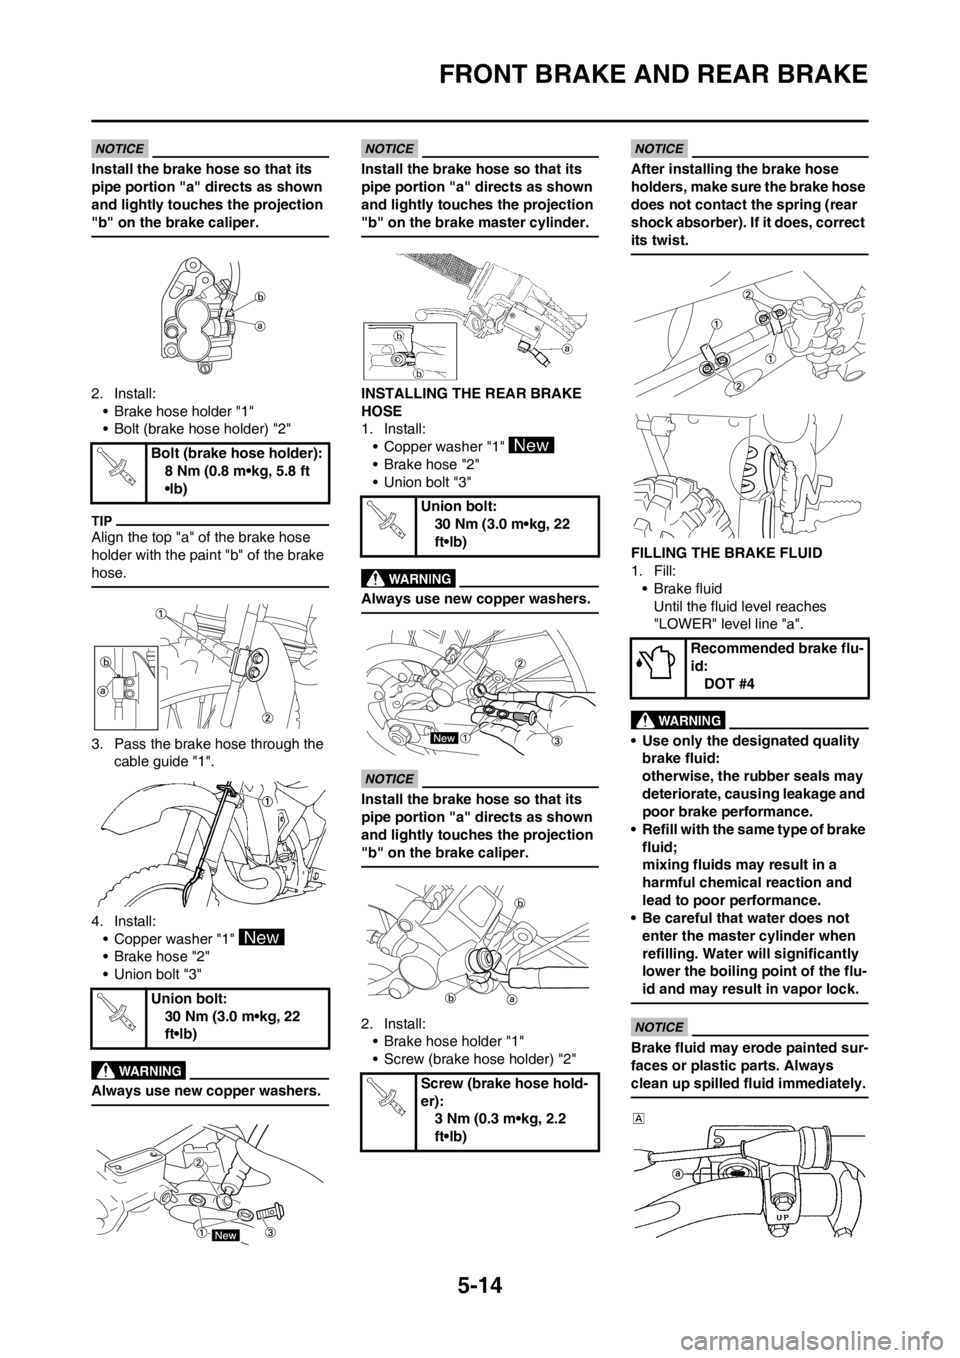
Install the brake hose so that its
pipe portion "a" directs as shown
and lightly touches the projection
"b" on the brake caliper.
2. Install:
• Brake hose holder "1"
• Bolt (brake hose holder) "2"
Align the top "a" of the brake hose
holder with the paint "b" of the brake
hose.
3. Pass the brake hose through the
cable guide "1".
4. Install:
• Copper washer "1"
• Brake hose "2"
• Union bolt "3"
Always use new copper washers.
Install the brake hose so that its
pipe portion "a" directs as shown
and lightly touches the projection
"b" on the brake master cylinder.
INSTALLING THE REAR BRAKE
HOSE
1. Install:
• Copper washer "1"
• Brake hose "2"
• Union bolt "3"
Always use new copper washers.
Install the brake hose so that its
pipe portion "a" directs as shown
and lightly touches the projection
"b" on the brake caliper.
2. Install:
• Brake hose holder "1"
• Screw (brake hose holder) "2"
After installing the brake hose
holders, make sure the brake hose
does not contact the spring (rear
shock absorber). If it does, correct
its twist.
FILLING THE BRAKE FLUID
1. Fill:
• Brake fluid
Until the fluid level reaches
"LOWER" level line "a".
• Use only the designated quality
brake fluid:
otherwise, the rubber seals may
deteriorate, causing leakage and
poor brake performance.
• Refill with the same type of brake
fluid;
mixing fluids may result in a
harmful chemical reaction and
lead to poor performance.
• Be careful that water does not
enter the master cylinder when
refilling. Water will significantly
lower the boiling point of the flu-
id and may result in vapor lock.
Brake fluid may erode painted sur-
faces or plastic parts. Always
clean up spilled fluid immediately.
Bolt (brake hose holder):
8 Nm (0.8 m•kg, 5.8 ft
•lb)
Union bolt:
30 Nm (3.0 m•kg, 22
ft•lb)
Union bolt:
30 Nm (3.0 m•kg, 22
ft•lb)
Screw (brake hose hold-
er):
3 Nm (0.3 m•kg, 2.2
ft•lb)
Recommended brake flu-
id:
DOT #4
Page 157 of 198
5-18
FRONT FORK
HANDLING NOTE
Support the machine securely so
there is no danger of it falling over.
The front fork requires careful atten-
tion. So it is recommended that the
front fork be maintained at the deal-
ers.
To prevent an accidental explosion
of air, the following instructions
should be observed:
• The front fork with a built-in pis-
ton rod has a very sophisticated
internal construction and is par-
ticularly sensitive to foreign ma-
terial. Use enough care not to
allow any foreign material to
come in when the oil is replaced
or when the front fork is disas-
sembled and reassembled.
• Before removing the base valves
or front forks, be sure to extract
the air from the air chamber com-
pletely.
REMOVING THE DAMPER
ASSEMBLY
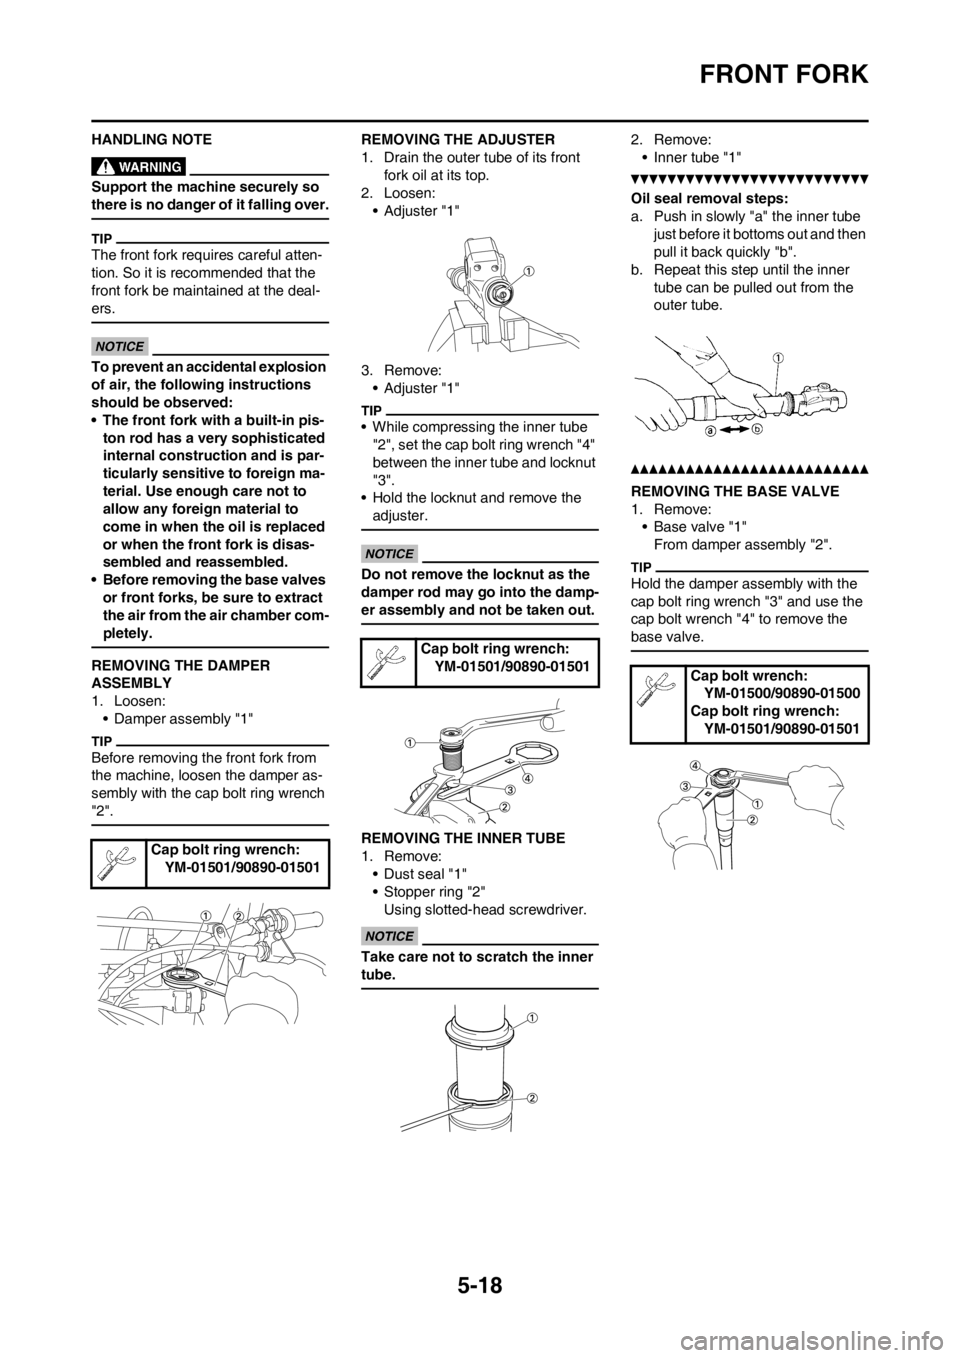
1. Loosen:
• Damper assembly "1"
Before removing the front fork from
the machine, loosen the damper as-
sembly with the cap bolt ring wrench
"2".
REMOVING THE ADJUSTER
1. Drain the outer tube of its front
fork oil at its top.
2. Loosen:
•Adjuster "1"
3. Remove:
•Adjuster "1"
• While compressing the inner tube
"2", set the cap bolt ring wrench "4"
between the inner tube and locknut
"3".
• Hold the locknut and remove the
adjuster.
Do not remove the locknut as the
damper rod may go into the damp-
er assembly and not be taken out.
REMOVING THE INNER TUBE
1. Remove:
• Dust seal "1"
• Stopper ring "2"
Using slotted-head screwdriver.
Take care not to scratch the inner
tube.
2. Remove:
• Inner tube "1"
Oil seal removal steps:
a. Push in slowly "a" the inner tube
just before it bottoms out and then
pull it back quickly "b".
b. Repeat this step until the inner
tube can be pulled out from the
outer tube.
REMOVING THE BASE VALVE
1. Remove:
• Base valve "1"
From damper assembly "2".
Hold the damper assembly with the
cap bolt ring wrench "3" and use the
cap bolt wrench "4" to remove the
base valve.
Cap bolt ring wrench:
YM-01501/90890-01501
Cap bolt ring wrench:
YM-01501/90890-01501
Cap bolt wrench:
YM-01500/90890-01500
Cap bolt ring wrench:
YM-01501/90890-01501
Page 158 of 198
5-19
FRONT FORK
CHECKING THE DAMPER
ASSEMBLY
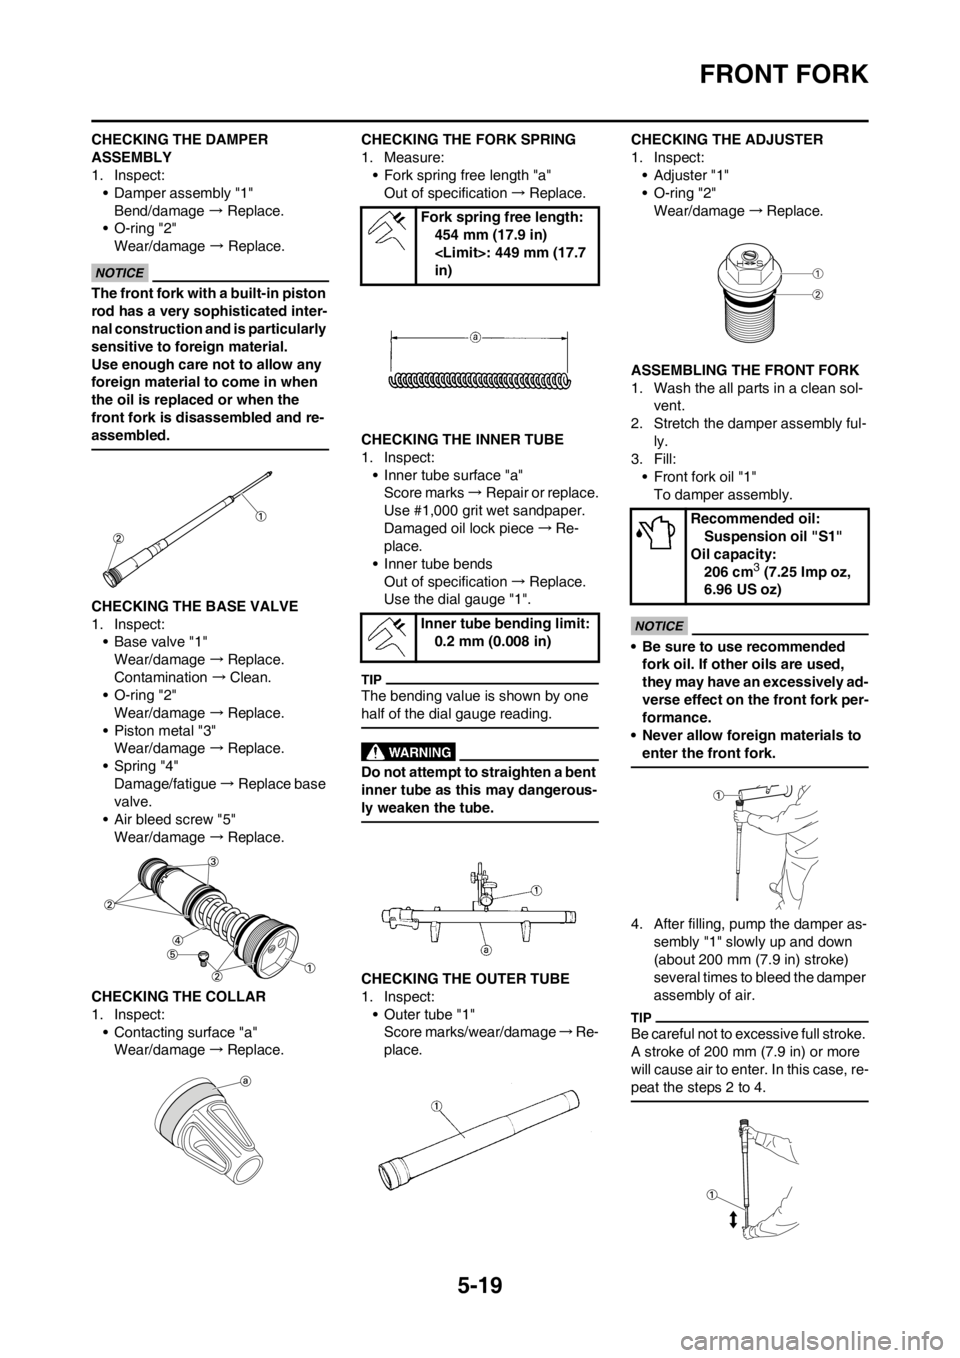
1. Inspect:
• Damper assembly "1"
Bend/damage → Replace.
• O-ring "2"
Wear/damage → Replace.
The front fork with a built-in piston
rod has a very sophisticated inter-
nal construction and is particularly
sensitive to foreign material.
Use enough care not to allow any
foreign material to come in when
the oil is replaced or when the
front fork is disassembled and re-
assembled.
CHECKING THE BASE VALVE
1. Inspect:
• Base valve "1"
Wear/damage →Replace.
Contamination →Clean.
• O-ring "2"
Wear/damage →Replace.
• Piston metal "3"
Wear/damage →Replace.
• Spring "4"
Damage/fatigue →Replace base
valve.
• Air bleed screw "5"
Wear/damage →Replace.
CHECKING THE COLLAR
1. Inspect:
• Contacting surface "a"
Wear/damage→Replace.CHECKING THE FORK SPRING
1. Measure:
• Fork spring free length "a"
Out of specification→Replace.
CHECKING THE INNER TUBE
1. Inspect:
• Inner tube surface "a"
Score marks→Repair or replace.
Use #1,000 grit wet sandpaper.
Damaged oil lock piece→Re-
place.
• Inner tube bends
Out of specification→Replace.
Use the dial gauge "1".
The bending value is shown by one
half of the dial gauge reading.
Do not attempt to straighten a bent
inner tube as this may dangerous-
ly weaken the tube.
CHECKING THE OUTER TUBE
1. Inspect:
• Outer tube "1"
Score marks/wear/damage→Re-
place.CHECKING THE ADJUSTER
1. Inspect:
•Adjuster "1"
• O-ring "2"
Wear/damage→Replace.
ASSEMBLING THE FRONT FORK
1. Wash the all parts in a clean sol-
vent.
2. Stretch the damper assembly ful-
ly.
3. Fill:
• Front fork oil "1"
To damper assembly.
• Be sure to use recommended
fork oil. If other oils are used,
they may have an excessively ad-
verse effect on the front fork per-
formance.
• Never allow foreign materials to
enter the front fork.
4. After filling, pump the damper as-
sembly "1" slowly up and down
(about 200 mm (7.9 in) stroke)
several times to bleed the damper
assembly of air.
Be careful not to excessive full stroke.
A stroke of 200 mm (7.9 in) or more
will cause air to enter. In this case, re-
peat the steps 2 to 4.
Fork spring free length:
454 mm (17.9 in)
in)
Inner tube bending limit:
0.2 mm (0.008 in)
Recommended oil:
Suspension oil "S1"
Oil capacity:
206 cm
3 (7.25 Imp oz,
6.96 US oz)
Page 161 of 198
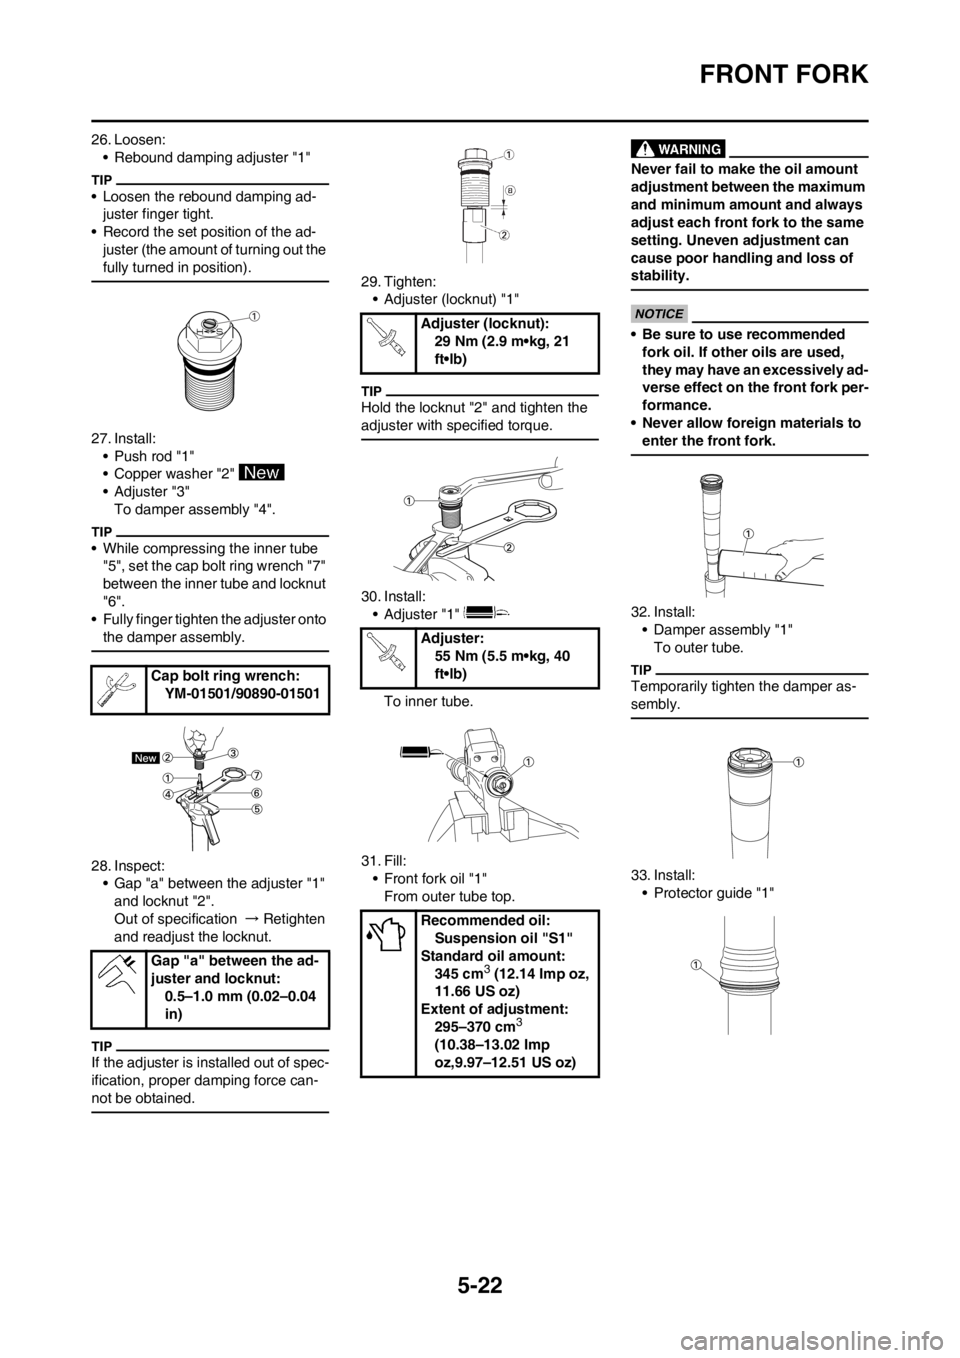
5-22
FRONT FORK
26. Loosen:
• Rebound damping adjuster "1"
• Loosen the rebound damping ad-
juster finger tight.
• Record the set position of the ad-
juster (the amount of turning out the
fully turned in position).
27. Install:
• Push rod "1"
• Copper washer "2"
• Adjuster "3"
To damper assembly "4".
• While compressing the inner tube
"5", set the cap bolt ring wrench "7"
between the inner tube and locknut
"6".
• Fully finger tighten the adjuster onto
the damper assembly.
28. Inspect:
• Gap "a" between the adjuster "1"
and locknut "2".
Out of specification → Retighten
and readjust the locknut.
If the adjuster is installed out of spec-
ification, proper damping force can-
not be obtained.
29. Tighten:
• Adjuster (locknut) "1"
Hold the locknut "2" and tighten the
adjuster with specified torque.
30. Install:
• Adjuster "1"
To inner tube.
31. Fill:
• Front fork oil "1"
From outer tube top.
Never fail to make the oil amount
adjustment between the maximum
and minimum amount and always
adjust each front fork to the same
setting. Uneven adjustment can
cause poor handling and loss of
stability.
• Be sure to use recommended
fork oil. If other oils are used,
they may have an excessively ad-
verse effect on the front fork per-
formance.
• Never allow foreign materials to
enter the front fork.
32. Install:
• Damper assembly "1"
To outer tube.
Temporarily tighten the damper as-
sembly.
33. Install:
• Protector guide "1" Cap bolt ring wrench:
YM-01501/90890-01501
Gap "a" between the ad-
juster and locknut:
0.5–1.0 mm (0.02–0.04
in)
Adjuster (locknut):
29 Nm (2.9 m•kg, 21
ft•lb)
Adjuster:
55 Nm (5.5 m•kg, 40
ft•lb)
Recommended oil:
Suspension oil "S1"
Standard oil amount:
345 cm
3 (12.14 Imp oz,
11.66 US oz)
Extent of adjustment:
295–370 cm
3
(10.38–13.02 Imp
oz,9.97–12.51 US oz)