lock YAMAHA YZ250LC 2001 Notices Demploi (in French)
[x] Cancel search | Manufacturer: YAMAHA, Model Year: 2001, Model line: YZ250LC, Model: YAMAHA YZ250LC 2001Pages: 578, PDF Size: 14.12 MB
Page 418 of 578

5-29
CHASFRONT FORK
EC556000
HANDLING NOTE
NOTE:
The front fork requires careful attention. So it is
recommended that the front fork be maintained
at the dealers.
cC
To prevent an accidental explosion of air,
the following instructions should be ob-
served:
9The front fork with a built-in piston rod
has a very sophisticated internal con-
struction and is particularly sensitive to
foreign material.
Use enough care not to allow any foreign
material to come in when the oil is re-
placed or when the front fork is disassem-
bled and reassembled.
9Before removing the cap bolts or front
forks, be sure to extract the air from the air
chamber completely.
EC553000
REMOVAL POINTSEC553151
Cap bolt
1. Remove:
9Cap bolt 1
From the outer tube.
NOTE:
Before removing the front fork from the machine,
loosen the cap bolt.
2. Remove:
9Cap bolt 1
NOTE:
9While compressing the fork spring, set the thin
type spanners 2between the spacer 3and
spring guide 4.
9Hold the locknut 5and remove the cap bolt.
5MW-9-30-5B 7/6/00 9:51 AM Page 6
Page 420 of 578
5-30
CHASFRONT FORK
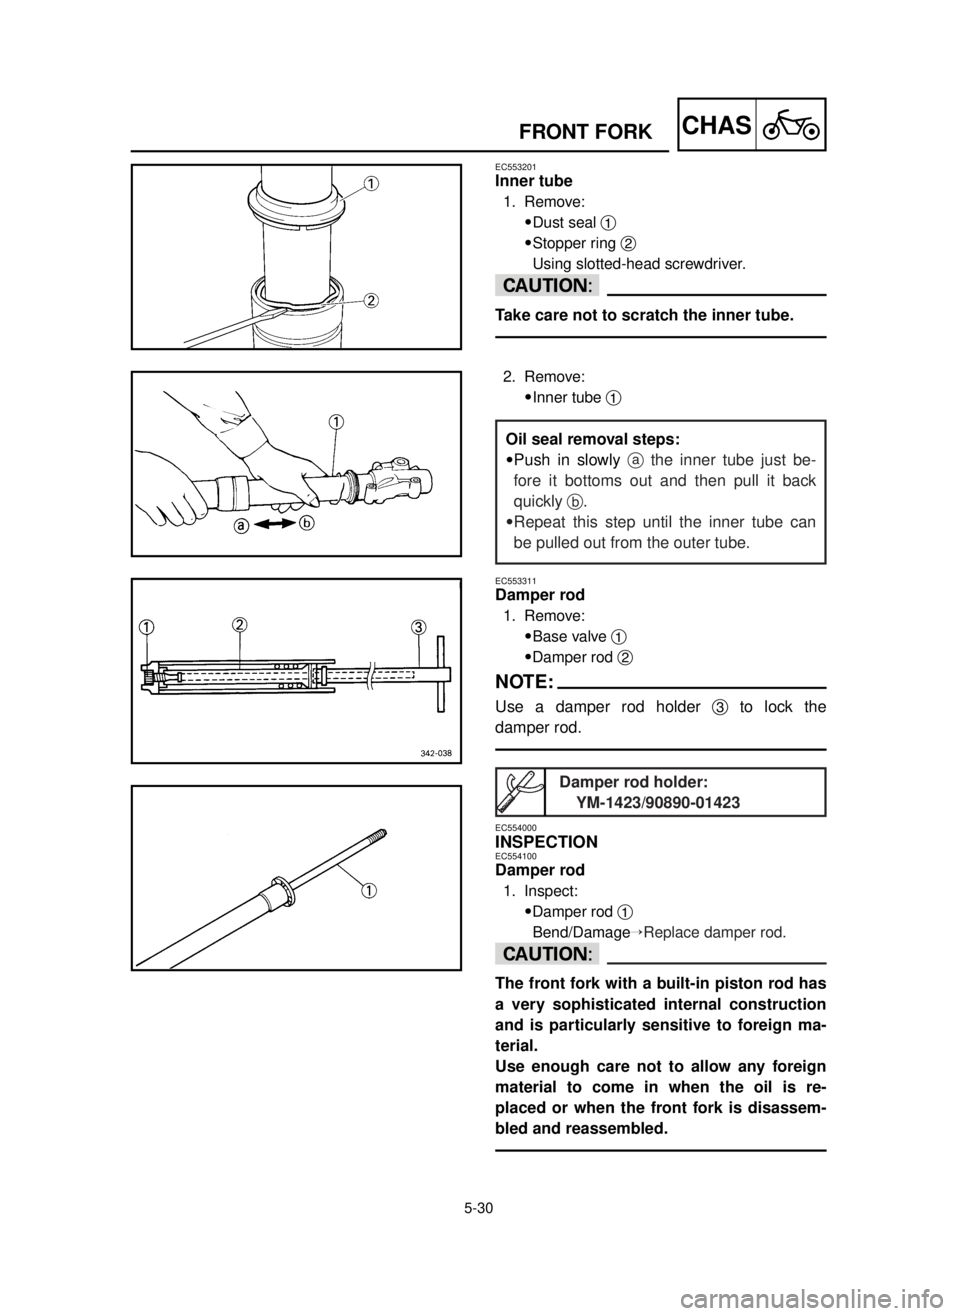
EC553201
Inner tube
1. Remove:
9Dust seal 1
9Stopper ring 2
Using slotted-head screwdriver.
cC
Take care not to scratch the inner tube.
2. Remove:
9Inner tube 1
EC553311
Damper rod
1. Remove:
9Base valve 1
9Damper rod 2
NOTE:
Use a damper rod holder 3to lock the
damper rod.
EC554000
INSPECTIONEC554100
Damper rod
1. Inspect:
9Damper rod 1
Bend/DamageÕReplace damper rod.
cC
The front fork with a built-in piston rod has
a very sophisticated internal construction
and is particularly sensitive to foreign ma-
terial.
Use enough care not to allow any foreign
material to come in when the oil is re-
placed or when the front fork is disassem-
bled and reassembled.
Oil seal removal steps:
9Push in slowly athe inner tube just be-
fore it bottoms out and then pull it back
quickly b.
9Repeat this step until the inner tube can
be pulled out from the outer tube.
Damper rod holder:
YM-1423/90890-01423
5MW-9-30-5B 7/6/00 9:52 AM Page 8
Page 422 of 578

5-31
CHASFRONT FORK
EC554200
Base valve
1. Inspect:
9Valve assembly 1
Wear/DamageÕReplace.
9O-ring 2
DamageÕReplace.
EC554400
Fork spring
1. Measure:
9Fork spring free length a
Out of specificationÕReplace.
EC554502
Inner tube
1. Inspect:
9Inner tube surface a
Score marksÕRepair or replace.
Use #1,000 grit wet sandpaper.
Damaged oil lock pieceÕReplace.
9Inner tube bends
Out of specificationÕReplace.
Use the dial gauge 1.
NOTE:
The bending value is shown by one half of the
dial gauge reading.
w
Do not attempt to straighten a bent inner
tube as this may dangerously weaken the
tube.
EC554600
Outer tube
1. Inspect:
9Outer tube 1
Score marks/Wear/DamageÕReplace.
Standard
460 mm 455 mm
(18.1 in) (17.9 in)Fork spring free length:
Inner tube bending limit:
0.2 mm (0.008 in)
5MW-9-30-5B 7/6/00 9:52 AM Page 10
Page 424 of 578
5-32
CHASFRONT FORK
EC554700
Cap bolt
1. Inspect:
9Cap bolt 1
9O-ring 2
9Air bleed screw 3
Wear/DamageÕReplace.
EC555000
ASSEMBLY AND INSTALLATIONEC5551A1
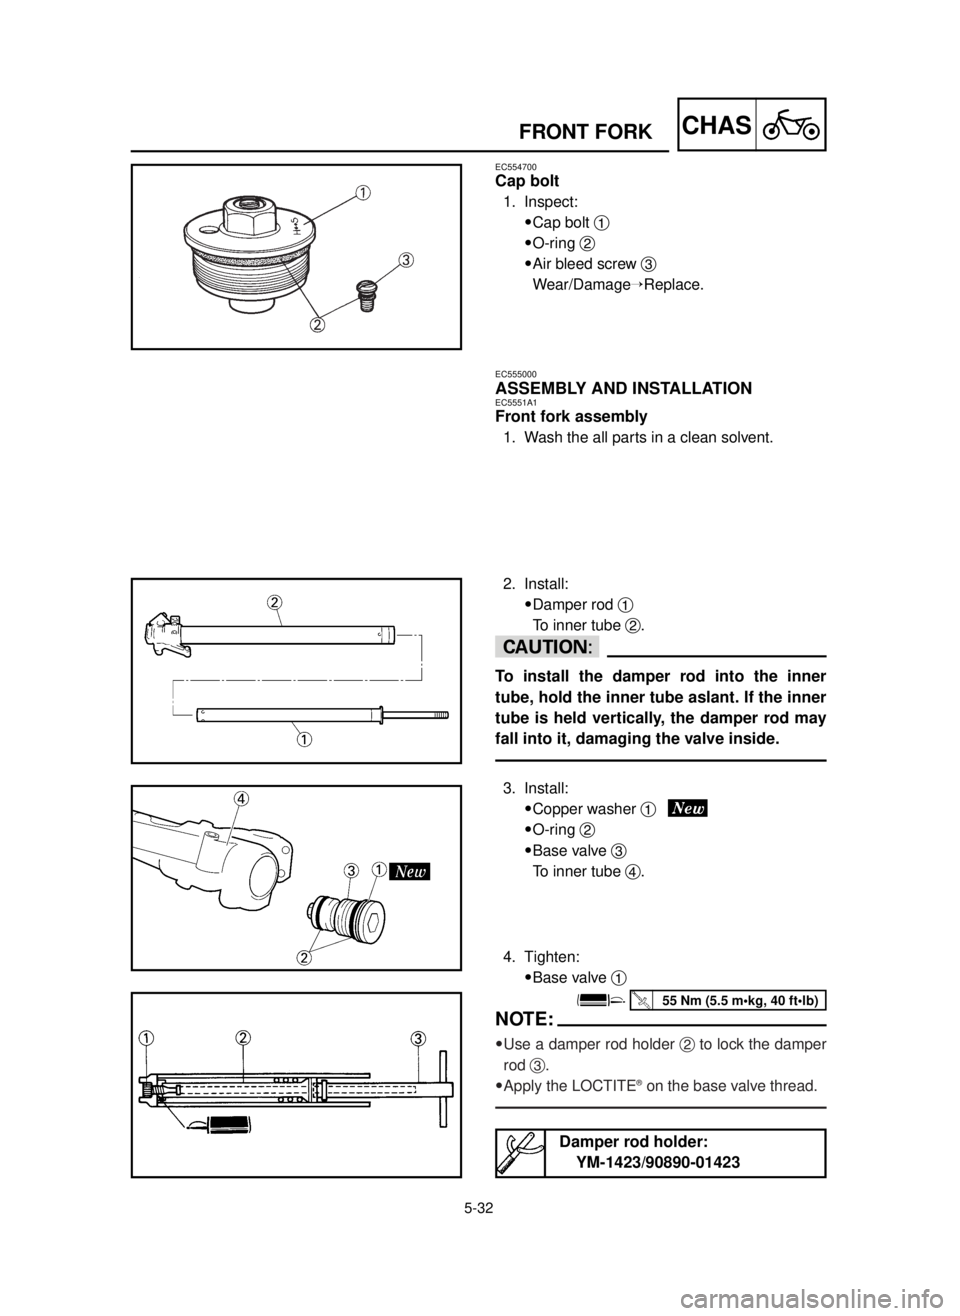
Front fork assembly
1. Wash the all parts in a clean solvent.
2. Install:
9Damper rod 1
To inner tube 2.
cC
To install the damper rod into the inner
tube, hold the inner tube aslant. If the inner
tube is held vertically, the damper rod may
fall into it, damaging the valve inside.
3. Install:
9Copper washer 1
9O-ring 2
9Base valve 3
To inner tube 4.
4. Tighten:
9Base valve 1
NOTE:
9Use a damper rod holder 2to lock the damper
rod 3.
9Apply the LOCTITE
®on the base valve thread.
Damper rod holder:
YM-1423/90890-01423
55 Nm (5.5 m•kg, 40 ft•lb)
5MW-9-30-5B 7/6/00 9:53 AM Page 12
Page 426 of 578

5-33
CHASFRONT FORK
5. Install:
9Spring guide 1
9Locknut 2
To damper rod 3.
NOTE:
9Install the spring guide with its cut afacing up-
ward.
9With its thread bfacing upward, fully finger
tighten the locknut onto the damper rod.
6. Install:
9Dust seal 1
9Stopper ring 2
9Oil seal 3
9Plain washer 4
9Slide metal 5
To inner tube 6.
NOTE:
9Apply the fork oil on the inner tube.
9When installing the oil seal, use vinyl seat a
with fork oil applied to protect the oil seal lip.
9Install the oil seal with its manufacture's marks
or number facing the axle holder side.
7. Install:
9Piston metal 1
NOTE:
Install the piston metal onto the slot on inner
tube.
8. Install:
9Outer tube 1
To inner tube 2.
5MW-9-30-5B 7/6/00 9:54 AM Page 14
Page 434 of 578
5-37
CHASFRONT FORK
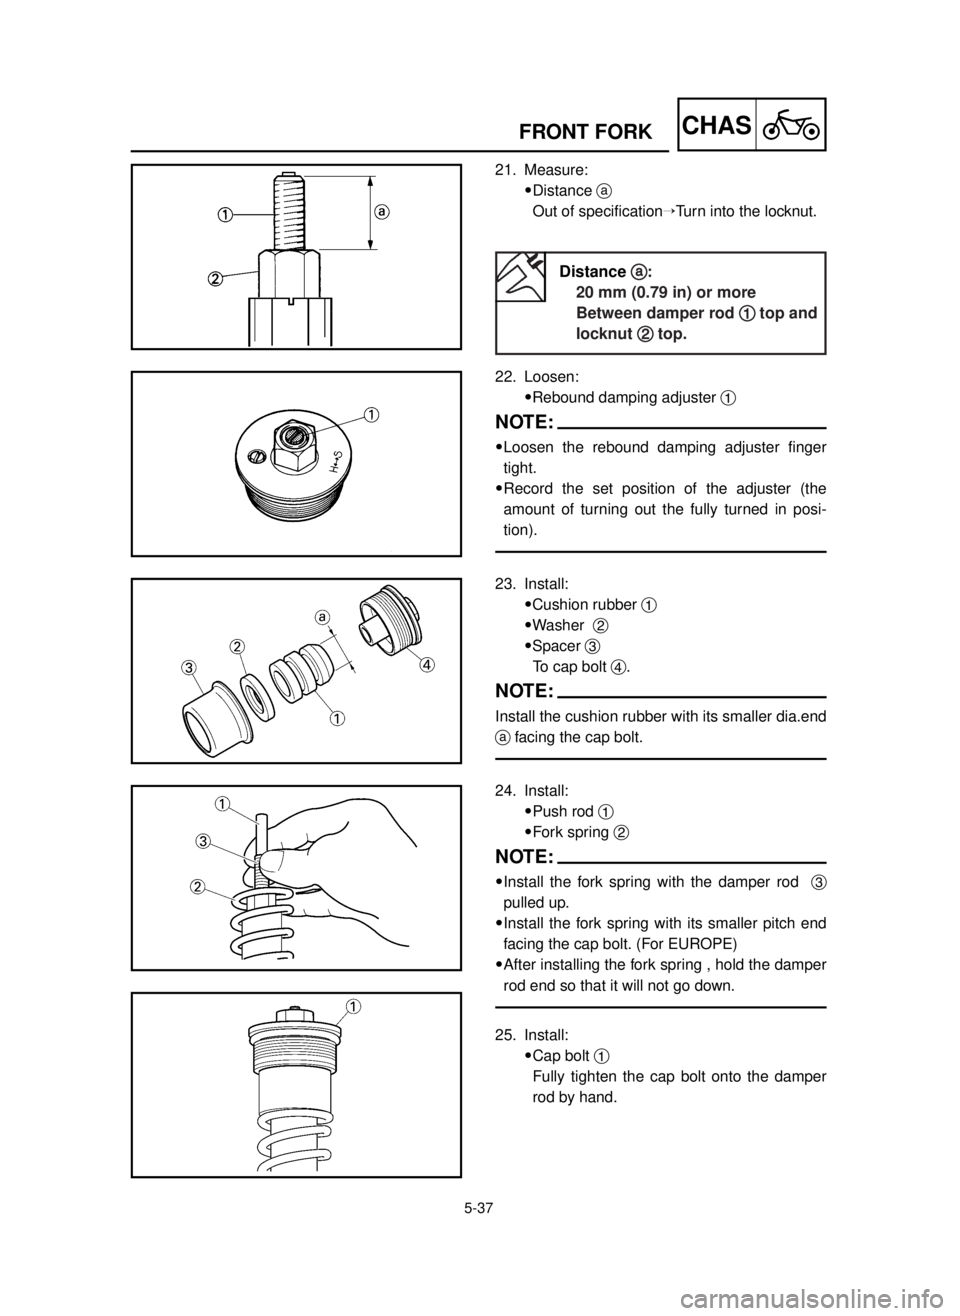
23. Install:
9Cushion rubber 1
9Washer 2
9Spacer 3
To cap bolt 4.
NOTE:
Install the cushion rubber with its smaller dia.end
afacing the cap bolt.
21. Measure:
9Distance a
Out of specificationÕTurn into the locknut.
24. Install:
9Push rod 1
9Fork spring 2
NOTE:
9Install the fork spring with the damper rod 3
pulled up.
9Install the fork spring with its smaller pitch end
facing the cap bolt. (For EUROPE)
9After installing the fork spring , hold the damper
rod end so that it will not go down.
25. Install:
9Cap bolt 1
Fully tighten the cap bolt onto the damper
rod by hand. 22. Loosen:
9Rebound damping adjuster 1
NOTE:
9Loosen the rebound damping adjuster finger
tight.
9Record the set position of the adjuster (the
amount of turning out the fully turned in posi-
tion).
Distance a a
:
20 mm (0.79 in) or more
Between damper rod 1 1
top and
locknut 2 2
top.
5MW-9-30-5B 7/6/00 9:57 AM Page 22
Page 436 of 578

5-38
CHASFRONT FORK
2. Tighten:
9Cap bolt 1
3. Adjust:
9Front fork top end a
30 Nm (3.0 m•kg, 22 ft•lb)
Front fork top end (standard) a a
:
Zero mm (Zero in)
26. Tighten:
9Cap bolt (locknut) 1
NOTE:
9While compressing the fork spring, set the thin
type spanners 2between the spacer 3and
spring guide 4.
9Hold the locknut 5and tighten the cap bolt
with specified torque.
27. Install:
9Cap bolt 1
To outer tube.
NOTE:
Temporarily tighten the cap bolt.
28. Install:
9Protector guide 1
EC5552A1
Installation
1. Install:
9Front fork 1
NOTE:
9Temporarily tighten the pinch bolts (under
bracket).
9Do not tighten the pinch bolts (handle crown)
yet.
29 Nm (2.9 m•kg, 21 ft•lb)
5MW-9-30-5B 7/6/00 9:58 AM Page 24
Page 460 of 578

5-50
CHASSTEERING
4. Install:
9Plain washer 1
9Ring nut 2
Tighten the ring nut using the ring nut
wrench 3.
Refer to “STEERING HEAD INSPECTION
AND ADJUSTMENT” section in the CHAP-
TER 3.
5. Check the steering shaft by turning it lock to
lock. If there is any binding, remove the
steering shaft assembly and inspect the
steering bearings.
6. Install:
9Plain washer 1
7. Install:
9Front fork 1
9Handle crown 2
NOTE:
9Temporarily tighten the pinch bolts (under
bracket).
9
Do not tighten the pinch bolts (handle crown) yet.
8. Install:
9Plain washer 1
9Steering shaft nut 2
7 Nm (0.7 m•kg, 5.1 ft•lb)
145 Nm (14.5 m•kg, 105 ft•lb)
5MW-9-30-5C 7/6/00 10:46 AM Page 22
Page 478 of 578
5-59
CHASREAR SHOCK ABSORBER
EC580000
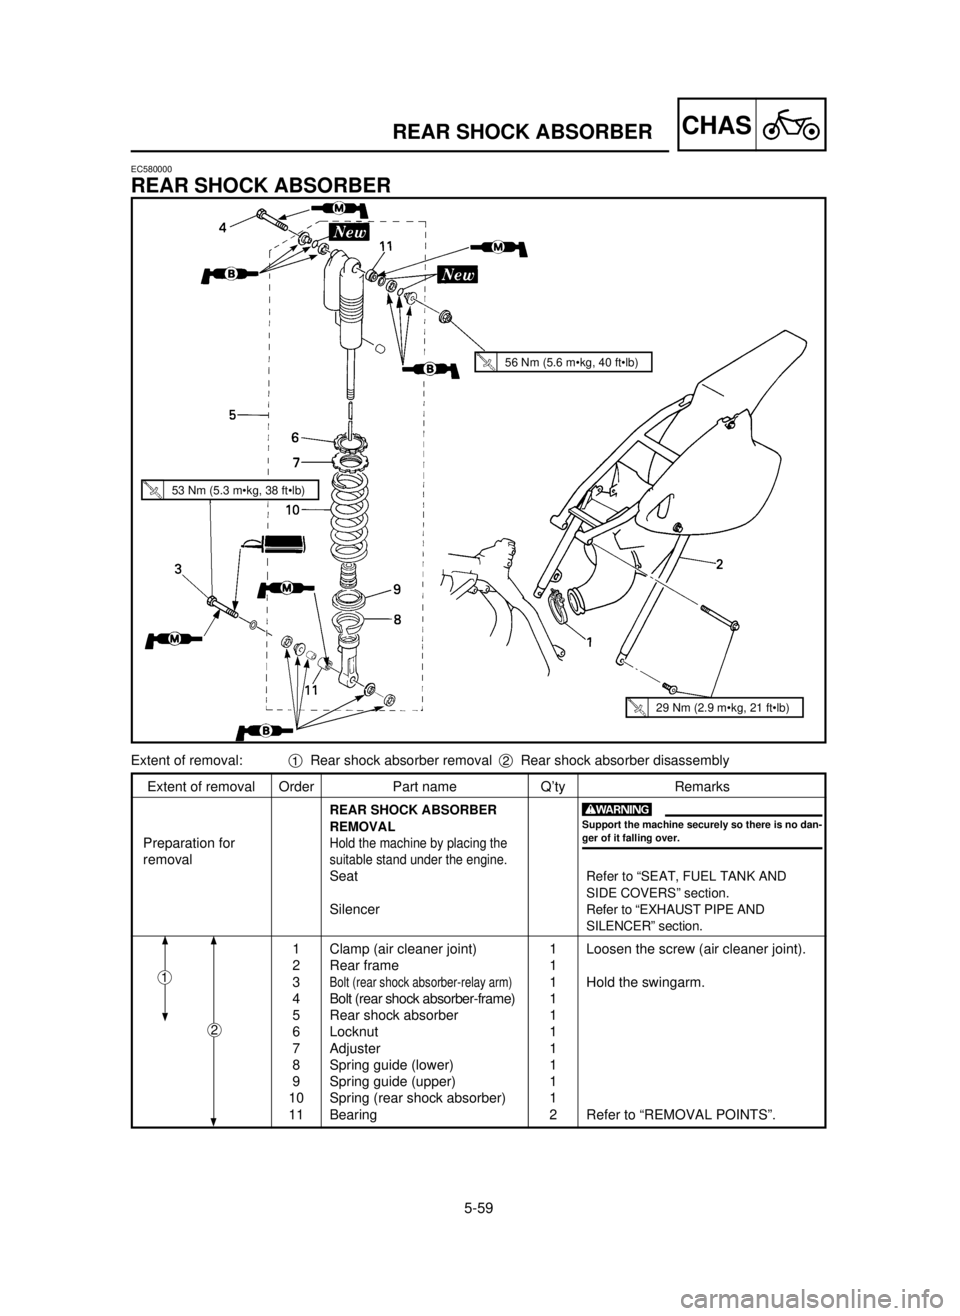
REAR SHOCK ABSORBER
Extent of removal Order Part name Q’ty Remarks
REAR SHOCK ABSORBER
REMOVAL
Preparation forHold the machine by placing the
removalsuitable stand under the engine.
SeatRefer to “SEAT, FUEL TANK AND
SIDE COVERS” section.
SilencerRefer to “EXHAUST PIPE AND
SILENCER” section.
1 Clamp (air cleaner joint) 1 Loosen the screw (air cleaner joint).
2 Rear frame 1
3
Bolt (rear shock absorber-relay arm)1 Hold the swingarm.
4 Bolt (rear shock absorber-frame) 1
5 Rear shock absorber 1
6 Locknut 1
7 Adjuster 1
8 Spring guide (lower) 1
9 Spring guide (upper) 1
10 Spring (rear shock absorber) 1
11 Bearing 2 Refer to “REMOVAL POINTS”.
2
w
Support the machine securely so there is no dan-
ger of it falling over.
Extent of removal:1Rear shock absorber removal 2Rear shock absorber disassembly
1
56 Nm (5.6 m•kg, 40 ft•lb)
53 Nm (5.3 m•kg, 38 ft•lb)
29 Nm (2.9 m•kg, 21 ft•lb)
5MW-9-30-5D 7/6/00 11:30 AM Page 16
Page 486 of 578
5-63
CHASREAR SHOCK ABSORBER
EC5852B3
Rear shock absorber
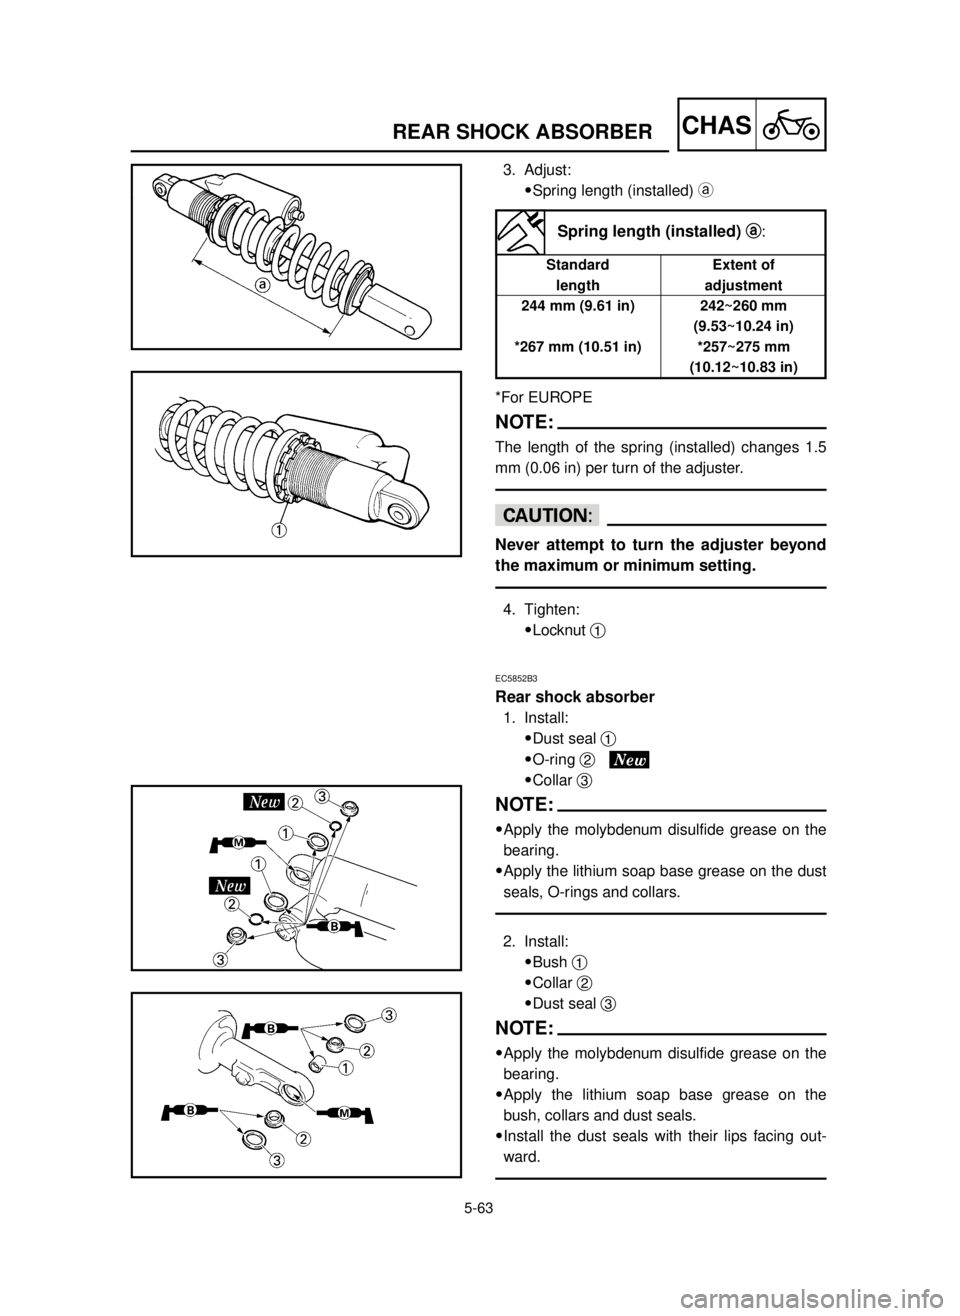
1. Install:
9Dust seal 1
9O-ring 2
9Collar 3
NOTE:
9Apply the molybdenum disulfide grease on the
bearing.
9Apply the lithium soap base grease on the dust
seals, O-rings and collars.
2. Install:
9Bush 1
9Collar 2
9Dust seal 3
NOTE:
9Apply the molybdenum disulfide grease on the
bearing.
9Apply the lithium soap base grease on the
bush, collars and dust seals.
9Install the dust seals with their lips facing out-
ward.
3. Adjust:
9Spring length (installed) a
*For EUROPE
NOTE:
The length of the spring (installed) changes 1.5
mm (0.06 in) per turn of the adjuster.
cC
Never attempt to turn the adjuster beyond
the maximum or minimum setting.
4. Tighten:
9Locknut 1
Spring length (installed) a
a
:
Standard
length
244 mm (9.61 in)
*267 mm (10.51 in)Extent of
adjustment
242~260 mm
(9.53~10.24 in)
*257~275 mm
(10.12~10.83 in)
5MW-9-30-5D 7/6/00 11:32 AM Page 24