check oil YAMAHA YZ426F 2001 Betriebsanleitungen (in German)
[x] Cancel search | Manufacturer: YAMAHA, Model Year: 2001, Model line: YZ426F, Model: YAMAHA YZ426F 2001Pages: 626, PDF-Größe: 47.57 MB
Page 176 of 626
3 - 17
INSP
ADJ
PILOT SCREW ADJUSTMENT
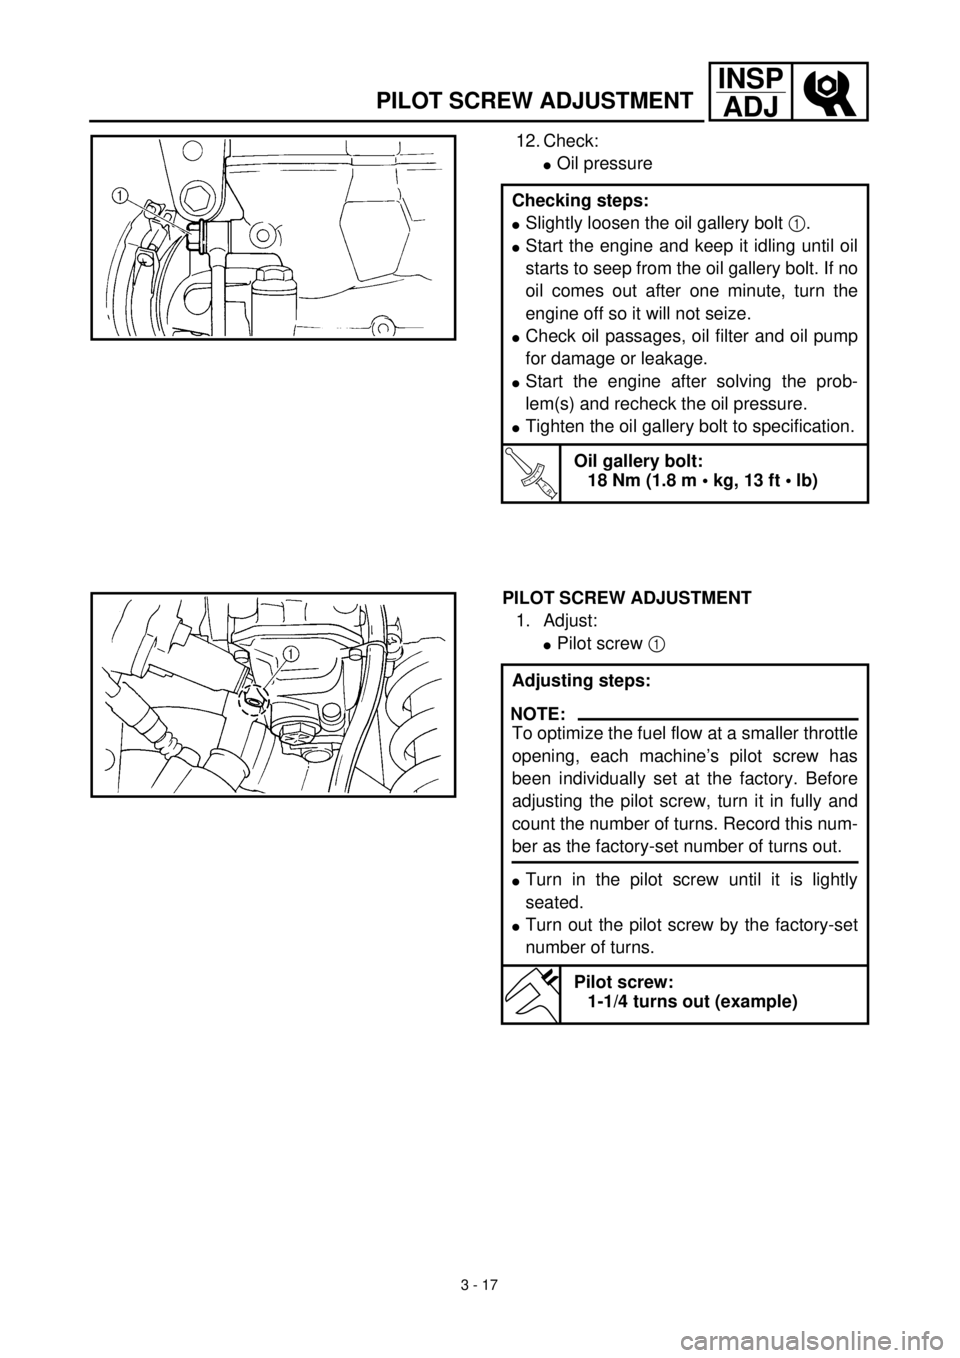
12. Check:
lOil pressure
Checking steps:
lSlightly loosen the oil gallery bolt 1.
lStart the engine and keep it idling until oil
starts to seep from the oil gallery bolt. If no
oil comes out after one minute, turn the
engine off so it will not seize.
lCheck oil passages, oil filter and oil pump
for damage or leakage.
lStart the engine after solving the prob-
lem(s) and recheck the oil pressure.
lTighten the oil gallery bolt to specification.
T R..
Oil gallery bolt:
18 Nm (1.8 m • kg, 13 ft • lb)
PILOT SCREW ADJUSTMENT
1. Adjust:
lPilot screw 1
Adjusting steps:
NOTE:
To optimize the fuel flow at a smaller throttle
opening, each machine’s pilot screw has
been individually set at the factory. Before
adjusting the pilot screw, turn it in fully and
count the number of turns. Record this num-
ber as the factory-set number of turns out.
lTurn in the pilot screw until it is lightly
seated.
lTurn out the pilot screw by the factory-set
number of turns.
Pilot screw:
1-1/4 turns out (example)
Page 206 of 626

3 - 31
INSP
ADJ
SPROCKETS INSPECTION/DRIVE CHAIN INSPECTION
EC368000
SPROCKETS INSPECTION
1. Inspect:
lSprocket teeth a
Excessive wear ® Replace.
NOTE:
Replace the drive, driven sprockets and drive
chain as a set.
EC369002
DRIVE CHAIN INSPECTION
1. Remove:
lMaster link clip
lJoint 1
lDrive chain 2
2. Clean:
lDrive chain
Place it in kerosene, and brush off as
much dirt as possible. Then remove the
chain from the kerosene and dry the
chain.
3. Measure:
lDrive chain length (10 links) a
Out of specification ® Replace.
Drive chain length (10 links):
Limit: 152.5 mm (6.00 in)
4. Check:
lDrive chain stiffness a
Clean and oil the chain and hold as
illustrated.
Stiff ® Replace drive chain.
Page 208 of 626

3 - 32
INSP
ADJ
DRIVE CHAIN SLACK ADJUSTMENT
5. Install:
lDrive chain 1
lJoint 2
lMaster link clip 3
CAUTION:
Be sure to install the master link clip to the
direction as shown.
aTurning direction
6. Lubricate:
lDrive chain
Drive chain lubricant:
SAE 10W-30 motor oil or suit-
able chain lubricants
New
EC36A060
DRIVE CHAIN SLACK ADJUSTMENT
1. Elevate the rear wheel by placing the
suitable stand under the engine.
2. Check:
lDrive chain slack a
Above the seal guard installation bolt.
Out of specification ® Adjust.
NOTE:
Before checking and/or adjusting, rotate the
rear wheel through several revolutions and
check the slack several times to find the tight-
est point. Check and/or adjust chain slack with
rear wheel in this “tight chain” position.
Drive chain slack:
40 ~ 50 mm (1.6 ~ 2.0 in)
Page 364 of 626

4 - 64
ENG
OIL PUMP
INSPECTION
Oil pump
1. Inspect:
l
Oil pump drive gear
l
Oil pump driven gear
l
Rotor housing
l
Oil pump cover
Cracks/wear/damage
®
Replace.
2. Measure:
l
Tip clearance
a
Between the inner rotor
1
and the
outer rotor
2
.
l
Tip clearance
b
Between the outer rotor
2
and the rotor
housing
3
.
Out of specification
®
Replace the oil
pump.
Tip clearance
a
:
0.12 mm or less
(0.0047 in or less)
Tip clearance
b
:
0.09 ~ 0.17 mm (0.0035 ~ 0.0067 in)
Side clearance
c
:
0.03 ~ 0.10 mm (0.0012 ~ 0.0039 in)
3. Check:
l
Unsmooth
®
Repeat steps #1 and #2
or replace the defective parts.
ASSEMBLY AND INSTALLATION
Oil pump
1. Install:
l
Oil pump drive shaft
1
lWasher 2
lPin 3
lInner rotor 1 4
NOTE:
lApply the engine oil on the oil pump drive
shaft and inner rotor 1.
lFit the pin into the groove in the inner rotor 1.
Page 414 of 626

4 - 89
ENGCRANKCASE AND CRANKSHAFT
2. Check:
lShifter operation
lTransmission operation
Unsmooth operation ® Repair.
3. Install:
lOil strainer 1
lBolt (oil strainer) 2
T R..10 Nm (1.0 m · kg, 7.2 ft · lb)
4. Apply:
lSealant
On the crankcase (right) 1.
NOTE:
Clean the contacting surface of crankcase (left
and right) before applying the sealant.
5. Install:
lDowel pin 1
lO-ring 2
lCrankcase (right)
To crankcase (left).
NOTE:
lFit the crankcase (right) onto the crankcase
(left). Tap lightly on the case with soft ham-
mer.
lWhen installing the crankcase, the connect-
ing rod should be positioned at TDC (top
dead center).
Quick gasket®:
ACC-QUICK-GS-KT
YAMAHA Bond No. 1215:
90890-85505
New
Page 416 of 626

4 - 90
ENGCRANKCASE AND CRANKSHAFT
6. Tighten:
lHose guide 1
lClutch cable holder 2
lBolt (crankcase)
NOTE:
Tighten the crankcase tightening bolts in
stage, using a crisscross pattern.
T R..12 Nm (1.2 m · kg, 8.7 ft · lb)
7. Install:
lOil delivery pipe
lO-ring
lBolt (oil delivery pipe)
8. Install:
lTiming chain
lTiming chain guide (rear)
lBolt (timing chain guide)
9. Remove:
lSealant
Forced out on the cylinder mating sur-
face.
10. Apply:
lEngine oil
To the crank pin, bearing and oil deliv-
ery hole.
11. Check:
lCrankshaft and transmission operation.
Unsmooth operation ® Repair.
New
T R..10 Nm (1.0 m · kg, 7.2 ft · lb)
T R..10 Nm (1.0 m · kg, 7.2 ft · lb)
Page 422 of 626

4 - 93
ENG
TRANSMISSION, SHIFT CAM AND SHIFT FORK
EC4H4801
Shift fork, shift cam and segment
1. Inspect:
l
Shift fork
1
Wear/damage/scratches
®
Replace.
2. Inspect:
l
Shift cam
1
l
Segment
2
Bend/wear/damage
®
Replace.
3. Check:
lShift fork movement
Unsmooth operation ® Replace shift
fork.
NOTE:
For a malfunctioning shift fork, replace not only
the shift fork itself but the two gears each adja-
cent to the shift fork.
ASSEMBLY AND INSTALLATION
Transmission
1. Install:
l5th pinion gear (21T) 1
l3rd pinion gear (18T) 2
lCollar 3
l4th pinion gear (22T) 4
l2nd pinion gear (15T) 5
To main axle 6.
NOTE:
lApply the molybdenum disulfide oil on the
4th and 5th pinion gears inner circumference
and on the end surface.
lApply the molybdenum disulfide oil on the
2nd and 3rd pinion gears inner circumfer-
ence.
Page 426 of 626

4 - 95
ENG
TRANSMISSION, SHIFT CAM AND SHIFT FORK
5. Install:
l
Shift fork 1 (L)
1
l
Shift fork 2 (C)
2
l
Shift fork 3 (R)
3
l
Shift cam
4
To main axle and drive axle.
NOTE:
l
Apply the molybdenum disulfide oil on the
shift fork grooves.
l
Mesh the shift fork #1 (L) with the 4th wheel
gear
5
and #3 (R) with the 5th wheel gear
7
on the drive axle.
l
Mesh the shift fork #2 (C) with the 3rd pinion
gear
6
on the main axle.
6. Install:
l
Transmission assembly
1
To crankcase (left)
2
.
NOTE:
Apply the engine oil on the bearings and guide
bars.
7. Check:
l
Shifter operation
l
Transmission operation
Unsmooth operation
®
Repair.
Page 496 of 626

5 - 35
CHASFRONT FORK
13. Check:
lInner tube smooth movement
Tightness/binding/rough spots ®
Repeat the steps 2 to 12.
14. Compress the front fork fully.
15. Fill:
lFront fork oil
Until outer tube top surface with recom-
mended fork oil 1.
ACHTUNG:CAUTION:
lBe sure to use recommended fork oil. If
other oils are used, they may have an
excessively adverse effect on the front
fork performance.
lNever allow foreign materials to enter the
front fork.
Recommended oil:
Suspension oil “01”
16. After filling, pump the damper rod 1
slowly up and down more than 10 times
to distribute the fork oil.
17. Fill:
lFront fork oil
Until outer tube top surface with recom-
mended fork oil once more.
18. After filling, pump the outer tube 1 slowly
up and down (about 200 mm (7.9 in)
stroke) to distribute the fork oil once
more.
NOTE:
Be careful not to excessive full stroke. A stroke
of 200 mm (7.9 in) or more will cause air to
enter. In this case, repeat the steps 15 to 18.
Page 498 of 626

5 - 36
CHASFRONT FORK
19. Wait ten minutes until the air bubbles
have been removed from the front fork,
and the oil has dispense evenly in system
before setting recommended oil level.
NOTE:
Fill with the fork oil up to the top end of the
outer tube, or the fork oil will not spread over to
every part of the front forks, thus making it
impossible to obtain the correct level.
Be sure to fill with the fork oil up to the top of
the outer tube and bleed the front forks.
20. Measure:
lOil level (left and right) a
Out of specification ® Adjust.
NOTE:
Be sure to install the spring guide 2 when
checking the oil level.
WARNING
Never fail to make the oil level adjustment
between the maximum and minimum level
and always adjust each front fork to the
same setting. Uneven adjustment can
cause poor handling and loss of stability.
Standard oil level:
130 mm (5.12 in)
Extent of adjustment:
80 ~ 150 mm (3.15 ~ 5.91 in)
From top of outer tube with
inner tube and damper rod 1
fully compressed without
spring.