check engine YAMAHA YZ450F 2005 Notices Demploi (in French)
[x] Cancel search | Manufacturer: YAMAHA, Model Year: 2005, Model line: YZ450F, Model: YAMAHA YZ450F 2005Pages: 646, PDF Size: 16.06 MB
Page 158 of 646
3 - 7
INSP
ADJ
RADIATOR CAP INSPECTION
CAUTION:
Do not mix more than one type of ethyl-
ene glycol antifreeze containing corro-
sion inhibitors for aluminum engine.
Do not use water containing impurities or
oil.
7. Install:
Radiator cap
Start the engine and warm it up for a sev-
eral minutes.
8. Check:
Coolant level
Coolant level low → Add coolant. Handling notes of coolant:
The coolant is harmful so it should be han-
dled with special care.
WARNING
When coolant splashes to your eye.
Thoroughly wash your eye with water
and see your doctor.
When coolant splashes to your clothes.
Quickly wash it away with water and
then with soap.
When coolant is swallowed.
Quickly make him vomit and take him
to a doctor.
EC355000
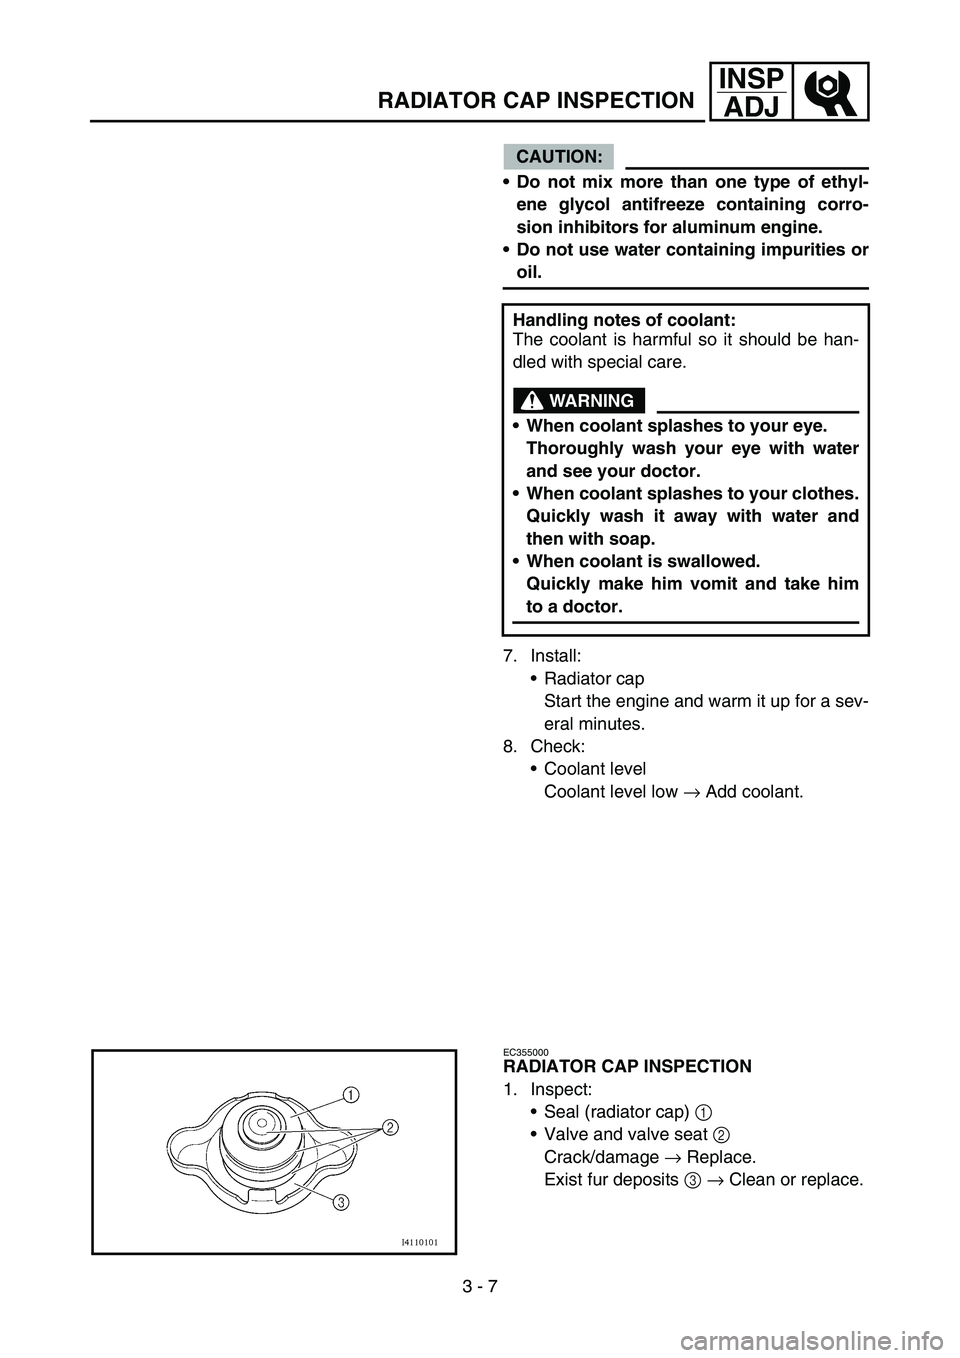
RADIATOR CAP INSPECTION
1. Inspect:
Seal (radiator cap) 1
Valve and valve seat 2
Crack/damage → Replace.
Exist fur deposits 3 → Clean or replace.
Page 164 of 646
3 - 10
INSP
ADJTHROTTLE CABLE ADJUSTMENT/
THROTTLE LUBRICATION
EC35A001
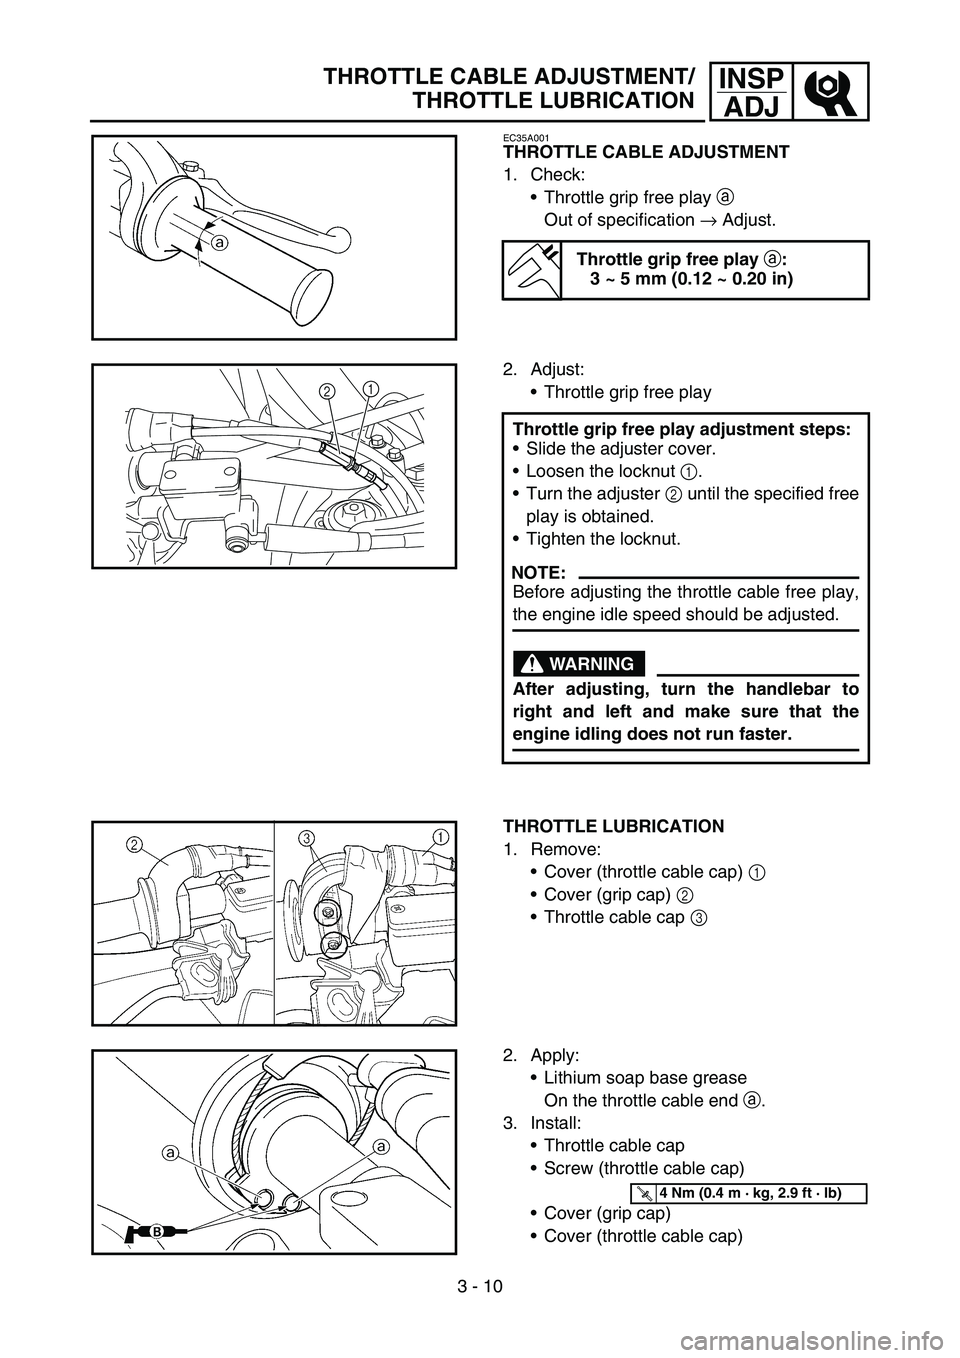
THROTTLE CABLE ADJUSTMENT
1. Check:
Throttle grip free play a
Out of specification → Adjust.
Throttle grip free play
a:
3 ~ 5 mm (0.12 ~ 0.20 in)
2. Adjust:
Throttle grip free play
Throttle grip free play adjustment steps:
Slide the adjuster cover.
Loosen the locknut 1.
Turn the adjuster 2 until the specified free
play is obtained.
Tighten the locknut.
NOTE:
Before adjusting the throttle cable free play,
the engine idle speed should be adjusted.
WARNING
After adjusting, turn the handlebar to
right and left and make sure that the
engine idling does not run faster.
21
THROTTLE LUBRICATION
1. Remove:
Cover (throttle cable cap) 1
Cover (grip cap) 2
Throttle cable cap 3
2. Apply:
Lithium soap base grease
On the throttle cable end a.
3. Install:
Throttle cable cap
Screw (throttle cable cap)
Cover (grip cap)
Cover (throttle cable cap)
T R..4 Nm (0.4 m · kg, 2.9 ft · lb)
Page 166 of 646
3 - 11
INSP
ADJHOT STARTER LEVER ADJUSTMENT/
AIR FILTER CLEANING
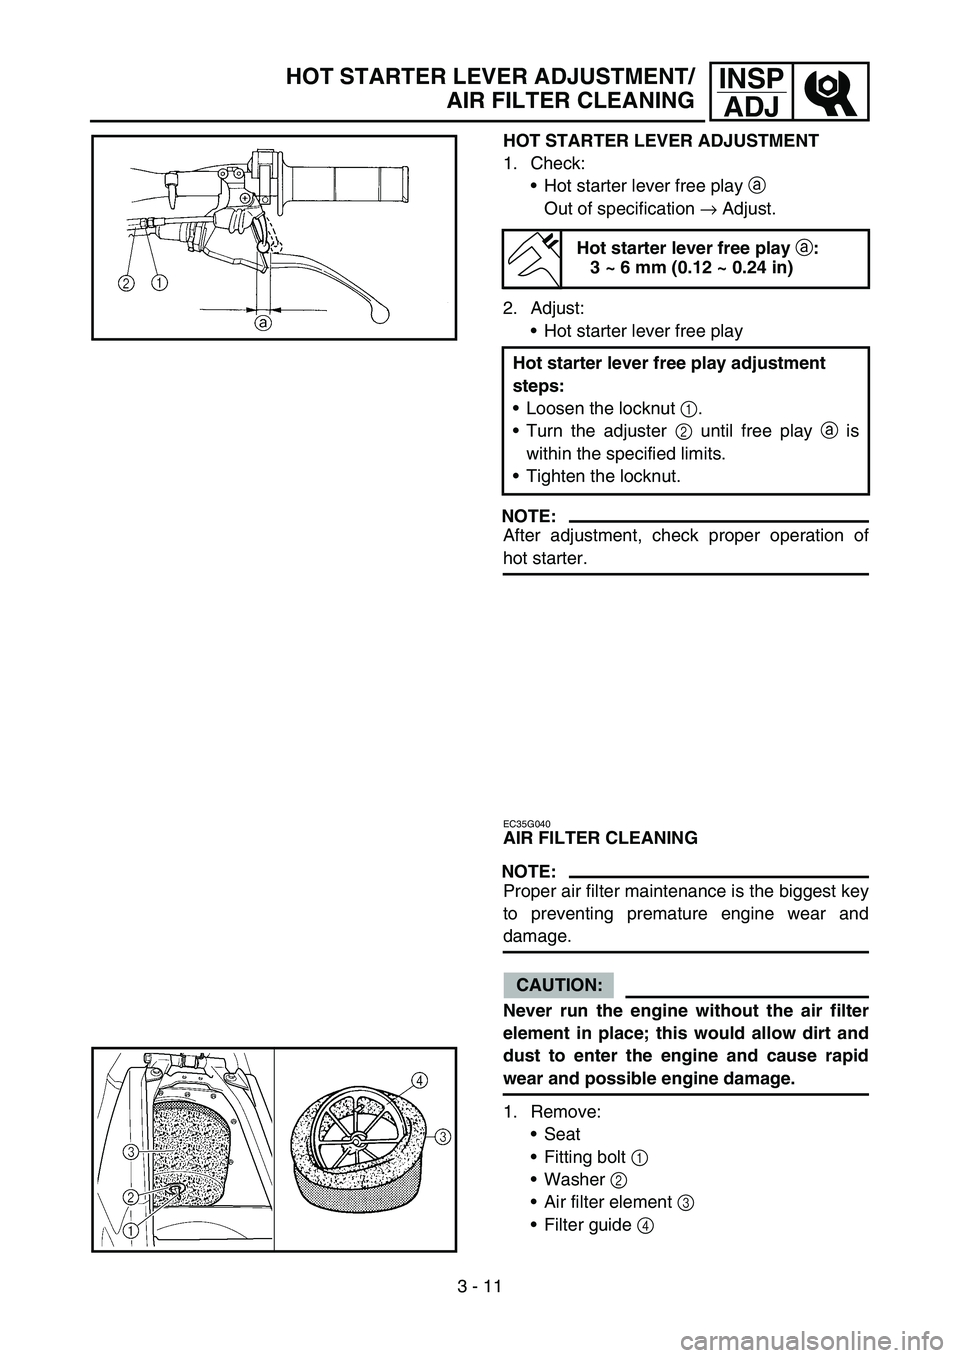
HOT STARTER LEVER ADJUSTMENT
1. Check:
Hot starter lever free play a
Out of specification → Adjust.
2. Adjust:
Hot starter lever free play
NOTE:
After adjustment, check proper operation of
hot starter.
Hot starter lever free play
a:
3 ~ 6 mm (0.12 ~ 0.24 in)
Hot starter lever free play adjustment
steps:
Loosen the locknut 1.
Turn the adjuster 2 until free play a is
within the specified limits.
Tighten the locknut.
EC35G040
AIR FILTER CLEANING
NOTE:
Proper air filter maintenance is the biggest key
to preventing premature engine wear and
damage.
CAUTION:
Never run the engine without the air filter
element in place; this would allow dirt and
dust to enter the engine and cause rapid
wear and possible engine damage.
1. Remove:
Seat
Fitting bolt 1
Washer 2
Air filter element 3
Filter guide 4
Page 170 of 646
3 - 13
INSP
ADJ
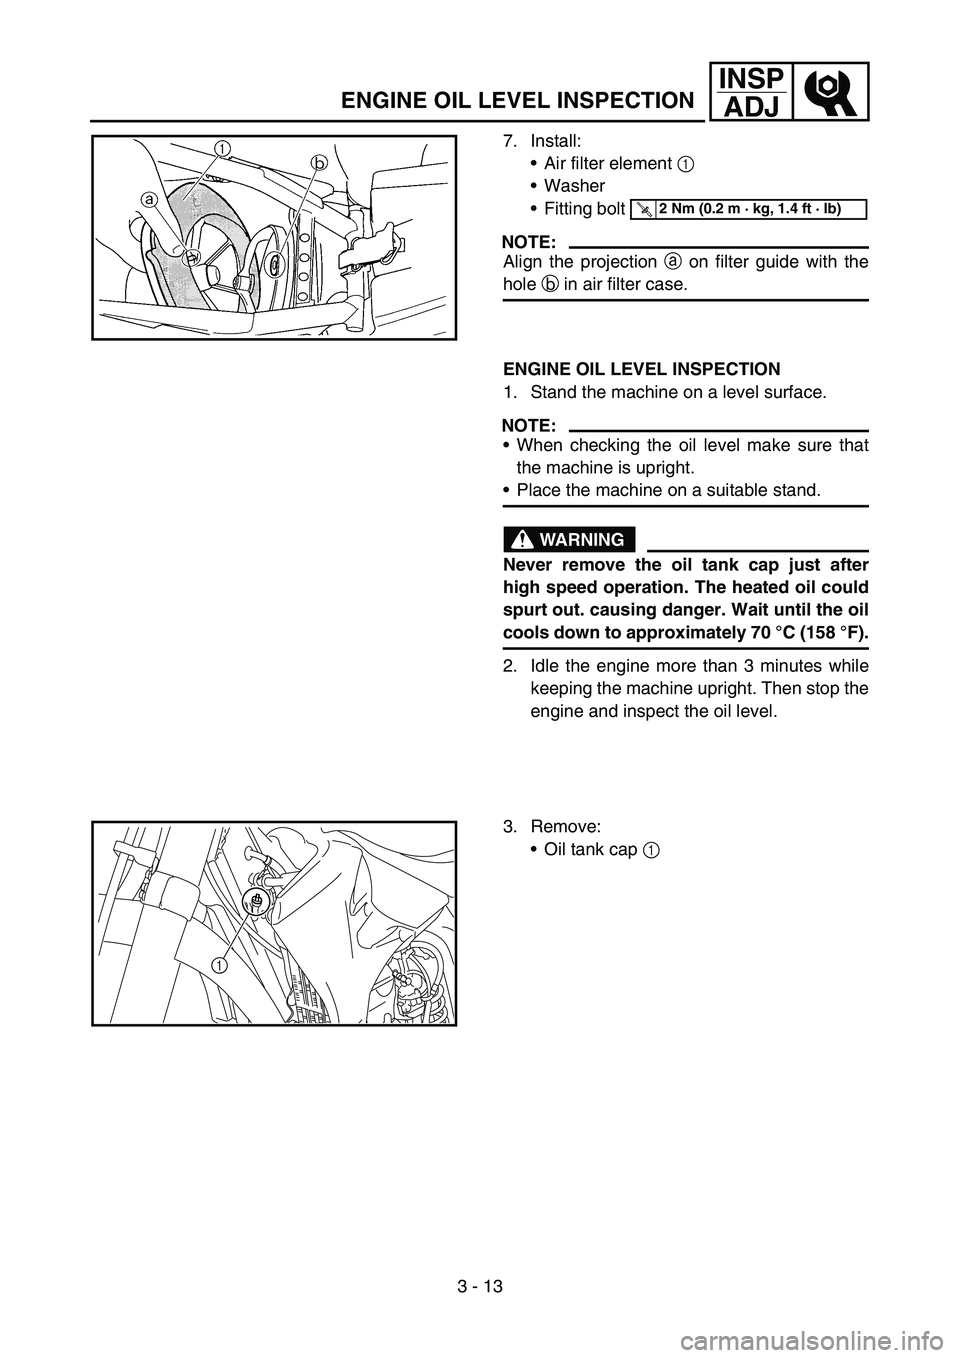
7. Install:
Air filter element 1
Washer
Fitting bolt
NOTE:
Align the projection a on filter guide with the
hole b in air filter case.
T R..2 Nm (0.2 m · kg, 1.4 ft · lb)
ENGINE OIL LEVEL INSPECTION
1. Stand the machine on a level surface.
NOTE:
When checking the oil level make sure that
the machine is upright.
Place the machine on a suitable stand.
WARNING
Never remove the oil tank cap just after
high speed operation. The heated oil could
spurt out. causing danger. Wait until the oil
cools down to approximately 70 °C (158 °F).
2. Idle the engine more than 3 minutes while
keeping the machine upright. Then stop the
engine and inspect the oil level.
3. Remove:
Oil tank cap 1
1
ENGINE OIL LEVEL INSPECTION
Page 176 of 646

3 - 16
INSP
ADJ
ENGINE OIL REPLACEMENT
6. If the oil filter is to be replaced during this
oil change, remove the following parts and
reinstall them.
7. Install:
Plain washer 1
Oil strainer (frame) 2
Engine oil hose 3
Bolt (engine oil hose) 4
Engine oil hose clamp 5
Engine skid plate
8. Install:
Gaskets
Oil filter drain bolt
Drain bolt (crankcase rear)
Drain bolt (crankcase left)
Drain bolt (frame)
9. Fill:
Crankcase Replacement steps:
Remove the oil filter cover 1 and oil filter
element 2.
Check the O-rings 3, if cracked or dam-
aged, replace them with a new one.
Install the oil filter element and oil filter
cover.
T R..
Oil filter cover:
10 Nm (1.0 m kg, 7.2 ft lb)
Oil quantity:
Periodic oil change:
1.0 L (0.88 Imp qt, 1.06 US qt)
With oil filter replacement:
1.1 L (0.97 Imp qt, 1.16 US qt)
Total amount:
1.2 L (1.06 Imp qt, 1.27 US qt)
New
T R..70 Nm (7.0 m · kg, 50 ft · lb)
T R..8 Nm (0.8 m · kg, 5.8 ft · lb)
T R..2 Nm (0.2 m · kg, 1.4 ft · lb)
T R..10 Nm (1.0 m · kg, 7.2 ft · lb)
New
T R..10 Nm (1.0 m · kg, 7.2 ft · lb)
T R..20 Nm (2.0 m · kg, 14 ft · lb)
T R..10 Nm (1.0 m · kg, 7.2 ft · lb)
T R..23 Nm (2.3 m · kg, 17 ft · lb)
Page 178 of 646
3 - 17
INSP
ADJ
PILOT SCREW ADJUSTMENT
10. Install:
Oil filler plug
11. Inspect:
Engine (for oil leaks)
Oil level
Refer to “ENGINE OIL LEVEL INSPEC-
TION”.
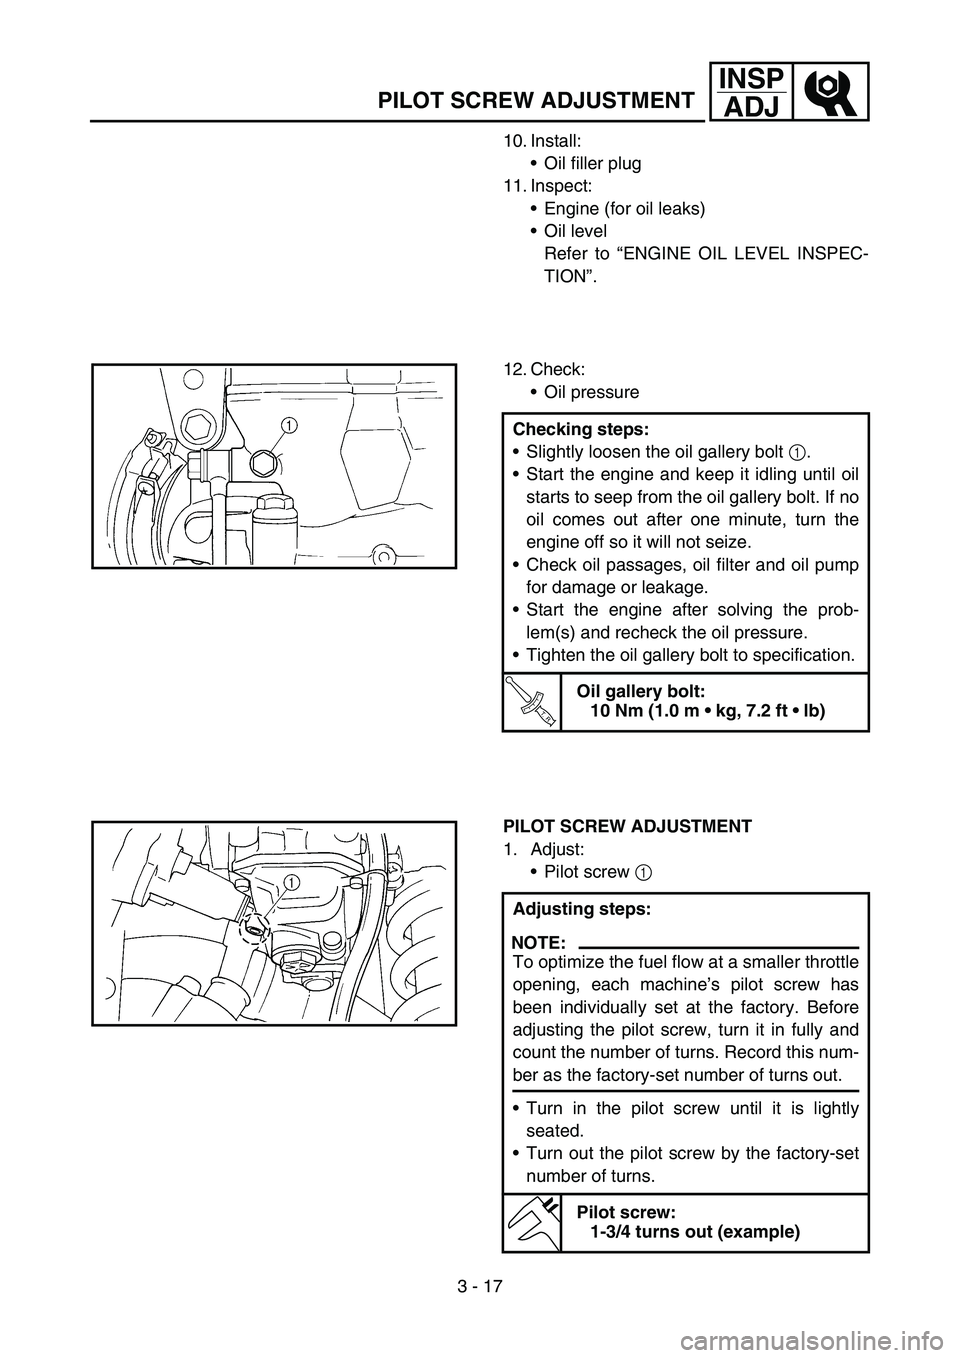
12. Check:
Oil pressure
Checking steps:
Slightly loosen the oil gallery bolt 1.
Start the engine and keep it idling until oil
starts to seep from the oil gallery bolt. If no
oil comes out after one minute, turn the
engine off so it will not seize.
Check oil passages, oil filter and oil pump
for damage or leakage.
Start the engine after solving the prob-
lem(s) and recheck the oil pressure.
Tighten the oil gallery bolt to specification.
T R..
Oil gallery bolt:
10 Nm (1.0 m kg, 7.2 ft lb)
PILOT SCREW ADJUSTMENT
1. Adjust:
Pilot screw 1
Adjusting steps:
NOTE:
To optimize the fuel flow at a smaller throttle
opening, each machine’s pilot screw has
been individually set at the factory. Before
adjusting the pilot screw, turn it in fully and
count the number of turns. Record this num-
ber as the factory-set number of turns out.
Turn in the pilot screw until it is lightly
seated.
Turn out the pilot screw by the factory-set
number of turns.
Pilot screw:
1-3/4 turns out (example)
Page 180 of 646
3 - 18
INSP
ADJIDLE SPEED ADJUSTMENT/
VALVE CLEARANCE ADJUSTMENT
EC35M021
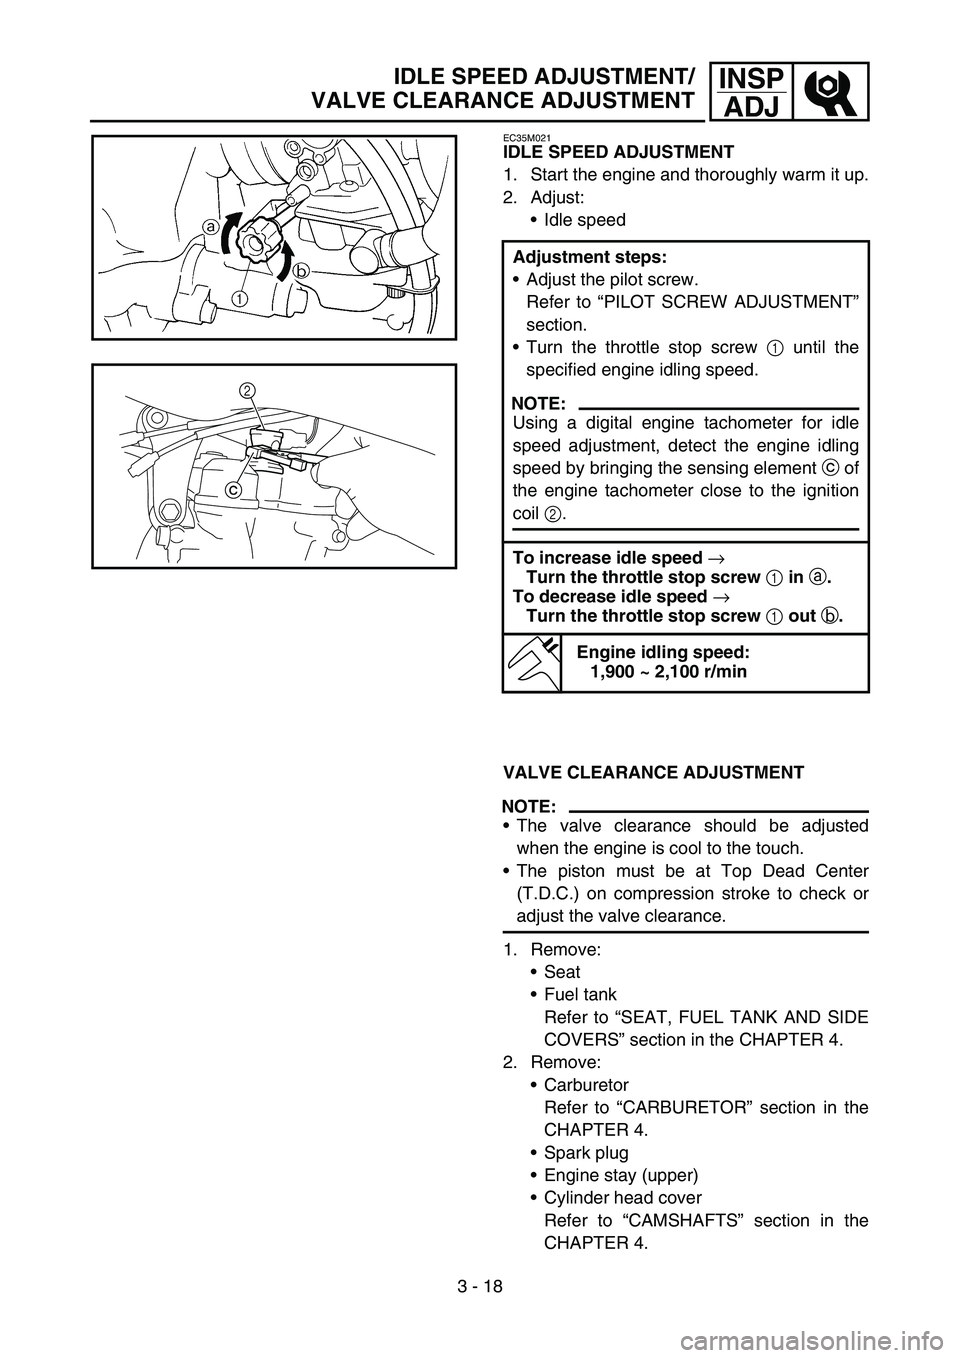
IDLE SPEED ADJUSTMENT
1. Start the engine and thoroughly warm it up.
2. Adjust:
Idle speed
VALVE CLEARANCE ADJUSTMENT
NOTE:
The valve clearance should be adjusted
when the engine is cool to the touch.
The piston must be at Top Dead Center
(T.D.C.) on compression stroke to check or
adjust the valve clearance.
1. Remove:
Seat
Fuel tank
Refer to “SEAT, FUEL TANK AND SIDE
COVERS” section in the CHAPTER 4.
2. Remove:
Carburetor
Refer to “CARBURETOR” section in the
CHAPTER 4.
Spark plug
Engine stay (upper)
Cylinder head cover
Refer to “CAMSHAFTS” section in the
CHAPTER 4. Adjustment steps:
Adjust the pilot screw.
Refer to “PILOT SCREW ADJUSTMENT”
section.
Turn the throttle stop screw 1 until the
specified engine idling speed.
NOTE:
Using a digital engine tachometer for idle
speed adjustment, detect the engine idling
speed by bringing the sensing element c of
the engine tachometer close to the ignition
coil 2.
To increase idle speed
→
Turn the throttle stop screw
1 in
a.
To decrease idle speed
→
Turn the throttle stop screw
1 out
b.
Engine idling speed:
1,900 ~ 2,100 r/min
c2
Page 210 of 646
3 - 32
INSP
ADJ
DRIVE CHAIN SLACK ADJUSTMENT
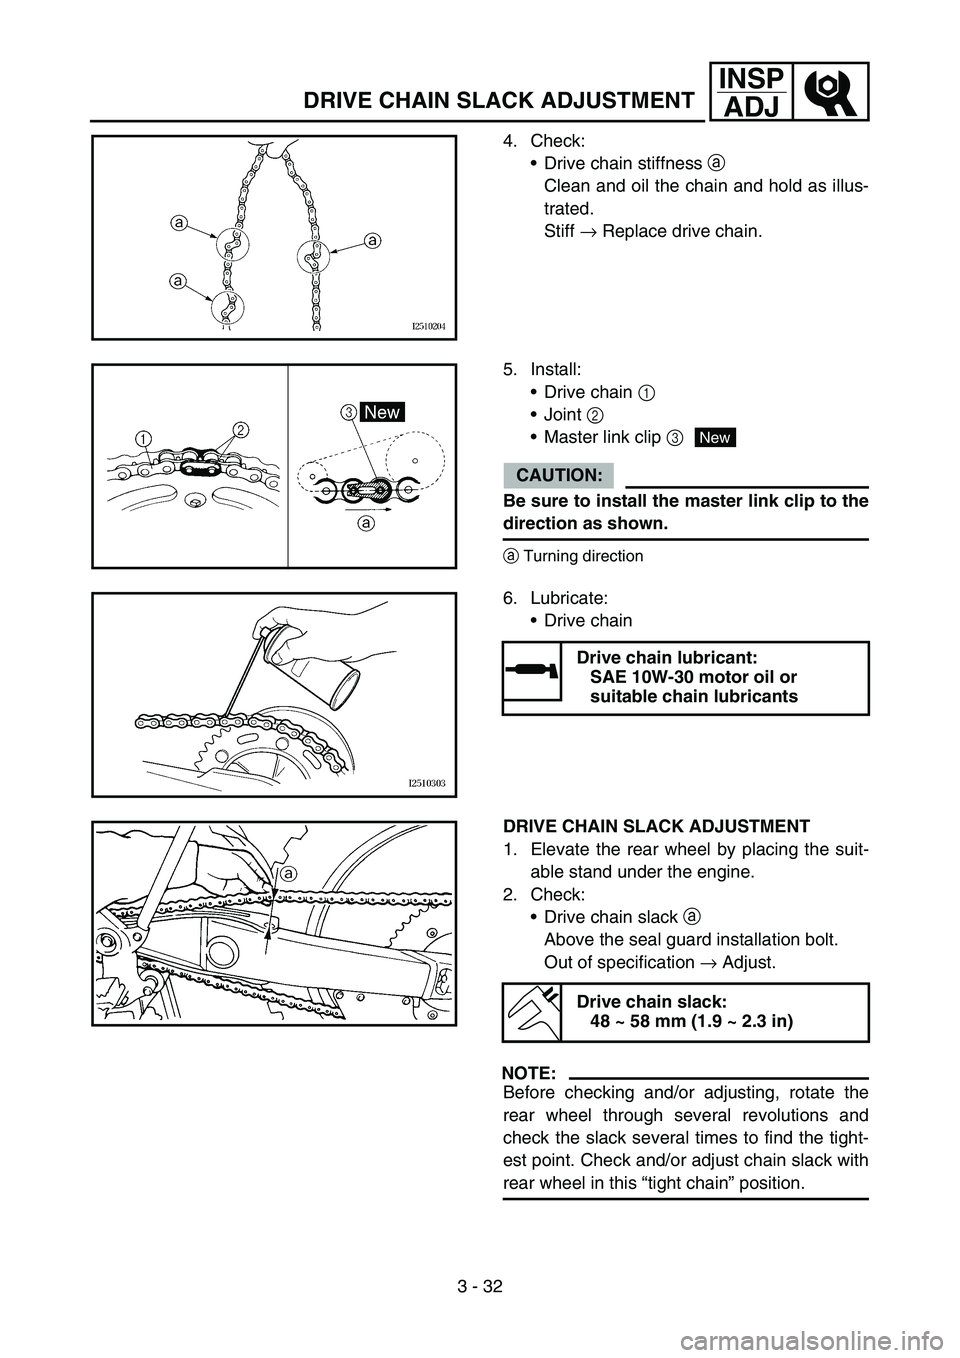
4. Check:
Drive chain stiffness a
Clean and oil the chain and hold as illus-
trated.
Stiff → Replace drive chain.
5. Install:
Drive chain 1
Joint 2
Master link clip 3
CAUTION:
Be sure to install the master link clip to the
direction as shown.
aTurning direction
New
6. Lubricate:
Drive chain
Drive chain lubricant:
SAE 10W-30 motor oil or
suitable chain lubricants
DRIVE CHAIN SLACK ADJUSTMENT
1. Elevate the rear wheel by placing the suit-
able stand under the engine.
2. Check:
Drive chain slack a
Above the seal guard installation bolt.
Out of specification → Adjust.
NOTE:
Before checking and/or adjusting, rotate the
rear wheel through several revolutions and
check the slack several times to find the tight-
est point. Check and/or adjust chain slack with
rear wheel in this “tight chain” position.
Drive chain slack:
48 ~ 58 mm (1.9 ~ 2.3 in)
Page 230 of 646
3 - 42
INSP
ADJ
STEERING HEAD INSPECTION AND ADJUSTMENT
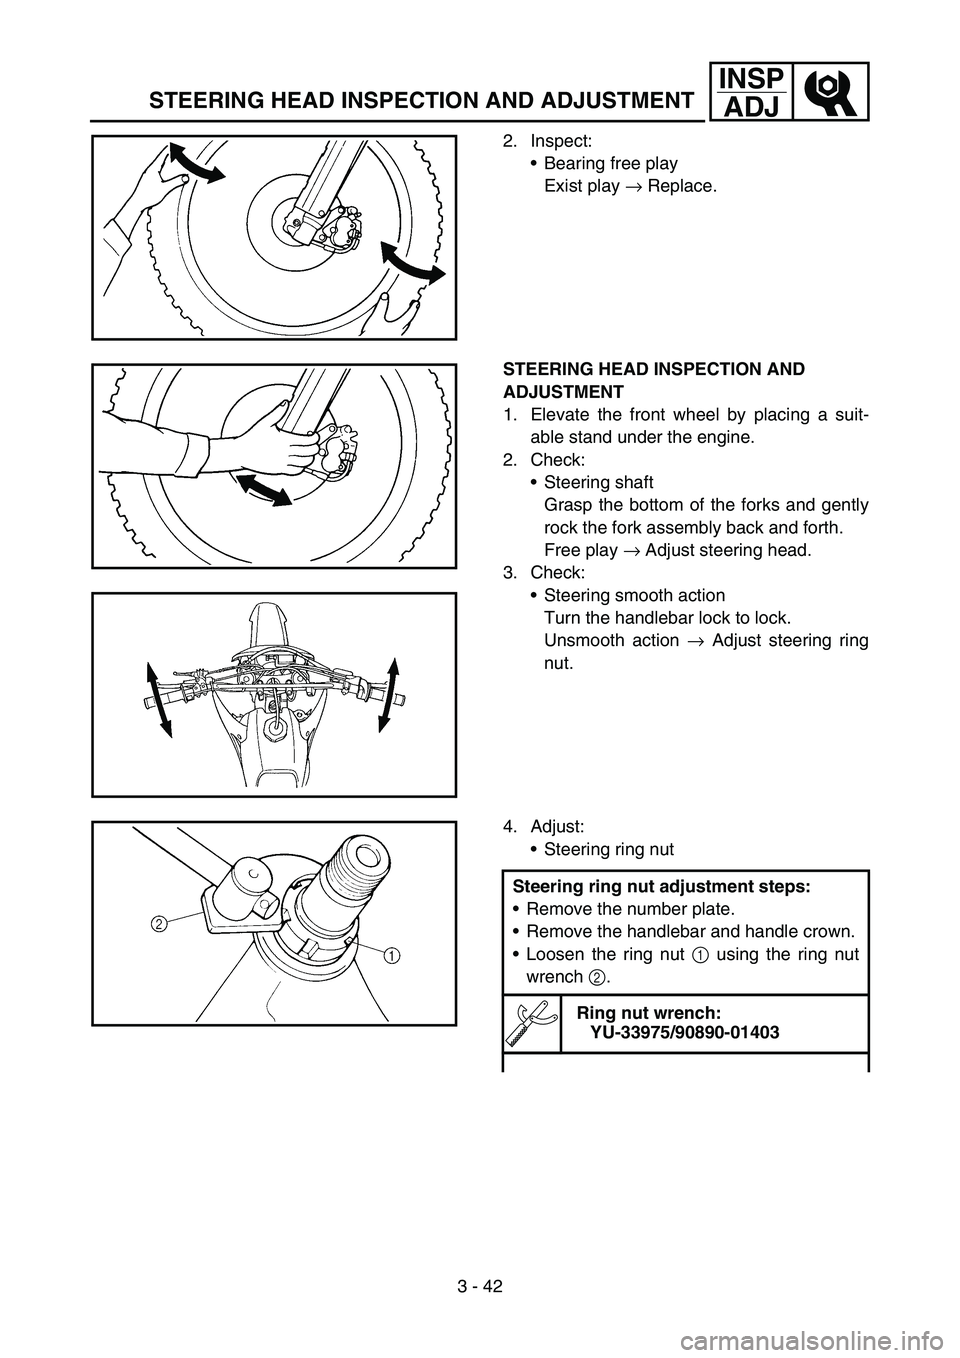
2. Inspect:
Bearing free play
Exist play → Replace.
STEERING HEAD INSPECTION AND
ADJUSTMENT
1. Elevate the front wheel by placing a suit-
able stand under the engine.
2. Check:
Steering shaft
Grasp the bottom of the forks and gently
rock the fork assembly back and forth.
Free play → Adjust steering head.
3. Check:
Steering smooth action
Turn the handlebar lock to lock.
Unsmooth action → Adjust steering ring
nut.
4. Adjust:
Steering ring nut
Steering ring nut adjustment steps:
Remove the number plate.
Remove the handlebar and handle crown.
Loosen the ring nut 1 using the ring nut
wrench 2.
Ring nut wrench:
YU-33975/90890-01403
Page 238 of 646

3 - 46
INSP
ADJ
ELECTRICAL/SPARK PLUG INSPECTION
EC370000
ELECTRICAL
EC371001
SPARK PLUG INSPECTION
1. Remove:
Spark plug
2. Inspect:
Electrode 1
Wear/damage → Replace.
Insulator color 2
Normal condition is a medium to light tan
color.
Distinctly different color → Check the
engine condition.
NOTE:
When the engine runs for many hours at low
speeds, the spark plug insulator will become
sooty, even if the engine and carburetor are in
good operating condition.
3. Measure:
Plug gap a
Use a wire gauge or thickness gauge.
Out of specification → Regap.
Spark plug gap:
0.7 ~ 0.8 mm (0.028 ~ 0.031 in)
4. Clean the plug with a spark plug cleaner if
necessary.
5. Tighten:
Spark plug
NOTE:
Before installing a spark plug, clean the gas-
ket surface and plug surface.
Finger-tighten a the spark plug before torqu-
ing to specification b.
T R..13 Nm (1.3 m · kg, 9.4 ft · lb)