clock YAMAHA YZ450F 2006 Notices Demploi (in French)
[x] Cancel search | Manufacturer: YAMAHA, Model Year: 2006, Model line: YZ450F, Model: YAMAHA YZ450F 2006Pages: 650, PDF Size: 20.71 MB
Page 384 of 650

4 - 72
ENGKICK AXLE AND SHIFT SHAFT
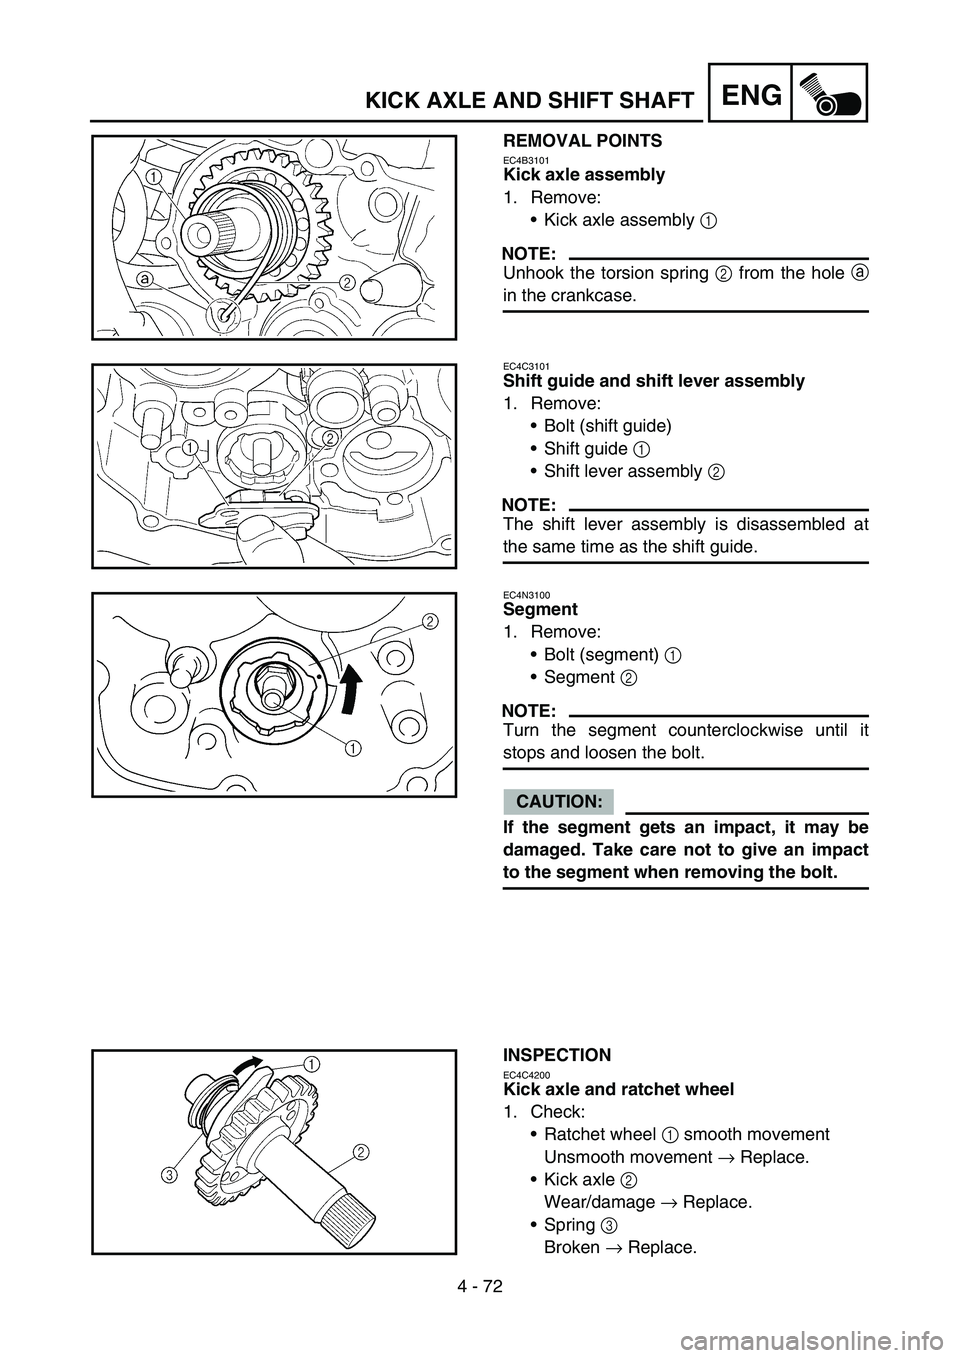
REMOVAL POINTS
EC4B3101
Kick axle assembly
1. Remove:
Kick axle assembly 1
NOTE:
Unhook the torsion spring 2 from the hole a
in the crankcase.
EC4C3101
Shift guide and shift lever assembly
1. Remove:
Bolt (shift guide)
Shift guide 1
Shift lever assembly 2
NOTE:
The shift lever assembly is disassembled at
the same time as the shift guide.
EC4N3100
Segment
1. Remove:
Bolt (segment) 1
Segment 2
NOTE:
Turn the segment counterclockwise until it
stops and loosen the bolt.
CAUTION:
If the segment gets an impact, it may be
damaged. Take care not to give an impact
to the segment when removing the bolt.
INSPECTION
EC4C4200
Kick axle and ratchet wheel
1. Check:
Ratchet wheel 1 smooth movement
Unsmooth movement → Replace.
Kick axle 2
Wear/damage → Replace.
Spring 3
Broken → Replace.
Page 394 of 650

4 - 77
ENG
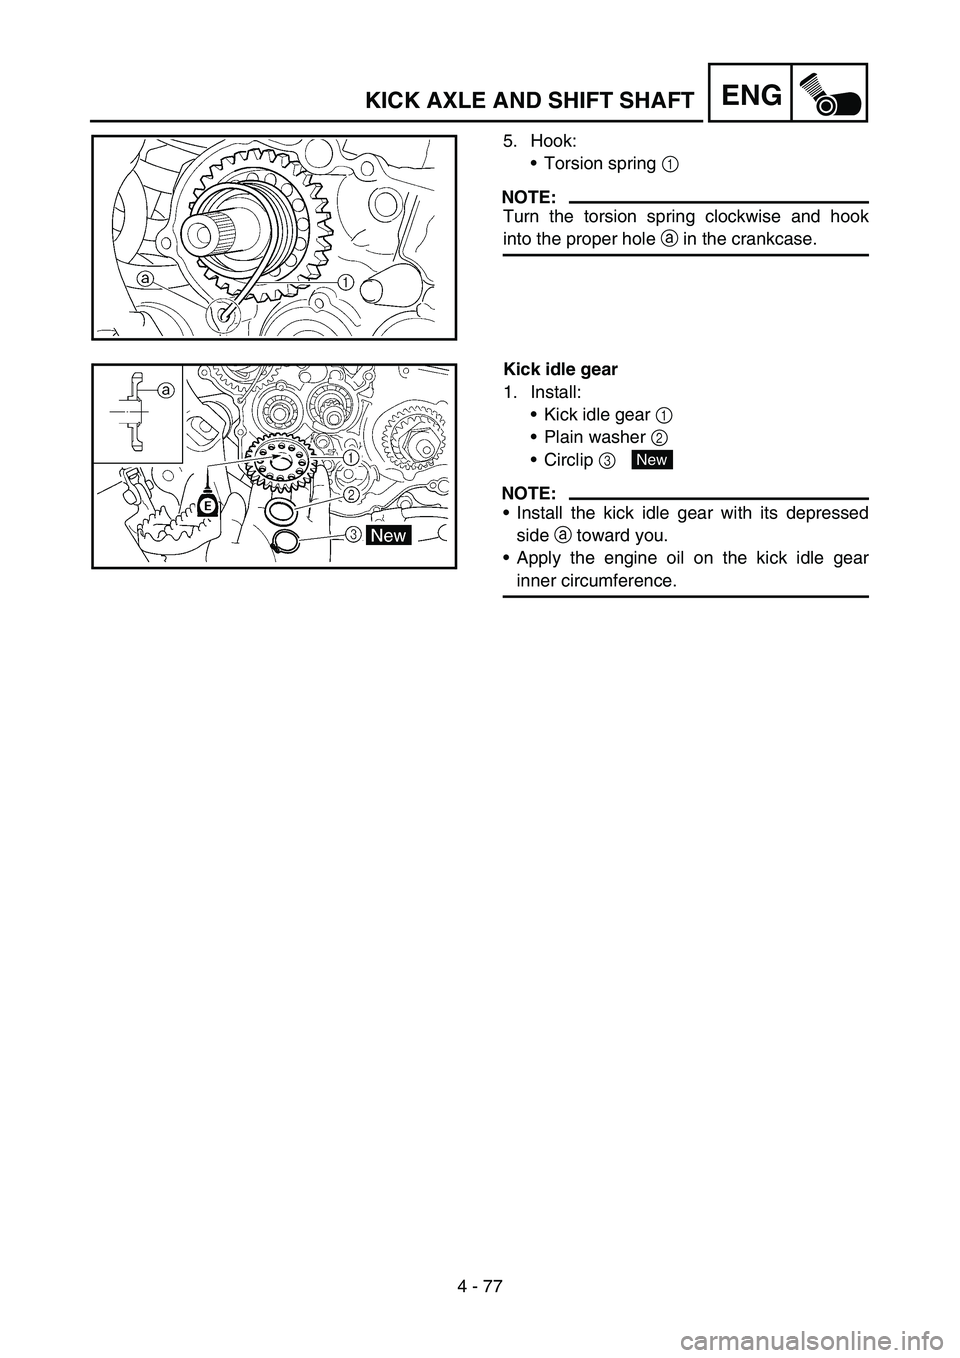
5. Hook:
Torsion spring 1
NOTE:
Turn the torsion spring clockwise and hook
into the proper hole a in the crankcase.
Kick idle gear
1. Install:
Kick idle gear 1
Plain washer 2
Circlip 3
NOTE:
Install the kick idle gear with its depressed
side a toward you.
Apply the engine oil on the kick idle gear
inner circumference.
New
KICK AXLE AND SHIFT SHAFT
Page 642 of 650

7 - 20
TUNSETTING
EC72H002
Suspension setting
•Front fork
NOTE:
•If any of the following symptoms is experienced with the standard position as the base, make
resetting by reference to the adjustment procedure given in the same chart.
•Before any change, set the rear shock absorber sunken length to the standard figure 90 ~ 100 mm
(3.5 ~ 3.9 in).
SymptomSection
Check Adjust
JumpLarge
gapMedium
gapSmall
gap
Stiff over entire rangeCompression damping Turn adjuster counterclockwise (about 2 clicks) to
decrease damping.
Oil amount Decrease oil amount by about 5 ~ 10 cm
3 (0.2 ~
0.4 Imp oz, 0.2 ~ 0.3 US oz).
Spring Replace with soft spring.
Unsmooth movement
over entire rangeOuter tube Check for any bends, dents, and other noticeable
scars, etc. If any, replace affected parts.
Inner tube
Slide metal Replace with a new one for extended use.
Piston metal Replace with a new one for extended use.
Under bracket tightening
torqueRetighten to specified torque.
Poor initial
movementRebound damping Turn adjuster counterclockwise (about 2 clicks) to
decrease damping.
Oil seal Apply grease in oil seal wall.
Soft over entire
range, bottoming outCompression damping Turn adjuster clockwise (about 2 clicks) to increase
damping.
Oil amount Increase oil amount by about 5 ~ 10 cm
3 (0.2 ~
0.4 Imp oz, 0.2 ~ 0.3 US oz).
Spring Replace with stiff spring.
Stiff toward stroke
endOil amountDecrease oil amount by about 5 cm
3 (0.2 Imp oz,
0.2 US oz).
Soft toward stroke
end, bottoming outOil amountIncrease oil amount by about 5 cm
3 (0.2 Imp oz,
0.2 US oz).
Stiff initial movement Compression dampingTurn adjuster counterclockwise (about 2 clicks) to
decrease damping.
Low front, tending to
lower front postureCompression damping Turn adjuster clockwise (about 2 clicks) to increase
damping.
Rebound damping Turn adjuster counterclockwise (about 2 clicks) to
decrease damping.
Balance with rear end Set sunken length for 95 ~ 100 mm (3.7 ~ 3.9 in) when
one passenger is astride seat (lower rear posture).
Oil amount Increase oil amount by about 5 cm
3 (0.2 Imp oz,
0.2 US oz).
“Obtrusive” front,
tending to upper front
postureCompression damping Turn adjuster counterclockwise (about 2 clicks) to
decrease damping.
Balance with rear end Set sunken length for 90 ~ 95 mm (3.5 ~ 3.7 in)
when one passenger is astride seat (upper rear pos-
ture).
Spring Replace with soft spring.
Oil amount Decrease oil amount by about 5 ~ 10 cm
3 (0.2 ~
0.4 Imp oz, 0.2 ~ 0.3 US oz).
Page 643 of 650

7 - 21
TUNSETTING
•Rear shock absorber
NOTE:
•If any of the following symptoms is experienced with the standard position as the base, make
resetting by reference to the adjustment procedure given in the same chart.
•Adjust the rebound damping in 2-click increments or decrements.
•Adjust the low compression damping in 1-click increments or decrements.
•Adjust the high compression damping in 1/6 turn increments or decrements.
SymptomSection
Check Adjust
JumpLarge
gapMedium
gapSmall
gap
Stiff, tending to sinkRebound damping Turn adjuster counterclockwise (about 2 clicks) to
decrease damping.
Spring set length Set sunken length for 90 ~ 100 mm (3.5 ~ 3.9 in)
when one passenger is astride seat.
Spongy and unstableRebound damping Turn adjuster clockwise (about 2 clicks) to increase
damping.
Low compression damp-
ingTurn adjuster clockwise (about 1 click) to increase
damping.
Spring Replace with stiff spring.
Heavy and draggingRebound damping Turn adjuster counterclockwise (about 2 clicks) to
decrease damping.
Spring Replace with soft spring.
Poor road grippingRebound damping Turn adjuster counterclockwise (about 2 clicks) to
decrease damping.
Low compression damp-
ingTurn adjuster clockwise (about 1 clicks) to increase
damping.
High compression damp-
ingTurn adjuster clockwise (about 1/6 clicks) to
increase damping.
Spring set length Set sunken length for 90 ~ 100 mm (3.5 ~ 3.9 in)
when one passenger is astride seat.
Spring Replace with soft spring.
Bottoming outHigh compression damp-
ingTurn adjuster clockwise (about 1/6 turn) to increase
damping.
Spring set length Set sunken length for 90 ~ 100 mm (3.5 ~ 3.9 in)
when one passenger in astride seat.
Spring Replace with stiff spring.
BouncingRebound damping Turn adjuster clockwise (about 2 clicks) to increase
damping.
Spring Replace with soft spring.
Stiff travelHigh compression damp-
ingTurn adjuster counterclockwise (about 1/6 turn) to
decrease damping.
Spring set length Set sunken length for 95 ~ 100 mm (3.7 ~ 3.9 in)
when one passenger is astride seat.
Spring Replace with soft spring.