torque YAMAHA YZ450F 2006 Notices Demploi (in French)
[x] Cancel search | Manufacturer: YAMAHA, Model Year: 2006, Model line: YZ450F, Model: YAMAHA YZ450F 2006Pages: 650, PDF Size: 20.71 MB
Page 296 of 650
4 - 28
ENGCAMSHAFTS
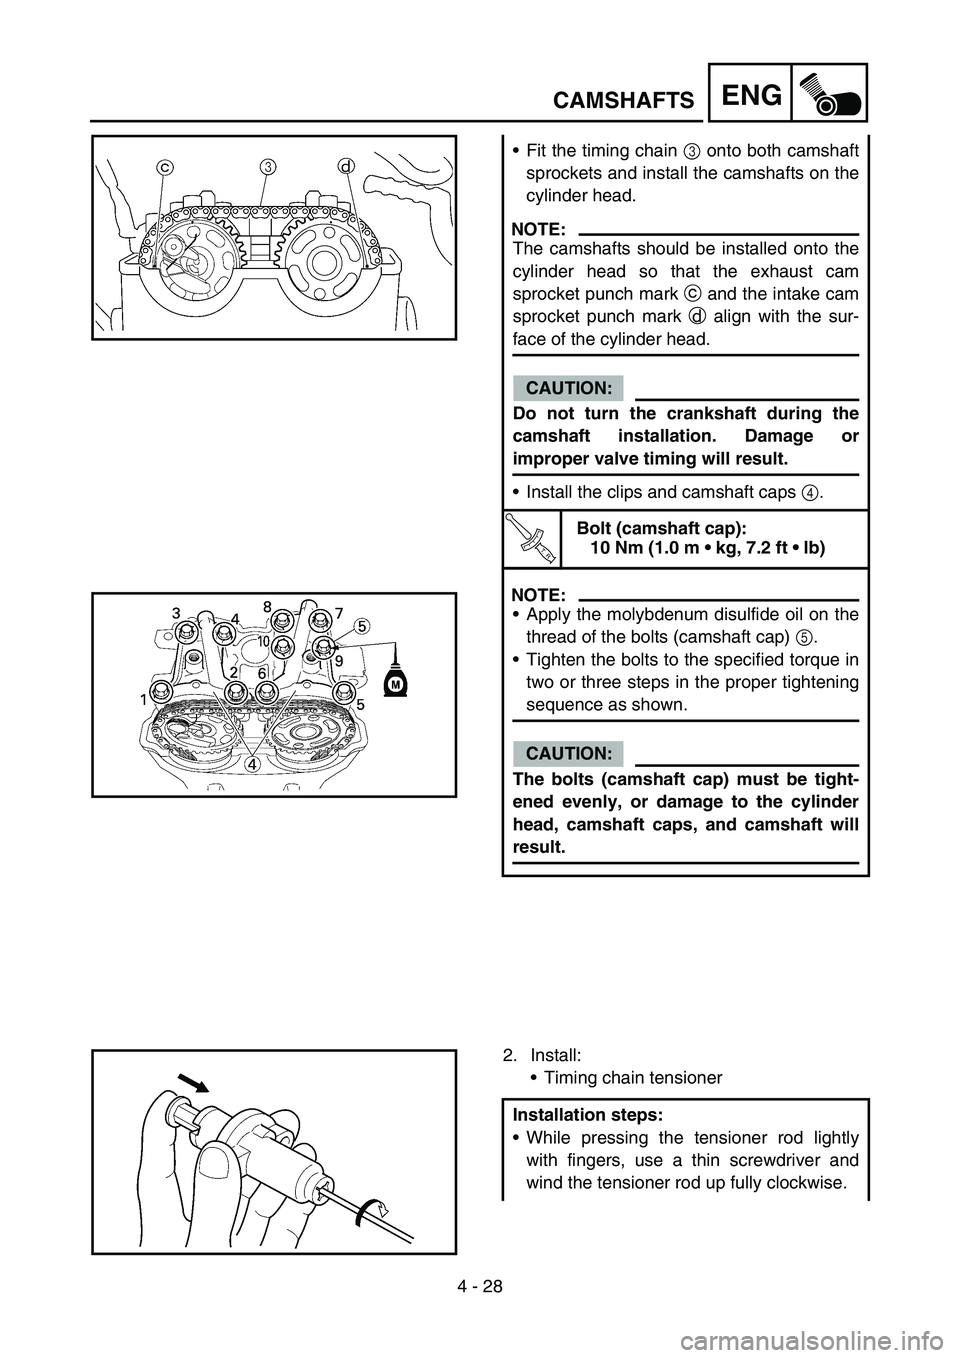
Fit the timing chain 3 onto both camshaft
sprockets and install the camshafts on the
cylinder head.
NOTE:
The camshafts should be installed onto the
cylinder head so that the exhaust cam
sprocket punch mark c and the intake cam
sprocket punch mark d align with the sur-
face of the cylinder head.
CAUTION:
Do not turn the crankshaft during the
camshaft installation. Damage or
improper valve timing will result.
Install the clips and camshaft caps 4.
T R..
Bolt (camshaft cap):
10 Nm (1.0 m kg, 7.2 ft lb)
NOTE:
Apply the molybdenum disulfide oil on the
thread of the bolts (camshaft cap) 5.
Tighten the bolts to the specified torque in
two or three steps in the proper tightening
sequence as shown.
CAUTION:
The bolts (camshaft cap) must be tight-
ened evenly, or damage to the cylinder
head, camshaft caps, and camshaft will
result.
2. Install:
Timing chain tensioner
Installation steps:
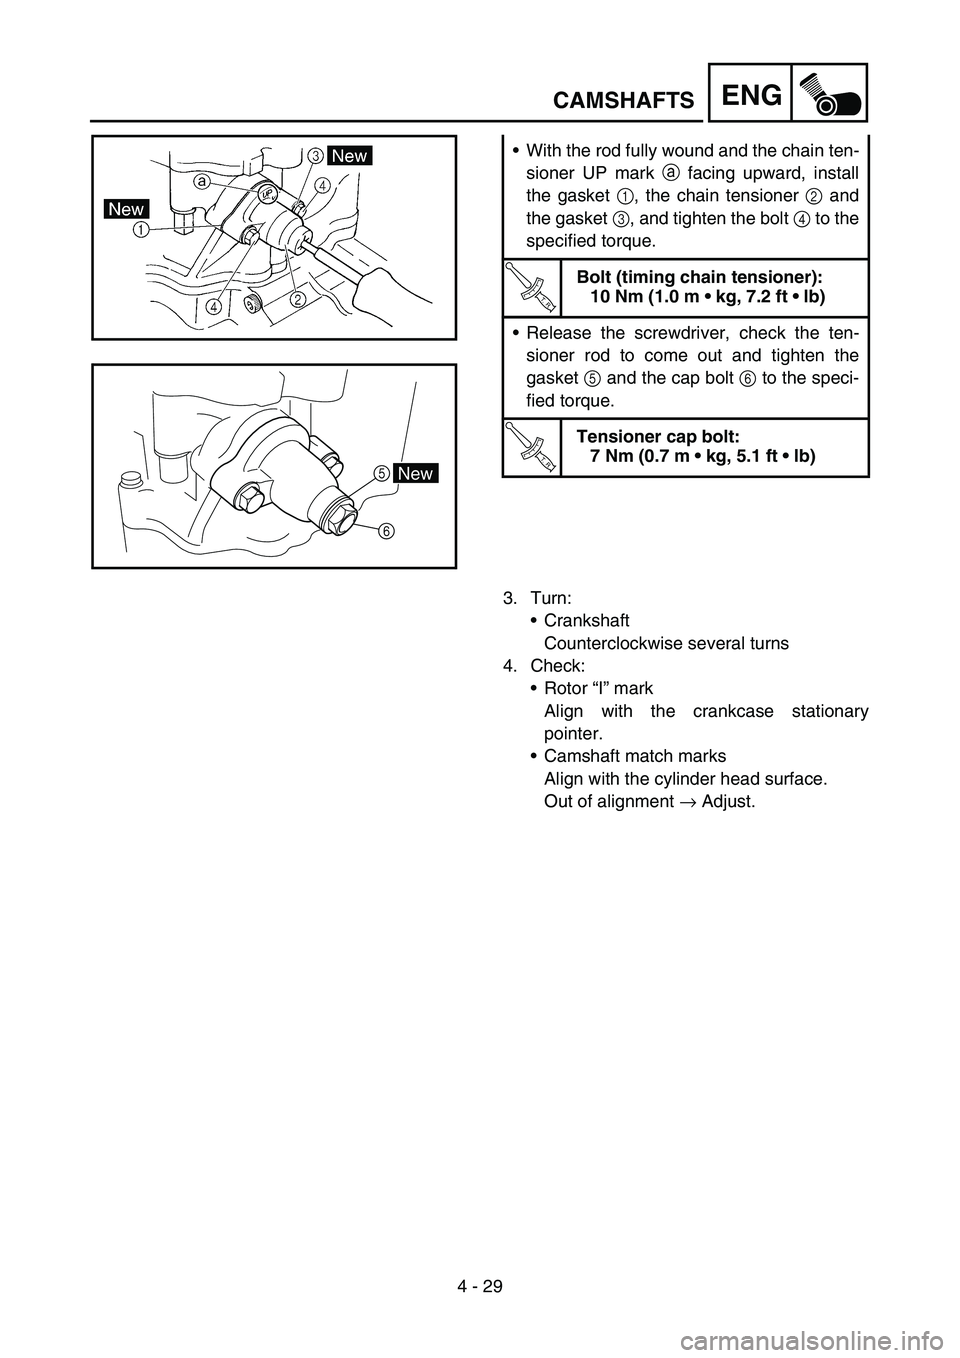
While pressing the tensioner rod lightly
with fingers, use a thin screwdriver and
wind the tensioner rod up fully clockwise.
Page 298 of 650
4 - 29
ENG
With the rod fully wound and the chain ten-
sioner UP mark a facing upward, install
the gasket 1, the chain tensioner 2 and
the gasket 3, and tighten the bolt 4 to the
specified torque.
T R..
Bolt (timing chain tensioner):
10 Nm (1.0 m kg, 7.2 ft lb)
Release the screwdriver, check the ten-
sioner rod to come out and tighten the
gasket 5 and the cap bolt 6 to the speci-
fied torque.
T R..
Tensioner cap bolt:
7 Nm (0.7 m kg, 5.1 ft lb)
6
5New
3. Turn:
Crankshaft
Counterclockwise several turns
4. Check:
Rotor “I” mark
Align with the crankcase stationary
pointer.
Camshaft match marks
Align with the cylinder head surface.
Out of alignment → Adjust.
CAMSHAFTS
Page 304 of 650
4 - 32
ENGCYLINDER HEAD
ASSEMBLY AND INSTALLATION
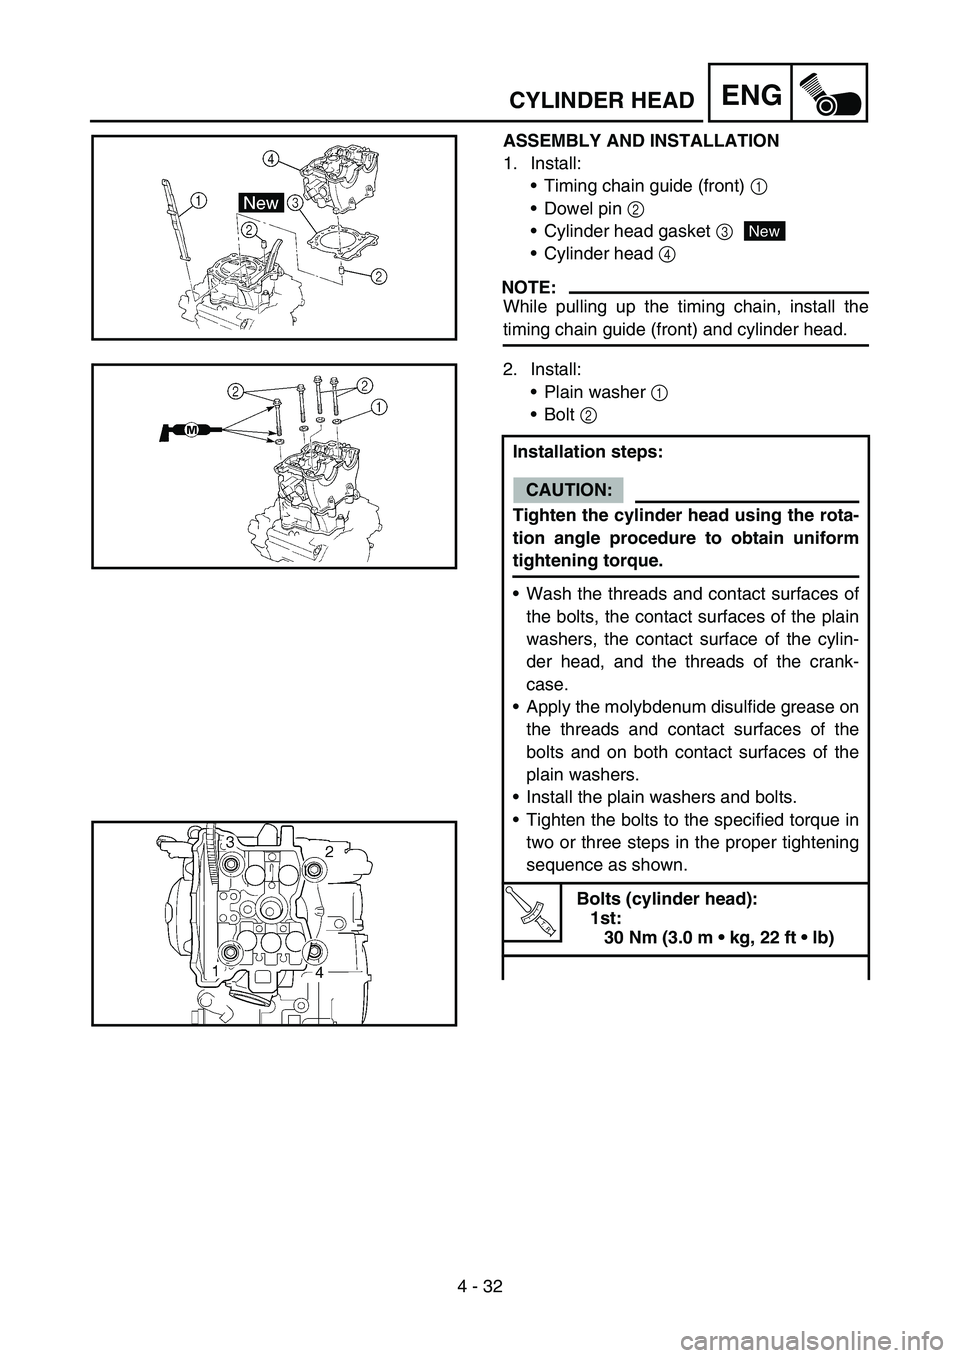
1. Install:
Timing chain guide (front) 1
Dowel pin 2
Cylinder head gasket 3
Cylinder head 4
NOTE:
While pulling up the timing chain, install the
timing chain guide (front) and cylinder head.
New
2. Install:
Plain washer 1
Bolt 2
Installation steps:
CAUTION:
Tighten the cylinder head using the rota-
tion angle procedure to obtain uniform
tightening torque.
Wash the threads and contact surfaces of
the bolts, the contact surfaces of the plain
washers, the contact surface of the cylin-
der head, and the threads of the crank-
case.
Apply the molybdenum disulfide grease on
the threads and contact surfaces of the
bolts and on both contact surfaces of the
plain washers.
Install the plain washers and bolts.
Tighten the bolts to the specified torque in
two or three steps in the proper tightening
sequence as shown.
T R..
Bolts (cylinder head):
1st:
30 Nm (3.0 m kg, 22 ft lb)
Page 306 of 650
4 - 33
ENG
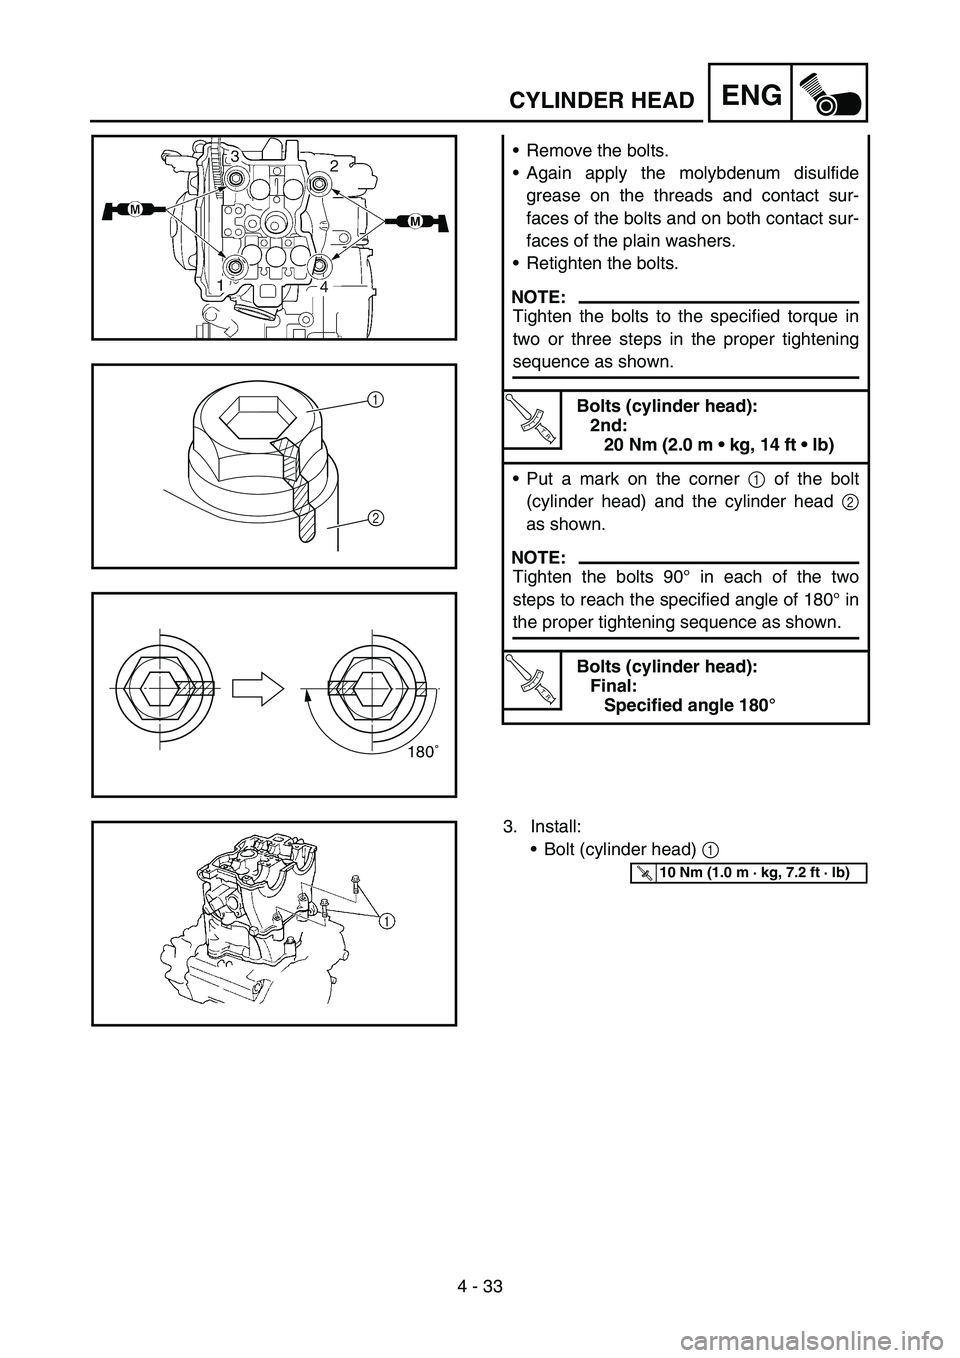
Remove the bolts.
Again apply the molybdenum disulfide
grease on the threads and contact sur-
faces of the bolts and on both contact sur-
faces of the plain washers.
Retighten the bolts.
NOTE:
Tighten the bolts to the specified torque in
two or three steps in the proper tightening
sequence as shown.
T R..
Bolts (cylinder head):
2nd:
20 Nm (2.0 m kg, 14 ft lb)
Put a mark on the corner 1 of the bolt
(cylinder head) and the cylinder head 2
as shown.
NOTE:
Tighten the bolts 90° in each of the two
steps to reach the specified angle of 180° in
the proper tightening sequence as shown.
T R..
Bolts (cylinder head):
Final:
Specified angle 180°
1
2
180˚
3. Install:
Bolt (cylinder head) 1
T R..10 Nm (1.0 m · kg, 7.2 ft · lb)
CYLINDER HEAD
Page 508 of 650
5 - 35
CHASFRONT FORK
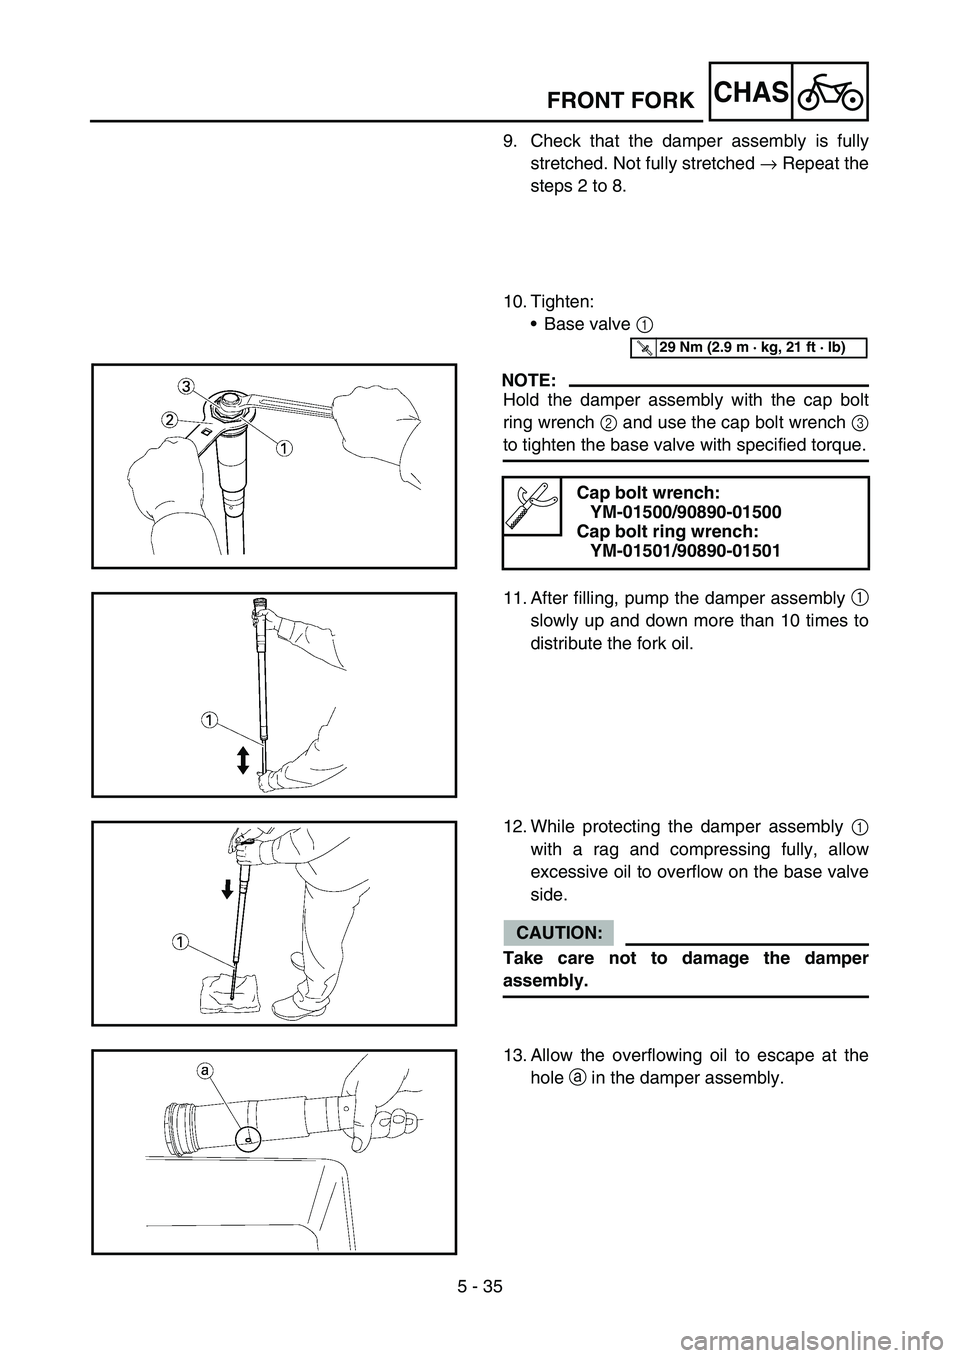
9. Check that the damper assembly is fully
stretched. Not fully stretched → Repeat the
steps 2 to 8.
10. Tighten:
Base valve 1
NOTE:
Hold the damper assembly with the cap bolt
ring wrench 2 and use the cap bolt wrench 3
to tighten the base valve with specified torque.
Cap bolt wrench:
YM-01500/90890-01500
Cap bolt ring wrench:
YM-01501/90890-01501
T R..29 Nm (2.9 m · kg, 21 ft · lb)
11. After filling, pump the damper assembly 1
slowly up and down more than 10 times to
distribute the fork oil.
12. While protecting the damper assembly 1
with a rag and compressing fully, allow
excessive oil to overflow on the base valve
side.
CAUTION:
Take care not to damage the damper
assembly.
13. Allow the overflowing oil to escape at the
hole a in the damper assembly.
Page 516 of 650
5 - 39
CHASFRONT FORK
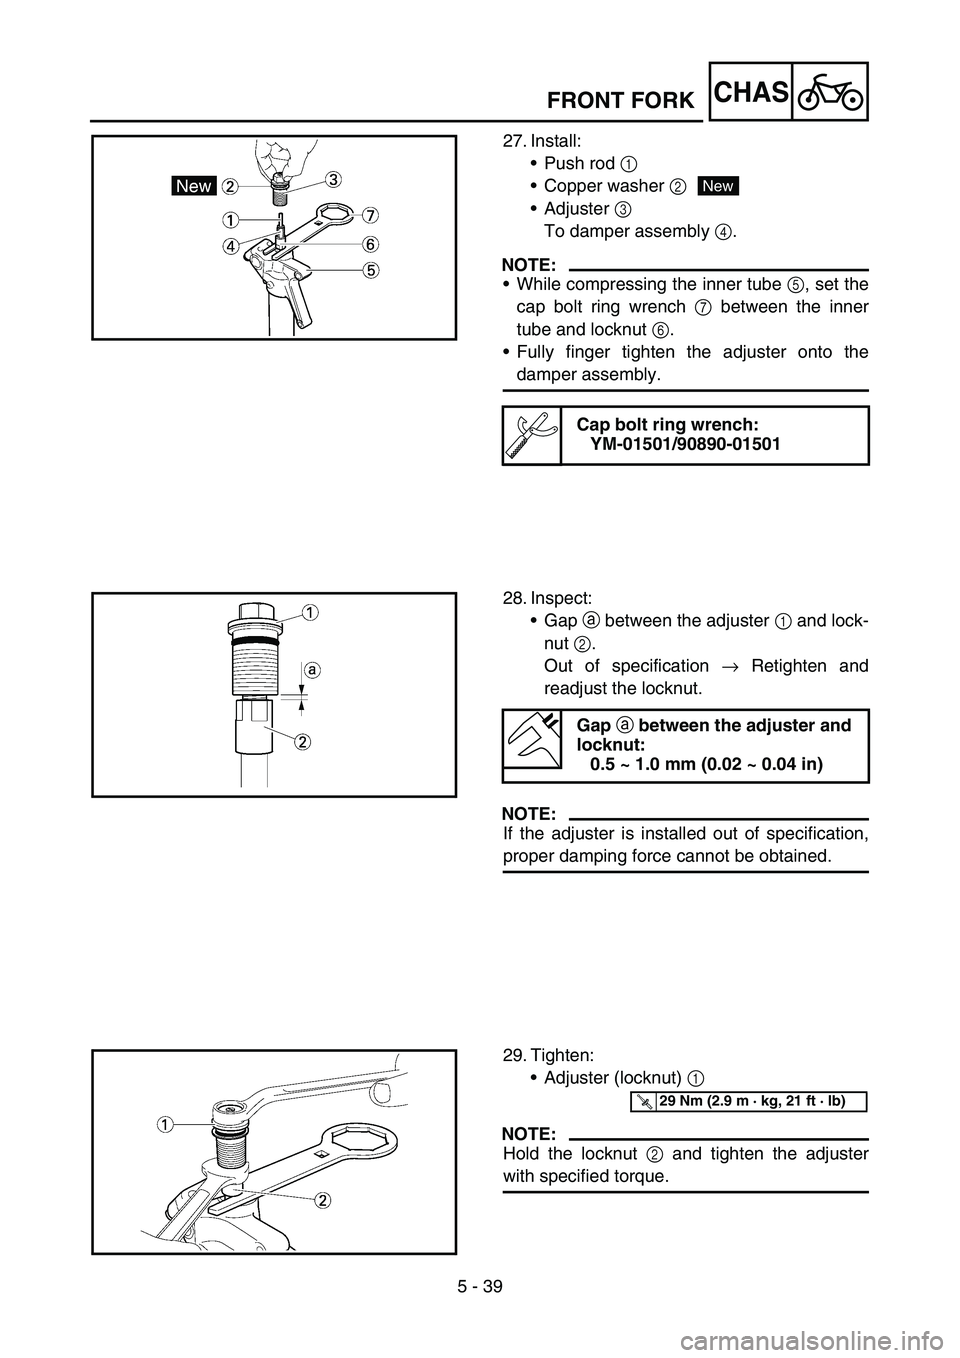
27. Install:
Push rod 1
Copper washer 2
Adjuster 3
To damper assembly 4.
NOTE:
While compressing the inner tube 5, set the
cap bolt ring wrench 7 between the inner
tube and locknut 6.
Fully finger tighten the adjuster onto the
damper assembly.
Cap bolt ring wrench:
YM-01501/90890-01501
New
28. Inspect:
Gap a between the adjuster 1 and lock-
nut 2.
Out of specification → Retighten and
readjust the locknut.
NOTE:
If the adjuster is installed out of specification,
proper damping force cannot be obtained.
Gap
a between the adjuster and
locknut:
0.5 ~ 1.0 mm (0.02 ~ 0.04 in)
29. Tighten:
Adjuster (locknut) 1
NOTE:
Hold the locknut 2 and tighten the adjuster
with specified torque.
T R..29 Nm (2.9 m · kg, 21 ft · lb)
Page 520 of 650
5 - 41
CHAS
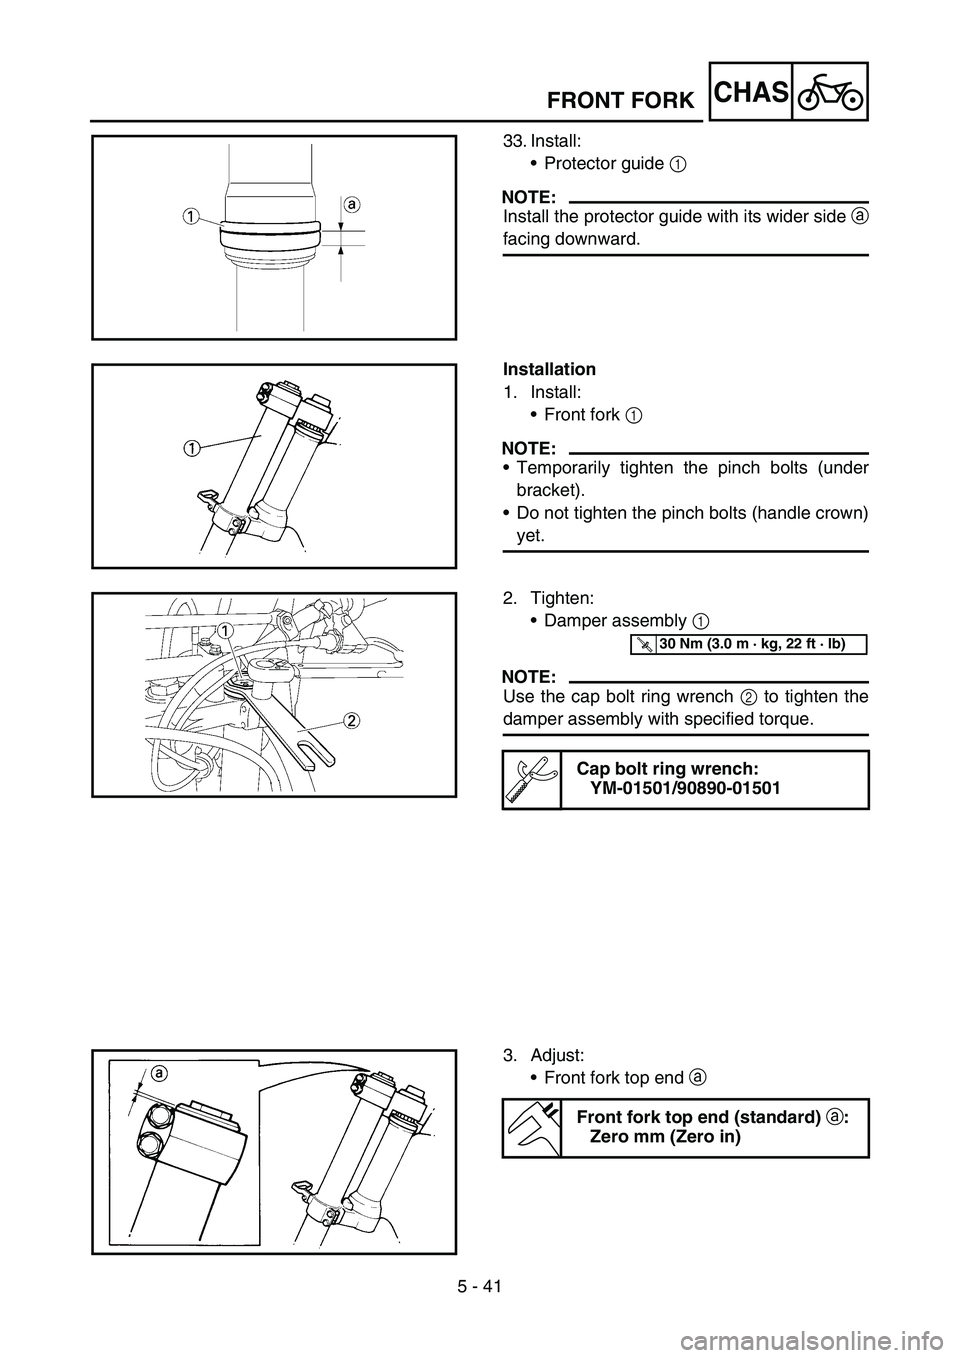
33. Install:
Protector guide 1
NOTE:
Install the protector guide with its wider side a
facing downward.
Installation
1. Install:
Front fork 1
NOTE:
Temporarily tighten the pinch bolts (under
bracket).
Do not tighten the pinch bolts (handle crown)
yet.
2. Tighten:
Damper assembly 1
NOTE:
Use the cap bolt ring wrench 2 to tighten the
damper assembly with specified torque.
Cap bolt ring wrench:
YM-01501/90890-01501
T R..30 Nm (3.0 m · kg, 22 ft · lb)
3. Adjust:
Front fork top end a
Front fork top end (standard) a:
Zero mm (Zero in)
FRONT FORK
Page 522 of 650
5 - 42
CHAS
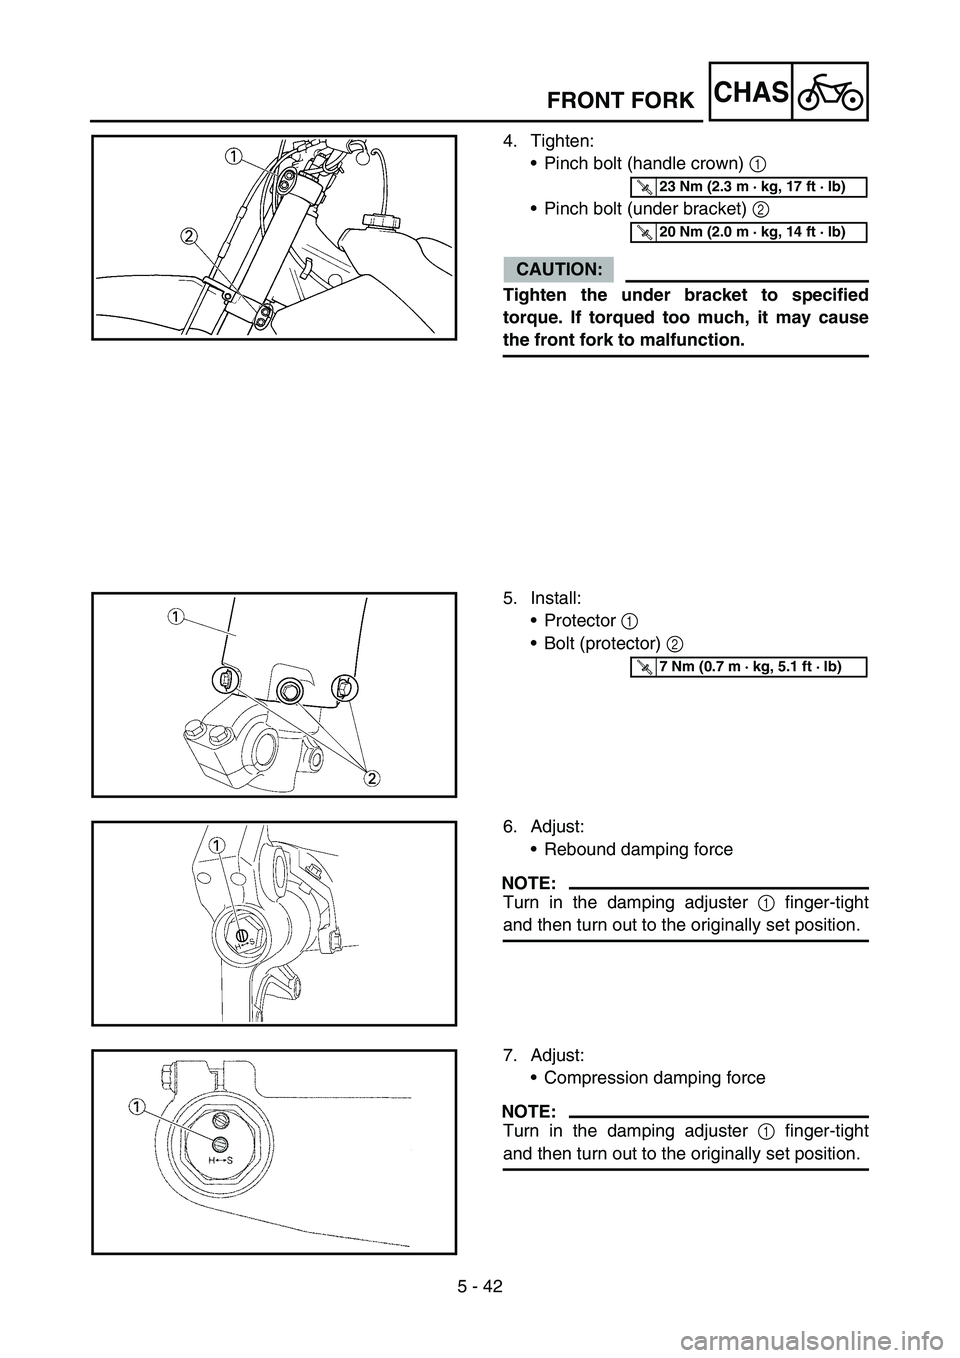
4. Tighten:
Pinch bolt (handle crown) 1
Pinch bolt (under bracket) 2
CAUTION:
Tighten the under bracket to specified
torque. If torqued too much, it may cause
the front fork to malfunction.
T R..23 Nm (2.3 m · kg, 17 ft · lb)
T R..20 Nm (2.0 m · kg, 14 ft · lb)
5. Install:
Protector 1
Bolt (protector) 2
T R..7 Nm (0.7 m · kg, 5.1 ft · lb)
6. Adjust:
Rebound damping force
NOTE:
Turn in the damping adjuster 1 finger-tight
and then turn out to the originally set position.
7. Adjust:
Compression damping force
NOTE:
Turn in the damping adjuster 1 finger-tight
and then turn out to the originally set position.
FRONT FORK
Page 544 of 650
5 - 53
CHASSTEERING
9. After tightening the nut, check the steering
for smooth movement. If not, adjust the
steering by loosening the ring nut little by
little.
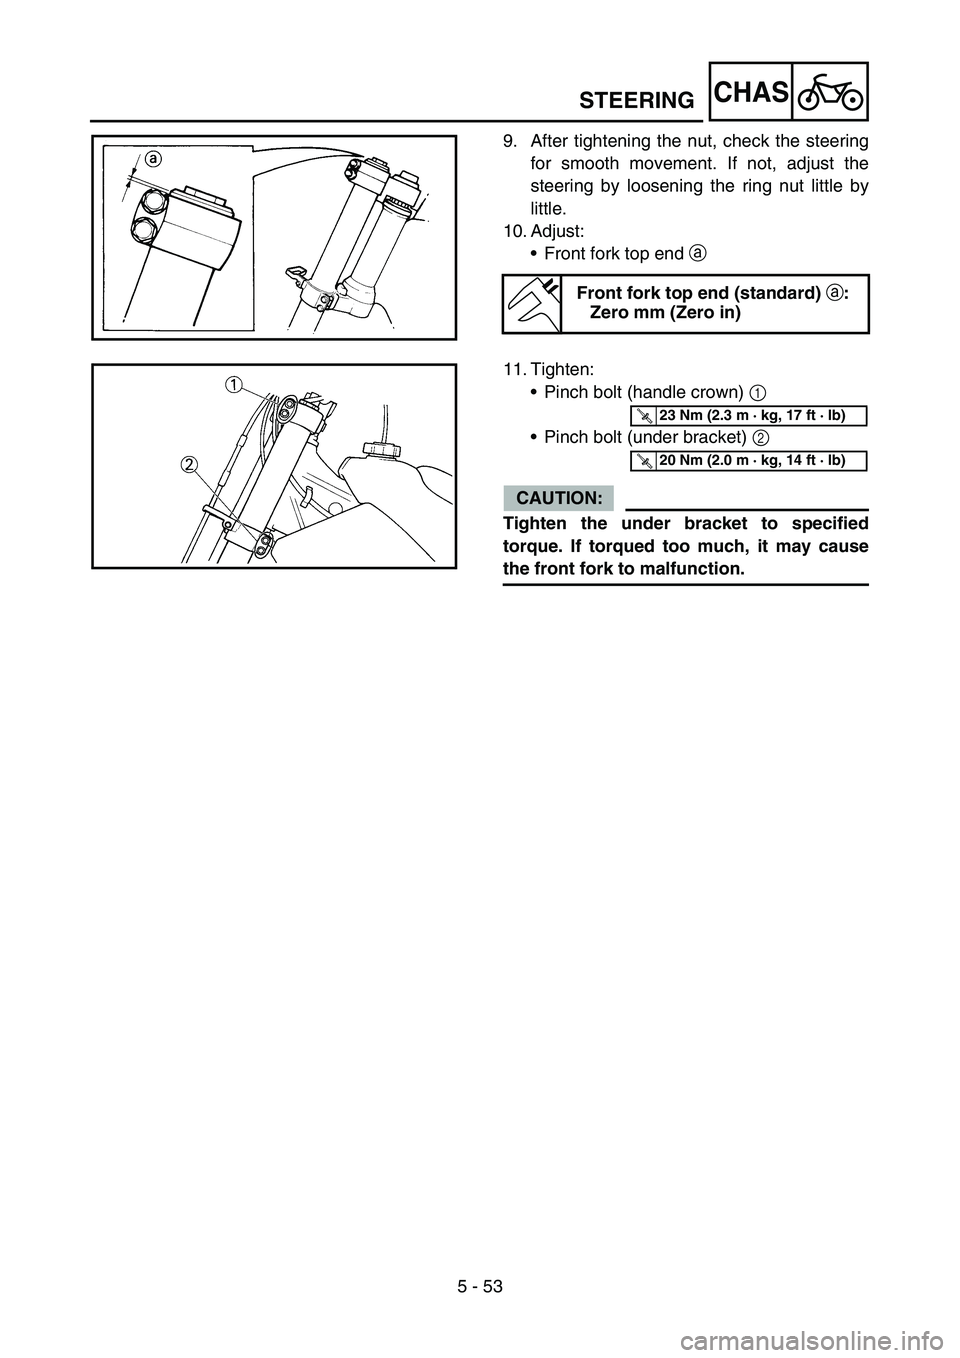
10. Adjust:
•Front fork top end a
Front fork top end (standard)
a:
Zero mm (Zero in)
11. Tighten:
•Pinch bolt (handle crown) 1
•Pinch bolt (under bracket) 2
CAUTION:
Tighten the under bracket to specified
torque. If torqued too much, it may cause
the front fork to malfunction.
T R..23 Nm (2.3 m · kg, 17 ft · lb)
T R..20 Nm (2.0 m · kg, 14 ft · lb)
Page 642 of 650

7 - 20
TUNSETTING
EC72H002
Suspension setting
•Front fork
NOTE:
•If any of the following symptoms is experienced with the standard position as the base, make
resetting by reference to the adjustment procedure given in the same chart.
•Before any change, set the rear shock absorber sunken length to the standard figure 90 ~ 100 mm
(3.5 ~ 3.9 in).
SymptomSection
Check Adjust
JumpLarge
gapMedium
gapSmall
gap
Stiff over entire rangeCompression damping Turn adjuster counterclockwise (about 2 clicks) to
decrease damping.
Oil amount Decrease oil amount by about 5 ~ 10 cm
3 (0.2 ~
0.4 Imp oz, 0.2 ~ 0.3 US oz).
Spring Replace with soft spring.
Unsmooth movement
over entire rangeOuter tube Check for any bends, dents, and other noticeable
scars, etc. If any, replace affected parts.
Inner tube
Slide metal Replace with a new one for extended use.
Piston metal Replace with a new one for extended use.
Under bracket tightening
torqueRetighten to specified torque.
Poor initial
movementRebound damping Turn adjuster counterclockwise (about 2 clicks) to
decrease damping.
Oil seal Apply grease in oil seal wall.
Soft over entire
range, bottoming outCompression damping Turn adjuster clockwise (about 2 clicks) to increase
damping.
Oil amount Increase oil amount by about 5 ~ 10 cm
3 (0.2 ~
0.4 Imp oz, 0.2 ~ 0.3 US oz).
Spring Replace with stiff spring.
Stiff toward stroke
endOil amountDecrease oil amount by about 5 cm
3 (0.2 Imp oz,
0.2 US oz).
Soft toward stroke
end, bottoming outOil amountIncrease oil amount by about 5 cm
3 (0.2 Imp oz,
0.2 US oz).
Stiff initial movement Compression dampingTurn adjuster counterclockwise (about 2 clicks) to
decrease damping.
Low front, tending to
lower front postureCompression damping Turn adjuster clockwise (about 2 clicks) to increase
damping.
Rebound damping Turn adjuster counterclockwise (about 2 clicks) to
decrease damping.
Balance with rear end Set sunken length for 95 ~ 100 mm (3.7 ~ 3.9 in) when
one passenger is astride seat (lower rear posture).
Oil amount Increase oil amount by about 5 cm
3 (0.2 Imp oz,
0.2 US oz).
“Obtrusive” front,
tending to upper front
postureCompression damping Turn adjuster counterclockwise (about 2 clicks) to
decrease damping.
Balance with rear end Set sunken length for 90 ~ 95 mm (3.5 ~ 3.7 in)
when one passenger is astride seat (upper rear pos-
ture).
Spring Replace with soft spring.
Oil amount Decrease oil amount by about 5 ~ 10 cm
3 (0.2 ~
0.4 Imp oz, 0.2 ~ 0.3 US oz).