check oil YAMAHA YZ450F 2014 User Guide
[x] Cancel search | Manufacturer: YAMAHA, Model Year: 2014, Model line: YZ450F, Model: YAMAHA YZ450F 2014Pages: 360, PDF Size: 11.76 MB
Page 87 of 360
3
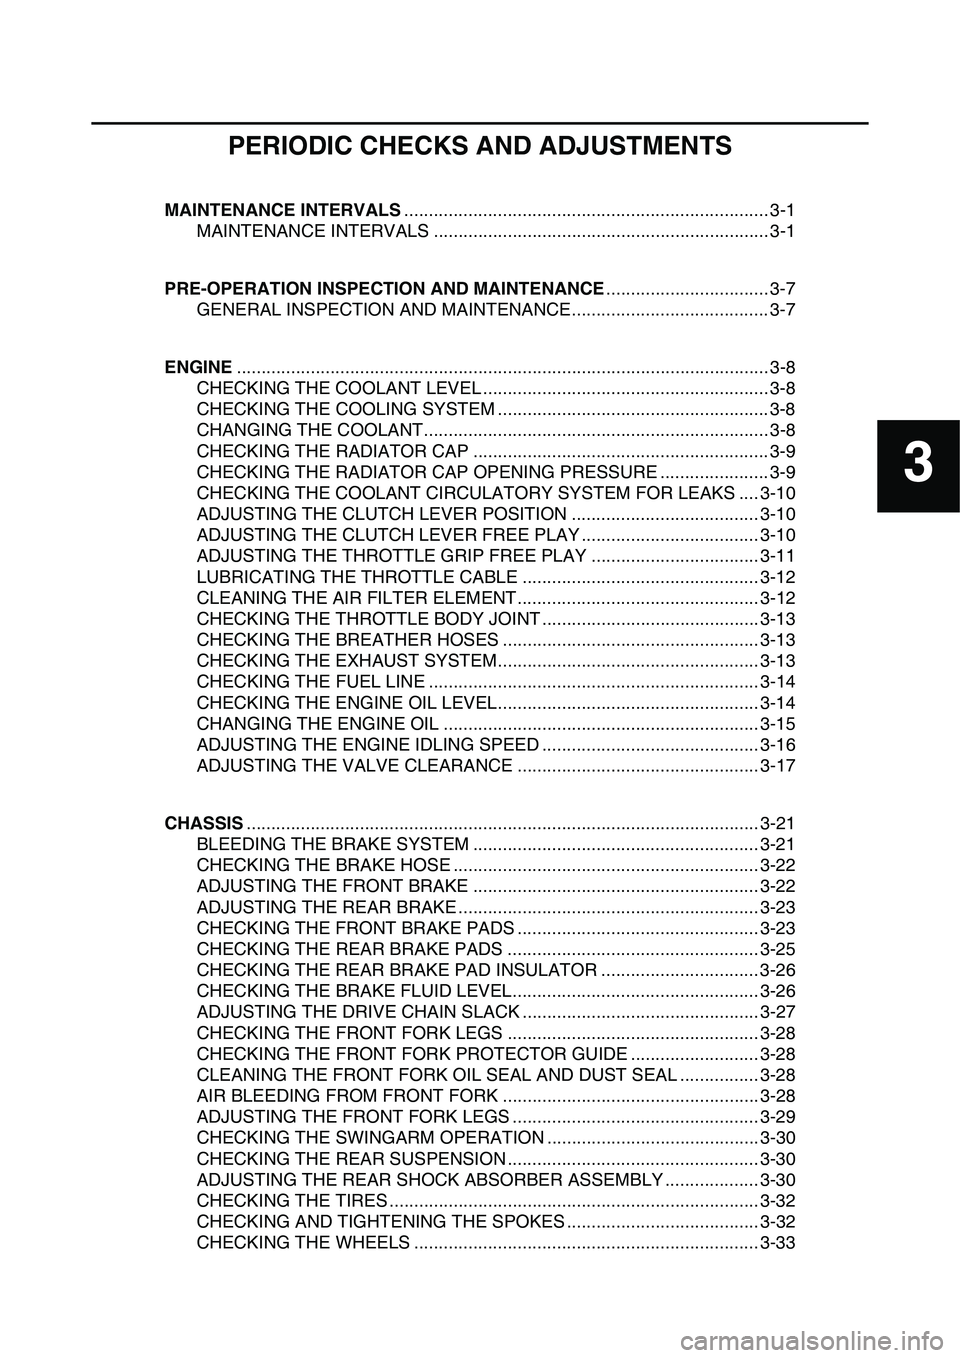
PERIODIC CHECKS AND ADJUSTMENTS
MAINTENANCE INTERVALS.......................................................................... 3-1
MAINTENANCE INTERVALS .................................................................... 3-1
PRE-OPERATION INSPECTION AND MAINTENANCE................................. 3-7
GENERAL INSPECTION AND MAINTENANCE........................................ 3-7
ENGINE............................................................................................................ 3-8
CHECKING THE COOLANT LEVEL .......................................................... 3-8
CHECKING THE COOLING SYSTEM ....................................................... 3-8
CHANGING THE COOLANT...................................................................... 3-8
CHECKING THE RADIATOR CAP ............................................................ 3-9
CHECKING THE RADIATOR CAP OPENING PRESSURE ...................... 3-9
CHECKING THE COOLANT CIRCULATORY SYSTEM FOR LEAKS .... 3-10
ADJUSTING THE CLUTCH LEVER POSITION ...................................... 3-10
ADJUSTING THE CLUTCH LEVER FREE PLAY .................................... 3-10
ADJUSTING THE THROTTLE GRIP FREE PLAY .................................. 3-11
LUBRICATING THE THROTTLE CABLE ................................................ 3-12
CLEANING THE AIR FILTER ELEMENT................................................. 3-12
CHECKING THE THROTTLE BODY JOINT ............................................ 3-13
CHECKING THE BREATHER HOSES .................................................... 3-13
CHECKING THE EXHAUST SYSTEM..................................................... 3-13
CHECKING THE FUEL LINE ................................................................... 3-14
CHECKING THE ENGINE OIL LEVEL..................................................... 3-14
CHANGING THE ENGINE OIL ................................................................ 3-15
ADJUSTING THE ENGINE IDLING SPEED ............................................ 3-16
ADJUSTING THE VALVE CLEARANCE ................................................. 3-17
CHASSIS........................................................................................................ 3-21
BLEEDING THE BRAKE SYSTEM .......................................................... 3-21
CHECKING THE BRAKE HOSE .............................................................. 3-22
ADJUSTING THE FRONT BRAKE .......................................................... 3-22
ADJUSTING THE REAR BRAKE ............................................................. 3-23
CHECKING THE FRONT BRAKE PADS ................................................. 3-23
CHECKING THE REAR BRAKE PADS ................................................... 3-25
CHECKING THE REAR BRAKE PAD INSULATOR ................................ 3-26
CHECKING THE BRAKE FLUID LEVEL.................................................. 3-26
ADJUSTING THE DRIVE CHAIN SLACK ................................................ 3-27
CHECKING THE FRONT FORK LEGS ................................................... 3-28
CHECKING THE FRONT FORK PROTECTOR GUIDE .......................... 3-28
CLEANING THE FRONT FORK OIL SEAL AND DUST SEAL ................ 3-28
AIR BLEEDING FROM FRONT FORK .................................................... 3-28
ADJUSTING THE FRONT FORK LEGS .................................................. 3-29
CHECKING THE SWINGARM OPERATION ........................................... 3-30
CHECKING THE REAR SUSPENSION ................................................... 3-30
ADJUSTING THE REAR SHOCK ABSORBER ASSEMBLY ................... 3-30
CHECKING THE TIRES ........................................................................... 3-32
CHECKING AND TIGHTENING THE SPOKES ....................................... 3-32
CHECKING THE WHEELS ...................................................................... 3-33
Page 90 of 360
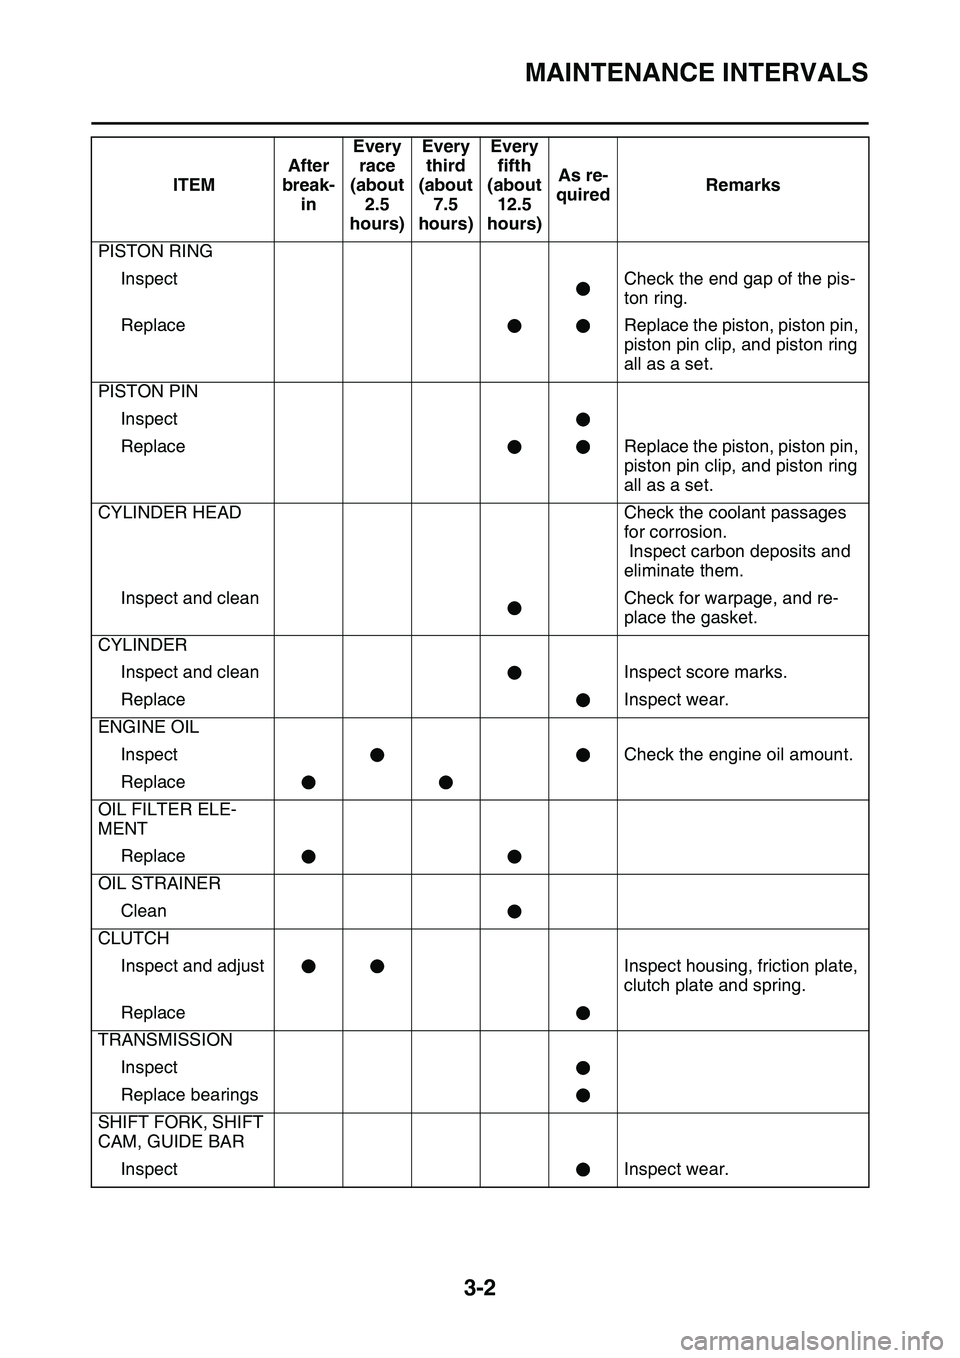
MAINTENANCE INTERVALS
3-2
PISTON RING
InspectCheck the end gap of the pis-
ton ring.
ReplaceReplace the piston, piston pin,
piston pin clip, and piston ring
all as a set.
PISTON PIN
Inspect
ReplaceReplace the piston, piston pin,
piston pin clip, and piston ring
all as a set.
CYLINDER HEADCheck the coolant passages
for corrosion.
Inspect carbon deposits and
eliminate them.
Inspect and cleanCheck for warpage, and re-
place the gasket.
CYLINDER
Inspect and cleanInspect score marks.
ReplaceInspect wear.
ENGINE OIL
InspectCheck the engine oil amount.
Replace
OIL FILTER ELE-
MENT
Replace
OIL STRAINER
Clean
CLUTCH
Inspect and adjustInspect housing, friction plate,
clutch plate and spring.
Replace
TRANSMISSION
Inspect
Replace bearings
SHIFT FORK, SHIFT
CAM, GUIDE BAR
InspectInspect wear.
ITEMAfter
break-
inEvery
race
(about
2.5
hours)Every
third
(about
7.5
hours)Every
fifth
(about
12.5
hours)As re-
quiredRemarks
Page 91 of 360
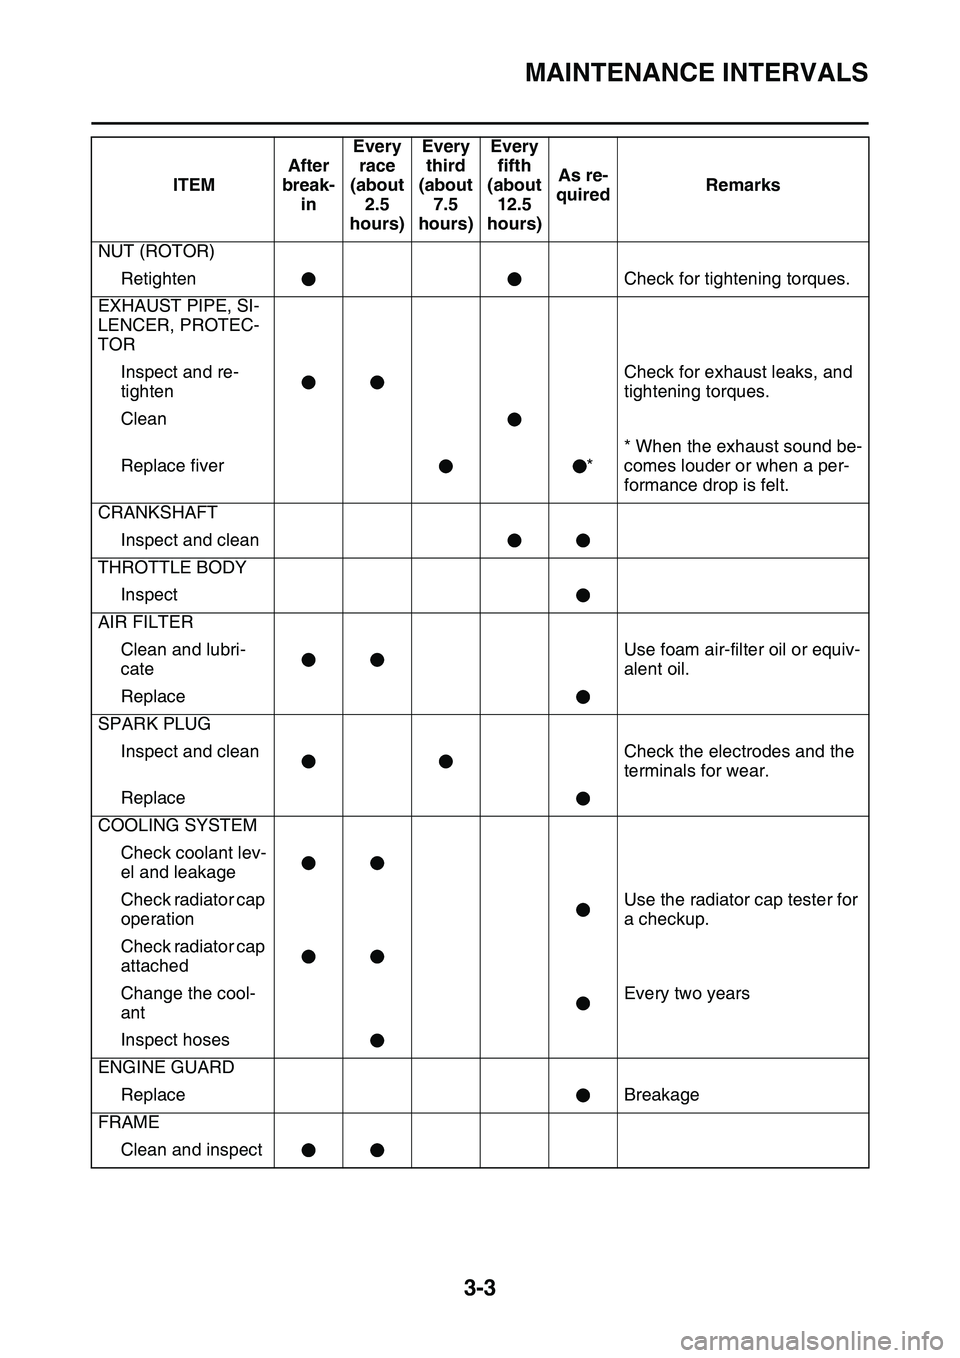
MAINTENANCE INTERVALS
3-3
NUT (ROTOR)
RetightenCheck for tightening torques.
EXHAUST PIPE, SI-
LENCER, PROTEC-
TOR
Inspect and re-
tighten
Check for exhaust leaks, and
tightening torques.
Clean
Replace fiver*
* When the exhaust sound be-
comes louder or when a per-
formance drop is felt.
CRANKSHAFT
Inspect and clean
THROTTLE BODY
Inspect
AIR FILTER
Clean and lubri-
cate
Use foam air-filter oil or equiv-
alent oil.
Replace
SPARK PLUG
Inspect and cleanCheck the electrodes and the
terminals for wear.
Replace
COOLING SYSTEM
Check coolant lev-
el and leakage
Check radiator cap
operationUse the radiator cap tester for
a checkup.
Check radiator cap
attached
Change the cool-
ant
Every two years
Inspect hoses
ENGINE GUARD
ReplaceBreakage
FRAME
Clean and inspect
ITEMAfter
break-
inEvery
race
(about
2.5
hours)Every
third
(about
7.5
hours)Every
fifth
(about
12.5
hours)As re-
quiredRemarks
Page 92 of 360
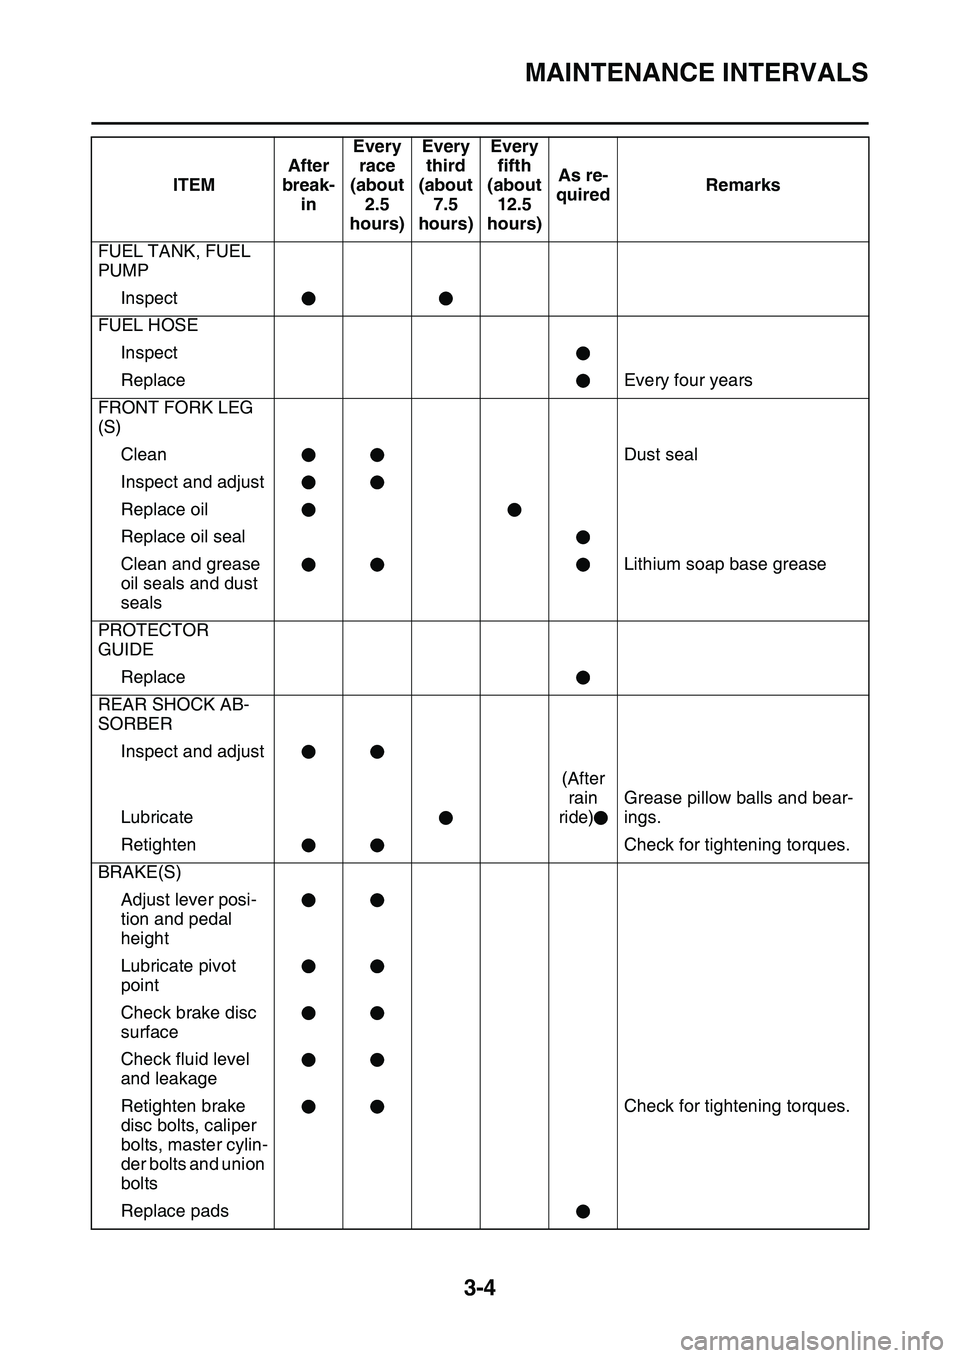
MAINTENANCE INTERVALS
3-4
FUEL TANK, FUEL
PUMP
Inspect
FUEL HOSE
Inspect
ReplaceEvery four years
FRONT FORK LEG
(S)
CleanDust seal
Inspect and adjust
Replace oil
Replace oil seal
Clean and grease
oil seals and dust
sealsLithium soap base grease
PROTECTOR
GUIDE
Replace
REAR SHOCK AB-
SORBER
Inspect and adjust
Lubricate
(After
rain
ride)
Grease pillow balls and bear-
ings.
RetightenCheck for tightening torques.
BRAKE(S)
Adjust lever posi-
tion and pedal
height
Lubricate pivot
point
Check brake disc
surface
Check fluid level
and leakage
Retighten brake
disc bolts, caliper
bolts, master cylin
-
der bolts and union
bolts
Check for tightening torques.
Replace pads
ITEMAfter
break-
inEvery
race
(about
2.5
hours)Every
third
(about
7.5
hours)Every
fifth
(about
12.5
hours)As re-
quiredRemarks
Page 93 of 360
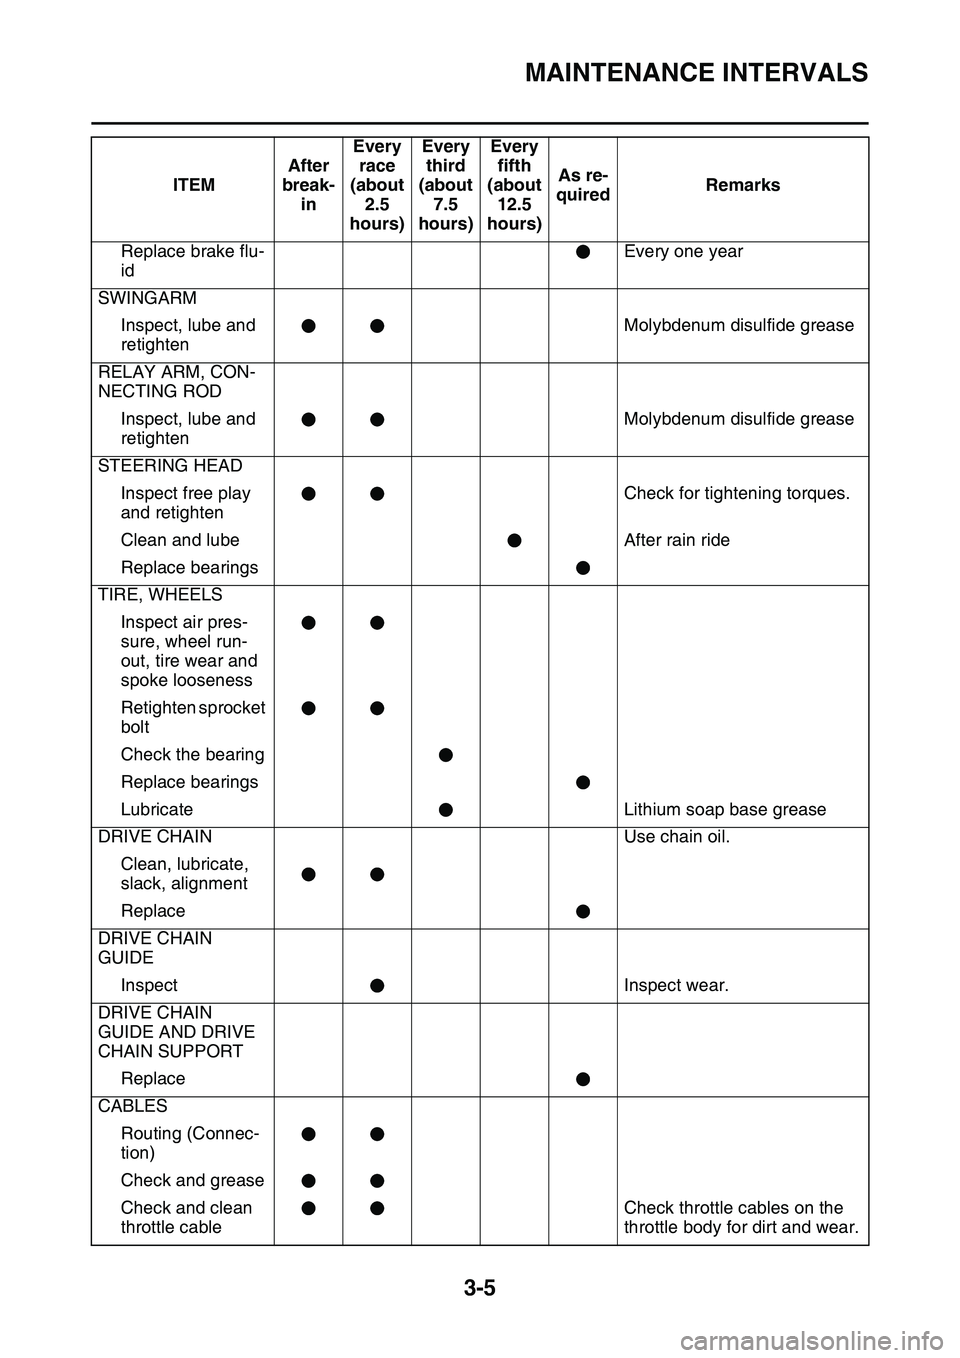
MAINTENANCE INTERVALS
3-5
Replace brake flu-
id
Every one year
SWINGARM
Inspect, lube and
retightenMolybdenum disulfide grease
RELAY ARM, CON-
NECTING ROD
Inspect, lube and
retightenMolybdenum disulfide grease
STEERING HEAD
Inspect free play
and retightenCheck for tightening torques.
Clean and lubeAfter rain ride
Replace bearings
TIRE, WHEELS
Inspect air pres-
sure, wheel run-
out, tire wear and
spoke looseness
Retighten sprocket
bolt
Check the bearing
Replace bearings
LubricateLithium soap base grease
DRIVE CHAINUse chain oil.
Clean, lubricate,
slack, alignment
Replace
DRIVE CHAIN
GUIDE
InspectInspect wear.
DRIVE CHAIN
GUIDE AND DRIVE
CHAIN SUPPORT
Replace
CABLES
Routing (Connec-
tion)
Check and grease
Check and clean
throttle cableCheck throttle cables on the
throttle body for dirt and wear.
ITEMAfter
break-
inEvery
race
(about
2.5
hours)Every
third
(about
7.5
hours)Every
fifth
(about
12.5
hours)As re-
quiredRemarks
Page 95 of 360
PRE-OPERATION INSPECTION AND MAINTENANCE
3-7
EAS1SL1067
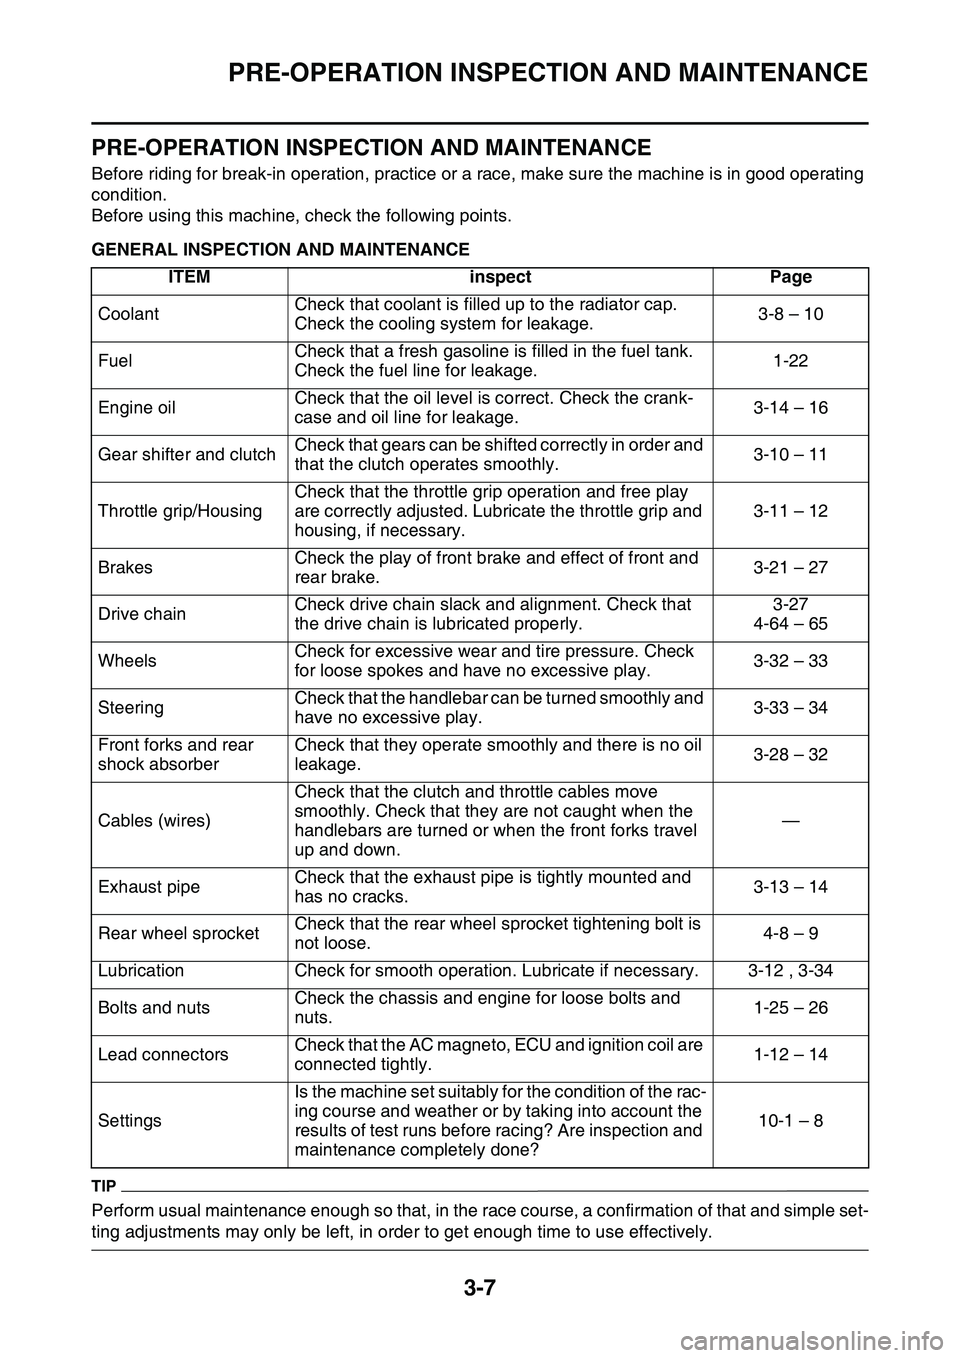
PRE-OPERATION INSPECTION AND MAINTENANCE
Before riding for break-in operation, practice or a race, make sure the machine is in good operating
condition.
Before using this machine, check the following points.
EAS1SL1068GENERAL INSPECTION AND MAINTENANCE
TIP
Perform usual maintenance enough so that, in the race course, a confirmation of that and simple set-
ting adjustments may only be left, in order to get enough time to use effectively.
ITEMinspectPage
CoolantCheck that coolant is filled up to the radiator cap.
Check the cooling system for leakage.3-8 – 10
FuelCheck that a fresh gasoline is filled in the fuel tank.
Check the fuel line for leakage.1-22
Engine oilCheck that the oil level is correct. Check the crank-
case and oil line for leakage.3-14 – 16
Gear shifter and clutchCheck that gears can be shifted correctly in order and
that the clutch operates smoothly.3-10 – 11
Throttle grip/Housing
Check that the throttle grip operation and free play
are correctly adjusted. Lubricate the throttle grip and
housing, if necessary.
3-11 – 12
BrakesCheck the play of front brake and effect of front and
rear brake.3-21 – 27
Drive chainCheck drive chain slack and alignment. Check that
the drive chain is lubricated properly.3-27
4-64 – 65
WheelsCheck for excessive wear and tire pressure. Check
for loose spokes and have no excessive play.3-32 – 33
SteeringCheck that the handlebar can be turned smoothly and
have no excessive play.3-33 – 34
Front forks and rear
shock absorberCheck that they operate smoothly and there is no oil
leakage.3-28 – 32
Cables (wires)
Check that the clutch and throttle cables move
smoothly. Check that they are not caught when the
handlebars are turned or when the front forks travel
up and down.
—
Exhaust pipeCheck that the exhaust pipe is tightly mounted and
has no cracks.3-13 – 14
Rear wheel sprocketCheck that the rear wheel sprocket tightening bolt is
not loose.4-8 – 9
LubricationCheck for smooth operation. Lubricate if necessary. 3-12 , 3-34
Bolts and nutsCheck the chassis and engine for loose bolts and
nuts.1-25 – 26
Lead connectorsCheck that the AC magneto, ECU and ignition coil are
connected tightly.1-12 – 14
Settings
Is the machine set suitably for the condition of the rac-
ing course and weather or by taking into account the
results of test runs before racing? Are inspection and
maintenance completely done?10-1 – 8
Page 100 of 360
ENGINE
3-12
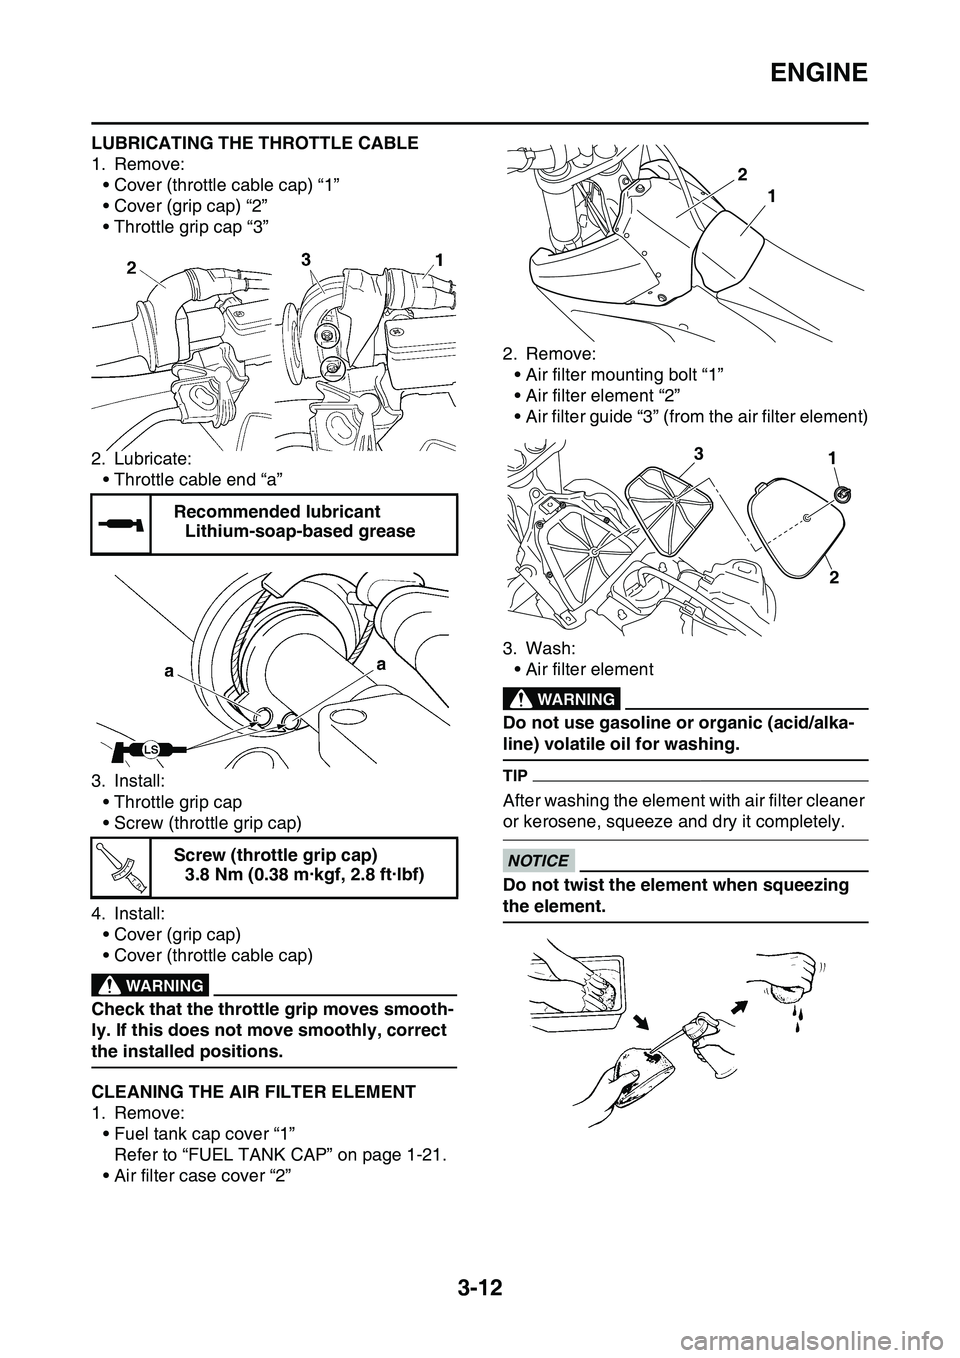
LUBRICATING THE THROTTLE CABLE
1. Remove:• Cover (throttle cable cap) “1”
• Cover (grip cap) “2”
• Throttle grip cap “3”
2. Lubricate: • Throttle cable end “a”
3. Install: • Throttle grip cap
• Screw (throttle grip cap)
4. Install: • Cover (grip cap)
• Cover (throttle cable cap)
EWA
WARNING
Check that the throttle grip moves smooth-
ly. If this does not move smoothly, correct
the installed positions.
EAS1SL1080CLEANING THE AIR FILTER ELEMENT
1. Remove:• Fuel tank cap cover “1”Refer to “FUEL TANK CAP” on page 1-21.
• Air filter case cover “2” 2. Remove:
• Air filter mounting bolt “1”
• Air filter element “2”
• Air filter guide “3” (from the air filter element)
3. Wash: • Air filter element
EWA
WARNING
Do not use gasoline or organic (acid/alka-
line) volatile oil for washing.
TIP
After washing the element with air filter cleaner
or kerosene, squeeze and dry it completely.
ECA33DD016
NOTICE
Do not twist the element when squeezing
the element.
Recommended lubricant
Lithium-soap-based grease
Screw (throttle grip cap) 3.8 Nm (0.38 m·kgf, 2.8 ft·lbf)
T R..
1
2
13
2
Page 101 of 360
ENGINE
3-13
4. Check:• Air filter elementDamage Replace.
5. Foam-air-filter oil or equivalent oil to the ele- ment
TIP
Squeeze out the excess oil. Element should be
wet but not dripping.
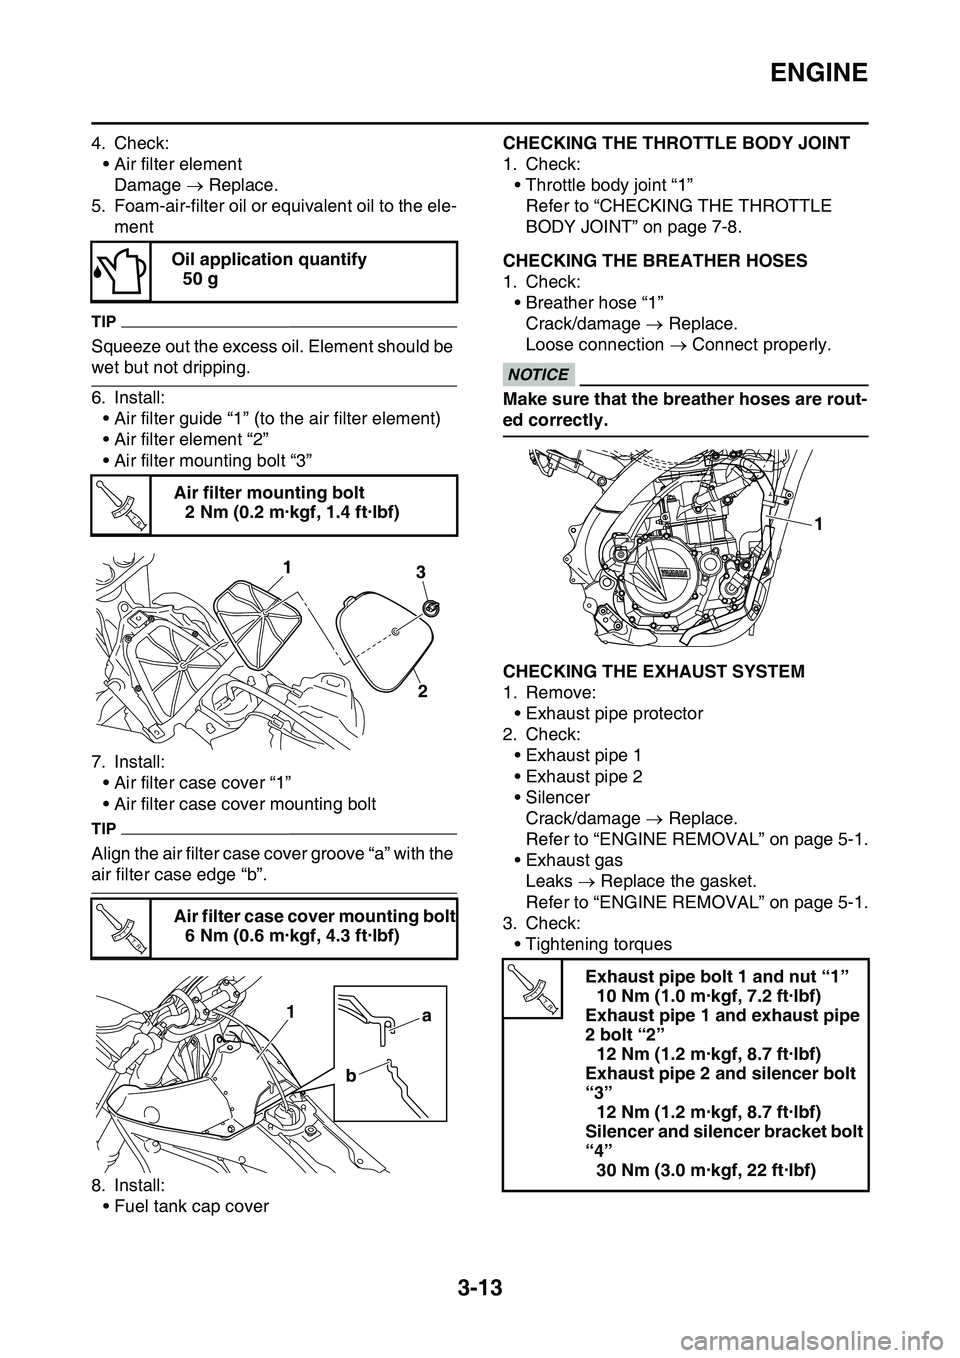
6. Install:• Air filter guide “1” (to the air filter element)
• Air filter element “2”
• Air filter mounting bolt “3”
7. Install: • Air filter case cover “1”
• Air filter case cover mounting bolt
TIP
Align the air filter case cover groove “a” with the
air filter case edge “b”.
8. Install:• Fuel tank cap cover
EAS1SL1081
CHECKING THE THROTTLE BODY JOINT
1. Check:• Throttle body joint “1”
Refer to “CHECKING THE THROTTLE
BODY JOINT” on page 7-8.
EAS1SL1082CHECKING THE BREATHER HOSES
1. Check:• Breather hose “1”Crack/damage Replace.
Loose connection Connect properly.
ECA14920
NOTICE
Make sure that the breather hoses are rout-
ed correctly.
EAS1SL1083CHECKING THE EXHAUST SYSTEM
1. Remove:
• Exhaust pipe protector
2. Check:
• Exhaust pipe 1
• Exhaust pipe 2
• SilencerCrack/damage Replace.
Refer to “ENGINE REMOVAL” on page 5-1.
• Exhaust gas
Leaks Replace the gasket.
Refer to “ENGINE REMOVAL” on page 5-1.
3. Check:
• Tightening torques
Oil application quantify
50 g
Air filter mounting bolt 2 Nm (0.2 m·kgf, 1.4 ft·lbf)
Air filter case cover mounting bolt 6 Nm (0.6 m·kgf, 4.3 ft·lbf)
T R..
31
2
T R..
a
b
1
Exhaust pipe bolt 1 and nut “1”
10 Nm (1.0 m·kgf, 7.2 ft·lbf)
Exhaust pipe 1 and exhaust pipe
2 bolt “2” 12 Nm (1.2 m·kgf, 8.7 ft·lbf)
Exhaust pipe 2 and silencer bolt
“3” 12 Nm (1.2 m·kgf, 8.7 ft·lbf)
Silencer and silencer bracket bolt
“4” 30 Nm (3.0 m·kgf, 22 ft·lbf)
1
T R..
Page 102 of 360
ENGINE
3-14
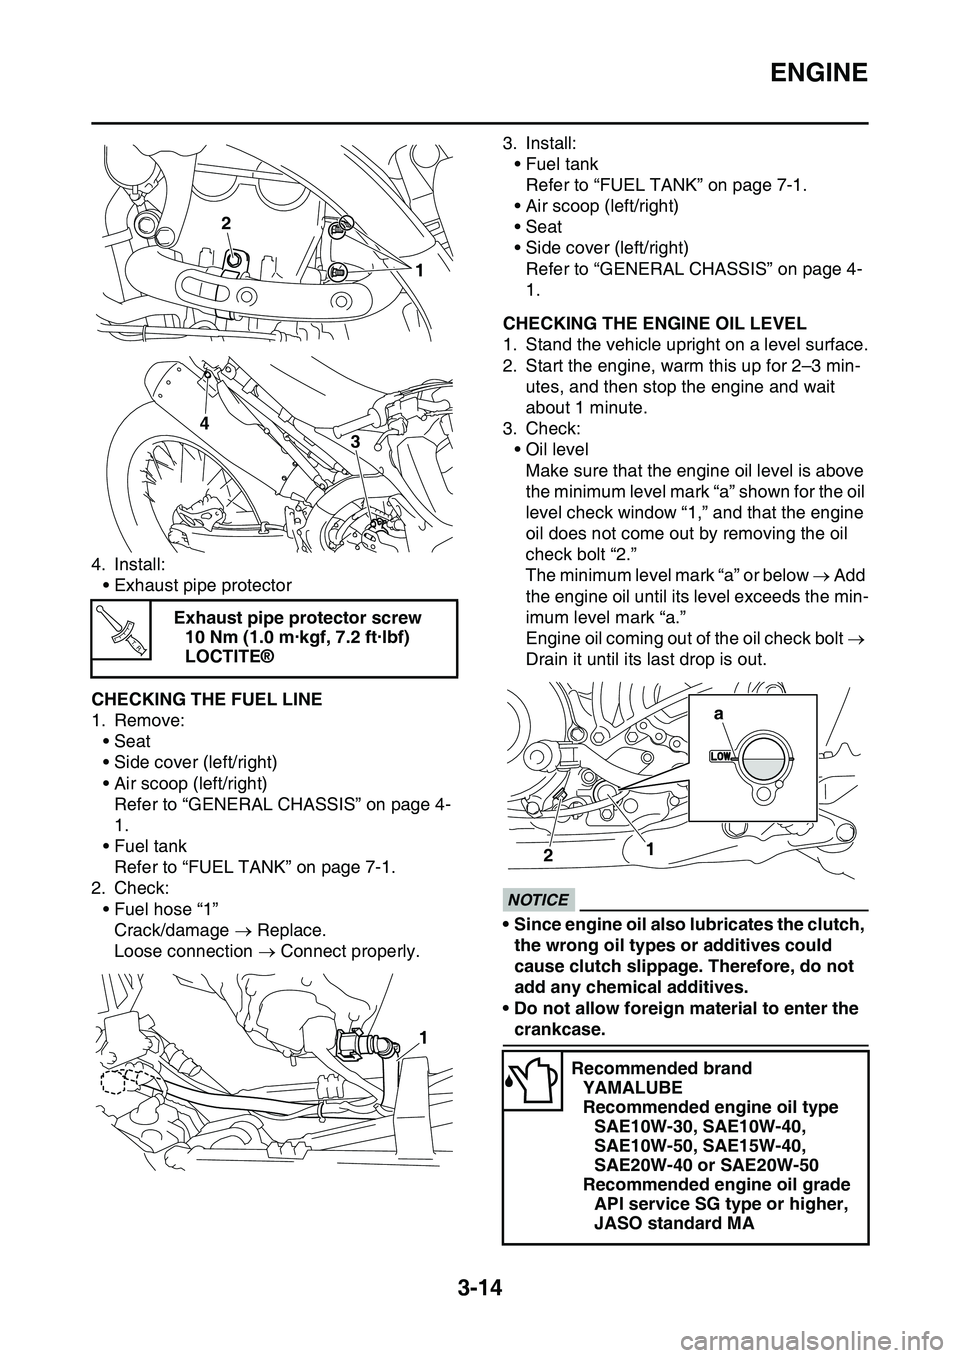
4. Install:
• Exhaust pipe protector
EAS1SL1084CHECKING THE FUEL LINE
1. Remove:
• Seat
• Side cover (left/right)
• Air scoop (left/right)
Refer to “GENERAL CHASSIS” on page 4-
1.
• Fuel tank
Refer to “FUEL TANK” on page 7-1.
2. Check:
• Fuel hose “1”
Crack/damage Replace.
Loose connection Connect properly.
3. Install:
• Fuel tank
Refer to “FUEL TANK” on page 7-1.
• Air scoop (left/right)
• Seat
• Side cover (left/right)
Refer to “GENERAL CHASSIS” on page 4-
1.
EAS1SL1085CHECKING THE ENGINE OIL LEVEL
1. Stand the vehicle upright on a level surface.
2. Start the engine, warm this up for 2–3 min-
utes, and then stop the engine and wait
about 1 minute.
3. Check:
• Oil level
Make sure that the engine oil level is above
the minimum level mark “a” shown for the oil
level check window “1,” and that the engine
oil does not come out by removing the oil
check bolt “2.”
The minimum level mark “a” or below Add
the engine oil until its level exceeds the min
-
imum level mark “a.”
Engine oil coming out of the oil check bolt
Drain it until its last drop is out.
ECA33DD018
NOTICE
• Since engine oil also lubricates the clutch,
the wrong oil types or additives could
cause clutch slippage. Therefore, do not
add any chemical additives.
• Do not allow foreign material to enter the
crankcase.
Exhaust pipe protector screw
10 Nm (1.0 m·kgf, 7.2 ft·lbf)
LOCTITE®
2
1
4
3
T R..
1
Recommended brand
YAMALUBE
Recommended engine oil type
SAE10W-30, SAE10W-40,
SAE10W-50, SAE15W-40,
SAE20W-40 or SAE20W-50
Recommended engine oil grade
API service SG type or higher,
JASO standard MA
12
a
Page 103 of 360
ENGINE
3-15
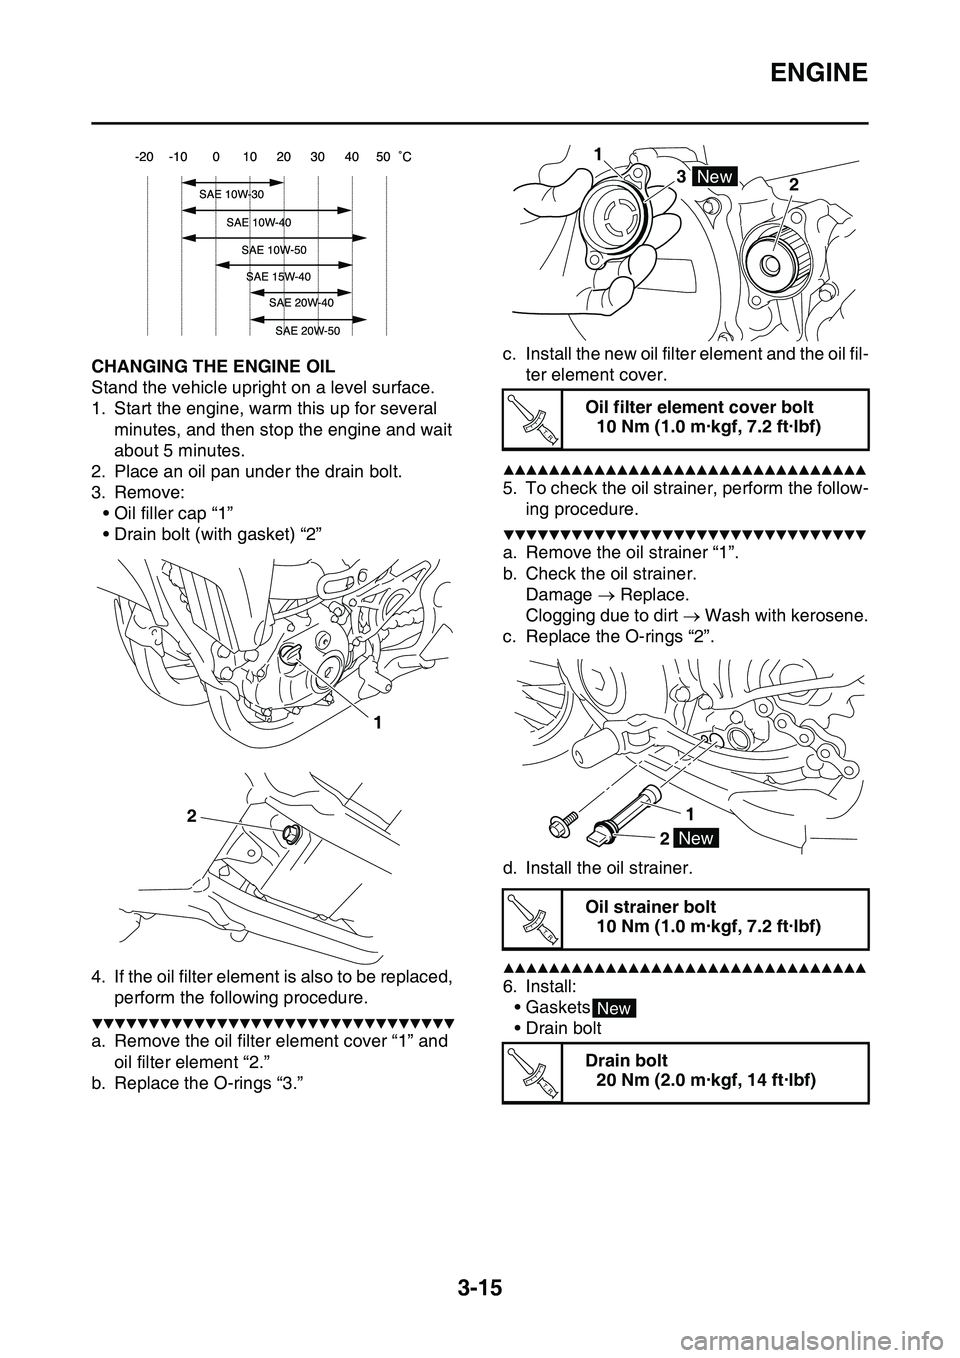
EAS1SL1086CHANGING THE ENGINE OIL
Stand the vehicle upright on a level surface.
1. Start the engine, warm this up for several
minutes, and then stop the engine and wait
about 5 minutes.
2. Place an oil pan under the drain bolt.
3. Remove:
• Oil filler cap “1”
• Drain bolt (with gasket) “2”
4. If the oil filter element is also to be replaced,
perform the following procedure.
▼▼▼▼▼▼▼▼▼▼▼▼▼▼▼▼▼▼▼▼▼▼▼▼▼▼▼▼▼▼▼▼
a. Remove the oil filter element cover “1” and
oil filter element “2.”
b. Replace the O-rings “3.”
c. Install the new oil filter element and the oil fil-
ter element cover.
▲▲▲▲▲▲▲▲▲▲▲▲▲▲▲▲▲▲▲▲▲▲▲▲▲▲▲▲▲▲▲▲
5. To check the oil strainer, perform the follow-
ing procedure.
▼▼▼▼▼▼▼▼▼▼▼▼▼▼▼▼▼▼▼▼▼▼▼▼▼▼▼▼▼▼▼▼
a. Remove the oil strainer “1”.
b. Check the oil strainer.
Damage Replace.
Clogging due to dirt Wash with kerosene.
c. Replace the O-rings “2”.
d. Install the oil strainer.
▲▲▲▲▲▲▲▲▲▲▲▲▲▲▲▲▲▲▲▲▲▲▲▲▲▲▲▲▲▲▲▲
6. Install:
•Gaskets
• Drain bolt
1
2
Oil filter element cover bolt
10 Nm (1.0 m·kgf, 7.2 ft·lbf)
Oil strainer bolt
10 Nm (1.0 m·kgf, 7.2 ft·lbf)
Drain bolt
20 Nm (2.0 m·kgf, 14 ft·lbf)
1
3
2
New
T R..
1
2New
T R..
New
T R..