service YAMAHA YZ450F 2014 Owners Manual
[x] Cancel search | Manufacturer: YAMAHA, Model Year: 2014, Model line: YZ450F, Model: YAMAHA YZ450F 2014Pages: 360, PDF Size: 11.76 MB
Page 1 of 360
OWNER’S SERVICE MANUALMANUEL D’ATELIER DU PROPRIETAIRE
FA\fRER- UND
WARTUNGS\fANDBUC\f
YZ450F (
E )
\bSL-28\b99-80PRINTED IN JAPAN
2013.04—2.0 × 1 !(E\f F\f G)
PRINTED \bN RECYCLED PAPER
20\b4
YZ450F (
E )
20\b4
q Read this manual carefully before operating this vehicle.
q Il convient de lire attentivement ce manuel avant la première utilisation du véhicule.
q Bitte lesen Sie diese Bedienungsanleitung sorgfältig durch, bevor Sie das Fahrzeug in Betrieb nehmen.
1SL-28199-80_cover.indd 12013/04/05 13:58:58
Page 5 of 360
EAS1SL1002
YZ450F(E) 2014
OWNER’S SERVICE MANUAL
©2013 by Yamaha Motor Co., Ltd.
First edition, April 2013
All rights reserved.
Any reproduction or unauthorized use
without the written permission of
Yamaha Motor Co., Ltd.
is expressly prohibited.
Printed in Japan.
Page 9 of 360
EAS1SL1007
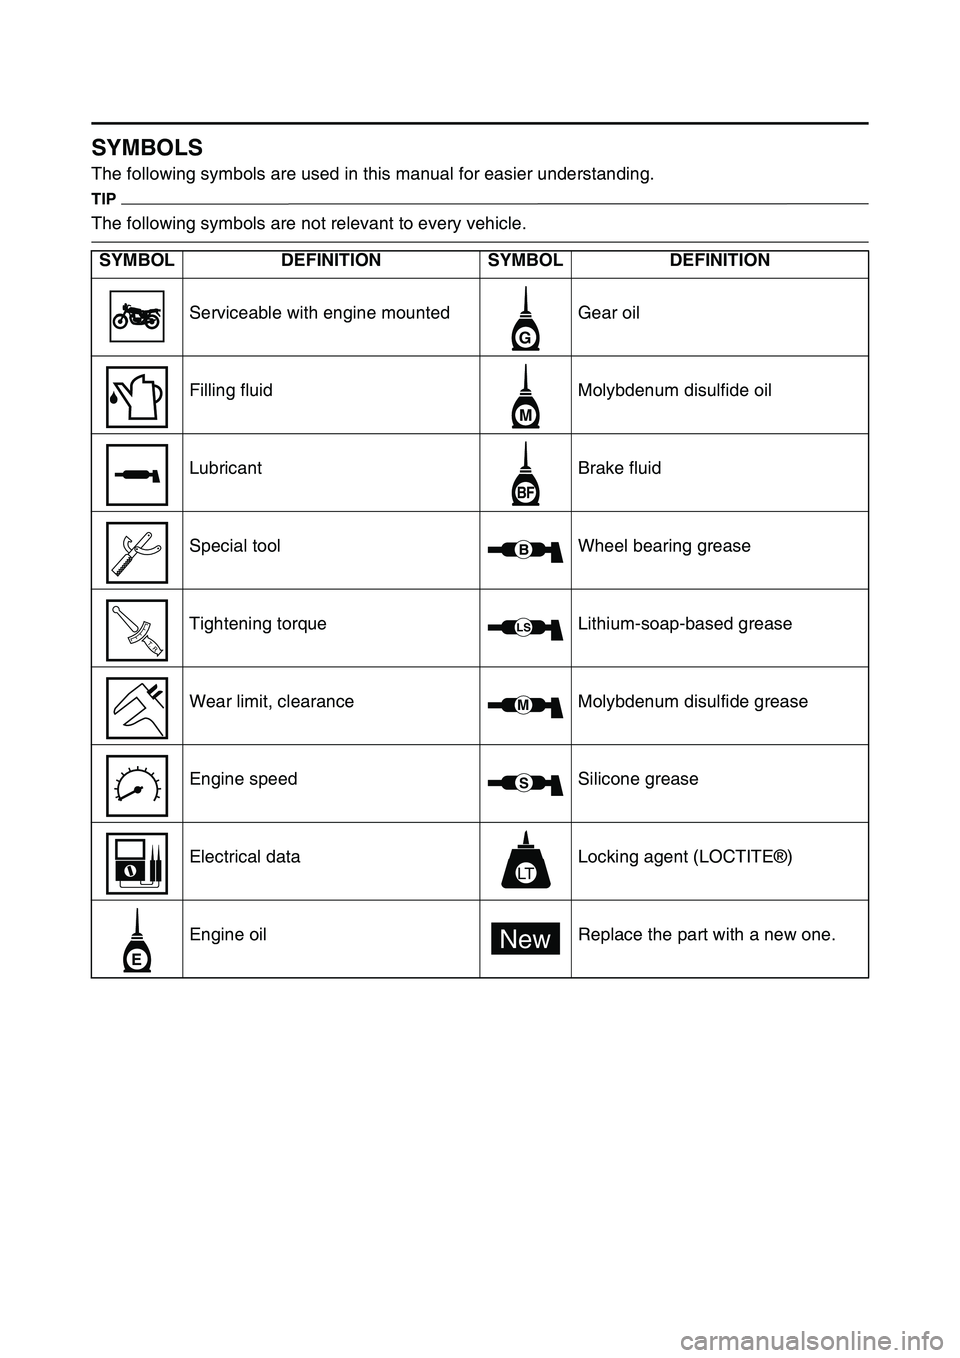
SYMBOLS
The following symbols are used in this manual for easier understanding.
TIP
The following symbols are not relevant to every vehicle.
SYMBOLDEFINITIONSYMBOLDEFINITION
Serviceable with engine mountedGear oil
Filling fluidMolybdenum disulfide oil
LubricantBrake fluid
Special toolWheel bearing grease
Tightening torqueLithium-soap-based grease
Wear limit, clearanceMolybdenum disulfide grease
Engine speedSilicone grease
Electrical dataLocking agent (LOCTITE®)
Engine oilReplace the part with a new one.
G
M
BF
B
T R..
LS
M
S
LT
E
New
Page 13 of 360
1
GENERAL INFORMATION
LOCATION OF IMPORTANT LABELS............................................................ 1-1
DESCRIPTION .................................................................................................. 1-4
IDENTIFICATION ............................................................................................. 1-5
VEHICLE IDENTIFICATION NUMBER ...................................................... 1-5
ENGINE SERIAL NUMBER ....................................................................... 1-5
MODEL LABEL........................................................................................... 1-5
FEATURES ....................................................................................................... 1-6
OUTLINE OF THE FI SYST EM .................................................................. 1-6
FI SYSTEM....................................... .......................................................... 1-7
INCLUDED PARTS .......................................................................................... 1-8
SIDESTAND ............................................................................................... 1-8
SPARK PLUG WRENCH ........................................................................... 1-8
NIPPLE WRENCH...................................................................................... 1-8
HANDLEBAR PROTECTOR .. .................................................................... 1-8
FUEL HOSE JOINT COVER ...................................................................... 1-8
COUPLER FOR CONNECTING OPTIONAL PART................................... 1-8
IMPORTANT INFORMATION ........................................................................ 1-10
PREPARATION FOR REMOVAL A ND DISASSEMBLY.......................... 1-10
REPLACEMENT PARTS.......................................................................... 1-10
GASKETS, OIL SEALS AND O-RINGS ................................................... 1-11
LOCK WASHERS/PLATES AND COTTER PINS .................................... 1-11
BEARINGS AND OIL SEALS ................................................................... 1-11
CIRCLIPS ................................................................................................. 1-11
BASIC SERVICE INFORMATION .................................................................. 1-12
ELECTRICAL SYSTEM.......... .................................................................. 1-12
SPECIAL TOOLS ........................................................................................... 1-15
CONTROL FUNCTIONS ................................................................................ 1-20
ENGINE STOP SWITCH .......................................................................... 1-20
CLUTCH LEVER ................................................................................... ... 1-20
SHIFT PEDAL .......................................................................................... 1-20
KICKSTARTER LEVER.......... .................................................................. 1-20
THROTTLE GRIP ..................................................................................... 1-20
FRONT BRAKE LEVER ........................................................................... 1-20
REAR BRAKE PEDAL.............................................................................. 1-21
STARTER KNOB/IDLE SCREW .............................................................. 1-21
FUEL TANK CAP ..................................................................................... 1-21
Page 26 of 360
BASIC SERVICE INFORMATION
1-12
EAS1SL1029
BASIC SERVICE INFORMATION
EAS1SL1030ELECTRICAL SYSTEM
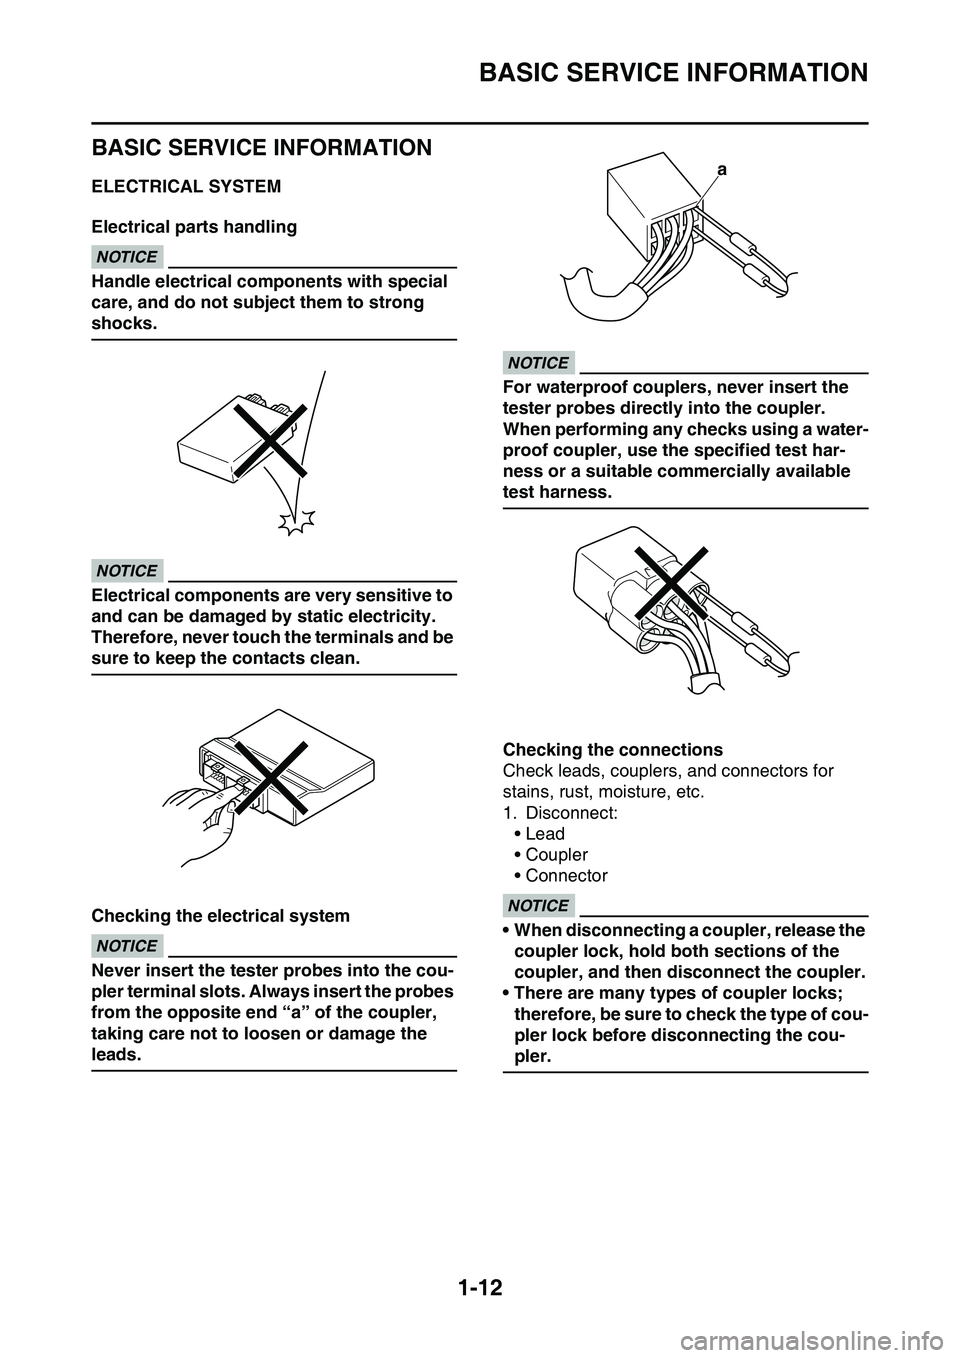
Electrical parts handlingECA16620
NOTICE
Handle electrical components with special
care, and do not subject them to strong
shocks.
ECA16630
NOTICE
Electrical components are very sensitive to
and can be damaged by static electricity.
Therefore, never touch the terminals and be
sure to keep the contacts clean.
Checking the electrical systemECA14371
NOTICE
Never insert the tester probes into the cou-
pler terminal slots. Always insert the probes
from the opposite end “a” of the coupler,
taking care not to loosen or damage the
leads.
ECA16640
NOTICE
For waterproof couplers, never insert the
tester probes directly into the coupler.
When performing any checks using a water
-
proof coupler, use the specified test har-
ness or a suitable commercially available
test harness.
Checking the connections
Check leads, couplers, and connectors for
stains, rust, moisture, etc.
1. Disconnect:
• Lead
• Coupler
• ConnectorECA16780
NOTICE
• When disconnecting a coupler, release the
coupler lock, hold both sections of the
coupler, and then disconnect the coupler.
• There are many types of coupler locks;
therefore, be sure to check the type of cou
-
pler lock before disconnecting the cou-
pler.
a
Page 27 of 360
BASIC SERVICE INFORMATION
1-13
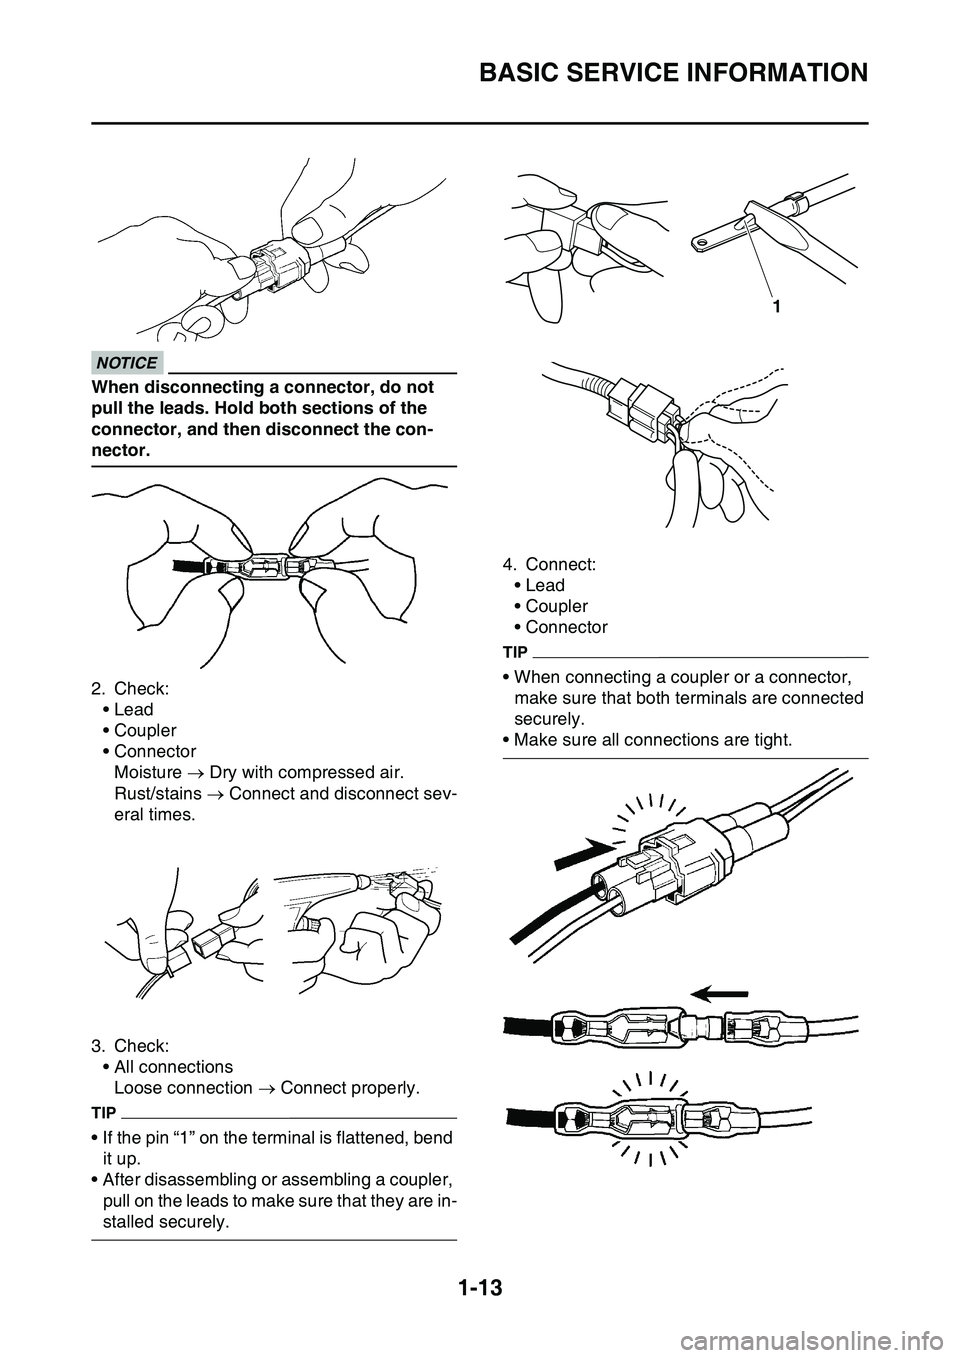
ECA16790
NOTICE
When disconnecting a connector, do not
pull the leads. Hold both sections of the
connector, and then disconnect the con
-
nector.
2. Check:
• Lead
• Coupler
• Connector
Moisture Dry with compressed air.
Rust/stains Connect and disconnect sev-
eral times.
3. Check:
• All connections
Loose connection Connect properly.
TIP
• If the pin “1” on the terminal is flattened, bend
it up.
• After disassembling or assembling a coupler,
pull on the leads to make sure that they are in
-
stalled securely.
4. Connect:
• Lead
• Coupler
• Connector
TIP
• When connecting a coupler or a connector,
make sure that both terminals are connected
securely.
• Make sure all connections are tight.
1
Page 28 of 360
BASIC SERVICE INFORMATION
1-14
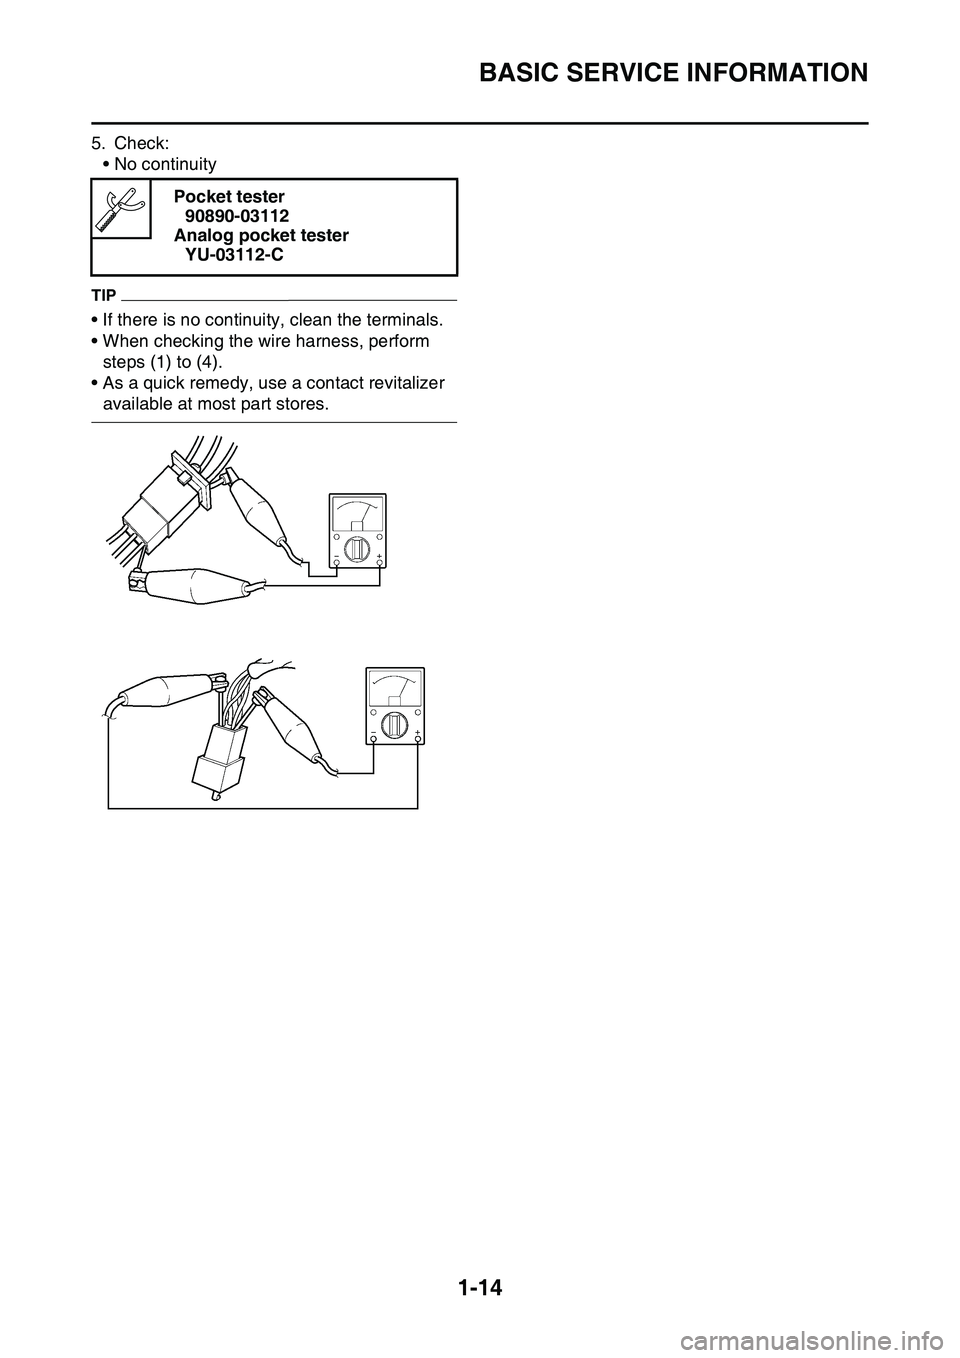
5. Check:
• No continuity
TIP
• If there is no continuity, clean the terminals.
• When checking the wire harness, perform
steps (1) to (4).
• As a quick remedy, use a contact revitalizer
available at most part stores.
Pocket tester
90890-03112
Analog pocket tester
YU-03112-C
Page 45 of 360
ENGINE SPECIFICATIONS
2-2
EAS1SL1053
ENGINE SPECIFICATIONS
Engine
Engine type Liquid cooled 4-stroke, DOHC
Displacement 449 cm3
Cylinder arrangement Single cylinder
Bore stroke 97.0 60.8 mm (3.82 2.39 in)
Compression ratio 12.50:1
Starting system Kickstarter
Fuel
Recommended fuel Premium unleaded gasoline only
Fuel tank capacity 7.5 L (1.98 US gal, 1.65 Imp.gal)
Engine oil
Lubrication system Wet sump
Recommended brand YAMALUBE
Type SAE 10W-30, SAE 10W-40, SAE 15W-40,
SAE 20W-40 or SAE 20W-50
Recommended oil grade API service SG type or higher,
JASO standard MA
Engine oil quantity
Quantity (disassembled) 0.95 L (1.00 US qt, 0.84 Imp.qt)
With oil filter element replacement 0.69 L (0.73 US qt, 0.61 Imp.qt)
Without oil filter element replacement 0.67 L (0.71 US qt, 0.59 Imp.qt)
Oil filter
Oil filter type Paper
Oil pump
Oil pump type Trochoid
Inner-rotor-to-outer-rotor-tip clearance Less than 0.150 mm (0.0059 in)
Limit 0.20 mm (0.0079 in)
Outer-rotor-to-oil-pump-housing clearance 0.13–0.18 mm (0.0051–0.0071 in)
Limit 0.24 mm (0.0094 in)
Oil-pump-housing-to-inner-and-outer-rotor
clearance 0.06–0.11 mm (0.0024–0.0043 in)
Limit 0.17 mm (0.0067 in)
Cooling system
Radiator capacity (including all routes) 1.04 L (1.10 US qt, 0.92 Imp.qt)
Radiator capacity 0.57 L (0.60 US qt, 0.50 mp.qt)
Radiator cap opening pressure 108–137 kPa (1.08–1.37 kg/cm2 15.7–19.9 psi)
Radiator core
Width 112.6 mm (4.43 in)
Height 235.0 mm (9.25 in)
Depth 28.0 mm (1.10 in)
Water pump
Water pump type Single suction centrifugal pump
Spark plug
Manufacturer/model NGK/CR8E
Spark plug gap 0.7–0.8 mm (0.028–0.031 in)
Page 102 of 360
ENGINE
3-14
4. Install:
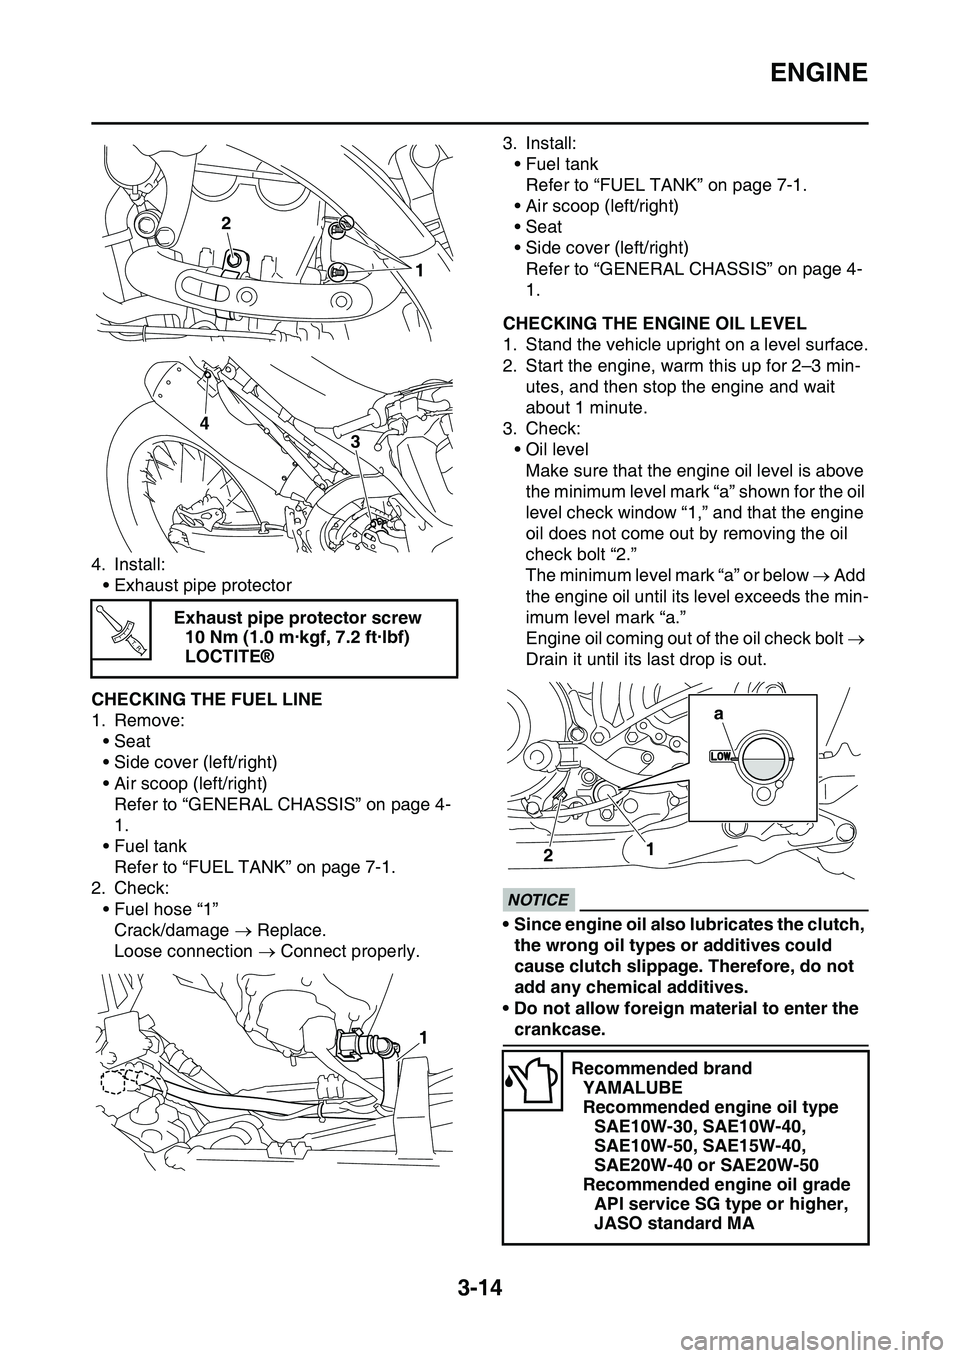
• Exhaust pipe protector
EAS1SL1084CHECKING THE FUEL LINE
1. Remove:
• Seat
• Side cover (left/right)
• Air scoop (left/right)
Refer to “GENERAL CHASSIS” on page 4-
1.
• Fuel tank
Refer to “FUEL TANK” on page 7-1.
2. Check:
• Fuel hose “1”
Crack/damage Replace.
Loose connection Connect properly.
3. Install:
• Fuel tank
Refer to “FUEL TANK” on page 7-1.
• Air scoop (left/right)
• Seat
• Side cover (left/right)
Refer to “GENERAL CHASSIS” on page 4-
1.
EAS1SL1085CHECKING THE ENGINE OIL LEVEL
1. Stand the vehicle upright on a level surface.
2. Start the engine, warm this up for 2–3 min-
utes, and then stop the engine and wait
about 1 minute.
3. Check:
• Oil level
Make sure that the engine oil level is above
the minimum level mark “a” shown for the oil
level check window “1,” and that the engine
oil does not come out by removing the oil
check bolt “2.”
The minimum level mark “a” or below Add
the engine oil until its level exceeds the min
-
imum level mark “a.”
Engine oil coming out of the oil check bolt
Drain it until its last drop is out.
ECA33DD018
NOTICE
• Since engine oil also lubricates the clutch,
the wrong oil types or additives could
cause clutch slippage. Therefore, do not
add any chemical additives.
• Do not allow foreign material to enter the
crankcase.
Exhaust pipe protector screw
10 Nm (1.0 m·kgf, 7.2 ft·lbf)
LOCTITE®
2
1
4
3
T R..
1
Recommended brand
YAMALUBE
Recommended engine oil type
SAE10W-30, SAE10W-40,
SAE10W-50, SAE15W-40,
SAE20W-40 or SAE20W-50
Recommended engine oil grade
API service SG type or higher,
JASO standard MA
12
a
Page 105 of 360
ENGINE
3-17
TIP
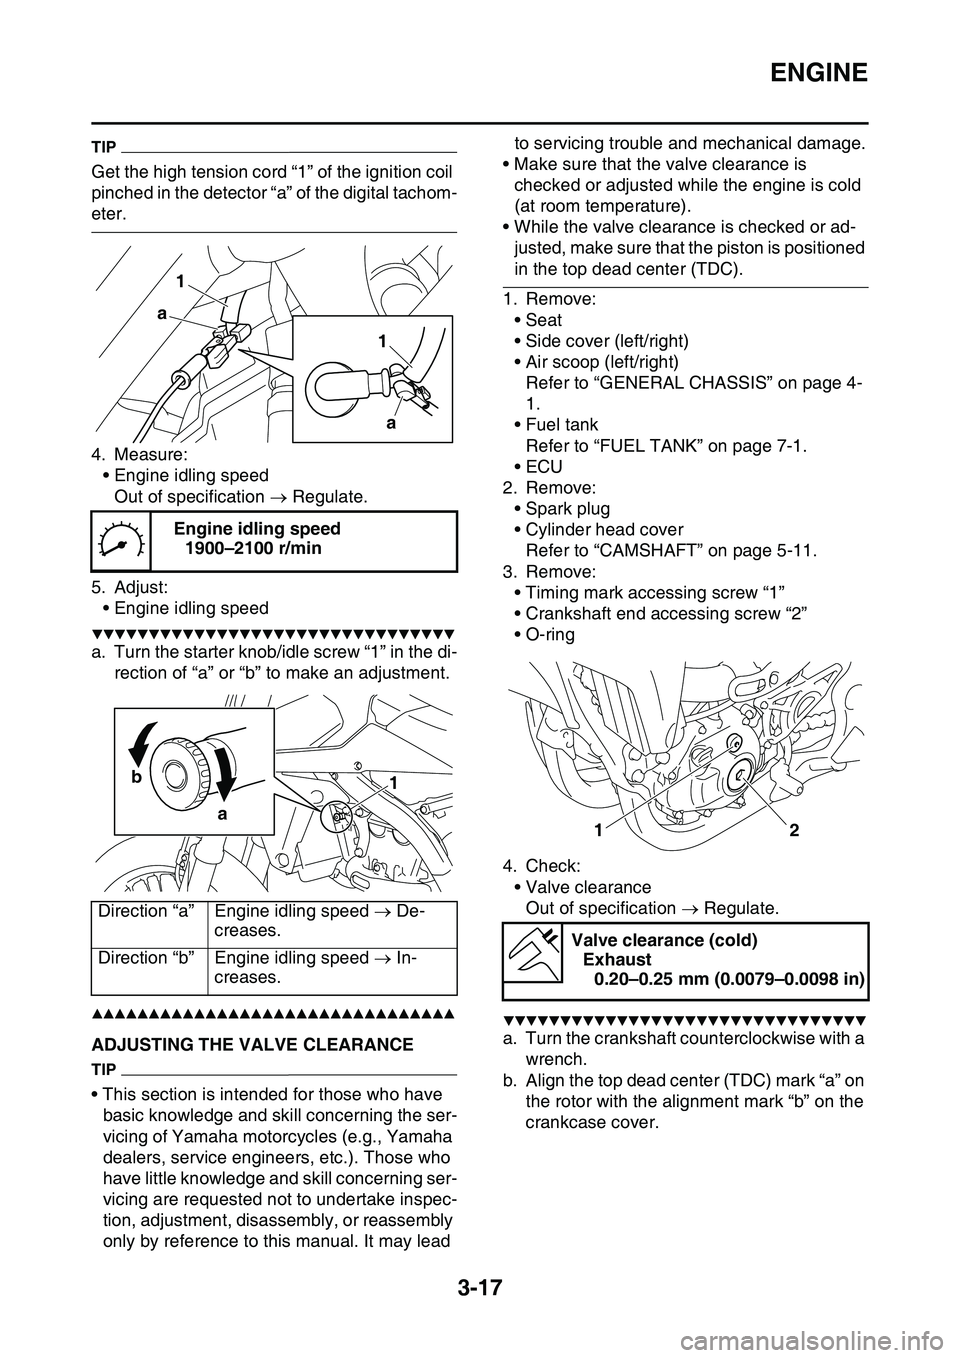
Get the high tension cord “1” of the ignition coil
pinched in the detector “a” of the digital tachom
-
eter.
4. Measure:
• Engine idling speed
Out of specification Regulate.
5. Adjust:
• Engine idling speed
▼▼▼▼▼▼▼▼▼▼▼▼▼▼▼▼▼▼▼▼▼▼▼▼▼▼▼▼▼▼▼▼
a. Turn the starter knob/idle screw “1” in the di-
rection of “a” or “b” to make an adjustment.
▲▲▲▲▲▲▲▲▲▲▲▲▲▲▲▲▲▲▲▲▲▲▲▲▲▲▲▲▲▲▲▲
EAS1SL1088ADJUSTING THE VALVE CLEARANCE
TIP
• This section is intended for those who have
basic knowledge and skill concerning the ser
-
vicing of Yamaha motorcycles (e.g., Yamaha
dealers, service engineers, etc.). Those who
have little knowledge and skill concerning ser
-
vicing are requested not to undertake inspec-
tion, adjustment, disassembly, or reassembly
only by reference to this manual. It may lead to servicing trouble and mechanical damage.
• Make sure that the valve clearance is
checked or adjusted while the engine is cold
(at room temperature).
• While the valve clearance is checked or ad-
justed, make sure that the piston is positioned
in the top dead center (TDC).
1. Remove:
• Seat
• Side cover (left/right)
• Air scoop (left/right)
Refer to “GENERAL CHASSIS” on page 4-
1.
• Fuel tank
Refer to “FUEL TANK” on page 7-1.
•ECU
2. Remove:
• Spark plug
• Cylinder head cover
Refer to “CAMSHAFT” on page 5-11.
3. Remove:
• Timing mark accessing screw “1”
• Crankshaft end accessing screw “2”
• O-ring
4. Check:
• Valve clearance
Out of specification Regulate.
▼▼▼▼▼▼▼▼▼▼▼▼▼▼▼▼▼▼▼▼▼▼▼▼▼▼▼▼▼▼▼▼
a. Turn the crankshaft counterclockwise with a
wrench.
b. Align the top dead center (TDC) mark “a” on
the rotor with the alignment mark “b” on the
crankcase cover.
Engine idling speed
1900–2100 r/min
Direction “a”Engine idling speed De-
creases.
Direction “b”Engine idling speed In-
creases.
1 1
a a
1 b
a
Valve clearance (cold)
Exhaust
0.20–0.25 mm (0.0079–0.0098 in)
1
2