tow bar YAMAHA YZ85 2005 Owners Manual
[x] Cancel search | Manufacturer: YAMAHA, Model Year: 2005, Model line: YZ85, Model: YAMAHA YZ85 2005Pages: 508, PDF Size: 10.47 MB
Page 44 of 508

1 - 9
GEN
INFO
CONTROL FUNCTIONS
EC150000
CONTROL FUNCTIONS
ENGINE STOP SWITCH
The engine stop switch 1 is located on the left
handlebar. Continue pushing the engine stop
switch till the engine comes to a stop.
5PA10420
EC152000
CLUTCH LEVER
The clutch lever 1 is located on the left han-
dlebar; it disengages or engages the clutch.
Pull the clutch lever to the handlebar to disen-
gage the clutch, and release the lever to
engage the clutch. The lever should be pulled
rapidly and released slowly for smooth starts.
5PA10430
EC153000
SHIFT PEDAL
The gear ratios of the constant-mesh 6 speed
transmission are ideally spaced. The gears
can be shifted by using the shift pedal 1 on
the left side of the engine.
5PA10440
KICKSTARTER CRANK
Rotate the kickstarter crank 1 away from the
engine. Push the starter down lightly with your
foot until the gears engage, then kick smoothly
and forcefully to start the engine. This model
has a primary kickstarter crank so the engine
can be started in any gear if the clutch is disen-
gaged. In normal practices, however, shift to
neutral before starting.
5PA10450
EC155001
THROTTLE GRIP
The throttle grip 1 is located on the right han-
dlebar; it accelerates or decelerates the
engine. For acceleration, turn the grip toward
you; for deceleration, turn it away from you.
5PA10460
Page 46 of 508

1 - 10
GEN
INFO
CONTROL FUNCTIONS
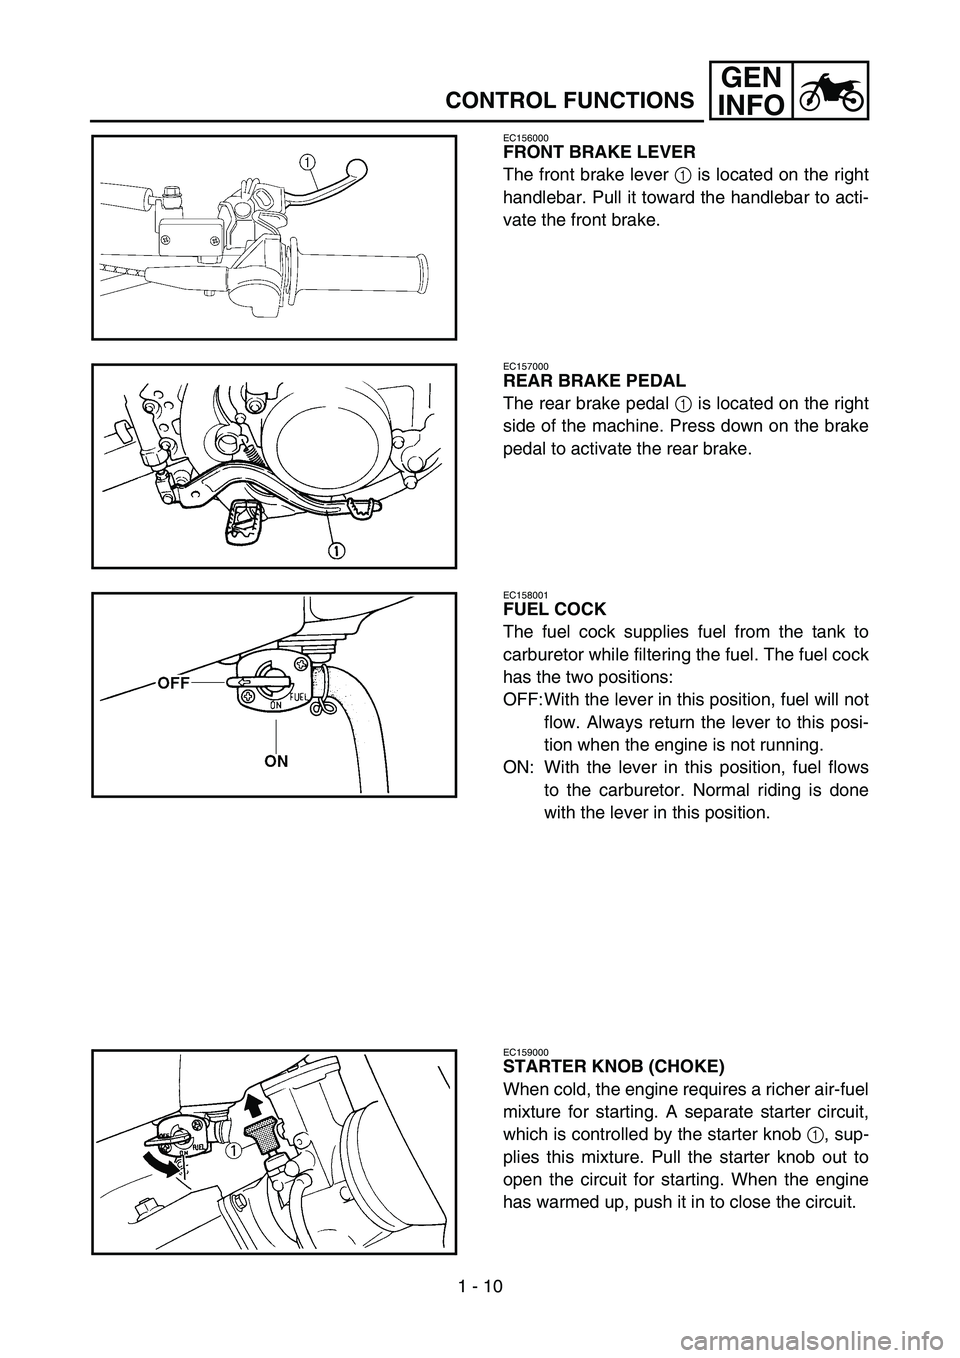
EC156000
FRONT BRAKE LEVER
The front brake lever 1 is located on the right
handlebar. Pull it toward the handlebar to acti-
vate the front brake.
5PAR0002
EC157000
REAR BRAKE PEDAL
The rear brake pedal 1 is located on the right
side of the machine. Press down on the brake
pedal to activate the rear brake.
5PA10480
EC158001
FUEL COCK
The fuel cock supplies fuel from the tank to
carburetor while filtering the fuel. The fuel cock
has the two positions:
OFF:With the lever in this position, fuel will not
flow. Always return the lever to this posi-
tion when the engine is not running.
ON: With the lever in this position, fuel flows
to the carburetor. Normal riding is done
with the lever in this position.
5PA10490
EC159000
STARTER KNOB (CHOKE)
When cold, the engine requires a richer air-fuel
mixture for starting. A separate starter circuit,
which is controlled by the starter knob 1, sup-
plies this mixture. Pull the starter knob out to
open the circuit for starting. When the engine
has warmed up, push it in to close the circuit.
5PA10500
Page 65 of 508

GEN
INFONETTOYAGE ET REMISAGE
REINIGUNG UND STILLEGUNG
NETTOYAGE ET REMISAGE
NETTOYAGE
Un nettoyage fréquent de la moto préservera son
apparence, maintiendra ses bonnes performances et
augmentera la durée de vie de nombre de ses com-
posants.
1. Avant de nettoyer la moto, couvrir la sortie du
tuyau d’échappement pour éviter toute pénétra-
tion d’eau. Un sachet en plastique retenu par un
élastique fera l’affaire.
2. Si le moteur est fortement encrassé, appliquer
un peu de dégraissant à l’aide d’un pinceau.
Eviter tout contact avec la chaîne, les pignons
ou les axes de roue.
3. Rincer la saleté et le dégraissant au tuyau
d’arrosage, en utilisant juste la pression néces-
saire.
ATTENTION:
Une pression excessive risque de causer des infil-
trations d’eau dans les roulements des roues, la
fourche avant, les freins et les joints de la trans-
mission. L’emploi abusif de détergents sous
forte pression, tels que ceux utilisés dans les por-
tiques de lavage automatique, est nuisible à la
moto et peut entraîner des réparations onéreu-
ses.
4. Après avoir éliminé le plus gros de la saleté au
tuyau d’arrosage, laver toutes les surfaces à
l’eau chaude savonneuse (employer un déter-
gent doux). Une vieille brosse à dents convient
parfaitement pour nettoyer les parties difficiles
d’accès.
5. Rincer immédiatement la moto à l’eau claire et
sécher toutes les surfaces à l’aide d’une peau de
chamois, d’une serviette ou d’un chiffon doux
absorbant.
6. Sécher immédiatement la chaîne à l’aide d’une
serviette en papier et la graisser afin de la proté-
ger contre la rouille.
7. Nettoyer la selle à l’aide d’un produit de net-
toyage pour similicuir afin de conserver intacts
la souplesse et le lustre de la housse.
8. Une cire pour carrosserie peut être utilisée pour
toutes les surfaces peintes et chromées. Ne pas
employer de cires détergentes car elles contien-
nent souvent des abrasifs.
9. Lorsque le nettoyage est terminé, mettre le
moteur en marche et le laisser tourner au ralenti
pendant plusieurs minutes.
REINIGUNG UND STILLEGUNG
REINIGUNG
Eine regelmäßige Reinigung Ihrer Maschine sorgt
nicht nur für gutes Aussehen, sondern verbessert
auch das allgemeine Betriebsverhalten und ver-
längert die Lebensdauer vieler Komponenten.
1. Decken Sie, bevor Sie die Maschine
waschen, das offene Ende des Auspuffs
ab, damit kein Wasser eindringen kann.
Eine über das Auspuffende gestülpte und
mit einem Gummiband befestigte Plastik-
tüte reicht für diesen Zweck aus.
2. Bei stark veröltem Motor mit einem Pinsel
etwas Kaltreiniger auftragen. Auf die
Antriebskette, Ritzel oder Radachsen kei-
nen Kaltreiniger auftragen.
3. Schmutz und Kaltreiniger mit einem Was-
serschlauch gründlich abspülen; dabei den
Wasserdruck möglichst gering halten.
ACHTUNG:
Durch zu hohen Wasserdruck können Was-
ser und Verunreinigungen in Radlager,
Teleskopgabel, Bremsen und Getriebedich-
tungen eindringen. Viele teure Reparatu-
ren sind die Folge falscher Anwendung von
Hochdruckreinigern, wie sie z.B. an Münz-
waschanlagen zu finden sind.
4. Nach dem Abspülen des groben Schmut-
zes alle Oberflächen mit warmem Wasser
und einem milden Reinigungsmittel abwa-
schen. Schwer zugängliche Stellen mit
einer alten Zahnbürste reinigen.
5. Unmittelbar danach die Maschine mit sau-
berem Wasser abspülen und mit einem
Waschleder oder weichen Lappen bzw.
Handtuch abtrocknen.
6. Unmittelbar nach dem Waschen über-
schüssiges Wasser mit einem Papierhand-
tuch von der Kette entfernen und die Kette
schmieren, um Rostansatz zu verhindern.
7. Die Sitzbank mit einem Reiniger für Vinyl-
polster abwischen, damit der Bezug
geschmeidig und glänzend bleibt.
8. Lack- und Chromflächen können mit einem
Autowachs behandelt werden. Kombi-
nierte Reiniger und Polituren sind zu ver-
meiden, da sie oft Scheuermittel enthalten.
9. Nach Beendigung der obigen Arbeiten den
Motor starten und einige Minuten im Leer-
lauf laufen lassen.
1 - 18